What is the idle air control on a Priora
Initially, the device that automatically keeps the engine idling was called an additional air regulator or RAD. Over time, this name was replaced by IAC, that is, idle air regulator, but drivers are more accepting of the name - idle air sensor. Let's figure out what is the correct name for this element? First you need to find out its purpose.
The device in question (we will call it that until we figure out what word to use to designate it) is a bypass valve, which is located in the body of the throttle assembly or throttle valve. It is installed next to the throttle position sensor TPS. It helps ensure smooth engine idling. However, it is important to note here that not only smooth operation of the internal combustion engine is ensured, but in general it is possible to start the engine.
When the engine starts at idle, the driver does not need to keep his foot on the accelerator (gas) pedal, much less help it start by opening the throttle (as everyone is used to doing when starting carburetor engines). When the engine starts, the idle valve comes into operation, which, when the damper is closed, opens a special channel (it is called bypass, i.e. bypass) in the throttle body, thereby supplying the engine with air in the amount needed to create FA (fuel-air mixture).
After starting the engine, if the device is in working order, the motor will function normally, maintaining a certain number of crankshaft revolutions (on Priora this is usually 900-950 rpm). If the device is faulty, then various problems arise, which can be discussed in detail in the sections below.
Returning to the name of the device, it should be noted that this needle valve is controlled by an electric drive, which, depending on the corresponding commands received from the electronic control unit, opens access to the intake manifold to the required distance. The amount of air supplied to the collector depends on the degree of opening of the channel. This device is often called an idle speed sensor, but is this correct? To answer this question, let’s remember what a sensor is.
A sensor is a device containing one or more measuring transducers. This product is designed to generate a signal that is transmitted for direct perception. Actually, this information is enough to state with confidence that the idle air valve is not a sensor, and it would be more correct to call it a regulator. This is a device that monitors the state of the control object and generates control signals.
Reasons for an injector
Now let’s look at the reasons why injection engines have constantly high idle speeds. Unlike carburetor counterparts, where all the problems are with mechanical elements, the injector is stuffed with electronics, so this problem is a failure in the electronics.
The reasons may be:
- Malfunction or breakdown of the sensor that monitors the temperature of the coolant in the engine. If this sensor malfunctions, the speed is not reset, since the electronics believes that the engine has not yet warmed up and drives it in warm-up mode, which is why the increased speed remains. The problem can quickly overheat the engine and cause jamming of parts and severe damage, after which only expensive and time-consuming repairs. A diagnostic scanner can help identify this type of problem.
- A breakdown of the air sensor causes increased speed, as the correct air supply to the engine is disrupted. A diagnostic scanner can also help identify this malfunction. As well as problems with other sensors.
- After this, check the sensor using a multimeter to exclude a broken wiring as the cause.
- A malfunction of the sensor responsible for idle speed, if any, also causes malfunctions at idle speed. If after replacing the idle speed sensor the high speeds do not disappear, then it was not the cause.
- The throttle opening sensor also plays a key role when the speed increases. If it is not working correctly, the computer believes that the damper is fully open and increases the speed, supplying more fuel to the cylinders.
- The sensor may have nothing to do with it, the damper itself is jammed due to dirt, or the spring on the damper, which is supposed to close it, has stretched, in addition, this spring sometimes jumps off or breaks, so the engine keeps high speeds. In this case, it needs to be corrected, if possible, or replaced.
- The damper control cable is stuck. This malfunction was common in older car models. Then it’s worth lubricating or replacing this cable.
- The sealing gaskets on the injectors are damaged. This is a difficult malfunction to check, and quite rare, so it should be checked as a last resort, when other faults have been excluded. Broken gaskets allow air to enter the combustion chambers, which also increases speed.
Useful video about this problem
The injector also has many reasons for such a malfunction, and if it occurs, it is also worth taking care of solving it as soon as possible, before the problems become more serious.
This happened to a friend of mine due to a break in the wiring on the sensor connector, which he discovered after changing all possible sensors, and was about to reflash the computer’s brains. Therefore, in addition to the sensors, do not forget to check the fuses and the condition of the wiring. If there is no visual damage, you can check with a multimeter.
We recommend: Lada Vesta head unit - price, replacement, connection and pinout
This is what could be the reason for high engine speeds, the main thing is to quickly calculate and eliminate it, I have everything for today, subscribe your friends to updates, and subscribe yourself, there will be a lot of useful things, don’t forget to send a link to the site for those who don’t know about it yet, see you.
How the idle speed control on the Priora works and the principle of its operation
In the operation of injection internal combustion engines, IAC plays a very important role. After all, its malfunction will lead to the impossibility of starting the engine. If the device malfunctions, it will be possible to start the engine, for which you should slightly open the throttle valve, but it will constantly stall, which is unsafe when operating the car.
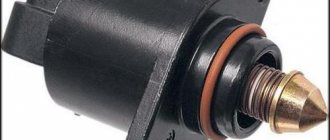
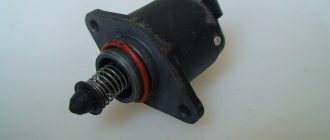
First, you should familiarize yourself with the operating principle of the idle speed control, which is a stepper motor with a worm gear, a rod and a needle valve.
The moving element of the product is the rotor, which moves in two directions (forward and backward). During such movements, not only the opening and closing of the idle channel occurs, but also the opening to the required distance to maintain a certain number of revolutions of the crankshaft. The photo below shows a cross-section of the IAC, so you can imagine the principle of its operation.
The diagram shows the main structural elements of the device. The photo below shows the regulator disassembled, which once again confirms its simple design.
First, let's look at how the stepper motor itself, that is, the controller drive, works. This information will be useful in order to correctly perform the product inspection procedure.
As can be seen from the diagram above (and photo), the stepper motor consists of two windings with a magnetic core, as well as a movable rotor (permanent magnet). Actually, there is no need to describe the operating principle further, since it is clear that when voltage is applied to the corresponding windings, the movable rotor moves. One winding is responsible for rotating the rotor forward, and the second in the opposite direction. The duration of the rotor movement (the number of steps it takes) depends on the duration of the pulses. The rotor is connected to a rod, at the end of which there is a cone-shaped needle valve.
Above is an animation of the operation of a stepper motor. If you still have difficulties with the concept of the operating principle of an electrical device, then in the video below you can see in detail how it works.
Knowing the principle of operation of a stepper motor, you can resort to considering the features of the functioning of the idle air control on a car. The diagram shown in the photo below will help us with this.
This is interesting! Few people know why a spring is needed in the design of the regulator. Some believe that it presses the valve against the seat. This is partly true, but the spring is needed to ensure the operation of the worm mechanism. The valve itself with the stem is stationary, and only the permanent magnet rotates. The spring is precisely what is needed to ensure the radial immobility of the needle rod with the cone valve.
This is exactly how the throttle assembly of injection cars is designed. And now let's look at how the regulator functions.
- The XX regulator comes into operation immediately after turning on the ignition. The ECU only needs a few seconds after turning the ignition key to determine the desired valve opening position. To do this, it reads information from the engine temperature sensor. Based on the information received, the ECU understands how much air is needed for the engine to start at idle. If the engine is warm, the valve opens to the appropriate amount (the air-fuel mixture is prepared in a ratio of 14/1 per 14 kg of air to 1 kg of fuel). When it is cold (the engine), the valve opens to a larger value, which ensures optimal preparation of the fuel assemblies for quick warming up of the engine. Information from the intake air temperature sensor (IATV), on the basis of which the ECU determines the temperature of the incoming air, is also important. After the stepper motor has opened the XX channel (bypass channel) to the required distance, the motor starts.
- After starting the engine, the ECU collects additional information from the mass air flow sensor, DTVV and other devices, on the basis of which it ensures that certain engine crankshaft speeds are maintained. The controller learns about the crankshaft rotation speed from the DPKV readings. As the engine warms up, the position of the idle air valve is adjusted.
- After the engine warms up, the driver starts driving. The electronic unit understands this based on the readings of the throttle position sensor and speed sensor. When the damper is opened, the idle air valve remains in a position (open) in which a stable speed of 800-1000 rpm is maintained at idle. When the damper is opened, air is sucked in by the engine directly, that is, in the direction of least resistance. As soon as the damper is closed, the engine continues to operate, since the XX channel is open.
The regulator has three operating modes:
- closed or null;
- working position - opening the valve to the appropriate distance depending on the warming up of the engine and the readings of other sensors;
- opening to maximum - usually the regulator goes into this mode when the engine is not warmed up at idle, when it is necessary to warm up the engine faster.
This is interesting! The system does not provide self-diagnosis of the idle air regulator. This means that if this device fails, the Check Engine indicator on the instrument panel will not light up.
The number of revolutions is counted from zero, that is, when the valve is closed (pressed against the seat). When the valve rests on the seat, the current in the circuit increases, indicating that the rod has taken the appropriate position. After this, the steps begin to count from the zero position (power is supplied to the second winding, which is responsible for the return stroke of the rod), which allows you to open the valve to the desired amount depending on the engine temperature. After turning off the ignition, the valve remains in the same position. When the ignition is turned on, the cycle is repeated, and based on the readings of the engine temperature sensor, the ECU determines the optimal opening value of the channel.
Engine or gearbox mounts
The main car components, such as the engine or gearbox, are attached to the body using cushions. The main purpose of this device is to fasten and dampen vibrations during operation. Old cars often had cushions made of durable rubber, which rarely failed.
On modern cars, hydraulic mounts are installed. This device contains a special hydraulic fluid, and this type of pillows smoothes out vibrations better.
If the cushion bursts or has a tear, then at the beginning of the movement the car will jerk due to the fact that the main units do not have a strong connection with the body.
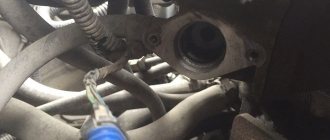
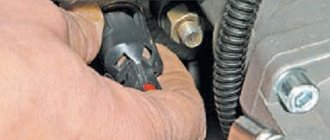
Where is the idle speed control installed on the Priora?
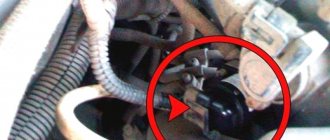
If you suspect a malfunction of the IAC on a Priora, it is important to determine the location of this device. As a rule, there are no problems with this. If you have an idea about the structure of the engine and know what a throttle valve is, then finding the IAC will not be difficult. The only difficulty that many drivers face is that they are mistaken about which of the two products that are installed on the throttle body is the idle air regulator. A throttle position sensor is installed next to the regulator, and these products may have different locations on different brands of cars. Often the IAC is located above and the TPS below (below it). However, on Priora cars the location of these devices is completely different.
In the photo above you can see that the TPS is on top and the idle speed control is on the bottom. In addition, if you are afraid of making a mistake, then do not rush to unscrew the products and remove them. Disconnect the power chips and look at the number of contact holes. There should be four of them on the chip that connects to the IAC, and three on the chip connected to the TPS. The plugs also differ in shape.
Why does the car jerk when driving?
Most often, the malfunctions listed above will cause the car to jerk while driving and work intermittently. But it is worth noting that each car is individual. Some cars have their own “childhood diseases” - design flaws that will cause this symptom. Such cars include the same Honda civic 8th generation; there was even a recall company for this fault, but the cause was soon discovered and learned to be eliminated.
People, help. All coils and spark plugs are new. At low speeds the car jerks very badly. If you heat it up a lot, then acceleration is normal, no problem. It's at the bottom. When you want to drive calmly the car jerks. I can’t understand why. The error does not appear. Who came across it?
Comments 30
I removed the valve and injectors. I cleaned everything with carburetor cleaner. Rhh was all dirty. Cleaned the injectors. In general, the engine whispered and now runs smoothly. I couldn't be happier. The injectors were also not so hot. One had so much agar that only one of the 4 holes worked.
I have the same problem! I'll clean it)
The throttle valve must be removed and cleaned.
Measure the voltage in the mass air flow sensor... it should be no more than 1.03...
After the firmware, it began to work smoothly even with the air conditioner.
change the firmware and forget about it, it’s been tested more than once, but the coil either works or it doesn’t! so there’s no point in changing everything!
The firmware is not standard anyway))) and coils also come with surprises) tested more than once)
Yes, even though five times it may not be standard, it will not work as expected! I sew them myself, that’s why I’m telling you. . . .
no, how come? I've been using the firmware for a year and everything is fine. What if it suddenly turns out to be a firmware issue? somehow I find it hard to believe
Don’t forget that the firmware is adjusted to certain parameters, but your parameters change - the calculator died, you installed spark plugs with a different glow, some sensor incorrectly calculates the information, etc. . .so updating the program brings new life to your sensors. . . although what am I trying to prove to you? You ask yourself and answer (argue) yourself. . . Why then ask questions if you know what they are doing?
What signs indicate a malfunction of the idle air control on a Priora
The idle air control has a long service life, so the need to check, repair or replace it does not arise earlier than after a mileage of over 100 thousand km. The main reasons why the IAC on a Priora may fail are:
- damage to the insulation of one of the power wires, resulting in a short circuit and one of the two windings burns out;
- the passage of high currents, which usually occurs when the driver tries to start the engine with a dead battery. That is why it is not recommended to try to start the engine when the battery is low, as the sensors or the idle regulator may eventually fail;
- contamination of the needle valve and rod;
- natural wear and tear over time.
If the idle speed regulator fails, the driver will immediately detect the following types of malfunctions:
- Inability to start the engine.
If the regulator valve is stuck in the closed (zero) position, the engine can be started by pressing the gas pedal. - When the engine is running, there is a floating speed (idling instability).
This is the most common cause of device malfunction. It appears when the regulator cannot select the optimal channel opening position. When it is installed in a certain position, but there is not enough air, the ECU tries to increase the opening of the channel, but as a result, increased air flow occurs. The ECU again tries to reduce the opening distance of the channel. The reason in this case may be not only the regulator itself, but also such consequences as clogging of the bypass channel, loose shutoff of the damper, incorrect information from the TPS. - The engine takes too long to warm up.
- When driving, when the driver switches to neutral mode, the engine stalls
. - No increased speed on a cold engine.
RPM floating is the most common phenomenon encountered by drivers of Prior and other cars. Moreover, the cause may not always be IAC. A malfunction of the TPS and other sensors cannot be ruled out. And in order to make sure that the IAC has really failed, it is necessary to diagnose this device.
This is interesting! The ECU does not diagnose the idle air regulator, so it cannot issue an error about its malfunction. However, low or high idle speeds can indirectly indicate its malfunction, which the controller records using a crankshaft sensor and generates the corresponding errors on the BC: P0506 - low idle speeds, and P0507 - high idle speeds, which occurs due to the regulator blocking .
Ignition system
This is another fairly common option and the reason why the Priora has difficulty starting when cold. Almost regularly, due to sudden and constant temperature changes, various microcracks form in the ignition coils. When the coil heats up, it tends to expand. If there are cracks between the walls of the coil, then there is no hot breakdown, since the gap in the crack will be minimal. When it is cold, the microcrack will be larger and as a result there will be a breakdown. There will be no spark on the spark plug. There is no ignition of the mixture, the car does not start well.
The problem exists not only with the ignition coils, but with any other components that operate in the Priora ignition system. This could be a distributor, wires, spark plugs. In this case, there is nothing better than replacing the coil and other elements.
Types of malfunctions of the XX regulator on Priora
As mentioned above, such a part rarely fails, unless the car has a cheap fake. However, breakdowns of this device occur and, as a rule, this happens with the following defects:
- Slippage occurs when the worm gear of a stepper motor wears out. Slipping leads to the fact that the ECU is not able to set the required number of steps to open the channel to the required distance.
- Jamming - most often, the valve is blocked in the closed position. This happens when the driver turns on the ignition and the regulator is set to zero (in this case an electrical circuit malfunction or rod damage occurs). If the rod is jammed in the closed position, the car engine can only be started by pressing the accelerator pedal. If it is possible to start the engine in this way, then the cause is clearly a malfunction of the XX regulator.
- A stepper drive malfunction occurs due to a break in the stator winding circuit (one of the windings).
- Air leakage - there is a sealing gasket on the IAC housing that prevents the possibility of air leakage through the product body. If the gasket is damaged, this will lead to excess air entering, and as a result, there will be unstable speed.
- Rod play in axial and radial directions. If you have removed the IAC, and by manually moving the rod, it is found to be freely moving, then this is considered a serious malfunction. This malfunction usually appears while driving, when the gas is released and the engine is idling. Due to the presence of play, the rod is delayed in opening the XX channel, so the engine stalls. There should be no play either when it moves in the axial direction or in the radial direction. The presence of play indicates the need to replace the product, but cannot be repaired in any way.
- Damage to the IAC housing - this often happens when a non-original Chinese element is installed on a car. Engine vibrations cause damage to the rivets, and as a result, the regulator simply falls apart. Even if the product can be repaired by installing new rivets, it is not recommended to use it further.
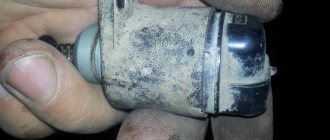
- Clogged cone valve - often during the operation of the car, carbon deposits consisting of dust and oily substances form on the valve. Dust comes from the air duct when the air filter is not changed for a long time. Oily substances enter the throttle assembly along with crankcase gases. The likelihood that the IAC valve is dirty can be determined by the clogged damper. A valve with a large amount of contamination cannot be set to zero and ensure complete closure of the channel. In addition, contamination causes the rod to become distorted.
Most of the above faults can be identified visually. Failures in the electrical circuit can be determined using a multimeter. And we’ll find out further how to identify all kinds of regulator malfunctions on a Priora.
Signs of engine tripping
Regardless of the reasons, engine tripping is associated with the presence of various problems, which can be solved after finding out what caused the stoppage of one of the cylinders of the internal combustion engine.
The main signs of engine tripping include
Signs
Auto mechanics identify several reasons why jerking occurs and the engine begins to stall. The main ones are: incorrect ignition timing, faulty spark plugs and installed condenser, broken piston rings, piston and valve burnout, rocker wear, clogged air filter, and others.
The cause of the jerking must be sought in the cylinders
To reduce the search for the cause of engine tripping, it is recommended to determine which cylinders are not working correctly or have stopped functioning. To do this, you will need to remove the high-voltage wire from the spark plugs one by one. This procedure must be performed carefully, as there is a risk of electric shock. Before performing this work, you will need to place a dielectric base in the form of rubber or wood under your feet. It is recommended to remove by the wire. Then the engine speed increases to 1500 rpm. The valves are removed from the cylinders one by one. If the sound of the vehicle changes when removed, then the cylinder is working correctly. Otherwise, it must be replaced.
Checking the idle speed regulator (sensor) on a Priora with your own hands: different methods
At the first sign of an IAC malfunction on the Priora, we resort to checking the device for serviceability. There are many different ways to do this, thanks to which you can determine with 100% probability whether the product is working properly or not.
The easiest way is if the car does not start, then press the gas pedal, thereby opening the throttle slightly, and try to start the car. If the car starts and immediately stalls when you release the gas pedal, then the problem is in the regulator. Based on the characteristic signs, we can say that it is stuck in the closed position. This could happen for various reasons. Additional verification procedures look like this:
- Check the voltage in the power supply wires. We connect the multimeter probe directly to contact A, and the second one to ground, and turn on the ignition. Should show 12V. Then we attach the probe to terminal D and check the voltage in the second winding. There should also be 12V voltage. If this is the case, then we move on to checking the sensor itself.
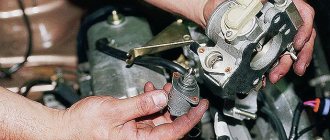
- Checking the regulator. There are many ways to do this. First, unscrew it from its seat and look at the cone valve. The presence of soot is unacceptable. If available, we clean it. Don’t forget to also clean the idle channel, since with 100% probability there is no less contamination there.
- Resistance measurement. If the rod is not dirty, then the easiest way to check it is to measure the resistance of the windings. To do this, take a multimeter and switch it to resistance measurement mode in Ohms (limit up to 200). And connect the probes to the contacts on the regulator. Initially, you need to connect to pins A and B, and then C and D. The resistance between them should be from 40 to 60 ohms. If the value is above 60 ohms, the product must be replaced. The situation is similar if the value is below 40 Ohms. The multimeter can also be set to continuity mode and make sure that the regulator windings are not damaged. This method allows you to check the condition of the windings, but even if everything is in order with the resistance, this does not mean that the product is working properly. After all, when the screw pair becomes coked, a picture such as the rod jamming when it moves is observed. That is why we resort to the following verification methods.
- Check using diagnostics. To do this, you can use a laptop and a special cable or ELM OBDII with the Open Diag application on your smartphone. Open the section “Position of the idle air control”, where you will see the position of the valve opening (in steps). We carry out the check on a warm engine. We look at the number of valve opening steps, which should be from 25 to 40 steps (with a warm engine to maintain idle). In this case, we focus on the value of the desired number of steps. The desired and current position must coincide. If this is not the case, then the product may be defective. By changing the number of steps according to the program, we control changes in engine operation. Sudden changes are unacceptable.
- Checking the serviceability of the regulator with the throttle assembly removed. This method is more labor-intensive, but safe for the regulator. It is recommended to implement it in order to eliminate the possibility of damage to the product. To do this, remove the throttle assembly from the car and, having connected the chip to the IAC, turn on the ignition. If the valve stem moves in and out smoothly, it means the product is working properly.
- Checking the IAC without removing the throttle valve. This method is not recommended, since its implementation can damage a working product. It is implemented like this: remove the regulator from the car, connect the power supply to it, and hold the needle valve slightly so that it does not completely come off the worm joint. Turn on the ignition. After the part comes out approximately 20 mm, you need to limit further movement of the rod so that it does not disengage. After this, the rod will return automatically.
The last method of checking must be implemented extremely carefully and carefully so that the rod does not disengage with the rotor.
If the rod is completely unscrewed, you can try to put it back in place. It is quite possible to do this, but it is possible that after this it will function correctly. The video below shows how to install the IAC rod when it falls out.
The photo below shows a diagram that can be assembled at home to check the serviceability of the IAC. Whether you need it or not, decide for yourself, since the method of removing the throttle assembly allows you to determine whether there are problems with the device.
It is important to consider that the maximum stroke of the rod on the IAC is 28 mm from the device body (see photo below). The minimum stroke of the new product is 23 mm.
Having verified that the regulator is in good working order or malfunctioning, we resort to replacing or repairing it. Repairs should be carried out only in exceptional cases, when you are sure that this device is really of high quality and can still serve. If it is a Chinese product, then simply change it without bothering with repairs or cleaning procedures. Next, we’ll look at how to clean the IAC on a Priora, and what you’ll need for this.
How to stabilize floating speed
- Penetration of foreign air into the engine. It is necessary to check the tightness of the air system channels with the intake manifold. For such purposes, it is necessary to dismantle each hose separately and pump it with a pump or compressor, but you can try spraying liquid -40 on the hoses, where it will quickly evaporate; there is most likely a crack in the hose. In such a situation, it is better to replace the damaged hose with a new one rather than wrap it with electrical tape.
- Replacement of IAC. The condition of this device is checked with a conventional multimeter, which needs to check its resistance. If the resistance readings are in the range of 40-80 Ohms, the regulator is faulty and such a device requires immediate replacement.
- Cleaning the valve and elements of the engine ventilation system. In this case, you will have to disassemble the oil sump and get to the ventilation valve. It should be pulled out and washed in a product for cleaning engine elements from an oil film. You can use regular kerosene. Next, dry the valve thoroughly and then put it in its place.
- Replacing the air flow sensor. This is the most delicate part and most often cannot be repaired. Therefore, if the cause is the air flow sensor, then it is advisable to replace it. It is known from practice that even professionals cannot repair a hot-wire anemometer.
- Flushing the throttle valve and then installing it in the correct position. There are two methods for cleaning the throttle valve from oil contaminants: without removing it from the car, and also with removing the throttle valve. When removing the damper from the car, you must disconnect all wires and hoses from the damper, loosen it and pull it out. Next, place it in a container and fill it with cleaning aerosol. If the oil stains on the surface of the throttle valve are already old, you can clean them with a brush. Next, dry the damper surfaces with a rag and put them in place, connecting all the wires and hoses. If the damper is not removed from the car, then it can be washed on a hot power unit with a similar aerosol. Before spraying cleaning agent, disconnect power from the throttle valve. First you need to pour the product inside the throttle valve, wait a few minutes and start the engine. With the power unit operating, continue cleaning the damper with the same product. If, during such cleaning, white smoke comes from the damper, then this is normal, since oil contaminants are cleaned in this way. At the end of the work, you should connect the wires and adjust the operating order of the throttle valve on the computer, setting the required opening gap.
- Idle speed adjustment. This procedure can be carried out using a regular screwdriver, adjusting the screws for the quality of the fuel mixture and the number of engine revolutions.
- Replacing the solenoid valve. If the carburetor idle valve malfunctions, the engine can only operate when the choke handle is pulled out. Therefore, in order to prevent idle speed fluctuations, it is advisable to replace the valve with a known good one or a new one.
- Cleaning the idle air jet. Even in the old days, cleaning the jet from oil deposits was considered a very labor-intensive task. Currently there is no need to remove the jet from the carburetor. To do this, you just need to pour a specialized product into it, designed for cleaning carburetors, and wait in this state for several minutes. Then you need to clean the nozzle from dirt using compressed air.
- Treatment of parts of the fuel pump on a diesel engine from rust. To perform this task, you will need a specialized corrosion cleaning agent. This can be either an imported or a domestic product. It is simply sprayed into the fuel tank by opening its neck before refueling with diesel fuel at a gas station. The cleaning agent will clean the pump parts from rust on its own. In order to prevent similar corrosion of the high-pressure pump in the future, it is recommended to pour a glass of motor oil into the tank, which can form a protective film on the surface of the pump parts when moving.
We recommend: Non-contact ignition system (BSI)
You need to know that if uneven engine speed occurs at idle, you must immediately contact a service station and carry out detailed diagnostics of the operation of all engine systems. Timely detection of faults will protect you from costly repairs.
Instructions for cleaning and lubricating IACs on Priora: detailed description of the process
In what case can a faulty idle air control regulator be repaired? Then, when this element is fully operational, and there is only contamination of the device rod. The cleaning procedure is not complicated and takes little time. To perform the cleaning procedure, you need to perform a number of the following manipulations:
- Remove the device from the car.
- Inspect his condition. The presence of play is unacceptable, and if such signs are detected, we immediately replace the product.
- If the rod needs cleaning, then it must be removed and the appropriate manipulations performed. The easiest way to remove the rod is to connect the power supply to it and turn on the ignition of the car. The rod will come out and simply separate from the rotor.
- Next, we evaluate the condition of the worm gear. If everything is in order, then clean the stem.
- Having cleaned the rod, we proceed to washing the inside of the rotor. To do this, we use kerosene, diesel fuel or WD-40, which needs to be used to treat the inside of the rotor. Carry out the procedure carefully so that liquid does not get on the stator winding, thereby damaging the insulation.
- After completing the above steps to clean the rod and seat in the rotor, you can lubricate it. Lubrication is needed to ensure smooth movement of the rod. To do this, we use regular Vaseline or technical lubricant for electrical devices. It is strictly contraindicated to use solid oil, litol, etc. Carefully lubricate the surface of the rod where there is a worm gear.
- It will not be superfluous to lubricate the bearing. To do this, we use a syringe with a needle and regular motor oil. Carefully lubricate the inside, and then proceed to the assembly stage.
- In order to install the rod in its place, it is recommended to additionally use a clamp. We screw in the rod, and after its threaded part is completely immersed in the rotor, it should be clamped in a clamp. We preliminarily control the position of the guides. After this, turn on the ignition. The rod will begin to move out and will automatically be pressed onto the rotor. Repeat the procedure several times until the rod in the extended position reaches a distance of 28 mm from the seat.
This completes the procedure for cleaning, lubricating and assembling the idle air regulator. It is suggested to watch a video where the author shows in detail how these manipulations are performed.
It is important to note that such manipulations with the IAC are recommended to be performed only in exceptional cases when the part can actually still serve. Otherwise, it is recommended to replace it immediately.
Instructions for replacing IAC on a Priora: choosing the optimal regulator option
There is nothing complicated in the procedure for replacing the IAC on a Priora. Knowing where this element is located, all that remains is to disconnect the power supply and unscrew the two screws that secure the product to the throttle body.
After this, the procedure for cleaning, lubrication or other types of repair work is carried out. It is important to note that if the part has a faulty bearing or winding of one of the circuits. Then do not attempt to repair the product. In this case, repairs can cost you a lot if the ECU fails.
This is interesting! When replacing the IAC, it is not at all necessary to disconnect the negative terminal from the battery. After replacing or removing a standard product, you will still need to perform the procedure for setting the regulator parameters.
The idle speed control on the Priora is installed in a similar sequence to the dismantling process. Initially, take the time to clean the valve seat on the damper body. In this case, the mounting screws are screwed in by hand without the need to control their tightening torque. Below is a video that describes and shows the detailed process of replacing the IAC on a Priora with your own hands.
After replacement, you will need to perform the procedure for setting the valve parameters. How to do this correctly is described in the next section.
One of the important and open questions is: which IAC is better to install on the Priora. Indeed, such devices are produced by different manufacturers, and it can be confusing to find a suitable option. The best option is to buy inexpensive products produced underground. To do this, choose products from the following manufacturers:
- Elkar;
- Regulators from the Kaluga plant are famous for their reliability (it is precisely these products that are installed on Priora). The photo below shows what the packaging looks like. Their cost is approximately 600-800 rubles;
- Pekar - good products, the cost of which is around 700 rubles;
- Omega group (yellow packaging) - keep in mind that the products of this company are inferior in quality to previous options, and they usually last no more than 30 thousand kilometers.
There are other options for regulators, for example, as in the photo below.
It also fits the Priora, but when buying such products from unknown manufacturers with Chinese designations, you risk that the part will not last even a month, and may not work correctly at all. That is why it is recommended, if necessary, to spend money once on the purchase of an IAC, which will last at least 100 thousand kilometers and will not cause your headaches.
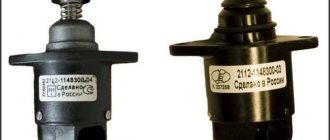
This is interesting! Chinese manufacturers or unscrupulous people produce an analogue of IAC from the Kaluga plant. A fake is very similar to the original, but its cost is lower and the quality of the product is much worse. To distinguish the original from the fake, see the photo below.
It is also important to pay attention to the regulator itself, which also has characteristic features of differences.
Choose only original products to ensure not only stable engine operation, but also not to damage the integrity of your car’s ECU.
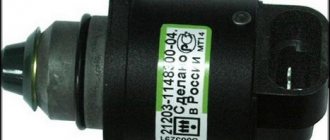
It is important to note that when purchasing a regulator, you need to pay attention not only to the shape of the valve (cap), but also to the code that is indicated on the body. For front-wheel drive vehicles, this code begins with the numbers 2112.
Be careful, as there are also devices that begin with the numbers 21203. They are designed for all-wheel drive vehicles, in particular for the Chevrolet Niva.
Now also about encoding. The Priora may have a regulator with the number 2112-1148300-01 or 2112-1148300-02 from the factory.
The products differ in the shape of the tip (valve). Pay attention to this and buy exactly the type that is on your car. The analogue for IAC with number 2112-1148300-01 is the device with code 2112-1148300-03 and vice versa. For regulator 2112-11483-02 it is equivalent to 2112-1148300-04 and vice versa. You cannot install a device with number 2112-1148300-01 or 03 instead of 2112-1148300-02, as the product will not work correctly.
After replacing the IAC, we move on to the process of setting it up. How to do this correctly, read on.
The process of setting the parameters of the idle air control on a Priora
After replacing the IAC on a car or removing the standard device to check it, it is necessary to perform a procedure called setting parameters or resetting the counter. The procedure is quite simple, for which you should do the following manipulations:
- Turn on the ignition for 5 seconds, then turn it off.
- Turn it on again and then turn it off.
- Start the engine and warm it up for 5 minutes.
- This is quite enough to set the IAC parameters.
After this, we monitor changes in engine operation. The improvements indicate that the IAC was indeed faulty.
In conclusion, it should be noted the importance of the device discussed. On Priora, IAC is often the cause of floating speed. And often the reason is hidden not in the quality of the product, but in a clogged valve, which, due to deposits, cannot efficiently open the channel by the required amount of steps. The reason for its contamination is dust when the filter is not replaced in a timely manner, as well as crankcase gases that adhere to the surface of the IAC. However, oil deposits are not as dangerous as dust entering the collector. Make it a rule to change the air filter in a timely manner in order to increase the service life of not only the IAC, but also the entire engine as a whole.
Air filter
As we know, a large amount of air is needed to form a fuel-air mixture. The air passes through the car's air filter. A dirty filter is another reason why the car jerks while moving or when starting off.
When the air filter becomes dirty, there is not enough air. The mixture is over-enriched in fuel, which burns incorrectly in the cylinders.
The car begins to behave inappropriately, misfires appear, which in turn are expressed in drops in speed and jerking of the car.