A throttle position sensor (TPS) in any car, including Lada Priora, is necessary to ensure the required volume of fuel in accordance with how the throttle is opened. Like any other regulator, the service life of the TPS is not eternal; accordingly, sooner or later the car owner will have to deal with device malfunctions. How to replace the sensor and what its operating principle is - read below.
About TPS and its purpose
From the name it becomes clear that this device is responsible for the position of the throttle valve. In turn, the throttle valve is a bypass valve located between the air duct and the intake manifold. Air enters through this valve, which is mixed with gasoline and supplied directly to the combustion chambers. The damper drive mechanism is connected to the accelerator pedal via a metal cable. Pressing the gas pedal causes the damper to deflect to the appropriate angle, which is necessary for the intake (suction) of the required amount of air.
Now let's return to the throttle position sensor on the Priora, which is an electrical device that transmits a signal to the computer about the amount of throttle opening. And based on such important information, the controller makes the appropriate decision on dosing the mixture of gasoline and air. If the PDZ sensor fails, the first thing that appears on the instrument panel is the Check Engine indicator. However, with such a breakdown, the engine will function, but only in emergency mode, that is, when the preparation of fuel assemblies and the ignition timing will occur at average values, which will lead to increased fuel consumption.
This is interesting! It is important to understand that the sensor can not only fail, but also begin to give incorrect readings if its elements wear out. In this case, the normal operation of the engine will be disrupted, since depending on the deviations, either the mixture becomes richer or becomes leaner. And, in addition, due to incorrect information received by the ECU from the TPS, incomplete combustion of the fuel assemblies will occur, which will lead to an increase in the emission of harmful substances.
Node location
Opening the hood of the Priora, you won’t be able to see the throttle assembly. It is located under a plastic casing that covers the top of the engine. In addition to aesthetic value, it has the function of protecting against a heated valve cover.
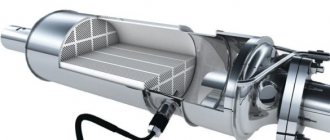
After removing the casing, the air supply system will appear. It is a large rubber pipe connected on one side to the air filter box, and on the other to the intake manifold. A Priora throttle valve assembly is installed between them. It looks like an aluminum insert with a plastic black wing in the form of a sector, to which the control cable is connected (in the case of a mechanical drive).
Types of TPS on Priora
Why do Priora car owners need to read this section, which describes the types of TPS sensors. Indeed, if you suspect a malfunction of this sensor, it is more important to first check it, and if the result is positive, replace it. All this is correct, but you need to know the types of TPS in order to choose the optimal device option for your car when replacing, which will not only last a long time, but also ensure more efficient and high-performance operation.
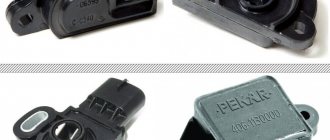
That is why there are two types of throttle position sensors. They have corresponding names, and differ in design, as well as principle of operation. In fact, you will learn about them further:
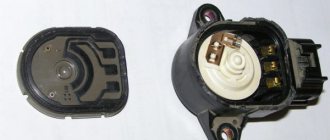
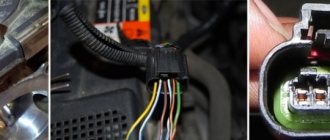
- Film-resistor (or resistive) TPS - it is also called a contact or mechanical device, which has a simple design and functions by changing the resistance. It consists of resistive tracks and a movable slider, which is connected directly to the throttle valve axis. Moving the slider along the track causes a change in resistance, which causes a voltage drop in the circuit. It is based on the change in voltage that the ECU understands what position the damper is in. In the design of Priora cars, sensors of the film-resistive type are most often installed from the factory, which are characterized by their low cost. Such a sensor has three contacts, one of which is a stabilized voltage of 5V, the second is ground, and the third is a signal contact, from which readings are taken and sent to the ECU.
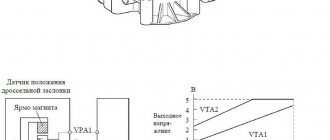
- A non-contact sensor or magnetoresistive sensor is a potentiometric device that consists of a permanent magnet that changes its position depending on the angle of rotation of the damper. Such sensors are more advanced and accurate, and are also characterized by a longer service life, which is due to the absence of contact elements. Moreover, their price is higher than the cost of resistive devices (about 2 times).
Having an idea of what types of TPS there are, you should consider the features of their functioning, which will be useful when carrying out test manipulations.
The principle of operation of the TPS on Priora
It is important to know how throttle position sensors work in order to decide on the appropriate option for your vehicle. Initially, we will pay attention to common models of film-resistive devices. They are called film because there is a track on the film coating along which the slider moves. Such a sensor consists of the following structural elements:
- plastic case;
- resistive track;
- a moving part in the form of a slider moving along the surface of the track.
Now, in detail about the operating principle of such an important product, which is most often used on Priora cars. A constant voltage of 5V is supplied to the track (when the ignition is turned on). The second end of the track is connected to the vehicle ground. The circuit is closed. The third contact is in the corresponding position and is connected to the throttle shaft. An insignificant voltage value of 0.55V is recorded at its output. When the gas pedal is pressed, the damper deflects, and with it the slider moves, during which the resistance of the circuit changes.
When the damper opens, the resistance increases (from 1 to 3 kOhm), which means the voltage at the output of the signal contact increases from 0.55 to 4.5 Volts. By changing the voltage value, the ECU understands the specific position of the throttle valve. Based on this value, as well as data from the mass air flow sensor, the control unit calculates the required amount of oxygen to prepare the optimal composition of the fuel assembly.
Over time, a mechanical sensor begins to show incorrect data, which often occurs due to abrasion of the contact layer on the tracks or slider. If such a part is unsuitable, it cannot be repaired and must be replaced.
Now let's look at the operating features of a more advanced sensor, which has not only a different design, but also a different operating principle.
They are also installed from the factory on Prioras. The operation of a magnetoresistive type TPS is based on the well-known Hall effect.
Thanks to this effect, the sensor has lost rubbing parts, which means its service life has increased. Instead of a contact plate with tracks, this sensor uses a permanent magnet. The case also contains an integrated board, which operates on the Hall effect principle. The microcircuit records changes in the magnetic field when the position of the permanent magnet, moving along with the damper, changes. The changing flow helps induce electrical impulses that arrive at the ECU.
Operating principle of a contactless sensor
The ECU receives similar impulses as in contact sensors, which indicates the most important thing - the possibility of their replacement with each other. This is very important, since many believe that contact-type TPS cannot be replaced with non-contact ones.
How to check the throttle
Checking the throttle is a simple process. It is enough to have a multimeter or just a voltmeter. Adjustment can take place in your garage. To do this, the corrugated tube responsible for the air supply is disconnected, thoroughly washed with alcohol and wiped with a soft cloth. The same procedure is done with the intake manifold and the damper itself.
Inspect everything carefully. If there is no mechanical damage, the sensor is adjusted. Use a wrench to loosen the screws. The damper rises and drops sharply until it stops; If you don't hear the impact, you need to repeat it again. The screws are loosened until the product finishes “biting.” And only after that the fasteners are fixed with nuts. Then the TPS bolts are unscrewed and the housing is rotated, the sensor is set so that the voltage changes only when the damper is opened. Everything returns to its place, the bolts are tightened, the adjustment is complete.
Common types of TPS failures
If a car has a film-resistive damper position sensor, its malfunctions are often associated with wear of the moving contact or fixed track.
During operation, the possibility of oxidation of the contacts, damage to the cores or insulation of the power wires is also not excluded. Over time, the elasticity of the spring is lost, which ultimately leads to its sticking.
Not only contact, but also non-contact sensors fail, but their service life is much longer, and they do not have the feature of supplying incorrect data.
If the contactless TPS fails, then it simply stops sending readings to the ECU, as a result of which the “CHECK” engine error will certainly be displayed.
This is interesting! The cause of failure of contactless sensors is a power outage or the occurrence of a short circuit current. Such devices, like film-resistive ones, cannot be repaired, so they need to be replaced.
Signs of a faulty TPS on a Priora: how to determine if the sensor is broken
Characteristic signs that the TPS on the Priora is failing are the following manifestations:
- drop in engine power;
- increased fuel consumption;
- the occurrence of jerks when accelerating the car;
- decrease in dynamics;
- problematic engine starting (especially when cold);
- possible engine detonation;
- floating speed - if the sensor shows at idle that the damper is open, then the ECU will try to reduce the speed, which will lead to a process of changes;
- delayed engine response to changes in throttle position.
The Check Engine indicator is displayed only when there is no signal from the TPS. The corresponding error codes are displayed on the Priora's on-board computer:
- P0122 - the signal from the TPS is low (i.e. weak).
- P0123 - the signal level from the TPS is high.
The signs described above only indicate that the problem is with the sensor circuit, so it remains to find out what exactly is faulty and how the breakdown can be repaired.
Features of checking contact and non-contact TPS on Priora: pinout
If the corresponding signs of a malfunction of the TPS on the Priora appear, it would not hurt to check the product to make sure that the sensor has actually failed and that the wire has not been damaged or the contacts in the power supply have oxidized. To do this, you will need to know the TPS pinout, which is presented in the diagram below.
The easiest way to check is to use a multimeter. The detailed process for checking the Priora TPS is described below:
- Checking the serviceability of the supply wires. Disconnect the power supply from the sensor. Connect the multimeter probes to pins A and B, then turn on the ignition and check the voltage. The supply voltage should be 4.8-5.2V. If the value differs from the specified value (usually it is lower), then you should look for the cause in a wire that has a short to ground.
- Next, we proceed to check the contact sensor. The best way to check it is to measure the resistance between contacts A and C, that is, the signal and positive contacts. It is recommended to perform the test on a removed sensor. We connect the probes to the corresponding terminals and measure the resistance in kOhms. It should be in the range from 1 to 3 kOhm. When changing the position of the slider, the resistance should increase, and very smoothly without sudden jumps. If a different picture is observed, then the TPS needs to be replaced.
- Another test method (suitable for both contact and non-contact devices), which does not require removing the sensor, is to measure the voltage at the signal contact. However, it is recommended to implement it in exceptional cases, since it involves violating the integrity of the contacts of the sensor chip. It is carried out as follows: using pins, you need to attach the probes of the multimeter to the back side of the chip. You need to connect to terminals B and C, that is, signal and ground. After connecting, you need to turn on the ignition and, without starting the engine, change the position of the damper. If the voltage smoothly increases to 5V when the damper is opened to maximum, it means the part is working properly. If sudden changes (jumps) occur in the contact-type TPS, the product must be replaced. If the non-contact TPS is faulty, then its voltage will not change or will change, but in a low range.
Below is a video that shows in detail the process of checking the mechanical TPS.
Having confirmed that the throttle position sensor on the Priora is faulty, it should be replaced. Do not attempt to disassemble or repair it, as it is not repairable.
This is interesting! You can check the health of the sensor using a Bluetooth scanner connected to the OBD2 connector, as well as a special application on your smartphone.
If the BC displays a low signal error from the sensor, you need to check the power wires, since most likely the insulation has been damaged. If the signal level is high, then the fault is probably in the sensor itself.
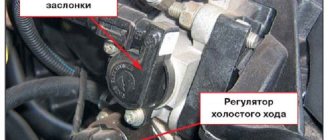
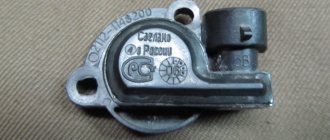
Where is TPS installed on Priora: location
You can make a mistake with the oil or speed sensor, but not knowing the location of the TPS on the Priora is unforgivable. If you have minimal knowledge of the structure of a car and know what a throttle valve is, then you will certainly be able to find the sensor responsible for its position.
The TPS on the Priora is located next to the throttle valve, but it is important not to confuse this product with the idle air control, since it is located nearby. The photo above shows the location, as well as the appearance of the TPS on the Priora.
Knowing its location, it will not be difficult to dismantle it for a detailed inspection or replacement.
Adjusting the electronic gas pedal
Adjusting the E-gas pedal of Priora, Kalina
Setting up the gas pedal on Kalina and Priora begins with its dismantling. After this, you need to loosen the 4 T20 star screws in the E-gas cover; it is not necessary to remove the cover. The screws are located in oval holes, so to adjust, it will be enough to move the pedal along with the bolts.
Moving the cap clockwise will make the gas more sensitive. The car will drive faster, but fuel consumption will increase slightly. By moving it counterclockwise, you will achieve lower consumption and smoother acceleration.
After adjustment, the cover must be fixed in the selected position and the bolts screwed back in. You can see in more detail how the electronic gas pedal is adjusted by watching the video:
Adjusting the pedal on a Priora
Adjustment, calibration and configuration of TPS on Priora
The need to adjust the damper position sensor arises not only when installing a new device, but also when removing a standard product to check it. What is sensor calibration or adjustment? This is the process that ensures the correct functioning of the device. When the throttle valve is closed, the signal from the sensor should be supplied at a minimum value, and when it is fully open to 90 degrees, the voltage value should be maximum. If, when the damper is closed, the voltage on the signal wire is, for example, 1V, although it should be about 0.5V, then the ECU will consider that it is open and will incorrectly adjust the composition of the fuel assembly.
When removing the standard sensor, you must note its position on the throttle assembly, otherwise you will need to carry out the adjustment process. Few people know about this, which ultimately leads to incorrect functioning of the engine. What is the process of calibrating TPS on Priora, we will consider further.
- Initially, it should be noted that sensors can be installed on Prioras from the factory without adjustment, and therefore the engine may not operate correctly. That is why it will be useful to carry out the setup process if signs of incorrect operation of the TPS are detected.
- The procedure can be performed in two ways. The first requires the use of diagnostic equipment (PC with software and OBDII connecting cable). You can also use the Bluetooth module and the Open Diag application. The second method is based on using a multimeter. First, let's look at the setup procedure using diagnostic equipment.
- Initially, install the TPS, but do not tighten the mounting screws. Be sure to wear a power supply.
- Connect a PC with the software and run the program. In the application, go to the “Variables” tab, where you indicate the value of the signal from the PD sensor.
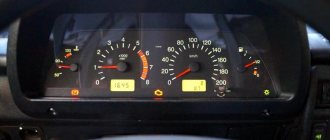
- We turn on the ignition and perform diagnostics. The left column indicates the throttle position as a percentage, and the right column indicates the output voltage (see photo below).
- When the throttle is closed, the value in the right column should be 0. To achieve this result, you need to move the sensor perpendicular to the throttle valve axis to the left or right. If you cannot set the value to 0, it means that you need to increase the diameter of the sensor mounting holes (bore them) using a needle file.
- It is important to enlarge the holes so as to be able to move the TPS relative to the damper, which will allow its position to be adjusted. The photo below shows the areas on the DPDZ that need to be filed off with a file.
- After this, we repeat the procedure and ensure that the program shows a value of 0 when the damper is closed. In the left column, the output signal voltage should be about 0.55V. We focus, first of all, on the percentage value, which should be equal to zero when the damper is closed. It will not be superfluous to inspect the condition of the damper, since a large amount of carbon deposits on it can cause incorrect adjustments.
- After this, open the damper to maximum and record the value in the application. The left column should display 100%. This indicates that the sensor is installed correctly, and regarding the position of the damper, it will transmit correct and accurate data to the ECU. We fix the sensor mounting screws and make sure that the product does not move to the side when tightening. Otherwise, repeat the check after tightening the screws.
This procedure is correct and allows you to adjust the position of the sensor with high efficiency and accuracy. If you do not have a PC, a connecting cable and an application, then the setup can be done using a multimeter. The process is almost identical, you just need to focus on the output voltage from the sensor:
- To do this, the sensor should also be installed in place, but do not tighten it with screws.
- Connect the multimeter probes to the terminals of the sensor chips B and C, using pins so as not to damage the integrity of the wire insulation.
- Set the multimeter to DC voltage measurement mode of at least 5V.
- Turn on the ignition and record the value with the throttle valve closed. The output signal should be around 0.556-0.557V. If the value is greater, it is necessary to increase the diameter of the mounting holes in the sensor and rotate it so as to obtain a value of 0.55V with the damper completely closed.
- Having achieved this indicator, you should open the damper to the maximum and record the voltage value. It should be 4.56-4.57V.
This completes the process of setting up the TPS. And you can verify by the sound of the motor that the sensor is functioning correctly.
After these steps, be sure to reset the controller. This can be done either by removing the negative terminal from the battery or by turning the ignition on and off several times.
This completes the process of setting up the TPS on the Priora. It remains to consider the question of what type of sensor is best installed on the car.
Sensor repair manual
How to replace and repair the throttle sensor? Before starting the process, it is necessary to de-energize the vehicle's on-board network; to do this, disconnect the battery.
Further actions are carried out in the following sequence:
- Open the hood and find the regulator, as we already reported, it is located on the throttle assembly. You need to disconnect the connector from it. To do this, the mount itself must be moved up, as shown in the photo.
- Next, using a Phillips-head screwdriver, you need to unscrew the two bolts that secure the controller to the assembly. Be careful not to lose these bolts.
- After the bolts are unscrewed, the sensor must be removed.
- When the regulator is removed, pay attention to where it fits. Here you can see a special foam pad; it must be left intact. Carefully inspect the gasket - if it shows signs of damage, it is better to replace it.
- If you decide to repair the device yourself, then you need to carefully inspect the part for damage. Measure the width of the shaft, this figure should be 5 mm. If this indicator is different, then it will not be possible to change the gap; it will need to be completely replaced. It is quite possible that to ensure normal operation of the power unit, you will also have to clean the throttle itself. After all, if dirt has accumulated on the axis of the unit, the controller will have difficulty moving.
- As for further installation, there is nothing complicated in this matter either. Installation is carried out in the reverse order; this task should not cause difficulties.