At which Kalina gearboxes can adjustments be made?
Lada Kalina cars are equipped with two types of manual gearboxes, which have different types of drive - lever and cable.
Adjusting the Lada Kalina gearbox lever
In the first case, the force of the lever, connected by a hinge to the transmission rod, is applied to the rod of the gearbox gear shift device. This design requires periodic adjustment of the Kalina gearbox linkage due to the gear selection lever moving beyond the range of movement provided by the design during operation. Most often, correction is required for the first generation Kalina gearbox with a mileage of more than 100 thousand km.
Unlike a traditional rocker, a cable shift drive effectively dampens the penetration of vibrations into the vehicle interior. The reduced lever travel in the longitudinal and transverse directions increases comfort when switching. Eliminating rigid traction eliminated the causes of incorrect operation when selecting gears, but problems can be caused by a malfunction and subsequent incorrect adjustment of the clutch on the cable box on the Lada Kalina-2. Insufficient oil level in the box can also be a reason for complaints about the quality of the device.
Adjustment of the gearbox on the Kalina with a cable drive is not required. Two cables with obvious signs of wear on the jackets or the appearance of effort when switching are removed and replaced. Avoiding sharp bends along the route is a necessary condition for trouble-free operation of flexible cables. After replacing the cables, additional adjustment of the clutch of the cable box on the VAZ Kalina-2 will be useful.
How to remove the gearbox
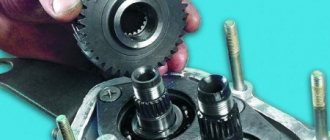
The fork fixing bolt and nut must be unscrewed after the input shaft stopper has been removed. The same thing will have to be done if it is necessary to replace the short-throw gearshift link.
The spline must be removed from the secondary shaft. The box assembly diagram assumes the reverse procedure.
We repair the Lada Kalina car ourselves:
- Replacing the cabin filter of Lada Kalina yourself
- Replacing the fuel filter on the Lada Kalina yourself
- Replacing the Lada Kalina air filter with your own hands
Other reasons for the lack of reverse gear on the VAZ-1118
The gearbox may not yet turn on if the link (thrust) is not adjusted, but in this case problems will also arise when trying to turn on some other speed (for example, first or fifth). That is why, whenever removing a manual transmission, it is recommended to put marks on the slide so that during reassembly it can be installed in exactly the same position.
Another reason for the malfunction of the gearbox is an unadjusted or poor clutch, but here, too, other gears either do not engage or shift with a crunch. The travel of the clutch pedal on Kalina is adjusted by decreasing or increasing the length of the cable; when the disc is worn out, the car begins to drive with slipping and does not pick up speed well. One of the main signs of bad ferrodo is the smell of burnt linings, which is especially noticeable when the car picks up speed and operates under increased load. At the same time, the free play of the clutch pedal increases, and it is not always possible to adjust it.
The Kalina gearbox has its own characteristics that every car owner should know. The manufacturer installs 5-speed gearboxes on the cars, which have 1 rear gear and 5 forward gears. Some car owners complain that the gearbox makes a squeaking noise when the lever is shifted. The thing is that the manufacturer installed special synchronizers on all forward gears. They are the ones who create the creak. When adjusting or replacing synchronizers, the squeak disappears. To carry out repairs, you will need a diagram of the device.
Most often, buyers choose cars with manual transmissions at car dealerships. It must be said that their power directly depends on how many valves there are in the car’s engine. More recently, the car plant has carried out work to improve them; changes affected engines with 8 and 16 valves. The installation of reinforced parts made the engines more powerful and reliable.
Kalina gearbox: description, design and principle of operation
One of the popular domestic cars is the Lada Kalina.
The second generation became available in 2013. The car has improved its technical qualities. Also, the exterior has improved. Comparison of the appearance of the old and new versions
The car may have an engine with a volume of 1.6 liters and a power of 106 horsepower. Lada Kalina VAZ 1118 is equipped with electric power steering. Also, the 2nd generation may have a cable gearbox. Its peculiarity is that it minimizes the occurrence of vibrations that occur on the body.
Replacing a manual transmission
If the circumstances were not the most favorable, and you still had to resort to replacing the Kalina gearbox, you need to know the correct sequence for dismantling the transmission.
Preparation
Before removing the gearbox, read the vehicle's operating instructions or watch a video about replacing the gearbox on a Kalina.
After this, prepare your work area. Replacing the gearbox on Kalina is carried out only when the car has cooled down. Raise the car on a lift or drive it into a pit. Don't forget about safety requirements. Ask a partner for help to carefully remove the gearbox.
Be sure to drain the transmission oil to prevent it from leaking when you remove it.
Tools
Prepare the necessary tools - wrenches and sockets of various sizes, a wheel wrench, a jack, an empty container.
Removing the box step by step
The first step is to unscrew the engine protection, which is secured with 6 bolts. The next step is to drain the oil from the gearbox - to do this, unscrew the filler and drain plugs of the gearbox.
- Remove the battery for convenience and to avoid spontaneous short circuits. The battery platform will also be in the way, so unscrew the 4 bolts securing it.
- Disconnect the throttle cable. To do this, remove the special bracket that secures it and pull out the cable.
- Remove the air filter. After disconnecting the main pipe, pull out the filter housing towards you. Under it you can see the clutch cable, which is located next to the starter; unscrew it as well.
- The next step is to unscrew and remove the starter, which also makes it difficult to get to the box. Now jack up the car and remove the front wheels.
- After removing the wheels, unhook the left drive. Now you need to hang the engine on a hydraulic jack. Remove the right drive. Be sure to insert the differential lock plug to prevent the planetary gear from flying out. In the case of a cable box, loosen the fastenings slightly so that the cable drives can be disconnected from above.
- Having unhooked the rocker arm from the box (by loosening the clamp), disconnect the torque rod. More precisely, you need to remove the part that is closer to the gearbox driveshaft.
- Hang the box on a hydraulic foot or special support. A “cushion” is screwed next to the cardan - unscrew it from both the body and the transmission, it is secured with bolts from the end side. Then you can easily crawl to the right front drive, which needs to be removed.
- To remove the box from the engine, unscrew the 4 bolts around its perimeter.
- The box is free. All that remains is to carefully lower her to the ground, pulling her out from under the car. If dismantling is carried out in a pit, then ask your partner for help to remove the gearbox without dropping it.
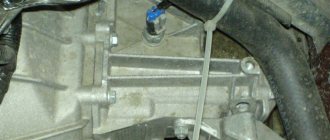
Bolt for securing the Lada Kalina gearbox.
The gearbox can be replaced at a service station. The price for replacing a gearbox on Kalina starts at 5 thousand rubles.
Which box to choose
Replacing the Kalina gearbox involves installing a transmission that was installed on this model by the factory. Mechanical gearboxes are considered the most reliable.
They are easy to repair and maintain and do not require special skills from the car owner during repairs.
When switching from one system to another, significant modifications to the Lada Kalina are required. The price for a gearbox with rigid traction is about 15 thousand rubles. If you have a new Kalina model, and it has a cable-driven gearbox, you will have to pay 25 rubles for a new unit.
Installing the box step by step
The step-by-step installation process is similar to its dismantling, only in reverse order. With the help of a partner, install it in its place, connecting the splines of the gearbox input shaft and the engine crankshaft, connect all attachments and pipes. Pour transmission oil into the box. The replacement of the gearbox on the Lada Kalina is almost complete. Connect and adjust the rocker rod drive.
Installing a gearbox on a car
Start the car, let it warm up, inspect the engine compartment for leaks, try changing gears. The move should be soft and without extraneous sounds. If so, the box is installed correctly. Turn off the car.
After the car has cooled down, install the engine protection.
How to change manual transmission bearings
Before replacing the Kalina gearbox bearings, the box is removed and disassembled. Both processes require care and attention. It is also necessary to prepare tools and select an assistant.
Preparation
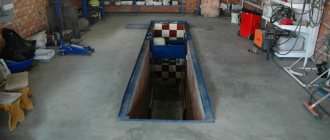
The car must be lifted or driven onto an overpass or inspection ditch.
Prepare the following list of tools:
- socket wrenches sizes: 10, 13, 19; 32;
- wrenches sizes: 10, 17, 19;
- TORX spanner T14, T25;
- large negative screwdriver or spatula for installation;
- hammer
The gearbox weighs more than 30 kg, so you need an assistant and a stand. After the car has been installed, lift the hood and secure it, and raise the handbrake.
When did they start installing the cable box?
In 2013, AvtoVAZ decided to abandon the 5-speed manual transmission with index 1118, which was installed only on the Lada Kalina since 2004, in favor of a newer transmission, also with 5 gears. Thus, the cable box on the Kalina received serial number 2181.
Why did they abandon the rocker box?
There are several reasons why the manufacturer abandoned the rocker box. Firstly, to reduce the vibrations that occur on the lever connected to the transmission through a rigid rod, as a result of which they switched to a cable gear shift drive. Secondly, when installing multi-cone synchronizers, the force applied to shift first and second gears also decreased. Thirdly, to make gear shifting easier, the bevel angle of the synchronizer teeth was reduced.
Gearbox slide
Next, in order to stop oil leaks, it was necessary to move the gear selection mechanism from bottom to top, which was done. A selector plate was also installed, which resulted in clearer gear shifting. Well, to prevent the driver from accidentally engaging reverse gear, an electric lock was installed instead of a mechanical one, as on the previous gearbox.
Due to the fact that the gearbox gears are not sufficiently processed and have a tolerance of 0.2 mm, many Kalin owners complain about the “howl” of the transmission.
Another reason for abandoning the 1118 manual transmission is unclear gear shifting, especially on a warm engine, which is why owners have to adjust the gear control drive. The process is certainly not complicated, and even “two schoolchildren” can cope with it, but it’s still not pleasant.
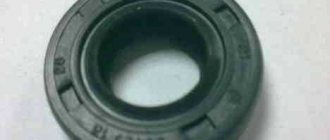
As with all other AvtoVAZ transmissions, transmission seals are also famous for their low reliability; due to the manufacturer’s savings on seal material, oil leaks from the box. Replacing oil seals is not an expensive procedure, but if you miss the moment, the lack of lubrication in the manual transmission can lead to serious consequences. Fortunately, to check the oil level in the gearbox there is a special dipstick, which is located near the battery.
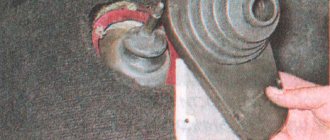
Left drive oil seal
AvtoVAZ determines the service life of this manual transmission at 160-180 thousand kilometers until it is completely replaced. But in practice, for a comfortable ride, Kalin owners change or upgrade most of the transmission components already within the first 100 thousand mileage.
How is a cable gearbox better than a rocker gearbox and why?
Having taken into account all the negative reviews from Kalina owners about the rocker transmission, AvtoVAZ decided to install a cable box on Kalina since 2013. For the first time, they began installing a cable gearbox on Kalina, Granta, and Priora, which were equipped with 16-valve engines
For the first time, they began installing a cable transmission on the Kalina, Grant, and Priora, which were equipped with 16-valve engines.
As a result of replacing the rigid gearbox control drive with cables, some of the shortcomings associated with the rocker manual transmission were eliminated. In particular, the travel of the gear lever has been significantly reduced, and the gear shifts themselves have become clearer. The vibration on the gearshift lever has almost disappeared, but still not completely, and car owners also slightly modified this mechanism. This suggests that problems with the cable drive of the Lada Kalina gearbox were also present, but were not as noticeable as with the previous transmission.
AvtoVAZ recommends filling this manual transmission not with mineral oil, as was the case before, but with synthetic oil. Thanks to this, even at sub-zero air temperatures, the gears are switched on “cold” with ease, and there is no need to wait for the oil in the transmission to warm up, because synthetics retain their operating properties at a much greater minus, unlike mineral oil. Also, the volume of oil poured into the box has decreased, since the gearbox itself has become more compact.
Lada Kalina Sport Cross edition › Logbook › DIY Kalina Sport gearbox repair
Hello friends! I spent New Year's weekend without a car. But yesterday, my brother and I restored my car in the garage. Let me remind you that on December 31, my gearbox broke down while driving on the highway. The reason is that I didn't pay attention to the oil in the box. Over 2 thousand kilometers from the moment I checked the level in the box and it was normal, before the breakdown, 1 liter of oil was lost from the box. The oil leaked out after the gear selector rod seal fell out. I was driving on the highway in 5th and 4th gear which resulted in 5th running dry which caused the 5th gear needle bearing to melt and the needles to bunch together. There is an interesting nuance here, as far as I know, AvtoVAZ, starting with the 10, has abandoned needle bearings and uses a bushing instead. Why on my box in 5th gear there was a needle bearing instead of a bushing is a question, because after opening it I looked at it in 4th gear there is a bushing. The bushing is more reliable than a needle bearing, so here is the “reinforced” box of the Viburnum Sport. I have a feeling that they put in what was at hand. That is, they did it to fuck off, as sometimes happens in our country. There were pieces of plastic inside the box when we opened it. Now let’s talk about how we repaired the gearbox and some nuances that need to be taken into account if you decide to rebuild the gearbox yourself. 1. You will need a pit or lift for removing and installing the gearbox, a jack, a hydraulic jack to support the engine, a set of ratchet tools with heads, and open-end wrenches. I recommend immediately purchasing a bearing puller; I bought it for 850 rubles during assembly, although during disassembly it would have greatly helped us save time. In order to wash the box before assembly, outside and inside, you need to use gasoline or carburol; we washed the parts of the box with gasoline using a compressor.
Repair, features and technical specifications
Inside a VAZ 21118 car, like any other, there is always a gearbox. For a model such as Kalina 1118, this device is a mechanical type design, which is equipped with one reverse stage, as well as 5 forward stages.
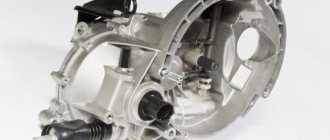
Gearbox from Lada Kalina.
In Lada Kalina, the gearbox is structurally combined with a differential, the main gear. Transmission differential repair should also take this into account.
The mechanism body of the VAZ Kalina car is presented in the form of three aluminum copper crankcases:
- Back cover.
- Box.
- Clutch.
Special sealants are applied between them when assembling and repairing the gearbox.
Removal and installation of the gearbox
Servicing the gearbox assumes that the mechanism will have to be removed and its position changed. Before doing this, you need to install the vehicle itself on the lift. The ignition must be turned off completely and the parking brake must be used.
How to repair a gearbox? To do this, disconnect the minus terminal from the battery. The hood must be opened completely. Any manual on gearbox repairs writes about this.
The oil filler cap is also removed. It is necessary to install the previous item after the screen is removed. The gearbox requires loosening the clamp responsible for fixing it. The inlet pipe hose must be disconnected from the corresponding sensor. Gearbox lever play requires the same actions in practice. Then you need to unscrew the air intake nut.
The repair progress further depends on the specific malfunction.
Gearbox Lada Kalina after dismantling and disassembly.
The gearbox can be installed in its original place after the 1st speed repair is completed. SHRUS-4 lubricant is applied to the outer surface of the corresponding bushing in the clutch in a very thin layer. This will also help if the gearbox is loose. The pin fixing bolts are removed from the steering knuckles.
Mechanical part
If the reverse gear on the Kalina does not engage, the reasons may be in the shift mechanism. The latter has a spring in its design. It breaks often. If the part “falls” to the bottom of the box, it will not interfere with gear shifting. The driver can drive like this for several years, not suspecting that a spring has fallen out of the mechanism.
But if it gets stuck in the grooves, reverse gear breakdowns will be inevitable. Depending on the position of the part, the speed may turn on periodically or not work at all. In this case, you will have to completely disassemble the gearbox and pull the stuck element out.
Lada Kalina gearbox repair
Disassembly, assembly of the gearbox and troubleshooting of its parts in Lada Kalina
Warning: if during the repair of the gearbox at least one of the following parts was replaced: clutch or gearbox housings, differential housing or differential bearings, then it is necessary to select a differential bearing adjusting ring. To disassemble and assemble the gearbox and troubleshoot its parts on a Lada Kalina VAZ 1118 car, you will need: socket wrenches (heads) “10”, “13”, “32”, keys “10” and “17”, large screwdriver, bit, hammer, circlip pliers, impact screwdriver. 1. Remove the transmission from the vehicle. Clean it from dirt and wash the outside.
Reverse gear repair in Lada Kalina
Why won't reverse gear engage?
There are quite a few reasons why reverse gear does not engage, so sometimes it is not at all easy to understand what caused this malfunction. Moreover, in cars “stuffed” with electronics and all kinds of sensors, it is the problem with the electronics or contacts that becomes the reason why the reverse gear stops engaging.
In this article I will talk about possible causes and malfunctions due to which the reverse gear on the Lada Kalina does not engage. You will also learn how to find and fix a malfunction in the reverse gear locking mechanism with your own hands.
1. Before you start drastic actions and disassemble “anything and everything,” check the gear shift lever itself, this may be the reason. The linkage and cardan are quite often the cause of this breakdown. The splines could also be worn out or the clamp loosened. In this case, you will need an inspection hole.
2. Faulty release bearing, as an option. Although it is unlikely, since in this case all gears without exception would be engaged with a characteristic crunch and with great effort.
3. Reverse gear may stop engaging due to problems in the reverse gear locking mechanism; in order to confirm or deny this, remove the gear shift knob along with the dashboard between the seats and perform a visual inspection.
In my case, the problem was precisely the faulty wiring of the transmission lock solenoids (break or fracture), how I solved this issue, read on.
WHY THE REVERSE GEAR DOES NOT GO INTO OR HOW TO CHECK AND REPAIR THE REVERSE GEAR LOCKING MECHANISM OF A LADA KALINA WITH YOUR OWN HANDS.
Power comes to the solenoid through a switch ring located on the gearshift knob. It works like this: you lift the ring, thereby turning on the solenoid, the rod is pulled into the solenoid, which leads to unlocking the reverse gear. You can then engage reverse gear by moving the gear shift knob. Next, the “limit switch” located on the box is turned on, and the rear stops are turned on, and an intermittent sound signal is turned on in the cabin.
What tricks have they done with TsBKE?
Some time ago, the list of defects would have included the failure of the CBKE, that is, the body electronics unit. The firmware intended for the specified Grants/Kalina-2 unit has now been updated. As a result, we managed to get rid of the malfunction completely - the equipment itself cannot fail. But not everyone likes how the new firmware works - some owners experienced an incomprehensible defect when the reaction of the lamps to the actions of the warrior became “strange”. However, we have published a video where a corresponding example is given further, and you can evaluate the quality of the work of the Central Bank of the Russian Federation “live”.
In the “first Kalina”, by the way, electrical devices were controlled by individual elements (relays, toggle switches), each of which could theoretically fail, which would require its search and replacement. The design of "Kalina-2" is more modern, something is being updated in it, and the use of some components has to be abandoned. This was the case with the South Korean EUR. Now Russian amplifiers continue to be used.
Features of electrical equipment of Lada Kalina-2
Technical features of the gearbox
The drive gear block is engaged by the input shaft
This is important to consider when repairing a gearbox. As for the input shaft itself, a constant clutch is created for it with the front gear elements that perform similar functions
When repairing the secondary shaft, we must remember that it has a hollow structure. It is thanks to this that the oil reaches the driven gears without any problems.
The design of the gearbox is such that repairs cannot be done without the use of special circuits. In this case, the radial clearance on the roller bearings is no more than 0.07 millimeters.
Repairing the gearbox is also a rather complicated process. Especially considering that 0.04 millimeters should not exceed the same figure, but for ball analogues.
Location of the checkpoint backstage on the Lada Kalina.
The oil sump is responsible for supplying oil. It is located in the area of the front bearing, fixed behind the output shaft. Major repairs often affect such details. If you select the desired thickness of the rings, it will be possible to adjust the tension indicator. The dimensions of the seals are easy to find in the instructions; these parts can be replaced without problems, even at home.
When repairing the gearshift knob, you must remember that the driven gear of the gearbox on this machine is attached to the differential flange. Through the saloon, the atmosphere is combined with the box itself, located at the top of the structure we are considering.
Lever repair is not the only operation that needs to be carried out from time to time. Sometimes it is necessary to replace bearings; this is done when extraneous noise appears. A gearbox repair kit must be purchased if excess noise becomes noticeable when pressing or releasing the clutch pedal.
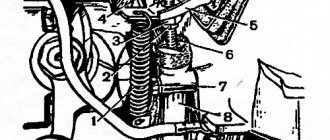
All control drive elements of the Lada Kalina gearbox.
The repair manual says that the box is controlled using a drive, which consists of several elements:
- Switch rod.
- Spherical bearing.
- Lever arm.
According to the manual, cable structures are always equipped with jet traction, then the gears do not turn off on their own. One of the ends of the rod is connected to the lever, and the other to the motor. If the seals of the internal joints are faulty, it is necessary to carry out independent repair of the gearbox. But before replacing them, you need to completely change the oil. The front wheel drive is completely disconnected.
Three axes are present on the shift system. One axis is equipped with a three-arm lever for selecting and disengaging gears. There is no gearbox on the second axle, but there are brackets that block rotation. After every 75 thousand kilometers, this design is completely changed. Gearbox lever play should also alert you, as should failure of other parts.
Gearbox lever jammed
In any case, it is necessary to remove the last fastener after the bolt nut securing the left suspension arm has been unscrewed to the body bracket.
Repairing a box cushion is not complete without many of the steps described above.
After this, all that remains is to remove the lever. Another rather important element is the gearbox fork; its condition must also be monitored.
You will need to drain all the remaining oil into the container. A complete gearbox repair also involves removing such parts as the wheel drive from the gears of the differential axle shafts. The plugs are placed in the place where the gears used to be. After the gearbox adjustment is completed, they usually proceed to installing the left suspension support and brackets for the rear of the car.
Any such work, including repair of the secondary shaft, must take into account the general design of the gearbox and the basic principle of its operation. It contains a book on repairing the box. The same applies to the functionality of the component elements, otherwise the gearshift lever support cannot be replaced, like other parts.
Dismantling of the Lada Kalina gearbox at a specialized service station.
The features of the repair are fully familiar only to real professionals. It is better to entrust the work to them if you do not have the proper experience or some practical skills.
It is necessary to completely rinse the mechanism with water before disassembling it to identify a gearbox malfunction. Problems during repair may arise if the part itself is not installed on a special stand. The bracket, which is responsible for fixing the clutch cable and engine suspension, is completely dismantled.
Many people give useful advice on replacing a VAZ gearbox. According to them, in any case you will need to remove the rear cover of the crankcase.
How does a manual transmission work?
The mechanical gearbox device in the Lada Kalina 2 consists of several main structural components. These should include:
- unit crankcase with shafts and gears;
- clutch housing;
- back cover.
The plug for draining used lubricating fluid is equipped with a special magnet. It is necessary to collect metal shavings, the formation of which is observed during the natural wear of gears and other crankcase elements.
The system also has two types of bearing designs, both roller products and ball components. The developers placed a special type of oil sump near the front bearing, from which the fluid is directed to the gear shafts and other elements of the system.
At the factory, oil intended for transmission units is poured inside the new box. This fluid must be replaced periodically. This is recommended to be done every 70 thousand km of the distance traveled. The owner should also be inclined to periodically check the lubricant level and, if necessary, top up to the required volume.
To monitor the level in the unit there is a special probe. It allows you to easily verify that there is enough oil inside the box. We act like this. Carefully insert the dipstick into the funnel and then remove it. On the measuring section of the probe there are a pair of marks indicating the maximum and minimum limits of the filled volume. If the amount of lubricant is not enough, then add it without haste.
When there is a need to replace the entire volume of lubricant, it would be better to carry out this procedure in a professional service environment. Alternatively, you can resort to the replacement process yourself. You will need to drain the oil through the hole present on the crankcase, which is closed with a special plug.
Replacing the electric window
If the window lift cable on a Lada Kalina car has become unusable or the motor has burned out, the ESP must be changed. We carry out the replacement operation in the following order:
- dismantle the power window control unit;
- remove the door trim;
- to disconnect the window regulator from the glass, the latter must be raised all the way up;
- unscrew the four bolts that secure the glass to the ESP (two in the front and two in the back). The glass is held on by seals, but it can also be secured so that it does not fall down;
- unscrew the black metal strip (three screws);
- unscrew the eleven window regulator fasteners (10 bolts), disconnect the power plug from the electric motor;
- We begin to remove the power window from the rear, first removing one half of it;
- then we take out the front part along with the motor from the door cavity;
A burnt-out electric motor on a lift can be easily replaced. For this:
- unscrew the three studs on the mechanism body, then four more screws;
- dismantle the motor, holding the cable spool with your hand, install a new part;
- We install the window regulator in the door, connect it to the glass guides, and put the trim in place.
Assembly and installation of the box
Before assembly, replace the input shaft oil seal. Clean the magnet from any metal debris. Replace the magnet if it begins to crack or become less magnetic. Check the gears and synchronizers; if they are chipped, replace them. Clean the contacting surfaces of the crankcases from traces of sealant. Then follow these steps:
- Engage the shafts and insert them together into the clutch housing.
- Install forks with rods.
- Reinsert the magnet.
- Lubricate parts subject to increased friction with transmission oil.
- Apply sealant to the contacting surfaces of the crankcases and rear cover before connecting them.
After assembling the box, install it back. Before “returning”, lubricate the end of the CV joint-4 drive shaft. Screw back the clutch housing stud, and also temporarily screw in 2 guides into the front lower hole of the cylinder block and into the rear upper hole - this will make the process of installing the box easier.
Next, insert the drive shaft into the clutch. The two screwed-in studs should go into the holes in the clutch housing, and the “original” stud should go into the cylinder block. The gearbox should rest against the cylinder block. After this you can remove the pins.
Disassembly and assembly process
Before disassembling, the Kalina gearbox is washed with water and installed on a stand. Dismantle the engine mount bracket and the clutch cable fixation. Then remove the rear crankcase cover. After locking the input shaft, unscrew the nuts and bolt securing the fork. The spline is removed from the secondary shaft. The gear is pressed out from the input shaft. Using a drill-driver, unscrew the screws that secure the thrust plate. The next stage involves removing the mounting rings from the shafts and bearings. If the retainer plugs are unscrewed, then remove the retainer balls and springs, then remove the crankcase.
When assembling the gearbox, the threads in the hinge and lever hub, including the fixing screws, are degreased. A special adhesive is applied to the screw threads. The lever and hinge fixing screws are different lengths. The tightening torque of this element is 33.6 N.m. The installation of oil seals of various mechanisms and the Kalina rocker is carried out using a special lubricant, which is applied to the working surfaces of these elements.
Installation of the rod into the crankcase requires inspection. The hinge flange must fit inside the cover along the entire perimeter. Lubricant is placed in the ball joint of the corresponding lever. Each fastener is tightened to a certain point. When assembling the secondary shaft, you will need to replace the retaining rings. Their installation involves pressing the rings into the groove. The internal element must be pressed all the way into the retaining ring.
During the inspection, gearbox parts are cleaned. This work is carried out using a scraper or brush. All deposits are removed and the holes are cleaned of dirt. The holes are washed and blown with a stream of compressed air. Auto mechanics recommend thoroughly blowing out the bearings. To do this, the air flow must be directed in such a way that the rings do not rotate quickly. The crankcase connector, clutch and rear cover are cleaned of sealant. The properties of the magnet are checked. If the performance is weak and there are cracks on the surface of the magnet, it is replaced with a new one.
Removing the box
After completing the preparatory stage, proceed to removing the gearbox. First, operations are carried out on top of the car according to the following instructions:
1. Remove the negative cable from the battery. 2. Remove the air purifying filter. 3. Remove the starter by first disconnecting the wires from the terminal and from the contact bolt. 4. Pull the clutch drive cable out of the clutch release fork. 4. Removing the drive cable
5. If the gearbox bearings are being replaced on Kalina 2, then 2 cables should be removed from the gear selection mechanism. In the figure they are indicated as number 1, and the mechanism as number 2.
You can remove the front wheels, this will make it easier to work. Then you should move under Kalina and do the remaining steps: 1. Remove the protective panel or mudguard on the left side. 2. Drain the oil from the box. 3. Unscrew the bolts on the lower clutch housing cover using a size 10 wrench and remove it.
Crankcase cover 4. Next, the drives are removed from the wheels. To do this, first unscrew the 2 bolts that secure the ball joint to the knuckle using a size 17 socket wrench. Perform the operation on the left and right sides. 5. Using the gearbox housing as a stop, press the left and right hinges out of the gearbox with a spatula or wide screwdriver. Move the drives away from the gearbox by moving the shock absorber struts outward. 6. Disconnect the electrical elements from the gearbox housing: the “trick” of the reverse lock solenoid. Speed sensor chip.
Remove the block from the reverse light switch
7. When replacing bearings in the gearbox on Kalina 1, unscrew the torque rod together with the bracket from the box. Use 2 size 19 keys. One to hold it from turning, the other to unscrew it. The same bolts fasten the clutch housings and boxes together. After unwinding, remove the rod from the box. 8. Squeeze the plastic holder of the drive damper cable and remove it from the gearbox. It is located near the oil level indicator.
9. Using a size 13 socket wrench, unscrew the bolt securing the ignition unit bracket to the clutch.
10. Next, the gearbox is disconnected from the cylinder block using the 19th head. First, unscrew the top 2 bolts. After removing them, it will be possible to move the throttle drive cable to the side along with the fastening. The first bolt, indicated in the figure by the letter “a”, is short, the second, “b” is long. 11. Place supports, preferably adjustable ones, under the gearbox and engine. 12. Next, unscrew the lower bolts connecting the cylinder block and the box. First, use a 19-size wrench to unscrew the rear one.
Then use a socket wrench No. 19 for the front one. 13. Now the box is disconnected from the engine. It is necessary to remove the bracket between the engine and gearbox. First, unscrew the 2 bolts connecting the front left support cushion to the bracket.
14. Next, remove 3 nuts securing the bracket to the gearbox. After this, remove the bracket. 15. Then the 3 bolts on the rear support bracket are disconnected. Two of them are unscrewed with a socket wrench No. 19, and in the middle - No. 17.
16. Together with an assistant, move the gearbox away from the engine so that the drive shaft comes out of the clutch.
If you can’t pull it out, then move the power unit to the side, release it in front of the gearbox and pull it out. Do not push the input shaft against the clutch “petals”, otherwise they can be damaged. Disassembling the box Disassembling the gearbox should begin with cleaning it. Do not allow dirt to get inside the device. Then follow the following instructions: 1. Remove the speed sensor by unscrewing the retaining nut. Then remove from the recess. 2. To install the gearbox on a table or workbench, unscrew the connecting pin from the clutch housing. To do this, screw 2 nuts onto it and unscrew it. Place the gearbox on the table, the clutch housing should be at the bottom. 3. Next, remove the reverse lock solenoid. First, unscrew the locking plug using key No. 13. The spring and ball are pulled out of the recess.
4. Then the solenoid is dismantled using key No. 36. 5. Unscrew the reverse lighting switch located nearby using key No. 22.
6. Next, remove the clutch release drive bracket from the body. It is held on by two nuts. First, using key No. 13, unscrew the first one, which simultaneously secures the rear cover of the gearbox housing. Then with key No. 17 - the second one. Remove the bracket.
7. Having freed the gearbox from the “external” elements, remove the rear crankcase cover. To do this, unscrew the remaining 5 nuts using a No. 13 wrench. 8. Tapping upwards on the lid with a wooden hammer or a regular one, but with a soft tip, loosen it, lift it and remove it. 9. To continue disassembly, you need to unscrew the 2 nuts on the shafts. This cannot be done on rotating shafts, so they must be stopped by simultaneously engaging two gears: 3 and 5 or 4 and 5. If the shift rod is pressed in, the third will engage. If you pull it out, it's the fourth one.
10. Next, turn on the fifth. Remove the bolt securing the fork of this gear using a No. 10 wrench.
11. Then you need to lower the fork to engage the 5th “speed”. You can use a drift.
12. Now the nuts will unscrew. First you need to open them up. If you do not intend to replace the nuts during assembly, then remember which shaft each of them belongs to. Unscrew using collar no. 32. You'll have to put in a lot of effort. 13. Using a screwdriver, lift the 5th gear gear and remove the synchronizer and fork along with it. In this case, all the elements must be removed together, pressed against each other, so that the balls do not scatter.
14. Pull out the plug and mark the relative position of the coupling and the locking ring. Then remove the gear and ring and separate them. Remove the plate from the synchronizer. 15. Using a screwdriver, remove the 5th gear bushing from the secondary shaft.
16. Press the 5th gear gear off the drive shaft using two screwdrivers. 17. Pull out the thrust ring from the driven shaft. 18. Next, remove the plate held by screws and spring washers. An impact screwdriver is used. If the washers burst, they must be replaced during assembly.
19. Next, unscrew the clamps holding the fork rods. There are 3 of them; when removing them, remove the springs and balls from the holes.
20. Remove the retaining rings of the rear bearings of the drive and driven shafts. 21. Now disconnect the gear housing and clutch. Unscrew 13 nuts and 1 bolt around the perimeter of the gearbox. 22. To separate the gearbox, insert screwdrivers into special grooves located at the junction of the crankcases, gradually lift the upper part and remove it. 23. Remove the magnet for collecting metal debris from the crankcase. 24. Remove 3 rods and speed forks. Unscrew the screw securing the 1-2 speed fork to the rod. Then slightly raise the rod and turn it counterclockwise to remove the fork from the engagement with the gear selection mechanism. Remove the assembly. 25. Unscrew the bolt connecting the second rod to the 3-4 gear fork. Pull the knot out of the hook and remove it. 26. The 5th gear fork was removed first, so all that remains is to remove the rod.
27. Next, pull out the reverse idler gear axle. Then push the gear into the gear selection system, rotate it 30°-40° and remove it.
28. Since the bearings need to be replaced, the gear selection mechanism does not need to be touched. At this point the shafts can be removed. They are pulled out at the same time.
This completes the disassembly of the gearbox. Proceed to replacing the Kalina gearbox bearings.
Recommendations for the use of transmission oils for Kalina
Adding oil or replacing it in the Kalina gearbox will require an answer to the question of which substance to choose. It is better to build on the manufacturer's recommendations. The machine's operating manual provides a list of different oils. They are classified by:
- brand;
- viscosity grade (SAE);
- API group;
- to the manufacturer.
It is important which substance ensures stable operation of the gearbox in the widest temperature ranges. This is oil with viscosity marking 75W-90
It guarantees lubrication of components at temperatures from -40° to +45°.
Which gear oil has more universal properties? This can be considered a substance whose viscosity is designated 80W-85. If Kalina’s gearbox is filled with this oil, then normal operation of the units is maintained in climatic conditions from -26° to +35°.
Price regulations
Transmission replacement as an alternative to major repairs
If you need a Lada Kalina gearbox, you can buy a used transmission unit today on favorable terms. The optimal units in terms of cost and quality are offered by our workshop. What kind of offers are on the market today? It should be noted that the situation with gearboxes is similar to that with Kalina engines. On the Internet you can find many current offers with quite significant price differences. What are the reasons for the latter? I would like to believe that it is solely the technical characteristics of the units sold. But practice shows that this is not entirely true. We can only say for sure that used transmission units are cheaper than the original ones presented in spare parts stores. to compare how much a manual transmission costs for a Kalina (price of a rebuilt one, price of a new one).
If you want to save money, feel free to give preference to used ones. What does replacing a gearbox give a car owner? First of all, saving time. You can find a box in good condition and dismantle/install it in a workshop in a matter of hours. Defecting the original box will take much longer. And the result may be worse than expected. This is especially true for transmission units that are at the limit of working resources. Source
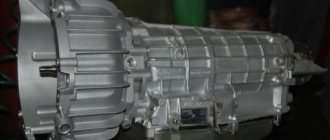
Manual transmission 2181
Unlike its predecessor, the new gearbox has received a lot of innovations. This box was the first for AvtoVAZ to undergo computer modeling; a similar approach to production and engineering made it possible to optimize the design and make it more reliable. The oil sump of the new gearbox has changed from 3.3 liters to 2.2 liters and the oil used is not outdated “mineral water”, but good “semi-synthetic” whose service life is designed for the entire life of the car, namely 5 years or 200 thousand kilometers .
But, undoubtedly, the most important and significant change was the introduction of gear shift cables instead of metal rods. This solution made it possible to completely remove vibration from the gearshift lever, qualitatively increase the clarity of gear engagement and their selectivity, and reduce the lever strokes.
The filling of the new box has also changed. The gear part, namely the primary and secondary shafts, remained unchanged; new multi-cone synchronizers were introduced in first and second gears. Unlike classic synchronizers, the new type of synchronizers are much more reliable, and since, according to statistics, the first and second gears are the most loaded, this solution made it possible to increase the reliability parameter of the new unit. Also, synchronizers of this design simplify gear shifting, making it even smoother. In addition, the car plant’s plans include installing this gearbox on more powerful engines, which means a clutch with a larger diameter is required. Unlike its predecessor, the new clutch has a size of 215mm (approx. It was 200mm), this entailed changing the clutch housing and relocating the starter.
The next change will be especially noticeable at subzero temperatures. In old-type boxes, the gear selection mechanism was located at the bottom and was in oil. When the temperature dropped below zero, the oil thickened and engaging gears until the oil warmed up was difficult. In the new model gearbox, the gear selection mechanism is a separate module located outside the gearbox - this solution made it possible to get rid of the problem of difficult shifts in cold weather during the first kilometers of the journey, and also in the future greatly simplifies the process of repairing and servicing the gearbox. There is protection against erroneous engagement of reverse gear, which can only be engaged in neutral.
Through an integrated approach to the development of a new gearbox, engineers managed to achieve a level of gearbox operation no worse than that of competitors in the price segment. AvtoVAZ plans to introduce multi-cone synchronizers in third gear, as well as switch to a hydraulic clutch drive.
Replacing bearings
After removing the shafts, the inner rings of the front roller bearings remain on them. To compress them follow these steps:
- Place soft pads on the jaws of the vice and clamp the shaft.
- Remove the retaining ring located on the roller bearing ring from the shaft. Use a screwdriver for this.
- Using mounting spatulas or two screwdrivers, press the bearing ring.
Remember that the shoulder should be directed towards the drive gear. Before replacing the primary and secondary bearings of the Kalina gearbox, compress the old parts from the crankcase. There are pullers that perform similar operations. If they are not there, then you can use a screwdriver and a hammer. Insert a screwdriver into the groove, place a wooden block on it and, gradually tapping, remove the roller bearing.
To replace the rear bearing of the Kalina gearbox input shaft, you need to turn the shaft over. The same applies to the secondary. Using screwdrivers, remove the ball bearings. Remember that their open side faces the 4th gear gear.
Before installing new products, they must be lubricated with CV joint, lithol or graphite grease. Check the seating points in the crankcases. If there are potholes or severe wear, the crankcases will need to be replaced. Check the retaining rings, if they have lost elasticity, replace them.
The rear bearings are pressed in using a mandrel and a hammer. You need to select a pipe so that its diameter is equal to the diameter of the inner ring of the bearing. Attach the mandrel to the part and, tapping it, drive the part. The shaft should rotate smoothly and easily.
The inner rings of the front bearings are installed in the same way. But before this, the retaining rings are mounted, and the internal bushings are pressed onto them until they stop. The front roller bearings are inserted into corresponding recesses in the crankcases.