Lada Vesta is a luxurious car, many people love it very much. But, like everything, it has its drawbacks. One of them is the gearbox.
I would like to note right away that the problem is not in reliability, but in how the gearbox works. This problem affects all Russian cars. I used to have a Lada VAZ-2106, then 2107, Kalina, UAZ Patriot, Gazelle. And now Lada Vesta.
I have already driven 100 thousand km on it. I’ll tell you exactly about my impressions. They may be different for you, so be sure to write in the comments what you think about how it all happens for you. Let's start with a discussion of the disadvantages of a manual transmission on Vesta.
Which boxes howl?
The noise problem appeared after Auto VAZ introduced a manual transmission of its own production with a cable drive. These boxes pleased us with clearer gear shifting, but disappointed us with a rather loud howl, especially in 2nd and 3rd gears. The transmission that has this problem is manual transmission 2181.
Box 2181 is an improved previous model 2180. Instead of rigid rods, it is driven by a cable drive. Thanks to the reduction in the bevel of the synchronizer teeth, the gears began to engage more clearly. In 1-2 gears, conventional synchronizers were replaced with multi-cone synchronizers. It would seem that everything should be for the better, but as an unpleasant bonus to the easy gear shifting, buyers received an unpleasant soundtrack.
The plant received a large number of complaints from car owners, so in 2014 the manufacturer modernized the transmission. As AvtoVAZ assures, the updated version has become 25% quieter, but it is still far from ideal.
Dismantling
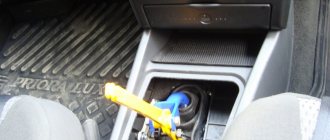
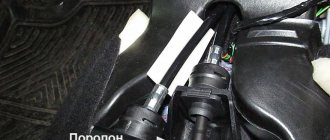
Before you begin work on eliminating crackling and clicking noises in the manual transmission of the Lada Vesta, you will need to remove the central tunnel. It consists of 2 sections - front and rear, with the rear being noticeably smaller.
To remove the rear section, you need to arm yourself with a ratchet with a Torx 20 bit (asterisk), use it to unscrew the 2 mounting screws, and then remove the plug. The trim itself is carefully pulled out - to do this you will need to remove the handbrake from it.
As for the front part, the tunnel is covered with plastic shields on both sides. They are secured with screws (1 per side), which need to be unscrewed and the plastic removed.
The screws need to be unscrewed
Then, carefully prying up the frame with a knife or screwdriver, the cover of the manual transmission lever is removed, after which the plug is disconnected and the lining is removed.
In the end, all that remains is to unscrew the 4 mounting screws and remove the remaining cladding.
Everything is clearly shown in the plot.
Reasons for howling boxes on Lada Granta, Kalina and Vesta
The howl of the box usually appears already in the first thousand kilometers; the appearance of the noise is not affected by the operating conditions of the car. It follows from this that the problem is related to the design features of this unit.
The manufacturer assures that the cause of third-party sounds is imperfect processing of the gears, as well as the main pair. Minor roughness leads to the appearance of characteristic sounds when moving. In the modified version of the manual transmission, this problem is partially eliminated, but it is impossible to completely get rid of the hum, since the equipment available at the factory does not allow the parts to be brought to ideal condition.
Perhaps the plant will eventually update the equipment and delight its customers with an updated, quieter transmission; it is unknown when this will happen. Therefore, for now, all that remains is to put up with the hum of the box or try in action ways to reduce the sound while driving.
Modification of the clutch cable
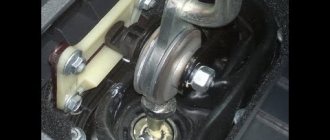
Sometimes the noise is due to vibration transfer between the fork and the clutch cable.
This problem can be solved with a simple modification that does not require financial investment. You need to remove the clutch cable from the fork, replace the standard rubber insert with a washer made of softer rubber, which dampens vibration well. The element is glued to a plastic part, which serves as a stop for the cable. This method does not help everyone and will not allow you to achieve ideal silence, but it makes the unpleasant sound much quieter. In any case, it won't hurt to try to implement this simple modification.
How to eliminate the howling of a VAZ box
The first thing you can do is contact the service center and request that the noise be eliminated as part of the warranty repair. This process is long, painstaking, requires patience and does not always end in victory. In most cases, the manufacturer claims that the sound during transmission operation is normal and the vehicle is not subject to warranty repair. But if the sound is very loud or the buyer is very persistent, the manufacturer suggests replacing the box. But, judging by the reviews of drivers who managed to replace the manual transmission under warranty, this does not always solve the problem. The fact is that a howling box is a manufacturing feature, not a defect, so whether it’s worth replacing it with exactly the same one is up to you to decide.
Modification of the clutch cable
Sometimes the noise is due to vibration transfer between the fork and the clutch cable. This problem can be solved with a simple modification that does not require financial investment. You need to remove the clutch cable from the fork, replace the standard rubber insert with a washer made of softer rubber, which dampens vibration well. The element is glued to a plastic part, which serves as a stop for the cable.
This method does not help everyone and will not allow you to achieve ideal silence, but it makes the unpleasant sound much quieter. In any case, it won't hurt to try to implement this simple modification.
Interior noise insulation
Another option is good sound insulation of the cabin. Of course, the howl of the box in this case will not go away, but it will be less audible. This event is expensive, but it will make the car more comfortable. If the performance of the transmission is not in doubt, and only noise is annoying, you can use this option.
Do I need to add oil?
It is difficult to check the oil level in a cable-driven box; this model does not have a dipstick. The only way to do this is to unscrew the oil filler plug. If at the same time the oil begins to flow out slowly, then the level is normal; if not, it is better to top it up. In this case, it is imperative to use exactly the same technical fluid as already poured in the box.
To add oil to the maximum level, you need to jack up the car from the side where the oil filler neck is located and add oil until it begins to flow out. For convenience, it is better to use a syringe. As soon as the liquid flows out, the plug must be quickly tightened. If you do not raise the correct side of the car, the transmission fluid level will be low.
In some cases, this procedure helps get rid of the howling or makes the box a little quieter. Some motorists noted that they had to add about 0.5 liters of oil to the manual transmission. But in most cases, the procedure does not eliminate the howling problem.
Does oil quality affect transmission noise?
At the factory, manual transmission 2181 is filled with budget oil of dubious quality. Many people prefer to replace it immediately. This not only makes the transmission quieter, but also extends its life. Does changing the oil eliminate the noise? In some cases, this procedure can improve the situation somewhat, but it is not a panacea. In most cases the box continues to howl.
Work in the salon
Retainer
It is the plastic clamp, to which the drive cable is connected on one side, while the transmission lever is attached on the other, that is one of the possible reasons.
To get rid of sounds, it is recommended to place elastic material under the cable. This will cause the cable entering the clamp to rest against the lining. As a rule, simple electrical tape is used.
To do this, the tape is first glued in half (with the adhesive side inward), after which the cable is pulled out a little and the tape is installed. The cable is put back and it will push the tape into the lock itself.
It is recommended to carry out similar modifications for both clamps.
Ties and lining
The cables themselves are attached using plastic brackets, and a slight play is visible, which can also become a source of background noise.
To eliminate cracking and clicking noises in the Lada Vesta manual transmission in this area, it is necessary to place elastic material under both cables.
Elastic material under the cables
Additionally, the cable for speeds III and IV is fixed using a plastic clamp.
Will disassembling the manual transmission help eliminate the whining?
Most Lada car owners, having tried the methods listed above, calm down, manage to get used to the noise and continue driving their car. But some are ready to go all the way, so they decide to disassemble the box themselves or contact a service center for this service. Is it possible to achieve the desired result using this complex procedure?
Sometimes when opening the box, significant defects in individual gears are revealed. In this case, the transmission usually makes a loud noise when engaging a particular gear. There may also be problems with the clutch and release bearing. Sometimes replacing these parts solves the problem.
In most cases, installing new parts does not make the gearbox quiet, because all gears are made on the same equipment, which, as already mentioned, does not allow for an ideal configuration.
The procedure for removing and disassembling the gearbox is lengthy and expensive, but may not yield results, so it is hardly worth going through the gearbox if howling is the only problem.
Engine compartment
Near the manual transmission
If modifications in the interior do not produce results, it is recommended to look for the reason under the hood.
To begin with, you can better secure the cable directly in front of the transmission using plastic clamps.
Screed in front of manual transmission
Near the engine shield
The fourth option for independently eliminating crackling and clicking noises in a Lada Vesta manual transmission also involves the use of plastic clamps, but they must be placed not near the place of fixation, but as far as possible from it.
Screed near the engine shield
In this case, you just need to tighten the cables together with a clamp.
Should I change the box?
Replacing a box with a Lada Granta, Kalina and Vesta is a lottery. The transmission has undergone several modifications, so manual transmissions produced at different times may sound differently. But it’s not a fact that you’ll be lucky: the new box may be even noisier. It’s good if they replaced it for free under warranty, but it definitely doesn’t make sense to buy a unit with your own money.
You need to understand that the howling of a VAZ cable-driven gearbox is not a problem with a specific instance, but a design feature.
What is the moral of this fable?
One gets the feeling that among all the shortcomings of Vesta, the main one is the low level of production culture (in simple terms, the crookedness of the hands of those who assemble it). And also the need to forcefully kick official dealers so that they do their job.
Timing roller. It seems like a cheap part, but if adjusted incorrectly it can become a source of much bigger problems. An overtightened belt wears out faster, and the load on the shaft bearings and their wear also increases. Regular replacement of the belt on Vesta is provided every 180 thousand kilometers. What will tightened belt turn into after such a mileage?
During a conversation with the master, he casually said that they had another Vesta in service and was waiting for an engine replacement. The reason is a jammed timing belt tension roller, which results in a belt break and the valves meeting the pistons. Mileage - 30 thousand kilometers. Draw your own conclusions.
What to do?
Unfortunately, there is no clear solution to the problem today. We can only wait for AvtoVAZ to find an opportunity to update equipment and improve technology. If you are planning to purchase a domestic car and silence in the cabin is important to you, abandon the mechanics in favor of, for example, a robotic transmission, which some models are equipped with.
In fact, the howl of a manual transmission is not so critical as to cause serious discomfort for the driver and passengers. It’s just that many, having heard a third-party sound, begin to doubt the serviceability of the unit, and when they learn that this is just a feature of a particular model, they calm down.
If you are planning to buy a Granta, Kalina or Vesta with a manual transmission, you should know that a howling gearbox is not a myth, but a reality that many owners of these cars face. It's up to you to make a purchase or look at a car of another brand.
Manual transmission 2181 with cable drive
Clutch cable location on manual transmission 2181
Checking the oil level in the gearbox
edit this post
Specifications
| Name | Renault JH3 (JR5) | Manual transmission - 21087 |
| type of drive | Wire rope | |
| Number of speeds | 5 | |
| Main couple | 3,9 | |
| Gear ratio | 3,87 | 3,94 |
| Acceleration to “hundreds” | 11,2 | 10,2 |
| Maximum speed (km/h) | 175 | 188 |
| Fuel consumption (l/100 km) | 6,9 | 7,5 |
| Gear ratios for each gear | 3,636; 1,950; 1,357; 0,941; 0,784 | 3,727; 2,048; 1,393; 1,029; 0,795 |
Installing a shorter main pair increased the dynamics of acceleration, taking one second from the French “brand”. Adjusting the gear ratios for each gear made the transitions to higher gears smoother, without jerking, and dynamic.
Variable speed drive
As it recently became known, AvtoVAZ decided to expand the choice of transmissions by including a continuously variable variator in the line. It will almost certainly be taken from the Nissan Tiida model, since the development of its own box, especially considering that the domestic automaker has no experience in this area, is unlikely.
The disadvantages of this type of transmission are the lack of gear simulator function and reliability, since aviators still have questions in this regard. Although, the presence of 1.6-liter engines should not negatively affect the condition of the CVT, if it is not deliberately “killed” and undergoes maintenance on time, of course.
Is it worth flashing
This is an individual decision for each driver. You need to understand the consequences of this procedure. The dealer will see this firmware, and it is unknown how he will react to it. It is a fact that the car drives better. The new mode is more correct for engine operation. There are no unnecessary jerks or slips, it just switches smoothly.
If the car is under warranty, then you should know the consequences if a warranty claim occurs. I don’t recommend flashing if the clutch is about to be replaced. Firmware 3.0 will only ruin it, but there will be no harm to the new clutch. Also, before changing the program, negotiate with the technician on shore so that you can come and roll back to the stock firmware while you contact the dealer.
In addition, do not forget to adapt the gearbox every 10 thousand km. This is setting the correct positions of the actuator.
“Pros” and “cons” in comparison with an automatic machine (robot)
| Advantages | Flaws |
| Acceleration dynamics have become better, the car picks up speed faster | Increased fuel consumption in the combined cycle |
| The car is 30 - 35 thousand cheaper when purchased with a manual transmission | Crunching, creaking when driving at low speeds |
| Long service life | |
| Cheapness of spare parts and components | |
| The car is more expensive on the secondary market compared to the robotic version |
Design features
The optimal level of acceleration is ensured by the transmission system. In particular, on the version of the car that develops 87 horsepower, the car accelerates to 100 km/h in approximately 12.5 seconds (manual transmission). This indicator is higher only on a car where an automatic transmission is installed. As for fuel consumption, the basic configuration consumes approximately 8 liters per 100 km. This indicator is optimal for cars of this class.
Cross-section of Kalina gearbox
The Kalina 2 gearbox includes a block of drive gears, driven bearings and synchronizers are installed. There is an oil sump near the front bearing. This element is responsible for supplying oil. The mechanical housing on the Lada includes, in addition to the clutch housing, the rear crankcase cover. They are cast from aluminum alloy.
Gearbox device
The solenoid is effective. It is necessary to block accidental reverse gear. The solenoid is located in the gearbox housing. If the solenoid breaks down, reverse gear will no longer engage. However, the occurrence of this malfunction may be due to an electrical circuit break.
AvtoVAZ told how to get rid of the fractional knock of the gearbox on Lada cars
02 September 2022 Lada.Online 53 448
The “fractional knock” defect appears in the area of the gearbox at idle in neutral gear; when the clutch is depressed, the knock disappears. To eliminate this gearbox problem at AVTOVAZ, a special technique was compiled, which was sent to the Lada.Online website by one of the site’s readers.
To eliminate the “fractional knock” defect, you must:
1. Place the car on a two-post lift, apply the parking brake, turn off the ignition, open the hood and disconnect the ground wire terminal (electro-hydraulic lift type P-3.2G with a lifting capacity of 3.2 tons, wrench 10).
2. Remove the gearbox in accordance with the requirements of the technological instructions for a specific car model (download for XRAY, Vesta, Largus, Granta, Kalina, Priora, Niva 4x4).
3. Make sure that there are two installation sleeves 2 on the cylinder block 1, Figure 1.
4. Make sure that the bushings are not damaged or deformed.
5. If one of the installation bushings is missing, it is necessary to install a new bushing on the cylinder block (a hammer with a plastic striker).
6. In case of deformation or destruction of the installation sleeve, it is necessary to carefully, without damaging the installation hole in the cylinder block, remove the damaged sleeve and install a new one (pliers, hammer).
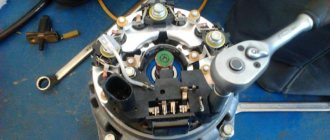
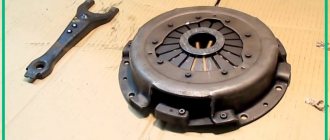
7. Remove the pressure 3 and driven 4 clutch discs in accordance with the requirements of the technological instructions for a specific car model.
8. Replace the clutch driven disc with a new one:
9. Install the clutch pressure and driven discs in accordance with the requirements of the technological instructions for a specific car model.
10. Install the gearbox on the transmission stand and bring it under the car (hydraulic transmission stand type ST-1 “GARO”).
11. Raise the supporting part of the transmission rack with the gearbox, insert the splined part of the input shaft into the splines of the driven clutch disk, carefully move the gearbox to the cylinder block and make sure that the installation bushings located on the cylinder block fit into the corresponding holes on the gearbox without deformation and destruction.
12. If the result is positive, install the gearbox in accordance with the requirements of the technological instructions for the specific car model. The AGO for the work performed should be filled out using defect code 1601130 096 000 “Transmission resonant noise, damper defect.”
13. If installing the gearbox on the engine without destroying and deforming the bushings is impossible, then it is necessary to agree on the repair method with the UOSOA by completing a “pre-approval” in the Lada-Garantiya information system.
14. Start the engine and make sure that the “fractional knock” defect is eliminated when the engine is idling and the gearbox is in neutral (exhaust coil with SERF/SP type fan from SovPlym).
Gear shift mechanism drive removal, disassembly, installation and adjustment
Removing the gear shift mechanism drive may be necessary when replacing faulty parts (for example, to replace a torn drive rod boot, damaged drive rod). The sequence and number of operations indicated below can be changed depending on the purpose of the work.
To complete the work, you will need an assistant, as well as an inspection ditch or overpass.
Removal and disassembly
1. We prepare the car for work.
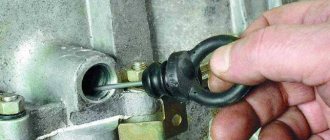
2. Clean the threads of the clamp bolt with a wire brush. We treat the junction of the rod with the hinge and the bolt with penetrating lubricant.
3. Using a 13 mm wrench, loosen the tightening of the clamp bolt nut.
4. Unclench the clamp with a screwdriver and move it along the rod. Unclench the rod with a screwdriver.
5. After wiping the connection between the rod and the hinge with a rag, we mark the relative position of the drive rod and the hinge.
6. Disconnect the rod from the hinge.
7. Disconnect the torque rod from the base of the ball joint of the gear shift lever.
8. Inside the car, use a thin slotted screwdriver to remove the plug from the gear shift lever handle.
9. Using a 13 mm socket wrench, unscrew the nut securing the handle bolt and remove the handle from the gear shift lever.
10. Using a screwdriver, remove the cover from the floor tunnel lining and turn the cover inside out.
11. Disconnect the wiring block from the reverse lock solenoid switch.
Loosen or cut the plastic clamp.
12. Remove the switch from the gear shift lever.
13. Remove the floor tunnel lining.
If necessary, you can unscrew the four bolts securing the gearshift lever support to the body (see below) and remove the drive assembly.
14. Using a 13 mm wrench, unscrew the nut of the bolt securing the linkage to the lever, holding the bolt from turning with a second wrench of the same size.
15. Remove the bolt from the lever. We remove the lever from the traction fork. We remove the metal and plastic washers, take out the metal spacer sleeve.
16. To compress the drive rod, lubricate it with a soap solution and remove it from the hole in the cover.
17. Using a 13 mm socket, unscrew the three bolts securing the bracket to the body.
We unscrew the fourth bolt securing the bracket with a spanner of the same size (access to it from above is blocked by the air duct).
18. Remove the bracket and drive rod cover. We replace the torn cover.
19. Remove the gear shift lever support from the hole in the floor tunnel.
20. Use a puller to compress the retaining ring of the ball joint of the lever and remove it from the base of the support.
21. Remove the lever from the base of the support.
22. Using a screwdriver, remove the upper sealing ring.
23. Remove the support from the lever.
Assembly and installation
We assemble and install the drive in the reverse order. Before tightening the gearshift mechanism drive rod clamp, adjust the drive (see below).
Adjustment
1. Loosen the tightening of the drive rod clamp of the gear shift mechanism (see paragraphs 2-4 above).
2. Lift the lower part of the gear shift lever cover (see point 10 above).
3. Move the gear shift lever so that its lower part is perpendicular to the floor surface, and the lever handle is located from the right seat cushion at a distance approximately equal to 1/3 of the distance between the front seats and hold it in this position. In this case, the assistant, moving the clamp 2-3 mm from the end of the rod, tightens the clamp nut.
4. We install the cover in place and, by trying to engage the gears, make sure that the gear shift mechanism drive is working.
Couplers and spring
In this case, there is no need to go into the engine compartment. This troubleshooting option was proposed by another member of the DRIVE2 community named Roman, who is known there under the nickname Roy04.
First, he dismantled the lining of the central tunnel to gain access to the mechanisms. After examination, it was determined that the sounds were coming from 3 points.
Further, after a test drive with the tunnel removed, it turned out that this was not the cause, but only its consequence. It's all about the design of the Lada Vesta transmission. Due to the design features, when driving at speed III, vibration occurs in the gearshift mechanism, which is directly on the transmission (under the hood). And from behind the scenes the cable vibrates and moves longitudinally.
There are no devices for damping these vibrations, but you can make your own “counterweight”, from scrap materials. To do this, you can use plastic clamps and a spring, for example, from a figure eight carburetor.
With the help of clamps, the rigidity of the components that make sounds is increased, and the spring guarantees tension on the manual transmission handle itself.
As a rule, after such modifications, crackling and clicking noises in the manual transmission of the Lada Vesta disappear.
Assembly is carried out in reverse order.
Reviews
| № | Positive |
| 1. | Dmitry , 33 years old (drive2.ru): they can’t say anything bad about the mechanics, the gearbox works properly. The car is only a year old, I regularly undergo maintenance, I don’t drive, I drive carefully. |
| 2. | Vyacheslav Petrovich , 47 years old (prom.ua): in a year and a half I drove about 20,000 km, mileage is above average. Impressions of the new mechanics are only positive. There is something to compare with; before this there was the Lada Granta. Grantmakers understand what I'm talking about. |
| 3. | Alexander Alekseevich , 43 years old (drom.ru): after buying the car, I changed the transmission oil for the first time at the 7000 km mark. I didn’t wait for 75,000 km, as the manufacturer recommends. The waste was of a natural color, metal shavings were present, but their quantity was insignificant. I did the same. |
| 4. | Alexey Petrovich , 48 years old (rozetka.ua): I’ve heard numerous negative reviews about the mechanics, I can’t confirm. I believe that the technical condition and performance of the unit depends on the driver. I don’t have any problems with this, I take care of my equipment. |
| 5. | Semyon Vyacheslavovich , 40 years old (Auto.ru): This is the second year since I bought and actively use a Lada Vesta on the mechanics. The review is positive, there are no comments about the work. |
| 6. | Vasily Timofeevich , 43 years old (Auto.Mail.Ru): for a year and a half of using a car with mechanics, he once made an unscheduled visit to a service station for diagnostics. I was at fault for the hum in the manual transmission, but it was the suspension. I hope that the device reaches the 180,000 km specified by the manufacturer. |
| 7. | Dmitry Gennadievich , 41 years old (drive2.ru): I like the mechanics more than the robot, I drove the AMT for three months, I can compare. Both robot and automatic are not adapted for domestic roads. The units do not last long, so it is better to buy a manual transmission. |
| 8. | Sergey , 35 years old (drive2.ru): on the mechanics, as soon as I pressed the pedal, I pressed it. And overtaking, and maneuverability, without kickdowns, delays in switching. Choice: definitely mechanics. |
| Negative | |
| 9. | Dmitry Semenovich , 52 years old (prom.ua): no matter how hard we tried, a miracle did not work. We decided to save several tens of thousands, but for the wrong reasons. It would be better to make the plastic cheaper than to install a Russian gearbox instead of a French one. Knocking and noise in the manual transmission was detected at 40,000 km. With such a low mileage there are such significant defects. |
| 10. | Gennady , 46 years old (Bibika.ru): after 30,000 km, cases of clutch slipping, delays when changing to higher gears, and howling of the gearbox became more frequent. You need to go to a workshop and order diagnostics. Couldn’t it have been done better from the start? |
| 11. | Boris , 38 years old (drive2.ru): at 25,000 km a gearbox whine appeared on a Lada Vesta. The officials said that the pressure bearing needs to be changed, but this is not certain. The final diagnosis will be announced after a comprehensive diagnosis. |
| 12. | Sergey Gennadievich , 45 years old (Avtodispatcher.ru): a knock in the gearbox was detected already at 31,000 km. Initially the fault was with the suspension, but after diagnostics the technician assured me otherwise. |