Leaving your garage one evening, you notice that nothing lights the way. The situation, frankly speaking, is unpleasant and makes you think about it. After all, the rear lights of a VAZ 2110 should be on in normal mode. This means that there is some kind of malfunction that needs to be found and eliminated. Who knows what the reason is, we will have to figure it out. If the reverse lights of a VAZ 2110 do not light up, then, in all likelihood, it is possible that they have simply burned out. Maybe it's a simple failure of a fuse or sensor.
Fault localization
Understanding the operating principle allows you to determine exactly why the brake lights may not light up:
- The fuse has blown. In the diagram, the fuses are marked with the letter F (from English - Fuse) and the serial number of the seat in the fuse block, for example, F3;
- poor contact at connectors;
- the light bulbs have burned out, but since the lights are connected in parallel, the likelihood that 2 lamps will burn out at once is extremely low;
- poor contact on the negative terminal of the lights. In this case, problems may begin not only with the feet, but also with the lighting of the remaining lamps in the lanterns;
- Damage to the negative track in the lamp board. From the total mass directly to the brake light lamp, the minus goes along a special path on the board. The path may collapse from water or mechanical impact;
- malfunction of the brake light switch, the so-called frog;
- broken wiring, oxidation of contacts.
Troubleshooting algorithm
To detect a fault in the electrical network, you will need a multimeter or a tester, which you can make yourself
Previously, we told you how to use a multimeter, so we won’t focus on that.
The sequence of searching for the cause of the breakdown:
- Check the fuse for the brake light circuit. The location diagram of the fuse links can be found in the repair and operating manual for your car; often the symbol of the protected circuits is located on the back of the cover covering the fuse mounting block. If the installed fuse of the required rating immediately blows, there is a short circuit (short circuit) in the circuit. Please note that the fuse can protect not only the feet, but also other circuits. Installing a fuse with an increased rating is fraught with the risk of a car fire;
- If oxidation is detected on the terminals, clean the contacts mechanically or use an aerosol contact cleaner.
- Having turned on the ignition first and holding the brake pedal depressed, check whether there is power on the positive wire that goes from the limit switch to the rear light connector. If there is power, there is a malfunction in the lights themselves;
- check whether the positive signal is coming from the mounting block to the limit switch. If + comes, but when you press the brake pedal it does not appear on the second terminal of the limit switch, then the problem is in the “frog”;
- If there is no + at the limit switch terminal, examine the circuit up to the mounting block. If the wire is intact and securely fastened in the connectors, then the problem is in the mounting block.
How to determine the cause?
At the first stage, the motorist needs to make sure that it is the controller that is damaged, and not the lamp or fuse. Therefore, you need to check the integrity of the fuse. On the “ten” it is located in the mounting block, directly under the dashboard. The switching device is designed for 7.5 A and is installed at No. 19. Then you need to check the light bulb and wires. If everything is in order with them, then you need to move on to checking the controller.
Before replacing the device in question, you need to determine its location.
To find the sensor you need to:
- drive onto the overpass;
- pay attention to the gearbox. On the left side of this assembly is the reverse controller;
- in this place there is only one sensor with wires from the gearbox. The motorist will not find any other elements in this unit.
Thus, finding the element you are looking for will not be difficult. But before replacing it, you need to make sure that there is no loss of performance.
To do this, you need to perform a number of actions:
- disconnect the terminal from the controller;
- use a multimeter, having previously turned it on in resistance measurement mode;
- connect a multimeter to the controller connectors;
- engage reverse gear;
- start the power unit.
Next, you need to act based on the readings of the device. If the resistance corresponds to 0, then everything is in order with the sensor. If the measuring device shows infinity, then the controller needs to be changed.
Debugg
To solve the problem of a constantly illuminated reverse gear, you will need to check the condition of the wiring.
But it’s better to start by assessing the current state of the switch itself. This sensor in all cars is almost always located directly in the gearbox. It comes into contact with moving elements. Because of this, the likelihood of it sticking is quite high.
To do this, you will have to perform dismantling work, gain access to the switch, and then try to restore it. But in most cases it is recommended to replace it immediately. Such an element cannot always be repaired. And in case of restoration, long-term performance is not guaranteed.
Moreover, it is better to buy a new sensor specifically for your car. There are cheap Chinese analogues, but there is a chance that they will not work correctly or will not last long. The choice is yours.
If you have to wait a long time for the part, then it makes sense to buy a cheap, affordable option, and then install a normal branded reverse switch.
How the system works
The sensor itself is a limit switch with normally open contacts. Under external influence, the contact group begins to move and closes. A special feature of this device is its aggressive operating conditions, as it is located in the engine compartment. That is, the electrical part must be sealed and protected from vibration.
The body of the device is metal, on one side there is a movable rod with an oil seal, on the other there is a contact group. The connection between the plastic dielectric and the metal main body is protected against the penetration of liquids.
The sensor is screwed into the gearbox in a strictly defined place. When moving the mechanism (scene) for engaging reverse gear, a special protrusion sets the sensor rod in motion. The contacts close and current can flow through the wires.
What the car electronics do next:
- activates the relay coil for turning on the reverse lights;
- gives a signal to turn on the parking assistance system;
- when a rear view camera is installed, it supplies power to it (again, through a relay).
The return spring is located inside the housing. After the impact on the rod has ceased, that is, the reverse gear has returned to a state of rest, the contact group returns back and opens. All involved electrics are switched off:
- The reversing lights go out;
- rear parking sensors are disabled;
- The rear view camera turns off.
Advice: If you install additional electronics on a VAZ 2110 or 2112, such as parking sensors or a rear view camera, then it is not recommended to connect to the contacts of the reversing lights.
It is better to find the primary circuit from the sensor using the electrical diagram of your car, and route this signal to a new device. Of course, you should use a relay rather than connecting the device directly. A fuse must be added to the circuit.
Location
The location of the switch or frog largely depends not on the make and model of the car, but on the transmission with which the vehicle is equipped.
If it is a manual transmission, then the switch will be installed directly on the gearbox housing. When reverse gear is engaged, the switch button is pressed, the frog contacts are bridged, and current flows to the rear lights.
As for automatic transmissions, instead of a standard limit switch (frog), a selector position sensor is used. Depending on the change in the position of the automatic transmission handle, the corresponding signal is transmitted to the power unit control unit, which transmits it to the unit that controls the light.
Checking the functionality of the sensor (frog)
When you manage to find it, you need to check its performance status:
- The wires connected to it must be disconnected.
- A tester is connected to their ends. The device is switched to “resistance” mode and the measurement is carried out.
- Then reverse gear is engaged.
- The ignition is switched to the on state.
- The instrument readings are taken.
The device may show 0 Ohm. This means that there are no problems with it. If there are other indicators, it needs to be replaced. This must be done not only when the VAZ 2110 does not have reverse gear on, but also when the lights are on and reverse gear is not engaged.
Typical faults and their elimination
So, why might the dimensions not work on the VAZ 2110? There are several reasons, we will list them all:
- The fuse responsible for powering the parking lamps has blown.
- The power cable has broken.
- There was a short circuit in the supply wire to the car body.
- The control relay K1 has failed.
- The light bulbs have burned out.
- The exterior lighting switch is faulty.
Let's try to independently find the problem with the rear lights on the VAZ 2110 and fix it. First of all, let's analyze the situation. As mentioned above, fuse F11 is responsible for the starboard side, and F1 is responsible for the left side.
If only the rear lights do not light up, but the front ones work, then it is logical to assume that the fuses are in order. Otherwise (the side does not light up both front and rear), it makes sense to check the serviceability of the fuses in the mounting block. Where to find it will be described at the end of the article.
Where is the starter relay on the VAZ-2114: photo and video location
Now we need the so-called “control”, which is easy to assemble yourself. You need to take any indicator LED and a resistor with a resistance of 800 Ohms.
Schematic diagram of the “control” Instead of an LED and a resistor, it is easier to take a low-power 12 V light bulb, for example, from the same dimensions or turn indicators. This scheme, firstly, is simpler, and secondly, when using it, you do not need to observe the polarity of connecting the probes.
Let's start with the rear lights. We open the trunk and find two pockets in the upholstery at the level of the rear lighting fixtures that cover the lights. We bend them and get access to the power connector.
We bend the upholstery and see the back of the lights with the power connector. On the top and bottom of the flashlight we find two latches, squeeze them and remove the board with the lamps from the flashlight.
Removing the VAZ 2110 rear light board Carefully remove the power connector from the board. We connect one “control” probe to the body of the VAZ 2110 car in a place that can provide good electrical contact with the metal. We turn on the dimensions and measure the voltage at the connector socket to which the red (right side) or red-yellow wire (left side) goes.
If there is voltage, then the problem is in the flashlight. We remove the flexible board and carefully inspect the tracks - they often break due to vibration.
Vibration can cause the conductors of the flexible board to break. If everything is in order, then the reason is poor contact of the light bulb with the socket or its failure. We considered the case when there is voltage on the flashlight block. If it is not there, we continue the search.
We find the common power supply for the rear light devices (see diagram) and measure the voltage on it. The wires are still the same - red and yellow-red. If there is voltage, then the cause of the malfunction is a break in the wire going from this connector to the corresponding size. We inspect the harness, find a break, and fix it.
There is no tension - we move on. Now we need a mounting block. Where to find it will be described below. On the back of this block we find connector Ш2 and measure the voltage at the contacts to which the red and yellow-red wires go.
Numbering of the blocks and the color of the wires connected to them. If it is there, then the reason is a break in the wire going from the mounting block to the power block for the rear light devices. We inspect the harness, find it, eliminate it. No voltage? We measure the voltage at the same connector, the wire is black and white.
If it is there, then there are problems with the mounting block - fuses F1 and F11, control relay K1, broken tracks. We check the fuses, inspect the tracks, change the relay or install jumpers instead (see diagram).
Location of jumpers instead of control relay K1 If there is no voltage, the cause of the malfunction is a break in the black and white wire coming from the outdoor lighting switch to the mounting block, or the switch itself.
- Voltage surge in the on-board network.
- Short circuit in power supply circuits.
In the first case, it is enough to replace the blown fuse with a device of the same rating (5A). In the second, the task becomes somewhat more complicated - after replacing the fuse, it burns out again. You will have to find a short circuit of the supply wires to the body, which is the negative power bus.
We inspect the harnesses, find them, and remove them. Most often, insulation damage occurs where wires pass over and through the ribs of the body.
Troubleshooting
As I said above, the lights may not light if the reverse sensor is broken. But there are other malfunctions that cause the same effect, and they occur no less frequently than sensor failure. Their list:
- the reversing light bulb has burned out;
- the power wires for the lights are broken;
- the contacts of the pads have oxidized;
- fuses have failed;
- There is no ground on the flashlight board.
Now let’s start troubleshooting, and start with the reasons that are easiest to diagnose. But before we begin, let’s digress a little and take a look at the electrical diagram of the VAZ 2110 lighting devices. It will be useful to us.
Electrical diagram of lighting devices of a VAZ 2110 car
In this scheme we are interested in the following positions:
- 4 – ignition switch;
- 2 – mounting block;
- 10 – reverse sensor (switch);
- 13 – reverse lamps.
How it works? You turn on the VAZ ignition, and power from the battery or generator is supplied to the mounting block (block Ш2, pin 16). In this block we are interested in fuse F19, through which the reversing lights are powered. Having passed the fuse, the voltage leaves the mounting block through contact 17 of the Ш4 block. Then it goes to the reverse sensor and through it powers both lights (green wire). The second contact of the lights is connected to the body of the VAZ car, which is the negative wire. As you can see, the scheme is very simple, but you need to know it. Now you can start troubleshooting.
Reverse sensor
To check it, all you need is an inspection hole and a regular paperclip or piece of wire. If there is no hole, then, as I said above, everything can be done from above, through the hood. However, to do this you will have to remove the air cleaner.
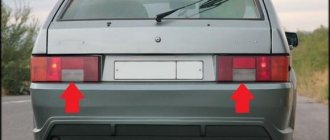
On a VAZ 2110, the reverse sensor (marked with an arrow) can also be reached through the engine compartment
Find the reverse sensor, let me remind you that in the VAZ 2110 it is located on the left side of the power take-off box if you stand in the direction of the car. Pull out the connector (block) with two wires from it. To do this, simply pull the connector housing.
Removing wires from the reverse sensor on a VAZ 2110
Now your task is to close the contacts on the block that you just pulled out (look into it and you will see these contacts). This can be done with a paper clip or a piece of stripped wire. Did the reverse lights come on? This means that the sensor is faulty, and you can proceed with the replacement, which I described in the last section (Step-by-step instructions for replacing the sensor for the VAZ 2110). If the lights still don’t light up, then we’ll continue searching.
Fuse
So, we are interested in fuse F19, located in the mounting block. The mounting block itself on the VAZ 2110 is located under the steering column on the left.
Location of the mounting block on the VAZ 2110
Remove the block and find fuse F19. If the fuses on your mounting block are not marked or are marked with obscure pictograms, then use the photo I provide below as a guide.
Numbering of fuses in the VAZ 2110 mounting block
Pull the F19 out of the holder and look at it in the light: if the fuse is blown, it can be seen with the naked eye.
A burnt-out jumper is clearly visible - the fuse has blown
If everything seems to be in order by eye, don’t be lazy to run it with a tester, so that after a week of troubleshooting in all possible places, you won’t be excruciatingly painful for wasted time. So, is the fuse good? You can move on to the next point. If it's burnt, then hold on to it.
Many owners of VAZ cars in such cases simply replace the burnt one with a working one and, as a rule, get another burnt one. If you have a lot of extra 10 A fuses, you can experiment. But it's better to think a little about why this happened.
A blown fuse causes a malfunction only in one case: it is defective. Then simply replacing the burnt one with a new one will be successful, and everything will work. But it may turn out (and most often this happens) that a blown fuse is not the cause, but a consequence of the malfunction. There was an overcurrent in the circuit for which it is responsible, and the device, saving this circuit, burned out. Why can an overload occur on a VAZ 2110? There are few reasons:
- The reversing lights of the VAZ 2110 are equipped with lamps of greater power than those provided for by the VAZ design.
- There is a short circuit in the power supply circuit of the reversing lights (see electrical diagram above) to the car body.
If it is known that the reversing lights on your VAZ have more powerful lamps (this is often done to make parking easier at night), then it is quite possible, although not necessarily, that this is the problem. If you have very little understanding of electrics, then, of course, you will ask why the fuse did not blow immediately after installing powerful lamps, but, say, a month later. There is nothing strange here. Typically, the fuse rating is selected 20-30% higher than the rated current.
By installing slightly more powerful lamps, you increased the current consumption, but not enough to go beyond this threshold. The fuse “held”, but worked at the limit of its capabilities. The slightest voltage surge in the on-board network (say, a bad contact at the battery terminal) - and the fuse runs out of patience, it burns out. And it would instantly fail only if you installed very powerful lamps.
If you know that your VAZ has more powerful lamps in the reversing lights, you can try to take a risk and install a new fuse of the same rating as the one installed. All such an experiment threatens is the loss of a fuse.
If the new one burns out immediately, then the problem is a short circuit. This could happen when the power wires fray and short to the body. We will look for this short circuit by elimination, using a tester in resistance measurement mode.
Tester in resistance measurement mode
First of all, turn off the ignition and remove the positive terminal from the VAZ battery. Disengage the gears by placing the shift lever in neutral. Connect one tester probe to pin 17 of block Ш4 of the mounting block, and connect the second one to the car body. You can find the pads on the side of the mounting block opposite the fuses. All of them, as well as their terminals, are marked.
The pads in the VAZ 2110 are located on the reverse side of the mounting block
If the device shows “0” (low resistance), then the problem is in the wire connecting the VAZ mounting block to the reverse sensor. Inspect this wire (it may be in the harness, but it has its own color) along its entire length, find the short circuit and repair it.
If the device shows “infinity”, then everything is in order with the circuit to the reverse sensor, we move on. Engage reverse gear and repeat the measurement. Now the resistance of the circuit should drop (the reverse lamps are connected to it), but still, with standard lamps for the VAZ 2110, it should not be lower than 2-3 Ohms. If the resistance is lower, look for a short in the wires from the reverse sensor to the lights (green wire in the wiring diagram above).
If the resistance cannot be measured (the device shows “infinity”), then the problem is either in the lamps, or in poor contact of the connecting blocks, or in a broken power wire. Install a new fuse to replace the burned one and proceed to the next diagnostic step.
Is the resistance ok (a few ohms)? You can install a new fuse to replace the burnt one with the same rating and call it a day - the problem was in a defective device.
Burnt out light bulb
The VAZ 2110 has two reversing lights, which means there are two lamps. It is unlikely that two burned out at once, and nothing else from the lighting equipment burned out, but it happens. Let's check the lamps. To do this, alas, you will have to “bomb” your VAZ a little, since the reverse lamps can only be reached by disassembling the rear light units.
Open the trunk and empty it if necessary. Remove the trim and unscrew the plastic protective cover. All you have to do is remove the back panel and you will have access to the lights and control board.
Opened light blocks on a VAZ 2110: access to the lamps and power supply is open
Arm yourself with a tester and test the reversing lamps. If they are faulty, replace them, and most likely the issue can be closed. If the lamps are working properly, then the problem is different. Put the lamps in place, but don’t assemble the VAZ lights yet: you may still have to climb into them.
Contacts in blocks
The next possible cause of the malfunction: the contacts in one of the blocks supplying the reversing lights have oxidized. There are 5 such pads in total, I marked them with blue arrows.
Blocks responsible for the operation of the reversing lights in the VAZ 2110
Each of these pads must be disconnected, inspected and, if necessary, cleaned. At the same time, lightly tug the wires that go into them - any of them could easily rot and hang on the same insulation, giving the impression of service. Still not working? The last option remains: a break in the wire supplying the reversing lights.
The power wires for the lights are broken
There are only three wires that could break (fray, burn out, etc.):
- From the mounting block (pin 17 of block Ш4) to the reverse sensor.
- From the reverse sensor to each of the lights.
- From the lights to the body of a VAZ car (there is no “ground” on the light board)
Turn off the ignition again, remove the terminal from the battery and, armed with a piece of long wire and a tester, ring them all. The one that does not ring, of course, will have to be inspected visually to find the location of the damage. If the damaged wire cannot be repaired, then, as an option, you can run a new one along the same harness, and disconnect the old one and simply leave it in its place.
For these purposes, use a special automotive wire with reinforced wear-resistant insulation and a core cross-section of at least 1.5 square meters. mm.
Automotive wire PGVA with a cross-section of 1.5 is perfect for VAZ flashlights
Replacing the sensor
How to choose a new sensor instead of a broken one? In fact, nothing complicated: just don’t buy products from counterfeit manufacturers. Given the availability of packaging technologies, it will not be possible to determine authenticity on your own. Therefore, the only “recipe” is to visit AvtoVAZ brand stores.
When replacing the sensor, you must follow certain steps:
- Before installing a new sensor, you must wait until the gearbox oil drains and clean the threaded hole.
- Be sure to check the sealing washer; without it, oil will leak out of the box.
- After tightening the sensor in the gearbox housing, add oil to the standard level.
- The final touch - before connecting the connector, lubricate the contacts with a special anti-corrosion compound.
Thus, the installation of the sensor will be successful.
Replacing the headlight bulb
Replacing the size lamp in the rear lights of a VAZ 2110 is quite simple. First of all, we dismantle the board with the lamps in the same way as we did when troubleshooting: we bend the upholstery flap, squeeze the two latches and remove the board from the lamp (see above).
In this case, the power supply does not need to be disconnected - the length of the wires is quite enough to replace light bulbs. Before us are three lamps - one small and two large. We need the first one.
The side light bulb in the rear light is the smallest. Slightly recess it and, turning it counterclockwise, remove it from the socket. In place of the burnt one, we install a new one, also drowning and turning, but clockwise. Turn on the side light and check the result of the work. If everything is in order, we install the board in place, making sure that both latches work, and close the canopy with the upholstery flap.
How to restore normal operation of reverse lights
First of all, you will need to dismantle the reversing lights, as follows:
- open and empty the trunk of the car;
- carefully removes the casing to prevent damage during repair work;
- unscrew the protective casing made of plastic;
- We remove the back panel, which gives access to the sensor, lights and control board.
If the problem lies in a burnt-out lamp, it can be easily replaced without resorting to any additional actions.
If the problem is caused by a damaged fuse, you will also need to find it in a special block located under the steering wheel of the car, then carefully remove the broken part and install a new one.
A more difficult task is replacing the sensor, which has stopped responding to gear shifts and turning on the lights. To perform this operation you will need:
- drive the car onto the overpass and put it on the handbrake;
- remove the protective cover;
- place some container for transmission oil;
- remove the sensor and disconnect it from the electrical circuit;
- install the correct part. After this, it is necessary to check the oil level and replenish it if there is not enough lubrication in the gearbox;
- the last stage is assembly of the unit, performed in reverse order.
The safety of vehicle operation directly depends on the performance of the reversing lights. That is why it is necessary to promptly identify any malfunctions described above and efficiently eliminate them either on your own or with the involvement of experienced car service specialists.
What to do if the reverse lights on a VAZ 2110 do not light up when the reverse gear is engaged? In fact, there may be several reasons, and one of them is a faulty reverse switch (frog).
Checking the reverse frog
To get to the reverse switch of the VAZ 2110, it is not necessary to drive the car into a pit. You can access the sensor through the engine compartment; it is located on the left side in the direction of travel, at the bottom, on the side of the box.
Before replacing the reverse sensor, make sure that it is the faulty circuit. To do this, remove the connector from it and close the contacts on the connector. If the reverse lights come on after turning on the ignition, the sensor is faulty.
The brake lights on the VAZ-2112 do not light up or work, why?
On all cars of the Tenth Family, the power lines for the lights contain many elements. There are lamp health relays, switches and fuses. Therefore, if the brake lights on a VAZ-2112 do not light up, you need to check the entire chain. But the reason may look simple: sometimes the lamps do not turn on because the socket does not contact ground. Circuits are easy to analyze, but finding the cause of a breakdown is difficult. Let's look into the details.
If one of the lamps does not light, it is simply replaced. See the example in the video - you need a P21W base.
Standard version of the brake light operating diagram
Power is supplied to fuse F17 from the battery, then the current goes to limit switch contact 11, and then, if the limit switch is closed, a circuit is formed with the filament of lamps 7
But pay attention: part of the circuit is relay K1, more precisely, its pins 5 and 4
Basic network diagram
If the brake lights do not light up, on the VAZ-2112, as on all Tens, check one fuse. It is called F17 and is located in the mounting block to the left of the driver.
Main mounting block
It is important to know: voltage is always present at one of the fuse terminals. Check it out!
A few words about the “serviceability relay”
The lamp health relay is called K1, and it is the largest in the mounting block. If you remove this relay, then when you press the pedal you can dial the voltage at terminal 5 (but not 4). Look at the diagram again, and it will become clear what we are talking about.
The largest relay in the block
All relay contacts are numbered. Check the voltage at the block terminals:
- 6 – “mass” potential;
- 2 – voltage “+12”, but only after turning on the ignition;
- 5 – “+12” by pressing the pedal;
- 4 – terminal rings as a ground tap.
If the potential “0” is not generated at terminal “4,” it means that the lamp filaments are burnt out or there is a break in the wiring. Now consider something else: the ground potential has been detected, but the lamps do not light. This is where suspicions of a short circuit arise.
We turn on the brake lights forcibly
Relay K1 is successfully replaced with a pad with jumpers. In Fig. 1 just shows its diagram. If there is no such platform, you can temporarily close contacts 4-5. First, check everything mentioned above.
How to and how not to check the “0 Volt” potential
Let’s agree right away that we only work with a voltmeter. Voltage “+12” is caused by connecting one probe to ground. The presence of potential “zero” is checked differently: any of the probes is connected to a terminal with positive voltage, and then the second probe is connected to the wire being tested.
How to connect a voltmeter
Consider the error: one probe is connected to ground, the second to the terminal being tested, and vol. Here they conclude that there is a “mass” potential, but this is wrong! If the contact with ground is broken, the device will also show “0”. That is, the number “0” does not contain information.
Wiring test for non-working brake lights (ground test)
Let's look at the basic diagram: the brake lights and the reversing lamps have a common ground pin. If contact with this pin is broken, the reverse lamps will not turn on. Well, brake lights too.
Connector for connecting “internal” lights
On the left side there is a connector through which the wiring goes to the fifth door. The connector has black and red wires. Check the voltages on them. Most often the ground on the black wire does not ring. But maybe the connector itself needs to be cleaned.
If the “plus” does not come to the red wire, we check the “frog”. It's simple here:
- Disconnect the connector with two wires from the limit switch;
- Using 17mm wrenches, loosen the two nuts: holding the lower nut, rotate the upper one;
Removing the frog brake
The end switch is removed as an assembly and checked with an ohmmeter.
By the way, one of the connector terminals receives a voltage of “12 Volts”. Check it!
Reverse diagram of VAZ 2110
To determine a malfunction in the operation of the reverse lamps, just look at the diagram for switching on the external lighting:
1 - side light lamps in the headlights. 2 - mounting block. 3 — external lighting switch. 4 - ignition switch. 5 - indicator lamp for external lighting in the instrument cluster. 6 — side light lamps in the external rear lights. 7 - brake light lamps in the internal rear lights. 8 — license plate lights. 9 — instrument lighting switch. 10 - reverse light switch. 11 - brake light switch. 12 — block of the on-board control system. 13 - reversing lamps in the internal rear lights. K1 - relay for monitoring the health of the lamps (contact jumpers are shown inside the relay, which must be installed in the absence of a relay). A - to power supplies. B - to instrument lighting lamps.
Power to the reversing lamp (No. 13) is supplied through the switch (No. 10), which is installed in the gearbox, and is supplied to it from the mounting block (Ш4-17) through the reverse fuse F19 (10A).
Dismantling and disassembly
There are several possible scenarios if the rear view camera stops working. The first involves contacting a car repair shop or an official service center, the second means eliminating the problem with your own efforts. If the device was purchased recently and its warranty period has not yet expired, it is advisable to take it to professional technicians. In the absence of a warranty, it is much cheaper and easier to restore the system yourself.
Even an inexperienced driver can get rid of breakdowns and errors in the camera’s operation. To do this, you need to know the basic principles of the system’s operation, the specifics of breakdowns and dismantling. Most models are analyzed according to the following principles:
- If the device is not able to start automatically or does not work at all, you will have to dismantle the entire casing.
- The first step is to remove the small panel at the top where the fasteners are located. They are removed to remove the main part of the skin. Under the skin layer there are nuts that secure the trunk handle. Four self-tapping screws are used to mount the camera. Two are for the device itself, and two more are for fixing the connector.
- If there are traces of corrosion on the surface of the radar, it is necessary to get rid of them, and only then proceed to the next stage.
- Self-tapping screws are used to connect the body. When dismantling you need to be careful, because... they undergo oxidation.
- If moisture gets under the housing, you will have to dry it. To do this, just clean the surface with a brush and then cover it with varnish to protect it from moisture.
- Many cameras have two gaskets. One of them is located on the camera eyepiece, the second is at the joints between the plastic parts and the body. If the gaskets are deformed, they will have to be replaced.
- Assembly of a working camera is carried out using the reverse principle. Before this, you need to treat the joints with a hermetic compound.
Sensor diagnostics
First of all, an external inspection is carried out. We check the integrity of the wiring and the condition of the contact group. It is better to test the wiring with a multimeter from the removed connector to the nearest input into the car's distribution contact box. Next, we test the sensor itself:
- We put the car on a pit or on a lift.
- Disconnect the connector and move it to the side.
- Turn on the ignition without starting the engine.
- We connect the multimeter probes to the sensor and ask an assistant to engage reverse gear.
- A working sensor will show zero resistance between the contacts.
If the test fails, the sensor must be removed from the transmission. In this case, some of the transmission oil will leak out of it, so it is better to prepare a plug in the form of a bolt with the same thread or temporarily screw in another sensor.
Tip: Do not throw away the broken sensor; it may be useful for temporarily closing the hole.
After washing the outside of the housing and cleaning the contacts, you can check the sensor with the same multimeter. The pressing force on the rod is small, provided that it is not blocked by corrosion. Therefore, just press it with your finger and look at the results of measuring the resistance.
Design and principle of operation
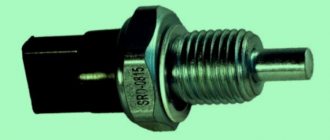
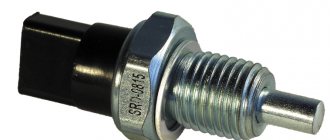
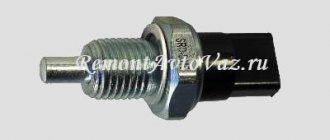
What is this sensor for the VAZ 2110? In fact, this is a regular switch that is screwed into a special hole in the gearbox. In this case, the working surface of the switch appears in the box itself, and normally open contacts are located outside. When you engage reverse gear, a specially designed rod presses on the working part of the sensor, and it is triggered - the contacts close.
The contacts, in turn, supply power to the reversing lamps. The only difference between this sensor and a conventional switch is its special design. It is sealed and can withstand fairly high mechanical loads and temperatures. It is attached to the gearbox using a thread and screwed in with a wrench.
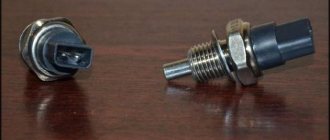
Appearance of the sensor for VAZ 2110
How to change?
- Place the VAZ 2110 in a pit or drive it on an overpass.
- Remove the engine protection, if any.
- Have a small container for the oil. Because when you open the sensor, oil will begin to flow out.
- Get under the car and disconnect the wires going to the part.
- Open the old sensor, immediately insert the container and screw in the new one.
- Add the leaked oil into the box.
- Stick in the wires, wipe the surfaces on which oil has gotten.
- Start the car and check if the lights come on when you put the vehicle in reverse.
For reference: A new one is inexpensive - from 100 rubles. Usually at the factory they install them from the VAZ 2108.
How can I check its functionality?
- Disconnect the wires from it. Just take them out.
- Connect the tester to them and set it to the mode: measure resistance or continuity.
- Engage reverse gear.
- Turn on the ignition.
- And look at what resistance the tester shows.
If 0 Ohm, then everything is fine with it. If not, then it needs to be changed (by the way, it definitely needs to be changed if the reverse lights are on even when the reverse gear is not engaged). Just then you will find out...
Repair methods
To repair the reverse signal, you can proceed in two ways. They differ in the way the sensor is accessed.
- Drive the car onto a lift or pit.
- Do the work by climbing under the car.
If you have already encountered a similar problem, then you will probably agree that replacing the DZH is best done using a pit or overpass. This makes access to the sensor as comfortable as possible, plus you minimize the risk of being splashed with oil from the gearbox.
Of course, there is another cleanest way - sending the car to a car repair shop. But then you will have to pay not only for the sensor, but also for the services of the specialists. And this is another 2-3 times the cost of the sensor. The choice is yours anyway.
Self-replacement
It’s not difficult to get to and replace a failed DZH on your own. Follow the instructions, do not break the sequence of operations, and then the process will not take you much time and effort.
- Place the car on a pit or overpass. Be sure to apply the handbrake and place the transmission in first gear. This will help prevent your car from accidentally rolling away.
- Remove the protection from the contacts of your sensor, disconnect the contacts.
- Prepare a container into which the oil will be drained when unscrewing the DZH.
- When the container is ready, remove the sensor. In some cases, it may not be unscrewed by hand. In such a situation, use a 22 mm socket.
- Very rarely even the key cannot help, since the sensor becomes stuck to its location. Here you will have to arm yourself with a hammer and chisel and try to remove it as carefully as possible.
- Take out the failed device and insert a new one in its place.
- If oil gets on the gearbox housing, remove it with dry rags. There is no need for extra dirt. Plus, it can lead to a decrease in the efficiency of the device.
- Return all contacts to their places, put the protection back on.
- If a decent amount of lubricating fluid has spilled out of the box, be sure to top it up. Just use fresh ones. By the way, this is one of the reasons to completely change the oil in the gearbox if it has been there for more than the first season.
- The decision to change the oil will simplify the task when removing the sensor. If the liquid is drained in advance, it will not flow in different directions when the sensor is unscrewed. The work will be cleaner, plus you will kill two birds with one stone - replace the sensor and gearbox oil.
After completing the work, do not forget to check whether the reverse traffic warning system is now working. For this:
- Turn the ignition key, but do not start the engine;
- Engage reverse gear on your gearbox;
- See if the white lights turn on. If yes, everything went great.
How much it costs?
Many VAZ 2114 owners are often interested in the cost of certain spare parts. In the case of DZH, a new device will cost you up to 300 rubles. You can find devices for 100 rubles.
The price depends on the manufacturer, quality level and pricing policy of the auto parts store where you decide to shop.
Additionally, it wouldn’t hurt to purchase WD40, which can be used to clean contacts. Plus, the wires may need to be replaced. We do not recommend doing this on your own if you do not have the relevant experience.
If the culprit for the problem with the rear lights is the light bulbs themselves, replacing them will cost a pittance. Today they cost up to 50 rubles.
If the white lights on the rear of the “Seven” stop glowing when moving in reverse, then the malfunction requires immediate correction. Not only do non-working reverse lights do not meet the technical requirements for the car and traffic rules, but this breakdown misleads other road users and can provoke an accident; as a rule, the reverse sensor on the VAZ 2107 can be to blame.
Usually, in order to eliminate such a malfunction, it is necessary to replace the VAZ 2107 reverse sensor. It is not necessary to spend time and money on a visit to a service station specialist - you can diagnose and replace the sensor yourself. But first you need to make sure that it was he who caused the malfunction.
Replacing the reverse sensor on the “ten”
Replacing the reverse sensor is carried out in several stages. To do this, if there is protection on the engine of the VAZ 2110, you need to remove it. At the same time, take a container for oil and place it near the place where the sensor is unscrewed to prevent it from leaking. Then you need to lie under the car in order to detach the wires attached to the part.
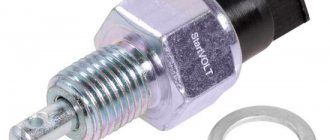
Unscrew the existing sensor, replace the oil container and attach the new vehicle device. In the standard set, a special sealing ring is attached to it, which is not recommended to be used more than once, since during the process of tightening the part it is subject to increased deformation.
Then you need to add technical oil to the gearbox and connect the wiring to the terminals. Oily stains on the gearbox casing and converter wires should be removed with a rag. It must be remembered that, according to safety regulations and to avoid fire, all oily tissues should be collected and removed from the place where the car is being repaired. The risk of spontaneous combustion is too high.
To final check the functionality of the alarm system, you need to start the electric motor and switch to reverse mode. The last stage will allow you to check the light bulbs while moving backwards.
If after replacing the reversing light sensor the problem is still not resolved, you should look for the reasons again. A complete list of possible problems includes the following factors:
- light bulbs burned out. The situation is complicated by a longer search for a violation. The test is carried out by removing it from the lanterns and then checking it with a multimeter;
- the wiring is damaged. Solving the problem complicates the lengthy search for a breakdown. Diagnostics are carried out with the same continuity or resistance measuring device;
- there are poor contacts on the sensor elements;
- the insulation on the wires near the converter is broken, which leads to a subsequent short circuit;
- the fuse has failed (blown);
- The sensor itself is broken. The presence of a breakdown is indicated by the lights not being turned on when reverse gear is engaged, as well as their constant burning.
So, the cause of the breakdown may be one of the listed defects or a combination of several of them. Only consistent action to eliminate each cause will lead to the long-awaited desired result. To troubleshoot problems, sometimes you have to carry out all the steps listed above, but it is recommended to start with the reverse sensor, since the price of this element is relatively low.
Have your neighbors started complaining that when you reverse your favorite VAZ, it’s not noticeable to others? Well, it's time to change the reverse sensor and forget about all the problems, including the neighbors. What could be the reasons for the rear lights not shining? How to do it yourself? Is it difficult and what is needed for this? What should I do in what order? This article provides answers to all these questions; it also contains supporting photos showing how to correctly replace this sensor on a VAZ 2106, 2108 and other models:
- Reasons why the reverse lights of a VAZ car do not light up
- Tools
- Replacing the sensor
- VAZ 2107
- VAZ 2109
- VAZ 2110
- VAZ 2114
- Functionality check
- What to do if replacing the sensor did not help?
How to change?
- Place the VAZ 2110 in a pit or drive it on an overpass.
- Remove the engine protection, if any.
- Have a small container for the oil. Because when you open the sensor, oil will begin to flow out.
- Get under the car and disconnect the wires going to the part.
- Open the old sensor, immediately insert the container and screw in the new one.
- Add the leaked oil into the box.
- Stick in the wires, wipe the surfaces on which oil has gotten.
- Start the car and check if the lights come on when you put the vehicle in reverse.
For reference: A new one is inexpensive - from 100 rubles. Usually at the factory they install them from the VAZ 2108.
Reverse sensor for VAZ 2110
Driving out of the garage in the evening, did you notice that nothing behind you illuminates the path? This is not good. After all, the reverse lights should be on. And if they don’t light up, they either burned out, or the fuse has failed, or the reverse sensor of the VAZ 2110 has broken down. We’ll talk about the latter today.
To find out for sure whether it is really out of order, do the following:
- Look at the condition of fuse No. 19 at 7.5 A. It is located under the instrument panel in the mounting block.
- Now check the light bulbs. If they are also in order, then you need to check the functionality of the reverse sensor. Only a question arises...
We turn on the brake lights forcibly
Relay K1 is successfully replaced with a pad with jumpers. In Fig. 1 just shows its diagram. If there is no such platform, you can temporarily close contacts 4-5. First, check everything mentioned above.
How to and how not to check the “0 Volt” potential
Let’s agree right away that we only work with a voltmeter. Voltage “+12” is caused by connecting one probe to ground. The presence of potential “zero” is checked differently: any of the probes is connected to a terminal with positive voltage, and then the second probe is connected to the wire being tested.
How to connect a voltmeter
Consider the error: one probe is connected to ground, the second to the terminal being tested, and vol. Here they conclude that there is a “mass” potential, but this is wrong! If the contact with ground is broken, the device will also show “0”. That is, the number “0” does not contain information.
Repair methods
To repair the reverse signal, you can proceed in two ways. They differ in the way the sensor is accessed.
- Drive the car onto a lift or pit.
- Do the work by climbing under the car.
If you have already encountered a similar problem, then you will probably agree that replacing the DZH is best done using a pit or overpass. This makes access to the sensor as comfortable as possible, plus you minimize the risk of being splashed with oil from the gearbox.
Replacing the DZH is not the cleanest job
Of course, there is another cleanest way - sending the car to a car repair shop. But then you will have to pay not only for the sensor, but also for the services of the specialists. And this is another 2-3 times the cost of the sensor. The choice is yours anyway.
Self-replacement
It’s not difficult to get to and replace a failed DZH on your own. Follow the instructions, do not break the sequence of operations, and then the process will not take you much time and effort.
- Place the car on a pit or overpass. Be sure to apply the handbrake and place the transmission in first gear. This will help prevent your car from accidentally rolling away.
- Remove the protection from the contacts of your sensor, disconnect the contacts.
- Prepare a container into which the oil will be drained when unscrewing the DZH.
- When the container is ready, remove the sensor. In some cases, it may not be unscrewed by hand. In such a situation, use a 22 mm socket.
- Very rarely even the key cannot help, since the sensor becomes stuck to its location. Here you will have to arm yourself with a hammer and chisel and try to remove it as carefully as possible.
- Take out the failed device and insert a new one in its place.
- If oil gets on the gearbox housing, remove it with dry rags. There is no need for extra dirt. Plus, it can lead to a decrease in the efficiency of the device.
- Return all contacts to their places, put the protection back on.
- If a decent amount of lubricating fluid has spilled out of the box, be sure to top it up. Just use fresh ones. By the way, this is one of the reasons to completely change the oil in the gearbox if it has been there for more than the first season.
- The decision to change the oil will simplify the task when removing the sensor. If the liquid is drained in advance, it will not flow in different directions when the sensor is unscrewed. The work will be cleaner, plus you will kill two birds with one stone - replace the sensor and gearbox oil.
Removal and replacement
After completing the work, do not forget to check whether the reverse traffic warning system is now working. For this:
- Turn the ignition key, but do not start the engine;
- Engage reverse gear on your gearbox;
- See if the white lights turn on. If yes, everything went great.
How much it costs?
Many VAZ 2114 owners are often interested in the cost of certain spare parts. In the case of DZH, a new device will cost you up to 300 rubles. You can find devices for 100 rubles.
The price depends on the manufacturer, quality level and pricing policy of the auto parts store where you decide to shop.
Additionally, it wouldn’t hurt to purchase WD40, which can be used to clean contacts. Plus, the wires may need to be replaced. We do not recommend doing this on your own if you do not have the relevant experience.
If the culprit for the problem with the rear lights is the light bulbs themselves, replacing them will cost a pittance. Today they cost up to 50 rubles.
Improving the reversing light
We connect halogens as reversing lights
Because 55W lamps have a 10A fuse installed, and in this case, through fuse F19 (in addition to other equipment), we connect 2 60W lamps. To remove the load from fuse F19, you can also install a relay from the reverse light switch.
Contact 2 from the switch is connected to contact 85 of the relay, and contact 86 goes to ground. We connect the wire that was disconnected from contact 2 of the switch to contact 87 of the relay. We supply +12V power to pin 30 of the relay: you can take it from the battery, but it’s better to connect to Ш2-16 (plus is supplied after turning on the ignition in the car). The relay is placed on the mounting module.
Halogen lamps G-4 in reverse VAZ
The second option suggests using 20 and 35 W halogens in the headlights for a G-4 base.
We break the bulb of a regular light bulb and remove the remains with tweezers. We insert the halogen bulb holder inside and solder the wiring.
To secure the halogen lamp socket in the iron base, we need to fill it with silicone sealant.
And in order for the sealant to fill all the cavities between the cartridge and the iron base evenly, you must use a syringe without a needle.
It should be taken into account that a halogen lamp heats up more than a simple lamp (up to 350-450 degrees), soldering the leads of such a lamp with ordinary solder is prohibited; a ceramic socket must be used. Since the contact area of the lamp with the socket is small, the socket itself does not get very hot. The sealant can maintain its shape when heated to 340 degrees.
Comparison of lamp light: standard 21-W, halogen 20-W and halogen 35-W.
The brightness of a simple 21-W lamp from a 20-W halogen lamp does not differ by eye.
And the 35-W halogen is already clearly brighter by eye, this is clearly visible in the picture.
The cost of questions is 2.00.
LEDs in the reversing lights will significantly add brightness to the light when parking.
It is also worth considering that LEDs do not heat up like halogen lamps.