Setting up music in a car can be done even by a beginner if you spend a little time and figure it out. Understanding the principles and operation of acoustic equipment in a car will save you money and effort. Any driver will be pleased to just get into the car and drive in comfort, without being distracted by the audio system every time.
adjusting the sound in the car
If you want the same, you only need to spend time once on high-quality car audio setup. Music in a car is so voluminous and pleasant for those inside mainly due to the correct placement of the speakers. If they are not there, then the sound will more likely resemble a radio, but not the result of a full-fledged audio system.
Setting up music in a car is easy with your own hands
You can handle the settings on your own, even if this is your first time working with audio systems in a car. First, you need to understand your needs. If you listen to music in the car exclusively for yourself and don’t like the bass rattling meters away from the car.
car audio system
There’s no need for an expensive Car Audio, the basic components are enough:
- The radio itself is built into the car. All you need to do is connect it with the rest of the elements and check the maximum power.
- Front acoustics - sound from the front.
- Rear acoustics - sound from behind.
- Frontal acoustics - peripheral sound.
All these devices must match in power, otherwise the “lagging” equipment will simply burn out. There is nothing complicated about how to connect speakers in a car correctly. No more than an hour of work will give you pleasure from music for years to come.
Level one. Noise insulation
Yes, yes, this is the very first point for any upgrade of a standard audio system. If you want to listen to music, first of all get rid of unnecessary sounds. By the way, we are talking not so much about outside noise as about body noise. Look at the home speaker. Durable body, devoid of overtones. Sound emits only what should emit sound, and what should not be held monolithically. Now take a look at where and how any car speaker is installed and what the housing is for it. Most often it is mounted on some kind of metal panel, and in the worst case, even on plastic upholstery. And the body of such a “column” is a door or some kind of body niche. Tough, and that's all. By the way, in the literal sense of the word.
The easiest way to improve the acoustic operating conditions of speakers and get rid of unnecessary resonances and other metallic sounds is to use vibration-damping materials. They are usually made from bitumen or rubber, often with some additives. Their main feature is high internal viscosity. Basically, these are just sheet materials that are cut right on site and carefully rolled onto the metal. But sometimes such materials come in the form of mastics.
Treatment with vibration-damping materials eliminates metallic sounds and improves the operating conditions of installed speakers
Vibration-damping materials are heavier and more rigid, more effective, but they are also harder to work with, so not all craftsmen like them. Thinner and lighter ones are easier to work with, but their effect is not so high. The optimum is usually somewhere in the middle.
Various kinds of lightweight foam and fibrous materials can be considered only optionally; they work somewhat differently and do not have much effect on the absorption of metal vibrations.
Car Audio Basics
If you have already decided what you want from the sound, then setting up the audio system in your car has already begun. You, as a customizer, are required to achieve the highest possible quality combination of all system elements.
Advice to all beginners - if you are starting to set up for the first time, you should not buy expensive speakers in large quantities.
For good sound, it is better to have up to three good speakers than 5-6 - the sound “at odds” will not please anyone.
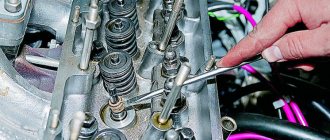
Level two. Replacing standard speakers
This is where you need to be very careful. This is a field with a rake; you can’t run with your eyes closed. This upgrade option is not always applicable. If you replace only the speakers and leave everything else, then it is far from a fact that the system will “sing.” Moreover, in some cases the result may be completely negative. Although the standard audio system itself is not of a high class, everything in it is matched to each other and balanced.
It is clear that the audio system is far from a priority element when designing a car, but sometimes the methods for installing standard speakers are simply surprising. The photo shows a standard BMW speaker, which was simply attached to the inside of the upholstery and covered with a light casing
One of the tricks that automakers resort to is reduced acoustic impedance. In general, the most common acoustics in car audio are 4-ohm ones, but in “standard” speakers they often use 2-ohm ones. All in order to boost the dead standard amplifier and slightly increase the volume headroom. Replace these speakers with more conventional 4-ohm ones and you get a quiet system, and any attempts to increase the volume will be accompanied by an increase in distortion.
But that’s okay, there are plenty of aftermarket acoustics with 2-ohm ones. Don't step on another rake - a corrected signal. This, by the way, is one of the “tricks” of many branded standard systems - it’s not the components that are better, but correction that compensates for the features of cheap speakers and the shortcomings of their acoustic design. Replace the dynamics in such a system, and such a correction will no longer be appropriate.
But there is no need to be scared and completely discard this option. Today you can find many acoustic kits that are tailored specifically for certain brands and models of cars. Mainly for European ones, in this part of the world such an upgrade is most in demand.
The video demonstrates the ease of upgrading a standard audio system by simply replacing the OEM speakers with a set specially designed for a specific car brand:
Taking into account the size of the car
Unfortunately, large systems with a variety of bass are only relevant for large cars - SUVs, crossovers, etc. It's not about the model and status, but about the size of the interior.
For beginners, installing an extensive and complex audio system in a small salon is not an easy task.
The installation will most likely end up like this:
- the sound will be too loud for the enclosed space of the cabin and driving with music will be uncomfortable (especially for passengers in the back seat, where the bass set is mostly present);
- in a small cabin there simply isn’t enough space to accommodate all the elements of the audio system, so the balance will be broken.
For a small car, it is better and more practical to get by with a basic set - a radio, a front speaker and two rear ones.
Sound emission angle
If the speaker is placed too high, it will affect the clarity of the music. High frequencies will be transmitted worse. Experience shows that tilt angles greater than 60 degrees distort the transmission of the audio signal. For this reason, when creating an external screen, this value should be accurately calculated.
When making the outer structure, you first need to securely fasten the inner screen. Then the outer box is either initially made with the desired slope to the vertical, or screwed obliquely with self-tapping screws. The voids are filled with putty. The entire structure is processed with fiberglass and covered with appropriate fabric.
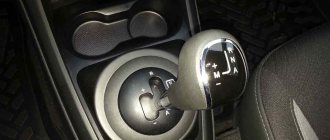
We understand the basic settings of the radio
Not all drivers consider it necessary to understand the technical settings of radio tape recorders. Considering that they work fine on their own after factory settings or the previous owner. It is not always so. Even if minimal sound is provided. Either a powerful or otherwise individual sound that suits you, you will have to do it yourself.
You can balance the sound of the speakers using the radio. This only applies to modern models. After connecting, the device will “see” all the speakers that you have connected and will offer to configure their interaction. This cannot be done without practical testing.
Be prepared to play comparison music even after very minor changes.
The main task is to make sure that all speakers play in unison. Of course, they have different roles and sounds. But you don’t need to have an ear for music to detect desynchronization.
Step-by-step verification instructions:
- Sit in the driver's seat, this is the place where the sound should be optimal. Since you are there most of the time.
- We set the bass to 0 Db - it is in the low frequencies that the causes of discomfort from sound usually lie.
- Let's switch to balance mode; you will find it on any modern radio. And using any melody we adjust the sound in real time.
- You can stop tuning when you are completely satisfied with the sound.
Sometimes the opinion about the sound changes - after tuning, you can drive for several days. And then want to make additional changes. For a more objective look at the state of the audio system, you can try different types of music. For example, very different from each other in the number of bass or high sounds.
Working with frequencies
Music consists of several types of frequencies. The higher the frequency, the louder the sound. Thanks to the capabilities of modern radio tape recorders, the driver can independently select music at those frequencies that suit him best. Emphasis on high and mid frequencies is the simplest and cheapest. A way to make the music sound as loud as possible.
The thing is that low frequencies themselves are not loud, this does not mean that they are not needed. But a large number of them makes the composition generally quieter, even if you have excellent acoustics. Manual tuning of car audio through frequencies has long existed. Using the radio - frequency cutoff mode.
This mode allows you to “prohibit” the device from reproducing frequencies below a certain minimum that you set. We recommend setting the lower threshold to 125 Hz (or frequency 78). In this way, the resources of the speaker system are redistributed. And the overall sound volume increases significantly.
The best car audio
Here is a small TOP of the best car audio at an affordable price:
| Model: | Specifics: | Price: |
| Focal Auditor RSE-165 | Coaxial acoustics; tweeter inverted in a dome; protective steel grille | $56 |
| Hertz K 165 Uno | Speaker diameter – 16.5 cm; component modification (two-way audio separation); power (nominal) 75W. | 60 dollars |
| Pioneer TS-A1600C | Component two-way; diameter of woofers – 16.5 cm; power (nominal) 80W. | $85 |
Of course, there is no limit to either the size or volume of car acoustics. There are craftsmen who, with the help of a couple of additional batteries, a powerful amplifier and huge speakers, can easily organize a rock concert in their Lada, which can cause the windows to fly out. In this review, we looked at recommendations for those who like beautiful, but not prohibitively loud sound.
Here is a short video comparison of coaxial and component acoustics for cars:
COMPONENT or COAXIAL? Which acoustics to choose!
Vibration isolation - what is it and how to install it?
All lovers of loud music have a problem in their car - vibration. Loud music, especially with a lot of bass, makes the car literally shake from the inside. The driver is faced with the choice of turning down the volume or continuing to pick up objects that have fallen due to shaking.
Noise-vibration insulation as a procedure is an additional lining of your car from the inside - such
“Rattling” sound and other unpleasant effects appear on top of the original sound. Because vibration from sound transfers to the materials of the machine - metal, plastic, etc., without encountering any obstacle. This can be corrected by purchasing a soundproofing layer for the car, which will not only improve the quality of the music sounding in the car. But it won’t allow extraneous noise from the street to interrupt it.
External acoustic screen
Pros:
- Since a significant part of the screen is located outside the door card, there are many more ideas for implementing different design solutions than in the previous version;
- Inside the screen, some of the sound waves are absorbed, and the desired sound is reflected, making the sound cleaner and the bass deeper;
- The column can be directed in any direction. Car audio enthusiasts often configure their speakers so that most of the sound waves are directed toward the top of the cabin.
Minuses:
- Since the speaker will be attached to the outside of the screen, the case must be as durable as possible;
- It will take time to create the design, as well as money to purchase additional material;
- If you don’t have the skills to install speakers, you can not only ruin the sound, but also break the speaker itself (in addition to the fact that it itself vibrates when the sound is loud, the vibrations intensify while driving, which is why the membrane can quickly tear);
- A certain angle of inclination is required.
Installing Music Components
Installation begins with laying power wires from the engine compartment into the passenger compartment. Having picked up the wires, we pull the positive and negative wires from the battery into the interior, through the technological holes in the engine panel. Wires passing through metal must be covered with a piece of plastic or rubber tube to avoid a short circuit to ground.
The positive wire must be connected through a bulb with a fuse whose rating corresponds to the fuse on the amplifier; the bulb itself must be located at a distance of no further than 30 cm from the battery.
We are starting to install the tweeters. High-frequency speakers with mid-bass speakers form a “sound stage”.
We place them on the lining of the windshield pillars, approximately at eye level, facing the center of the windshield. Thus, we force the speakers to play on reflection, forming the width and height of the sound stage. In other words, the left tweeter plays on the right passenger seat, the right one on the driver’s seat. We lead acoustic, interconnect and power wires to the amplifier.
Power wires must be laid separately from acoustic and interconnect wires. Their mutual intersection at an angle of 90 degrees is allowed. It is advisable to lay each group of wires separately, including from the standard car wiring. We connect the wires to the amplifier and connect the subwoofer. If the subwoofer is intended to be used in a housing, and it was purchased together with a ready-made housing, then for cars with a sedan body we turn the subwoofer with the speaker towards the back of the rear seat, and for cars with hatchback and station wagon bodies - towards the fifth door. If you plan to make your own housing, this article will come in handy - how to make a housing for a subwoofer.
Is it possible to make a simple car audio system play?
Yes, you can. But it will still be the same simple acoustics and your head unit (radio tape recorder). It’s worth thinking - where to start?
About preparing the speakers in the doors
Let's start with the speakers. They, as we have already discussed, can be broadband or coaxial. But both of them have significant limitations on the spectrum of frequency reproduction, as well as on their distribution in the interior of your car.
Therefore, let’s discard the topic of “sound directionality”, “quality of reproduced frequencies”, “cost of speakers”. Let's see what we can do with the speakers we already have.
First. If they wheeze, then further actions are 100% meaningless. Such speakers simply need to be replaced with new or used ones, but without such a defect.
You can, if you have the skill, try to clean them. But the work to carry out such manipulation will require real effort. Such repairs have already been written about here. Think about it - do you need it?
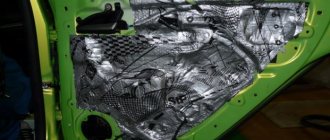
The speakers work and do not wheeze. Let's try to remove them from the door card. It happens that you have to drill out the rivets that attach the speakers to the door body. But it's not a problem.
Then we look at the condition of the inside of the door trim - where the speaker “plays”. There is nothing there? Is there “bare metal”? Amazing. There is no audio preparation.
Further. If there is no rust, then we wipe the place where we will glue the vibration insulation. Otherwise, we first get rid of the rust so that the “vibration” does not fall off in a day. They sealed it up.
Everyone’s recommendations are different, but for me, simple foil insulation based on resin or tar (a black mass that can be washed off with gasoline), 2-3 millimeters thick, will do the job.
This is enough to slightly stop the vibration of the door trim sheet itself. There is no talk of any volume in the door yet. This will be the next stage of audio preparation, a more professional one, which we will not touch on here.
You can also glue some holes in the door itself with this “vibration”. This is the plane that is located immediately behind the door trim (card). This will create some volume for the speaker. It may very well happen that he will play “lower” than before. And that's what we need. After all, this was the goal of audio training – to improve some sound parameters.
You can finish preparing the door. Further work will not make an “audible” difference. That's why it's worth stopping at this point. Let's deal with the wires and terminals that connect the speaker itself.
About wires
The cross-section of the standard wire for standard car audio speakers at the factory is almost always made with a small margin. “Practically” does not mean that it is so. You need to look and study this issue first.
Does this mean that you can only connect to the standard wires the same low-power speakers as the standard ones? No. This is not entirely true. But this question requires serious analysis. It all depends on the resistance of the acoustics itself, the amplifier (car radio), the length of the wire and the power supplied to the speakers (more precisely, the supplied current).
Do I need to change or buy additional wiring for simple audio preparation? No, not necessarily. Standard wires will be quite enough. Since we are currently not going to connect our speakers to an additional amplifier, there is no point in changing the wires.
We won’t be able to overload the wire with the car radio so much that it can heat up. Thicker wires will be required if more power is supplied to the speaker.
The picture above shows the ideal way to connect the stock wiring from the speakers to the car radio connector. This eliminates oxidation and thereby eliminates dips and wheezing in the sound path. You can use other connectors for such a connection (such as Wago), but the option with soldering wires is ideal.
About wire thickness
Frequently asked questions - “How to determine the cross-section of wires for car audio speakers?” Or - “What cross-section is needed for the wire to connect the speakers to the car radio?”
In world practice, it is accepted that the standard cross-section of wires for acoustics should not be less than 0.75 mm2 (0.75 square). And this almost always happens. But often, especially in old cars, foreign cars, the wire cross-section is larger, and is usually 1 mm2.
This is often enough to, within certain limits, “boost” midbass, coaxials, and component acoustics. It is important to correctly and efficiently connect the connectors from the control unit to the standard wiring and to the speakers directly.
When it comes to using amplifiers and powerful speakers in a car audio system, then you will need to lay new wires to the speakers. Their thickness should already be at least 1 “square”, and ideally 1.5 mm2. You can see how to choose a section here. And what wire can be used was discussed here.
And so, it turns out that a 1.5 mm2 wire will allow good current to be supplied to the speakers (note, not power, but CURRENT!). Because it is not power that comes from the amplifier, but current. And for the required current you need a wire of the appropriate cross-section.
How to determine the wire cross-section?
There is also an article that discussed in detail how to measure the cross-section of a wire. I highly recommend checking it out. Everything is not complicated at all; using a simple formula, you can get a fairly accurate idea of the cross-section of the wire you are using, or the wire you are going to use. This is the formula, and it is described in more detail in the article.
About connecting to speakers
First point.
You should never forget about the presence of a “plus” and a “minus” in a car - short circuits lead to disastrous situations. The same applies to connecting speakers. There are also “plus” and “minus” .
Connecting them incorrectly (reversing the polarity) will not cause serious problems to the speaker, as well as to the radio amplifier. But you won’t be able to get good or just adequate sound. This is why there are markings on speakers and cables, so that the “minus” from the amplifier goes to the “minus” of the speaker, and nothing else.
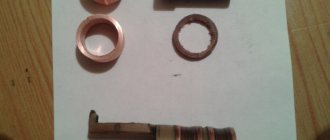
How to determine which terminal to connect the “plus” to and where to connect the “minus”? There is nothing tricky here. All manufacturers of acoustics for car audio mark the terminals with icons symbolizing “+” and “-“, or stick a sticker with a picture of where and what to connect.
If there is no such marking, then the thickness of the terminals indicates this. The “positive” terminal is wider and more massive than the “negative” terminal. The picture clearly shows the difference.
It is necessary that the diffusers of each of the speakers oscillate synchronously. And if the speakers do not work synchronously, then the sound waves will be out of phase. This means that the waves will partially compensate each other. In this case, the spatial orientation of the sound source may be distorted.
The music will play, but you will listen to 100% cacophony, strangled and overwhelmed in frequencies in almost the entire spectrum! Please take this into account. It will feel like you have cotton earbuds placed on your ears and you are trying to listen to the sound from the speakers.
If connected correctly - maintaining polarity, the speaker cones will operate in phase. The sound waves will add up, thereby creating a complete and accurate sound picture. This concerns polarity reversal.
Second point.
When connecting wires to the speaker, in the door itself, you should keep in mind that there is an “aggressive environment” there - moisture. It very quickly oxidizes the contacts (terminals) of the speakers. Likewise, the wires themselves, when exposed to constant moisture, can oxidize and fall off at the most unpredictable moment. And it’s good if the wire cannot be shorted to the car body (to the door trim).
The ideal option, in my opinion, is to solder good wires to the terminals and put a connector at the end (as in the picture). The length of this wire should allow the connector to be brought out to the outside of the door, and the mating part of the connector be placed there. This way you can avoid rapid oxidation of parts of the connectors, since moisture often prevails only inside the door.
Let's pay attention to how the speakers in your car are connected now - there is probably no soldering there. But the speakers from the factory use a terminal connection, this is one way. But there is nothing better than soldering. And in any case, you need to protect the soldering points or the terminal connections themselves with cambrics and always with a moisture-repellent compound and lubricant.
A little physics. From school we know that the surface of anything smooth and even always remains rough. And no matter how well we make the contact between the speaker terminals, the metals do not touch the entire area.
Here the lubricant will help fill the voids to remove all the air from the contact patch. The lubricant used is conductive, so the transition resistance at the connection point will not be high. Here is some example - Aluminum grease (spray), Ciatim 221, LIQUI MOLY lubricants, even Solidol and CV joints will do.
Car audio and wires
The standard wires from the factory sound system to the speakers are carried out together with the wires that go into the doors to the electric locks, to the power windows, to the door opening limit switches. And they already have a normal cross-section, as we previously found out. They are carried out in common loops, in general insulation. This does not affect the sound quality of a simple audio system.
There is very rarely interference from the generator. Therefore, there is no point in changing anything for our simple system. But if the wires were damaged somewhere and their repair is not possible or simply not practical, then you can lay new wires to the speakers. We have already talked about thickness. But about the place where they will be laid again - no.
Actually, you can lay new wires exactly where the factory wires were. Sometimes this is a very real idea. And often, you just have to go through the wiring. And to do this, disassemble half of the interior. It's not always worth it.
You can lay new wires in a convenient and accessible place, but take into account that they do not interfere with the future removal of rugs and seats in order to perform any other manipulations. I think that it would be better to intertwine the wires, as if to make a “twisted pair”. This concept came from electronics. And now it is used in computer technology almost everywhere.
All local networks are made in this way. Intertwining the wires with each other is like putting them into a screen. At a time when radio was developing, the wires were simply shielded to reduce and eliminate interference on low-voltage parts of the radio equipment.
But in this case, you can use this “shielding” method to cut off possible interference to these wires. Although this part of the audio system is practically not critical to such interference in the car.
The main thing is to check that in places where doors open, in places where the wire is often bent, the insulation does not delaminate and moisture does not get in.
History of car audio
The beginning of the entire history of car sound (we will call it car sound), one might say, was laid in the 30s of the 20th century. With the development of radio technology, the first radio receiver for a car appeared. And already in the late 60s, the first car tape recorder was invented in America. From that moment it all began! The era of car audio has begun.
Now we will not delve into the intricacies of radio technology of those times and analyze historical moments in detail. Although there were a lot of interesting things there (maybe we’ll return to this issue later).