A carburetor is an important element of a car's fuel system. Its main task is to prepare the air-fuel mixture and seamlessly transfer it to the engine combustion chamber. Solex 21073 is one of the best designs of an emulsion two-chamber carburetor. It consists of two main elements: a massive lower part and a lighter lid. Taking into account the increasing requirements for environmental safety and decisions of the European Union Commission, all manufactured cars must comply with Euro 2 and Euro 3 standards. The Solex carburetor allows you to fulfill these rules.
Device and principle of operation
The basic principles of mixing fuel and air using a simplified scheme are demonstrated in the figure.
As the piston moves downward from top dead center, the intake valve opens, allowing the air-fuel mixture to be drawn in from the carburetor. At this moment, in the diffuser 6 of the mixing chamber 8, the fuel coming from the atomizer 4 through the nozzle 9, metering the fuel flow, is mixed with the air sucked in through the air damper 5. The flow of the air-fuel mixture is regulated by the throttle valve 7, connected to the gas pedal.
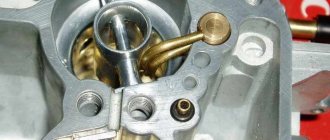
One of the main parts of the carburetor design is the float chamber 11. The operation of the engine depends on its correct setting. The fuel level in the float chamber is regulated by the position of floats 10 - there are two of them in Solex. When gasoline enters chamber 11 from fuel line 1, the floats float up and block the flow of fuel through needle valve 2. In this case, the air displaced from the float chamber leaves through technological hole 3.
Sprayer 4 is designed in such a way that its upper cut edge is slightly higher than the fuel level in the float chamber. As the air flow passes through the diffuser, gasoline is sucked in and further mixed with air. If there is too much fuel in the float chamber, it may leak out. If the mixture contains too much gasoline, it will lead to the following negative consequences:
- pouring candles;
- incomplete combustion of fuel;
- increased fuel consumption;
- reduction of engine thrust;
- increase in the volume of harmful emissions.
When the level of gasoline in the float chamber is low, it is difficult to suck it in. The air-fuel mixture contains an insufficient amount of gasoline, which leads to unstable engine operation and jerking when driving the car. For this reason, it is necessary to monitor the fuel level in the float chamber and the condition of the needle valve.
Doing the work yourself
The low wear resistance and efficiency of an SUV engine of Russian origin determines that it is practically impossible to do without mechanical modifications. Many people call such work a change in geometry.
The internal combustion engine installed on the vehicle in question can have many systems modified. Experts recommend starting with upgrading the carburetor. This is due to the fact that due to the use of imperfect production technology, its efficiency is very low. Modernization is carried out as follows:
- To begin with, it is recommended to replace the nozzle. The factory version is installed with 1 cam, but should be installed with 2 cam.
- The pump accelerator should be updated.
- All sharp corners that could cause turbulence in the air flow are removed.
- Some craftsmen also clean accessible surfaces, reducing their roughness. Due to this, the efficiency indicator is significantly reduced.
Insert: Important: It is important to clean the carburetor structure from carbon deposits and dirt. To do this, use gasoline or a rag. If the dirt has become too deeply embedded in the surface, you can use special cleaning products.
Experts do not recommend chipping a naturally aspirated engine. You can further increase engine power if you try to increase the piston stroke. This can be achieved by installing another crankshaft with a stroke of 84 mm, suitable for the VAZ 2130
. The piston has a diameter of 82 mm, but the piston pin must be offset by 2 mm. After this, the working volume will become 1.8 liters.
In the future, if you bore the block to 84 mm. with the same crankshaft, the volume will become 1.9 liters. But that’s not all, in the future you can increase the filling capacity of the working cylinders. This is achieved by boring and installing valves with an increased diameter of their plates. This operation is quite complex and requires special equipment. It is also advisable to use lightweight connecting rods and then you can have about 100 horses at the output.
Lubricant supplied through the oil pump extends engine life. To improve the performance of the oil pump when tuning the Niva engine, you need to take another pump and cut off part of the housing with the parting plane from it. The thickness of this “pancake” should be about 11 cm. Using milling, cut off the excess and leave a thickness of 10 mm.
Next, do the following to remove chamfers on the edges of the teeth:
- We compress, that is, remove, the drive gears.
- We trim one of the gears by 0.75 mm on each side.
- We cut the second gear to 11.5 mm (after trimming).
- We repeat the operation with the remaining gears (driven).
This car is distinguished by its simplicity of design, easy accessibility to all components and mechanisms, as well as its increased reliability.
Installing a carburetor on a Niva
Until 1994, the Niva 2121 was equipped with Ozone carburetors, which still operate successfully to this day. Assessing all the positive and negative aspects of existing designs, AvtoVAZ began installing Solex 21073 carburetors on the Niva. According to numerous car enthusiasts, this mechanism is more economical than Ozone. The engine is characterized by better performance, but it becomes more difficult to configure, more capricious to the quality of gasoline and oil vapors penetrating from the crankcase.
You can install or replace the carburetor yourself using standard tools. First, you need to dismantle the air filter, loosen the fuel line clamp and carefully remove it from the fitting, draining the gasoline in the fuel line into a prepared container. Then you should loosen the clamps and remove all pipes connecting to the carburetor:
- draining fuel into the fuel tank;
- carburetor heating unit;
- vacuum regulator of the ignition distributor;
- exhaust gas recirculation systems;
- suction of crankcase gases.
By removing all the electrical connectors, you can remove the throttle linkages and the choke control cable. Having disconnected all external communications from the carburetor, it is necessary to unscrew the nuts securing it to the intake manifold. Then you can carefully dismantle the mechanism. Installing a new carburetor is performed in the reverse order.
Oil pump work
Lubricant supplied through the oil pump extends engine life. To improve the performance of the oil pump when tuning the Niva engine, you need to take another pump and cut off part of the housing with the parting plane from it. The thickness of this “pancake” should be about 11 cm. Using milling, cut off the excess and leave a thickness of 10 mm.
Next, do the following to remove chamfers on the edges of the teeth:
- We compress, that is, remove, the drive gears.
- We trim one of the gears by 0.75 mm on each side.
- We cut the second gear to 11.5 mm (after trimming).
- We repeat the operation with the remaining gears (driven).
Let's start working on the body. To do this we do the following:
- We release the driven gear axis from the housing.
- We form a longer axis from the drive roller.
- We insert the resulting axle into the body.
- We press the narrow gear onto the second drive shaft.
- Press on the wide gear.
- We fix the wide driven gear in the housing.
- We install a narrow gear into the housing.
Instructions for adjusting the carburetor
Solex is a fairly reliable device, but it is advisable to carry out the necessary adjustments every six months of vehicle operation in order to optimize engine performance and save gasoline. These include: adjusting the quality of the fuel mixture, its level in the float chamber and the number of idle speeds.
Before carrying out any calibration work or troubleshooting, it is advisable to clean the carburetor of dust, oil and other contaminants. It is more convenient to do this with the air filter removed.
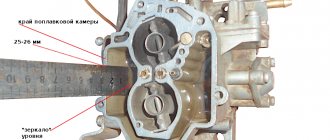
When adjusting the Solex carburetor installed on the Niva, you need to put the gearshift knob in the neutral position, start the engine and let it run for about five minutes. This will allow the fuel pump to fill the chamber. Then you should remove the fuel hose from the carburetor, after turning off the ignition. To prevent the gasoline remaining in the fuel line from leaking onto the engine, prepare in advance a container into which it can be drained. After this, dismantle the choke control cable and remove the screws securing the carburetor cover to its body. When removing the cover, you need to be extremely careful not to damage the gasket and fastenings of the floats.
Having gained access to the float chamber, it is necessary to measure the fuel level. It is convenient to do this with a caliper with a depth gauge. The distance from the edge of the chamber to the edge of the fuel should be 24-25 millimeters. If these values do not correspond, you should bend the tongue on the float axis in the desired direction, put the cap in place, start the engine, and then repeat the procedure of removing the cap and measuring the fuel level.
The idle speed setting is carried out on a warm engine. First, use a flat-head screwdriver to tighten the mixture quality screw located on the base of the carburetor until it stops. It has a left-hand thread, so it should be screwed counterclockwise. Then you need to unscrew it five turns and start the engine. Having removed the choke (air damper), we make minimum but stable engine speeds by rotating the fuel supply amount screw. Then, slowly turning the quality screw, you need to achieve unstable operation of the motor, and after that, unscrew the quality screw one and a half turns. This is enough to restore stable operation. You can set the recommended rpm (850-900) using the quantity screw.
Replacing engine components
If we consider the Niva in relation to the new years, then we should take into account that engine tuning comes in two options:
Recently, chip tuning has become very popular, which allows you to significantly increase the power indicator in the shortest possible time. However, this tuning method should be treated with some caution, which we will discuss in more detail later.
Not all SUVs of domestic origin have an on-board computer. At the same time, we should not forget that some on-board computers are in poor condition and in fact do not affect the operation of the engine.
When considering this tuning method, we note the following points:
- You can increase the power by about 10-30 hp. or more. It all depends on what parameters were set before tuning.
- It is recommended to entrust this type of work to specialists who provide services in this field of activity. This is due to the fact that incorrectly carried out chip tuning can cause various problems with engine operation.
- The technical condition of the internal combustion engine design largely determines whether chip tuning can be carried out. If the motor is in poor technical condition, then increasing the load causes rapid wear. Therefore, if the process in question is carried out correctly, a complete diagnosis is first performed.
- As a rule, the automaker sets minimum power values, leaving a margin. If chip tuning has not been carried out previously, the programmer will be able to configure the engine to increase its power. If the modification in question has already been carried out previously, it will no longer be possible to carry it out again.
In general, we can say that chip tuning is carried out in many cases when it is necessary to increase engine power. However, in order to significantly increase traction, it is necessary to improve the geometry.
Modernization of the off-road features of the Chevrolet Niva contributes to a significant expansion of the vehicle’s capabilities:
- the upper shock absorber mounts are strengthened;
- The fastening of the upper bolt holding the front axle gearbox is being modernized.
Additionally, you can install a hydraulic power steering control, double or gas springs instead of the standard ones. All this is quite expensive, but if you do this tuning, you will never regret it.
The appearance can be significantly changed using the following details:
- front and rear bumper protection;
- thresholds;
- spoiler;
- kangurins.
You can see how tuned Chevrolet Nivas look in the photos or video clips attached at the end of the article.
Engine VAZ 21213 1.7 l. carburetor/injection (21214) in-line 4-cylinder with overhead camshaft, Niva timing belt has a chain drive. Based on the 214 engine, the VAZ 2123 engine is produced for the Chevy Niva; the differences in adapting the block for installing a pulley in the engine compartment and mounting attachments are technically almost identical.
The main differences between the VAZ 21213 engine and the 2106 are the cylinder diameter is 82 mm, the cylinder head, the Niva 21213 engine block from the 2106 is smaller in height. Among the advantages of the 213 engine, it is worth noting the presence of a chain tensioner (no need to tighten it) and hydraulic compensators (no need to adjust the valves).
The simplest modernization of a Chevrolet Niva engine involves replacing certain parts. First you need to bore the sleeves. After this, you need to select pistons and special ring-shaped elements that have a certain size.
The next step is to equip the engine with a crankshaft with larger arms and smaller connecting rods. The result of the above actions will be an increase in engine volume from 1.7 to 1.9 liters, and, consequently, power will increase.
It is also worth thinking about increasing the volume of fuel going to the cylinders. To do this, the cylinder head is modified, namely, the intake and exhaust ports are bored, the valve is replaced with a larger one, the valve seats are bored or completely changed.
Basic Solex malfunctions and methods for eliminating them
Before looking for problems with the device, you need to make sure that the ignition system is working flawlessly and is adjusted correctly. You also need to check whether the timing belt is functioning correctly, since malfunctions in the operation of this mechanism can also cause malfunctions in the carburetor.
Table 1. Classification of possible carburetor malfunctions and methods for eliminating them.
| Malfunctions | Causes |
Elimination methods
Advantages and disadvantages of tuning
The Solex carburetor is assembled from standard parts and assemblies from various manufacturers and is not subject to individual adjustment. But the cast body, made of aluminum alloy, diffusers, damper jets, as well as fasteners have unprocessed burrs, protrusions, and roughness. The task of tuning is to remove all obstacles to the movement of the air-fuel mixture by grinding, polishing channels and parts with which the fuel flow comes into contact, as well as modifying diffusers and adjusting jets in accordance with the individual requirements of the car enthusiast.
Solex carburetor: modifications
The basic design of these devices was developed by engineers from the French company Soleks.
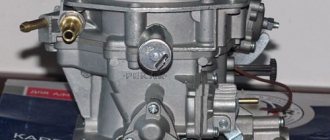
The Dimitrovgrad plant later received a production license, and all other modifications were made by specialists here. The popular Solex 21073 was developed at DAAZ. Reviews about it are only positive. The mechanism is easy to customize and is highly reliable. DAAZ-2108 is designed to work with a 1.3-liter engine for VAZ 2108 and 2109. Solex 21083 was modified for 1.5-liter power units. The same mechanisms were equipped with models from the first batches of the VAZ 2110 with a microprocessor-based ignition system. On classic VAZ models, Solex 21053-1107010 was installed. VAZ Niva models were equipped with the Solex mechanism 21073-1107010. Now it has been replaced by an injector.
Device
The Solex 21073 carburetor is an emulsion type. Its modifications were initially installed on motors with contactless ignition. The device is distinguished by the presence of two chambers equipped with throttle valves, as well as dosing systems. The device also has transition systems for the first and second cameras. There is an idle system, but only for the first chamber.
The mechanism consists of two halves. The lower one is more massive - and the upper one. This half is the body of the device itself, and the upper part is the cover for the carburetor. At the bottom of each chamber there are rotary-type dampers with a mechanical drive. At the top of the first chamber of the carburetor there is a damper for air supply. It is necessary to start a still unheated power unit. This part is activated by a cable that goes into the cabin and is connected to a lever responsible for the suction and to the starting vacuum system.
Theory
The engine sucks air through the diffuser, and a certain amount of gasoline through the fuel nozzle. The volume of air and fuel sucked in depends on the volume of the engine. Therefore, the trend is to install a small jet for a larger engine volume. And if you have to install a similar Solex 21073 carburetor on a small engine (for example, 1.5), then the standard jets are poor (that is, they give an unsaturated mixture).
Therefore, we can say that it all starts with the fuel nozzle - its selection and settings. Afterwards, for the second time, you need to pick up an air one for it. Start strictly with the first camera until you have set it up; it is not recommended to work on the second one under any circumstances.
Rule:
We select the jets according to the engine volume. And before starting the setup, it’s best to find a factory Solex that matches the volume of the unit on your car, and rearrange (or install the same) jets from it.
Operating principle
Solex 21073 works as follows. Gasoline will enter the float chamber using the inlet fitting - the fuel also passes through the filter mesh, where it is cleaned, and goes through the needle valve. The chamber with the float is two-sectional, and the sections are connected to each other. They will contain the same amount of gasoline. This design makes it possible to significantly reduce the effect of body tilt on the fuel level in this chamber.
This ensures more stable engine operation. As the chamber fills, the float, pressing part of the needle valve, blocks the access of fuel to the chamber. This maintains a constant level of gasoline in the mechanism. Next, from the float chamber, gasoline flows through the jets into the mixing wells. Air enters these same wells through special holes in the emulsion tubes or air jets. Next, gasoline and air are mixed in them. As a result, a fuel mixture is formed. It will get into the small as well as large diffusers of the device. This is the main dosing chamber. Depending on the operating mode of the engine, certain mechanisms and systems can be started in the carburetor. When the owner tries to start the engine “cold” in order to enrich the fuel mixture, the starting device comes into play. The driver starts it from the passenger compartment - this is a choke.
When the handle is pulled out to its maximum, the air damper of the first chamber is completely closed. At the same time, the throttle valve in the first chamber opens to the distance of the starting gap. It is adjusted using the adjusting screw on the Solex carburetor. Adjusting the gap will allow you to adjust the idle speed.
When to change, what interior to install
To perform scheduled maintenance operations, there are regulations, as well as manufacturer recommendations. According to them, replacing the cabin filter of the Kia Rio II JB heating and air conditioning system should be done every 15,000 kilometers or once a year.
Considering that the operating conditions of the car in most cases will be far from ideal, experts advise performing this operation approximately twice as often, in spring and autumn.
Characteristic symptoms:
- Windows often fog up;
- the appearance of unpleasant odors in the cabin when the airflow is turned on;
- deterioration of the stove and air conditioner;
They may make you doubt that the filter element is coping with its tasks and an unscheduled replacement will be required. In principle, these symptoms should be relied upon when choosing the correct replacement interval.
Suitable sizes
When choosing a filter element, owners do not always use products recommended by the car manufacturer. Everyone has their own reasons for this, some say that the original is unreasonably expensive. Some people in the region sell only analogues, so there is a need to know the sizes by which you can subsequently make a selection:
- Height: 17 mm
- Width: 200 mm
- Length: 225 mm
As a rule, sometimes analogues for Kia Rio II JB can be a few millimeters larger or smaller than the original, there is nothing wrong with that. And if the difference is measured in centimeters, then of course it’s worth looking for another option.
Selecting an original cabin filter
The manufacturer recommends using exclusively original consumables, which, in general, is not surprising. They themselves are of good quality and are widely available in car dealerships, but their price may seem overpriced to many car owners.
Regardless of the configuration, on all second-generation Kia Rios (including the restyled version), the manufacturer recommends installing a cabin air filter with article number 97133-2E210 (971332E210) or its full analogue 97133-2E200 (971332E200).
It is worth noting that sometimes consumables and other spare parts may be supplied to dealerships under different part numbers. Which can sometimes confuse those who want to purchase an original product.
When choosing between a dust and carbon product, car owners are advised to use a carbon filter element. This filter is more expensive, but it cleans the air much better.
It is easy to distinguish - the paper filter accordion is impregnated with a carbon composition, and therefore has a dark gray color. The filter cleans the air flow from dust, fine dirt, germs, bacteria and enhances the protection of your lungs.
Which analogues to choose
In addition to simple cabin filters, there are also carbon filters that filter the air more effectively, but they are more expensive. The advantage of coal SF is that it does not allow foreign odors coming from the road (street) to penetrate into the car interior.
But this filter element also has a drawback - air does not pass through it well. GodWill and Corteco carbon filters are of fairly high quality and are a good replacement for the original.
However, in some retail outlets the price of the original second-generation Kia Rio cabin filter may be greatly inflated. In this case, it makes sense to purchase a non-original consumable item. In particular, cabin filters are considered quite popular:
Conventional dust cabin filters
- Mann Filter CU2336 – high-tech consumables from a well-known manufacturer
- BIG filter GB-9910 – popular brand, good fine cleaning
- Nevsky filter NF-6164 - Russian manufacturer with an affordable price
Carbon cabin filters
- TSN 9.7.115 – high-quality and thick carbon coating
- BIG filter GB9910/C – activated carbon
- Nevsky filter NF6164C – normal quality, affordable price
It makes sense to take a closer look at the products of other companies - they also specialize in the production of high-quality consumables for passenger cars:
- Corteco
- Filtron
- SCT
- Sakura
- GoodWill
- Fram
- JS Asakashi
- Champion
- Zekkert
- Masuma
- Nipparts
- Purflux
- Knecht Mahle
- RU54
It is quite possible that sellers may recommend replacing the Rio II JB cabin filter with non-original cheap substitutes with a much smaller thickness. They are not worth buying, since their filtering characteristics are unlikely to be at the proper level.
Starting system
This mechanism is a special cavity that connects to the intake manifold. The device also has a diaphragm and a rod that is connected to the air damper. After the engine is started, a vacuum occurs in the intake manifold. It acts on the diaphragm rod, thereby opening the air damper. If the choke handle is returned to its normal position, this will reduce the starting clearances.
The gap parameters depend on the geometric characteristics of the lever and are not adjustable in any way. As for the throttle valve of the second chamber, when the choke is pulled out, it is in a locked state.
How much will such a service cost from a specialist?
The price depends on whether the car owner will pick up the controller, in this case the cost will be 12,000 thousand rubles. If the controller remains with the master, then this service will cost the driver 10,000 thousand rubles. And for the Niva 21214M version the cost will be 7,000 thousand rubles. Of course, in different regions and cities, prices for chip tuning may increase or decrease, but not by much.
If you still decide to do engine tuning yourself, be sure to watch this video:
Chip tuning of a Chevrolet Niva significantly increases its capabilities, but do not forget that only a professional can perform this procedure efficiently. If you are confident in your abilities and (or) want to save a tidy sum, you can try tuning the car yourself, but the risk of serious damage rests entirely on your shoulders.
Many of those owners who drive a Niva Chevrolet note one, but quite significant drawback on this car - the rather low final engine power. Due to the fact that the car has increased cross-country ability, its weight is quite large, and 80 “stock” horses are simply not enough.
Idle system
This unit is necessary in order to supply the combustion chambers with a combustible mixture at the lowest speeds. Thanks to this system, the power unit will not stall when there is no load. Fuel will enter the system through the main jet into the first chamber. Through the XX jet, where it is then mixed with oxygen, the fuel enters the system through the air valve. This mechanism allows you to ensure stable engine operation at idle speed without load.
Next, the combustible mixture will enter the first chamber through a special channel located under the throttle valve. The fuel mechanism leading to the XX exhaust port is closed with a quality screw. This is an adjusting screw that can be used to adjust and change the characteristics of the carburetor. The operation of the engine in idle mode on the Solex 21073 mechanism is also adjusted with this element. Due to it, the gap value of the throttle valve of the first chamber in XX mode is determined.
Third step: flashing the ECU
The most inexpensive way to increase the power of an off-road SUV, because chip tuning is a software modification and does not involve technical intervention. Replacing and adjusting ECU software is the essence of flashing. In this way, it is possible to change the operation of the electronic control unit, adjust the fuel supply and reduce its consumption, due to the engine’s performance in terms of power and dynamics. You can increase engine power by about 15% just by chipping.
Setting the level in the float chamber
So, we looked at the Solex device. Adjusting the carburetor will help set the optimal mode when the engine will operate as efficiently as possible and at the same time fuel consumption will not be too high. First you need to start and warm up the engine a little. Then remove the fuel hose and carburetor cover. Then disconnect the suction cable and twist the cover off the device.
It must be removed as smoothly and carefully as possible so as not to damage the float. Then use a ruler or caliper to measure the distance in each chamber. You need to measure from the mating surfaces to the edge of the gasoline. This size should be about 24 mm. If it is larger or smaller, then the parameter is adjusted by bending the float. Then the device is reassembled, the engine is started and it is warmed up.
The lower classes can't, the upper classes don't want to
I won’t bother you - I have a modified 105 hp engine under the hood. with a maximum torque of 160 N.m versus 79.6 “horses” and 127 N.m for the standard car.
Who is Volodya? The head of the LSGA engineering center, Vladimir Sharandin, is a specialist in engine development and has been a good friend of mine for almost two decades.
The idea to start working on Niva was born spontaneously. We discussed another car, but the conversation itself led to the all-wheel drive of the GM-AVTOVAZ joint venture. What does Niva lack in driving disciplines? Of course, engine vigor. Especially when driving on highways. Off-road, the lower row of the transfer case helps out, but on the highway... The car frankly falls out of the modern flow. This is especially noticeable during acceleration. Trucks have now become fast and overtaking them on Niva is quite problematic. You have to fire up the SUV ahead of time, calculate the situation almost to the horizon and, without resetting, so as not to lose speed, perform a series of overtaking. Dangerous? Yes! This is the problem Vladimir undertook to solve.
It is clear that no one was going to make a youth car for street racing - the device was not for such an audience. It was about safety: the fight against prolonged overtaking and at least some reserve of agility under the gas pedal. At the same time, it was necessary not to overdo it. It was necessary to maintain all the best off-road qualities, not to overload the transmission with excess torque, keep fuel consumption at the same level and fit all this into a budget feasible for Niv owners. Oh yes, a mere trifle, the cylinder volume is standard - no work on the block, pistons, connecting rods or crankshaft. We don’t touch the bottom of the engine, we only modernize the top: cylinder head, exhaust, intake.
The Niva LSGA with a 105-horsepower engine has not lost its best qualities on off-road. The Niva LSGA with a 105-horsepower engine has not lost its best qualities on off-road.
|
|
|
Idle adjustment
Many car owners, namely beginners, most often buy old cars and do not know how to adjust the carburetor correctly. The result is power loss, high fuel consumption, floating speed and other problems. After the level adjustment is successfully completed, the idle speed is adjusted. Before doing this, it is recommended to turn off the engine. To work, you will need a flat blade screwdriver and time. There is a hole on the base of the mechanism. It contains a screw responsible for the quality of the mixture. It is screwed in until it stops. However, you should not be too zealous.
Then, from the extreme position, the screw is unscrewed five turns. Next, the engine is started without choke. Unscrew the quality screw - carburetor 21073 will regulate the engine speed. Then the element is screwed in again. It is necessary to rotate until the operation of the power unit becomes as stable as possible. Rotate the screw slowly. When the engine becomes quieter, turn it out no more than one turn. As a result, the idle speed will be about 900. But if the engine stalls, they are slightly increased.