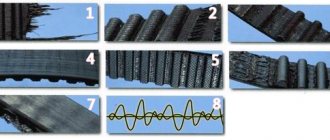
A slightly battered VAZ 2110 with an 8-valve engine, replacing the timing belt, tension pulley and pump. There are 150 thousand kilometers on the odometer, but judging by the condition, it has definitely been damaged a couple of times. The last replacement of the timing belt, according to the client, was almost 50 thousand km ago, immediately after the purchase. The frequency of replacing the timing belt on VAZ 2110 8-valve engines is 60 thousand kilometers or four years of operation. The replacement interval can be increased to 80 thousand kilometers, with periodic monitoring of the condition of the gas distribution mechanism elements.
If the timing belt on an eight-valve VAZ 2110 engine breaks, the valve does not bend.
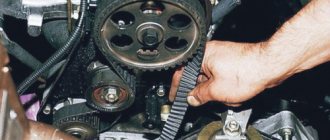
Step-by-step instructions for replacing the timing belt
- Be sure to open the hood.)
Engine 8 valves. - Loosen the locking nut of the generator tensioning device (key 13) and unscrew the adjusting screw (head 10) to the maximum. We take the generator to the cylinder block and remove the generator drive belt.
- We dismantle the plastic protective cover of the timing belt by unscrewing three bolts (10 wrench).
Plastic timing cover.
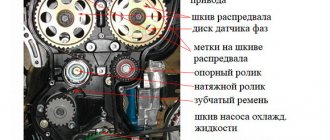
Set top dead center (TDC)
- We turn the crankshaft clockwise until the mark on the camshaft gear pulley and the curved edge on the metal casing coincide.
Camshaft mark. - We remove the generator belt drive pulley by unscrewing the bolt by 17, you will need a wrench with an extension and a pipe as a lever, since the bolt must be well tightened.
- The mark on the crankshaft toothed pulley should also coincide with the low cast mark on the oil pump.
Crankshaft mark. - We dismantle the tension roller together with the timing belt by unscrewing the nut (head 17). Next, unscrew the bolt 17 and remove the camshaft pulley. To avoid losing the key, you can secure it with electrical tape. It is advisable to replace the camshaft and crankshaft pulley.
Fastening the tension roller.
Replacing the pump
- We remove the metal protection, unscrew the 10 nut on top and the three bolts on the bottom securing the water pump. We take out the old water pump.
Pump mount. - Before installing a new pump, apply a thin layer of sealant to its gasket. After installing the pump in place evenly, in several passes, tighten its mounting bolts.
How to set the timing on the markers on the VAZ 2113-VAZ 2115?
1) As we said earlier, if you just need to set the marks, provided that the phases you usually use before removing the timing belt, for example, this is all done easily and quickly, but if you don't have these marks, then after this is already forced to remove the timing belt and all these labels are set, first we will explain how to apply all the marks and so you will make sure that you have set the valve timing normally or there are deviations, come to first you need to remove the cover that covers the RM mechanism and already turned on. After that, everything is placed on the marks, the cover is removed as follows, all the bolts that secure it are turned off (in all three places they are fixed exactly in what you see in the photo below), and once everything is unscrewed, remove the cover of the closing mechanism from the car engine.
Installing a new timing belt
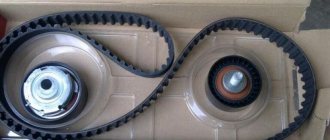
- A new timing kit from Gates was purchased.
- The kit includes a toothed belt and a tension roller.
VAZ 2110 timing kit. - We check that all marks match. We start installing the belt from the crankshaft pulley, then put it on the camshaft pulley, pump and tension roller. We make sure that the descending branch of the belt between the pulleys is tensioned.
- We tighten the timing belt by turning the tension roller counterclockwise. The optimal tension is considered if, with the effort of two fingers, we can turn the belt at the longest section by a maximum of 90 degrees.
We also check the tension during periodic monitoring.
Tighten the tension roller fastening.
- We install all elements in the reverse order of removal.
Do not overtighten the timing belt as this will apply increased force to the pump bearing and it will not last for a long time.
The entire operation took approximately 30 minutes. Since this procedure does not require hanging the engine, you can do it yourself in the field, and if the pump does not change, then you don’t even need to remove the wheel.
What is timing belt?
The timing belt, also known as the gas distribution mechanism, is a part responsible for synchronizing the injection and gas distribution phases in the power unit of the machine. In order for the entire system to work as a single whole, it is necessary to align special marks, which are the point of manual synchronization of the gas distribution.
Most often they go astray when the timing belt is replaced or it breaks while the engine is running. If you do not double-check that the marks match, the engine will not operate correctly, which means you will have to remove the belt again and set everything up.
Timing diagram
TAKE INTO ACCOUNT! The timing belt has two pairs of marks, one of which is located on the pulleys, and the second near the block. They must coincide at the highest position of the first or fourth cylinder.
Purpose and characteristics of the circuit
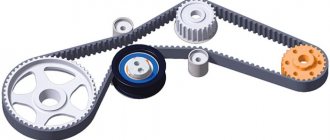
The timing drive mechanism of the VAZ 2106 solves 3 problems:
- Rotates the camshaft, which opens the intake and exhaust valves in the cylinder head.
- The oil pump is driven by the intermediate sprocket.
- Transmits rotation to the ignition distributor shaft - distributor.
The length and number of links of the main drive element - the chain - depends on the type of unit. The manufacturer installed 3 types of engines with a displacement of 1.3, 1.5 and 1.6 liters on the “sixth” Zhiguli models. In the VAZ 21063 (1.3 l) engine, the piston stroke length is 66 mm, on modifications 21061 (1.5 l) and 2106 (1.6 l) - 80 mm.
Many manufacturers indicate information about the number of links directly on the packaging
Accordingly, on power units with different displacements, chains of 2 sizes are used:
- 1.3 l engine (VAZ 21063) - 114 links;
- engines 1.5-1.6 l (VAZ 21061, 2106 ) - 116 links.
How to check the length of a chain when purchasing without counting the links? Pull it out to its full length, placing both parts close to each other. If both ends look the same, you have a 116 link part for long stroke engines (1.5-1.6L). On a short chain for VAZ 21063, one end link will rotate at a different angle.
If the ends of the stretched chain look the same, there are 116 sections.
Diagnosis of ignition system faults
In order to save time and money, it is recommended to check the functionality of the VAZ 2106 ignition system in a certain order. For diagnosis you will need:
Battery check
If the engine does not start at all, that is, when you turn the ignition key, you cannot hear the click of the starter relay or the sound of the starter itself, the test should begin with the battery. To do this, you need to turn on the voltmeter mode on the multimeter with a measurement range of 20 V and measure the voltage at the battery terminals - it should not be lower than 11.7 V. With lower values, the starter will not start and will not be able to crank the crankshaft. As a result, the camshaft and distributor rotor, which drives the breaker contact, will not begin to rotate, and sufficient voltage for normal sparking will not form in the coil. The problem is solved by charging the battery or replacing it.
Checking the switch
If the battery is in good condition and the relays with the starter operate normally when starting, but the engine does not start, you should check the ignition switch. In order not to disassemble the lock, you can simply measure the voltage on the low-voltage winding of the coil. To do this, you need to connect the positive probe of the voltmeter to the terminal indicated by the signs “B” or “+”, and the negative one to the ground of the car. When the ignition is turned on, the device should show a voltage equal to the voltage at the battery terminals. If there is no voltage, you should “ring” the wire going from the contact group of the switch to the coil, and if it breaks, replace it. If the wire is intact, you will have to disassemble the ignition switch and clean the switch contacts or completely replace the contact group.
Checking the coil
After making sure that voltage is supplied to the primary winding, you should evaluate the performance of the coil itself and check it for a short circuit. This is done as follows.
Sometimes the coil works, but the spark is too weak. This means that the voltage generated by it is not enough for normal sparking. In this case, check the coil windings for opens and short circuits in the following order.
If the actual winding resistance values differ markedly from the standard values, the coil should be replaced. In VAZ 2106 cars with a contact type ignition system, a B117A type bobbin is used.
Table: technical characteristics of ignition coil type B117A
| Characteristics | Indicators |
| Design | Oil-filled, two-winding, with open magnetic circuit |
| Input voltage, V | 12 |
| Low voltage winding inductance, mH | 12,4 |
| Resistance value of the low-voltage winding, Ohm | 3,1 |
| Secondary voltage rise time (up to 15 kV), μs | 30 |
| Pulse discharge current, mA | 30 |
| Pulse discharge duration, ms | 1,5 |
| Discharge energy, mJ | 20 |
Checking the spark plugs
The most common cause of ignition system problems is spark plugs. Candles are diagnosed as follows.
The engine may run unstably due to an incorrectly set gap between the spark plug electrodes, the value of which is measured using a set of flat feeler gauges. The gap size regulated by the manufacturer for a VAZ 2106 with contact-type ignition is 0.5–0.7 mm. If it goes beyond these limits, the gap can be adjusted by bending (bending) the side electrode.
Table: main characteristics of spark plugs for the VAZ 2106 engine
| Characteristics | Indicators |
| Gap between electrodes, mm | 0,5–0,7 |
| Heat index | 17 |
| Type of thread | M14/1.25 |
| Thread height, mm | 19 |
For VAZ 2106, when replacing, it is recommended to use the following spark plugs:
Checking high voltage wires
First, the wires should be inspected for damage to the insulation and observed in the dark with the engine running. If any of the wires in the engine compartment breaks down, sparking will be noticeable. In this case, the wires need to be replaced, preferably all at once.
When checking wires for wear on the conductor, its resistance is measured. To do this, connect the probes of a multimeter to the ends of the wire in ohmmeter mode with a measurement limit of 20 kOhm. Serviceable wires have a resistance of 3.5–10.0 kOhm. If the measurement results are outside the specified limits, it is recommended to replace the wires. For replacement, you can use products from any manufacturer, but it is better to give preference to companies such as BOSH, TESLA, NGK.
Rules for connecting high-voltage wires
When installing new wires, you should be very careful not to confuse the order of their connection to the distributor cover and to the spark plugs. Usually the wires are numbered - the insulation indicates the number of the cylinder to which it should go, but some manufacturers do not do this. If the connection sequence is broken, the engine will not start or will become unstable.
To avoid mistakes, you need to know the order of operation of the cylinders. They work in this order: 1-3-4-2. On the distributor cover, the first cylinder is necessarily indicated by the corresponding number. The cylinders are numbered in order from left to right.
The wire of the first cylinder is the longest. It connects to pin “1” and goes to the spark plug of the first cylinder on the left. Then the third, fourth and second cylinders are connected clockwise.
Checking the slider and contacts of the distributor
Diagnostics of the VAZ 2106 ignition system involves a mandatory check of the slider and distributor cover contacts. If they burn out for one reason or another, the power of the spark may noticeably decrease. No tools are required for diagnosis. It is enough to disconnect the wires from the distributor cover, unfasten the two latches and remove it. If the internal contacts or slider have slight burn marks, you can try cleaning them with a file or fine-grained sandpaper. If they are very burnt, it is easier to replace the lid and slider.
Checking the breaker capacitor
To check the serviceability of the capacitor, you will need a test lamp with wires. One wire is connected to the “K” terminal of the ignition coil, the other to the wire going from the capacitor to the breaker. Then, without starting the engine, the ignition is turned on. If the lamp lights up, the capacitor is faulty and must be replaced. The VAZ 2106 distributor uses a capacitor with a capacity of 0.22 μF, designed for voltages up to 400 V.
Ignition adjustment of VAZ 2106
Setting the ignition is half the battle, because then it needs to be adjusted. After starting the engine, you need to warm it up, accelerate to 40 km/h in third gear, then turn on fourth and press the gas pedal about halfway, maybe three-quarters, but not to the floor. There are a couple of scenarios for the development of events, each of which requires its own solution.
How to set the ignition on a VAZ 2106 video:
Source
Is it possible to shorten a stretched chain?
Theoretically, such an operation is quite possible - it is enough to knock out the cotter pin of one or several links and reconnect the chain. Why such repairs are very rarely practiced:
- It is difficult to estimate the degree of elongation of the element and the number of links removed.
- There is a high probability that after the operation the marks will no longer align by 5-10 mm.
- A worn chain will definitely continue to stretch and will soon begin to rattle again.
- Worn gear teeth will allow the links to skip easily when the chain is pulled back out.
Economic feasibility plays an important role. A set of spare parts is not so expensive that you waste time and effort trying to repair the part by shortening it.
Replacing the timing chain drive will take an experienced technician approximately 2-3 hours. An ordinary car enthusiast will need twice as much time without taking into account unforeseen breakdowns. Set aside part of the weekend for repairs and do the work without rushing. Before starting the engine, do not forget to compare the marks and make sure that the mechanism is assembled correctly.
How to understand that you need to set the ignition
There are several indirect signs that are worth looking at. Of course, if the engine does not start, then turning the ignition on is the first thing that comes to mind, unless of course the spark plugs are wet. Let's look at the main symptoms that indicate the need to install the ignition.
Signs that an ignition installation is required:
- Increased fuel consumption. Of course, this may be a consequence of improper carburetor adjustment, but it also happens. For example, when ignition is delayed, the car’s dynamics decrease; in order to achieve the same acceleration, a larger amount of combustible mixture is required.
Loss of dynamics. With late ignition, the explosion follows the piston, which has already gone down under the influence of the inertia of the flywheel.
Silencer shots. When the explosion occurs afterward, the expansion of the gases takes some time. If the piston has already reached bottom dead center, then the exhaust stroke comes next. This means that part of the fuel explosion will be transferred to the exhaust system, hence the popping noise.
- Increased engine noise. Installing the ignition on the VAZ 2106 will be required if the engine begins to noticeably “rumble” and shake. In this case, the piston is still going up, and the explosion is already happening towards it. This makes his work very harsh, unpleasant to the ear, and immediately noticeable.
Removing and installing the camshaft
Removal is often required during major repairs or for replacement in the event of a breakdown. To complete the work you will need the following tools:
- chapters 10, 13 and 17;
- extension with cardan;
- wrench 13;
- crank;
- device for mounting and dismantling the VAZ camshaft.
- ratchet handle;
First, remove the valve cover, which is screwed to the cylinder head and has a rubber gasket. Be careful not to damage it, otherwise oil may leak out in the future. Next, the timing chain tensioner is unscrewed. It is located on the right side of the engine when viewed from the cockpit. The camshaft gear is turned off by head 17.
For convenience, engage the gear and place chocks under the rear wheel. Move the gear to the side; if necessary, you can pry it with a useful tool. Now you need to unscrew all the nuts holding the camshaft housing (housing) in place. To make the job easier, use the handle first.
All threaded connections are tightened with a large torque, so sometimes it can be difficult to disassemble. Then, while gently rocking the camshaft housing, pull it upward with force. And after unscrewing the two nuts at the front of the housing, you can easily hit the back of the rod with a wooden hammer to finally remove it from the socket. The camshaft is installed in the reverse order.
If the repair is due to excessive shaft wear, replace the rocker arms. They can be removed quite easily, just pull them up. But if the condition of the elements is good, then you shouldn’t bother with them - carefully inspect each one and return it to its original place. And do the installation in the same sequence that you filmed.
Contactless ignition VAZ 2106
Some VAZ 2106 owners replace the contact ignition system with a contactless one. To do this, you have to replace almost all the elements of the system with new ones, but as a result, ignition is simpler and more reliable.
In a contactless ignition system there is no breaker, and its function is performed by a Hall sensor built into the distributor and an electronic switch. Due to the lack of contacts, nothing gets lost or burns here, and the resource of the sensor and switch is quite long. They can fail only due to power surges and mechanical damage. Apart from the absence of a breaker, a non-contact distributor is no different from a contact distributor. There is no gap setting on it, and setting the ignition timing is no different.
A contactless ignition kit will cost approximately 2,500 rubles. It includes:
All these parts can be purchased separately. In addition, new spark plugs (with a gap of 0.7–0.8 mm) will be required, although old ones can be adapted. Replacing all elements of the contact system will take no more than an hour. In this case, the main problem is finding a seat for the switch. The new coil and distributor are easily installed in place of the old ones.
Briefly about the main thing
The technology for setting timing marks on a VAZ 2106 engine is performed with the chain removed. A sprocket mounted on the camshaft without a chain is fixed with a screwdriver and tightened with a wrench. After rotating the camshaft in the desired direction and combining the drilling with the boss on the bed, the gear is again immobilized with a suitable object and dismantled. Next, the new chain is installed.
Perfect alignment of the marks can only be achieved by using a split gear. However, this is not at all necessary to comply with. It is quite possible that the camshaft marks coincide and the crankshaft pulley moves a little forward.
I must say “how to set the ignition on a VAZ 2106” - this is a fairly common question. How to do this and what you need for this is in the article.
- How to understand that you need to set the ignition
- How to set the ignition on a VAZ 2106 - procedure
- Ignition adjustment of VAZ 2106
Let's start with the fact that it is simply impossible to set the ignition on the injector. This system has an engine control unit, which, judging by the indicators from the phase sensor and crankshaft position sensor, supplies voltage to the ignition system. Therefore, it is impossible to adjust the ignition on the injector. Not at all.
The device of the ignition system of the VAZ 2106
The ignition system (IS) of a gasoline engine is designed to create and timely supply pulse voltage to the spark plugs.
Composition of the ignition system
The VAZ 2106 engine is equipped with a battery-contact ignition system.
The ignition system includes:
The ignition includes low and high voltage circuits. Low voltage circuits include:
The high voltage circuit includes:
Purpose of the main elements of the ignition system
Each SZ element is a separate unit and performs strictly defined functions.
Accumulator battery
The battery is designed not only to ensure the operation of the starter, but also to power the low voltage circuit when starting the power unit. During engine operation, voltage is supplied to the circuit not from the battery, but from the generator.
Switch
The switch is designed to close (open) contacts of a low-voltage circuit. When you turn the ignition key in the lock, power is supplied (cut off) to the engine.
Ignition coil
The coil (bobbin) is a step-up two-winding transformer. It increases the voltage of the on-board network to several tens of thousands of volts.
Distributor (distributor)
The distributor is used to distribute the pulse voltage coming from the high-voltage winding of the coil to the rotor of the device along the contacts of the top cover. This distribution is carried out by means of a slider having external contact and located on the rotor.
Breaker
The breaker is part of the distributor and is designed to create electrical impulses in a low-voltage circuit. Its design is based on two contacts - stationary and movable. The latter is driven by a cam located on the distributor shaft.
chopper capacitor
The capacitor prevents the formation of a spark (arc) at the breaker contacts if they are in the open position. One of its outputs is connected to the moving contact, the other to the stationary one.
High voltage wires
Using high-voltage wires, voltage is supplied from the terminals of the distributor cover to the spark plugs. All wires have the same design. Each of them consists of a conductive core, insulation and special caps that protect the contact connection.
Spark plug
The VAZ 2106 engine has four cylinders, each of which has one spark plug. The main function of spark plugs is to create a powerful spark that can, at a certain moment, ignite the combustible mixture in the cylinder.
Operating principle of the ignition system
When you turn the ignition key, current begins to flow through the low-voltage circuit. It passes through the contacts of the breaker and enters the primary winding of the coil, where due to inductance its strength increases to a certain value. When the breaker contacts open, the current instantly drops to zero. As a result, an electromotive force arises in the high-voltage winding, increasing the voltage tens of thousands of times. At the moment such a pulse is given, the distributor rotor, moving in a circle, transmits voltage to one of the contacts of the distributor cover, from which voltage is supplied to the spark plug through a high-voltage wire.
Setting the angle of the closed state of the breaker contacts
The angle of the closed state of the breaker contacts (UZSK) is, in fact, the gap between the contacts of the breaker. Due to constant loads, it gets knocked down over time, which leads to disruption of the spark formation process. The UZSK adjustment algorithm is as follows:
After setting up the UZSK, the ignition timing is always off, so it should be set before assembling the distributor.