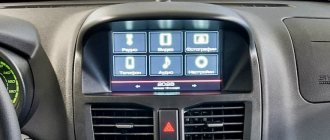
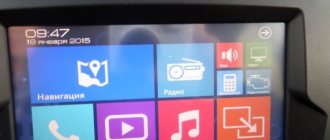
In the LADA Granta “Lux+” configuration, the driver will have access to an extremely convenient navigator display, which is built into the dashboard. Thanks to this useful option, there is no need to purchase a portable navigator, which often impairs visibility and distracts the driver from driving. The navigator features a dual-system GLONASS/GPS receiver. Thanks to it, the number of available satellites increases, which is extremely important in the conditions of a modern metropolis with its huge number of high-rise buildings that worsen the stability of communications. The navigator will be focused on the Russian GLONASS satellite system, the American GPS will only initially support the domestic one. After some time, the Russians will refuse the help of American satellites, and the LADA Granta navigation system will work exclusively with GLONASS.
The navigator on Grant will be controlled by a joystick
The LADA Granta navigation system is controlled by a joystick, which is located in the right steering column switch. Speaking about the navigator, special attention should be paid to the “voice guide” function, which is built into the system. Voice prompts about a change of route or that the driver has strayed from the laid path will help you fully concentrate on driving the car without constantly being distracted by the display. It is worth noting that the “voice guide” function is built into the audio system with which the LADA Granta is supplied. If necessary, the function will automatically mute the radio so that the driver can hear the navigation system message. The display of the LADA Granta navigator, in addition to the route and location of the car, shows the driver information from the on-board computer, odometer readings and displays the temperature outside.
Choosing a location
Active antennas have a compact design and are attached using a special adhesive mounting pad or double-sided tape. Therefore, you can choose any installation location inside the cabin. Most often, preference is given to the windshield near the front passenger seat. This is due to its location near the radio and convenient installation of cables into the car's trim.
Placing on the roof has an advantage in signal reception, but is more difficult. Oxidation of metal parts and deterioration in reception quality are also possible.
When choosing a place where the antenna will be installed, you should adhere to the following rules:
In the Grants navigator you can change the maps yourself
According to official representatives of the automaker, the WindowCE.Net operating system is used as a platform. Thanks to it, the car owner will be able to update maps at his own discretion and even install new navigation programs on his own. In the provided navigation system software, the driver can easily find maps of 83 regions of Russia, on which 350,000 points of “high interest” are marked (hotels, hotels, banks and much more). The maps will allow you to navigate 1,500 cities and towns with high accuracy. In 92 cities, it will be possible to focus only on “street search” - without house numbers and buildings. The Lada Granta navigator will work in 2D and pseudo 3D modes. There is also the possibility of turn-by-turn navigation, in which the driver will only see an arrow on the display informing him of the next maneuver. As already mentioned, a “voice guide” will also be invaluable.
Installing a GPS antenna in a car
At the very beginning of the process, a location for the GPS antenna in the car is determined. Next, the device is connected and configured, and possible problems are eliminated.
Installation
Before installing a GPS antenna in your car, it is better to choose a location for it. The most popular locations for installing the device include:
- wings;
- bumper;
- mirror;
- Windshield;
- roof;
- frame.
However, for each of them, different fastening methods are used: magnetic, mortise, internal or overhead.
GPS antenna on glass
Connection and setup
The device can be calibrated either in a specialized salon or independently, using the photo in the instructions. An approximate sequence of actions looks like this:
- The programs needed for operation are loaded onto the memory card. They are listed in the user manual.
- The memory card is inserted into the device and the main menu is turned on. From there you need to go to the “Options” item and enter the path to the programs.
- After completing the procedure, open the program and select the desired operating parameters.
The complete process of setting up the antenna is shown in the video at the end of the article.
Troubleshooting
After proper configuration, the device should not malfunction. However, it may produce some common errors:
- Interference with signal reception. An additional amplifier can solve the problem. If you urgently need to improve the signal, you can try to leave the area where other electrical appliances and cars are located.
- The device records incorrect data. In this case, you need to reflash the device.
- The internal antenna does not pick up the signal well. Then you should check the windshield. Tinted windows with metallic inclusions can block signals.
- The device stops working. It could be a simple disconnection from the power supply or a breakdown. It is best to check all the parts and wiring of the device.
Useful tips for car owners
On driver forums you can find the three most common recommendations regarding GPS antennas:
- Install in a specialized salon. Car owners complain that instead of wasting time and effort, they would prefer to pay 1,500 rubles for installation.
- Do not reflash yourself. If you install the wrong firmware version, the antenna will stop working altogether.
- Give preference to internal antennas with a wire connection. Drivers motivate this decision by the poor protection of external devices from precipitation and the instability of the Bluetooth channel.
And at this time...
AvtoVAZ tried to apply all the innovations on the new Lada Granta model. But he does not forget about his favorite - Kalina. This particular car was the best-selling car at the end of 2011. The management decided to use the acquired skills and small inventions to use on the Lada Kalina model in a luxury version. The same navigation on Kalina will look like this:
What do YOU think about this?
Write! You will need
: USB-GPS receiver BU-353S4 ($38), driver for GPS receiver, navigation program.
Choosing a GPS antenna for a car
When searching for a device, you need to rely on the technical specifications. The first of them is functionality. The device is capable of receiving three types of signals:
- Radio.
- Television.
- Satellite.
Devices can receive one type of signal or several. As a rule, combined type devices cost more. A cable connected to the on-board network or Bluetooth technology can be used as a communication channel. This indicator is reflected in the price of the device.
A combined technique for determining coordinates is also allowed - in addition to satellite systems, the device can determine its location using cellular communications. Car trackers work on the same principle. Devices with a GSM transmitter are capable of transmitting location data to a mobile phone or other device. Such devices cost more than classic models.
You can install a GPS antenna either in a specialized salon or on your own if you have instructions and simple tools. The main thing is to determine in advance the mounting location of the device.
So, for example, when choosing the Starline s96 bt gsm gps model, installation is carried out at a car dealership.
Installing a driver in the MMC (radio tape recorder) for a GPS receiver
The Lada Kalina 2/Granta head unit runs on the Windows CE 6 operating system (ARM architecture).
To exit the radio menu to the WinCE desktop, press the “Settings” button on the screen and hold it for a few seconds. To go back, double-click on the Home icon. We copy the driver for the antenna onto a USB flash drive and install it on the radio (click on the file twice). The driver will be installed in the root of the Windows folder, which is not very good, because after rebooting the radio, the driver will be deleted and will have to be installed again each time. To avoid this, you should move the USBSER.DLL file to the StaticStore partition, for example, to the Drivers folder. If, when connecting a GPS receiver, the system asks where the driver is located (specify our path, for example, \StaticStore\Drivers\usbser.dll).
How to return to the regular menu
On the “Desktop” screen, in addition to the “My Device” icon, there is another interesting icon called “Home”. Double clicking on the “ Home” icon always returns us to the main menu of the VAZ radio. There is no other way. Before returning to the menu, be sure to close the application. You won’t be able to use Navitel’s voice prompts anyway if you turn on the radio, video, or sound.
Let us note another interesting feature of the Navitel program. You can turn on the radio or play music in the main menu, then open the “Desktop” and launch the application. So, in this mode, only music will sound in the speakers, and not voice prompts from the navigator. Maybe in the firmware modified by AvtoVAZ everything will look different. And we note that another tuning option without reinstalling the firmware is connecting a rear view camera. The driver is also installed here, and that’s it.
Installing navigation software in Kalina 2/Granta radio
The most popular navigation program is Navitel (version 7.5.0.202 has been tested and works).
You can download it from the torrent forum. Configure the program to work on the COM5 port at a speed of 4800. We write Navitel to the SD card, and we also write the NavitelContent folder in the root of the card, which should contain maps and speedcams. We insert the card into the radio and launch Navitel. If everything is configured correctly, then after a while you should hear “Connection with satellites established.” That's it, the navigation is configured and ready for use:
Hi all! A big request to everyone who is against the domestic auto industry - don’t read, don’t waste your precious time! After all, there are so many reviews about Toyotas, Kia, Chevrolets and other excellent cars. This review is for those who are really interested in this and may help in choosing a car.
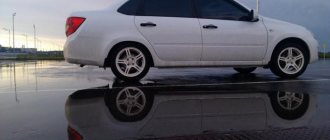
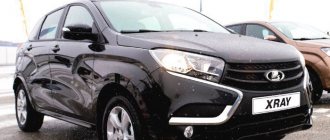
My wife and I thought for a long time about which car to buy. I wanted something new and, preferably, for 5-7 years, so that I could only change consumables and refill them. Because In the future there are plans for a mortgage. Therefore, the choice fell on the LADA Granta Liftback. But, as you know, the taste and color...
Why Grant? Kalinas and Priors were not liked by their appearance. Friends advised me to take a closer look at Grant. But my wife didn’t like the sedan body, and, in principle, neither did I. By chance we saw Grant's liftback.
The car seemed quite nice and, probably, somewhat similar to a foreign car in appearance (at work, colleagues jokingly call the little X6). We began to study the technical specifications, reviews on the Internet, signed up and took a test drive. Overall, I liked the car. Plus we got a good discount and decided that it was fate!
Before that I owned a VAZ-2114, 15; Daewoo Nexia, Kia Ceed, Chevy Niva. Due to certain circumstances, it turned out that I was left without a car, and then I started a family. Because We work and live in one city, and our parents and friends live in another, so we no longer had the strength or nerves to remain without a car!
We came to the showroom and... bought a car in the Luxury configuration with a navigation system! Naturally, on credit. Anyway.
The salon immediately ordered anticorrosive and alarm installation (kgb alarm) as a gift from the car dealership (instead of winter tires). Winter tires offered as a gift - Kama 517, I had the experience of driving on these tires... Scary! I decided to buy something I trust.
Do-it-yourself installation of a radio in a Lada Granta
This article will discuss how to install a radio on a Lada Granta car. I would immediately like to say about the electrical connection of the radio. AvtoVAZ has made a significant step forward.
Now, when installing a radio, there is no need to run wires to power the radio and speakers; all this is included in the standard audio preparation of the car.
This is a big plus if you remember the tenth family, when the owners of tens and twelves had to do everything from A to Z, everything themselves.
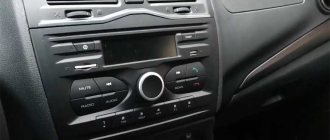
Dimensions of the radio for installation in a regular place in the Lada Granta
The space for installing a radio in the dashboard console of a Lada Granta car is designed for 1 DIN radio. Here is an example of installing such a radio.
When installing a 2 DIN radio, you will need to cut the partition up and adjust the frame in the console to the size of your audio system, which will make your life somewhat more difficult
Operations for connecting a radio to a Lada Granta
The first thing you need to do is remove the plastic pocket installed in place of the future radio. To do this you will need a flat blade screwdriver. Having taken out the pocket, on the reverse side you will find slots where ISO connectors will be inserted to connect the radio.
You can learn more about them from the article “How to connect a radio with your own hands.” The connectors fit quite securely into pockets, meaning you don’t have to look for them in the wilds of the panel to make connections. Now you need to remove the metal frame from the radio and install it in the place where the plastic pocket was. Unbend the frame's antennae to lock it securely in place.
Connect the connectors to the radio and insert it into the previously installed frame.
When installing the radio, you will not need any tool to change the shape of the holes (a file, a file), all dimensions have already been made in accordance with generally accepted standards for 1 DIN radio casings.
Installing speakers in the standard places of the front doors on the Lada Granta
In addition to the radio, for its normal operation, it will also be necessary to install speakers and acoustics in the car door.
To cut holes in the door trim, it is better to remove it from the car.
To do this, you need to dismantle the door handle, the plastic casing in which the door opening lever is installed, and the glass position adjustment handle (if you have a standard package).
See the article “Removing and installing door trim on the Lada Granta.” The door trim and metal frame of the front doors provide a size for 16 cm speakers.
Depending on the variation of the speakers you have chosen, the following problems may arise: - if you have chosen 13 cm speakers, then you need to cut out a corresponding hole in the center of the plug on the door trim according to the template supplied with the speakers.
In this case, the hole in the door frame is slightly larger and you will have to increase the plane from the mounting “ears” of the speaker to the mounting holes in the door; - If you decide to install 16 cm speakers, then you may have to modify the door frame here, since the speaker basket can It definitely won’t fit into the standard hole in the door hardware.
You will need a grinder or a jigsaw with metal files. We cut a hole of the required diameter and try on the speaker.
We connect the speaker and install it in place. We install door trim. We mount the frame for the metal grille of the speaker and, accordingly, firmly fasten the speaker to the door with 4 self-tapping screws. We install the speaker grille.
This is, in principle, the entire algorithm for installing a radio and speakers in the front doors on a Lada Granta car.
In addition, you may find the material from the article “Wiring diagrams of the Lada Granta” useful, which shows the blocks for connecting the radio power supply and connecting the speaker wires to it, blocks 17 and 18.
The “standard” configuration also includes wires leading to the speakers of the front doors of the car. So, the connection of the radio speakers in the doors is carried out through the rear harness, see the article “Wiring diagram of the rear wiring harness of the Lada Granta”, contacts on the block 16,17,18,19.
Impression
First impressions: the seating position is high, I like it. With my height of 183 cm, I settled in quite comfortably. Ergonomics vary, but I’m happy with everything, everything is at hand, I don’t need to reach for anything. Good review, although I still replaced my original wipers with winter ones because... Relatives refused to clean it when the temperature was near zero.
I’ll tell you about the stove, since I couldn’t use it without it, it’s autumn. The engine warms up very quickly, as does the interior. I really liked the work of the climate system, or, as AvtoVAZ positions it, climate control.
I probably agree with this, I started the car, I started driving, the heater was at second speed, the temperature control knob was completely in the red zone. After a couple of kilometers, the temperature selector handle moves to 22 degrees, the fan to the first position. That's it, then the climate automatically maintains the set temperature. I love.
The glass comes off very quickly. Naturally, provided that the air flow is directed towards them and the position is as warm as possible. And it doesn’t matter whether they are fogged up or covered with frost after the night.
The heated mirror function is very useful and convenient. For our car, I consider the presence of climate control and heated mirrors to be a big breakthrough. I was very pleased with the aerodynamics of the car, in the sense that when driving on the highway, the side windows and mirrors do not get dirty when the wipers are working. You can feel the work of engineers.
The rear-view mirrors are very large, but there is a problem - perhaps this only applies to the liftback body. When parking in reverse, there is very little visibility of exactly what is going on directly in front of the trunk - this is a minus. I found a solution to this problem, I will install a rear view camera.
About navigation. I recently traveled to the capital of the wild, sunny republic of Bashkortostan. I had to use navigation. The CityGuide program has been installed. I’ll say right away, so as not to go into details and not torment the reader with unnecessary information, it works correctly, determines the location quickly and accurately.
As for the multimedia system as a whole, it works great. Plays all music files, shows photos. The only thing is that it doesn’t work with video files. Plays only in one format, which is not very common. But for me it’s not critical, because... You still can’t look behind the wheel.
And so far, unfortunately, I have not been able to figure out the function of automatically switching the “day-night” mode. Overall, I'm satisfied. Although over time I will change the speakers for better sound.
About controllability. From the showroom, the car was equipped with 15-inch alloy wheels and Pirelli Cinturato P1 summer tires. But considering that it’s autumn, I immediately purchased and changed the car to winter tires Bridgestone blizzak 01. I won’t go into discussions about the correctness/wrongness of my choice regarding these tires, I’ll say briefly - I’m satisfied with the tires.
Now about the handling of the Lada Granta liftback. My configuration includes electric power steering. Pros, they are also cons - the steering wheel is very light and there is no clear “zero”, or rather there is none at all. Out of habit, this is very annoying.
Comparing with power steering. How to turn the steering wheel on the power steering to turn, turn, start moving, release it and it itself goes to the “zero” position. This doesn’t happen on electric; the steering wheel remains in the turned position and does not try to return to its original position.
I’ll make a reservation right away in order to avoid conversations about alignment / collapse. After the car show, the first thing I did was go there and not to the one that was cheaper, but to the one that was more expensive and proven, of high quality. As it turned out, not in vain.
The camber was perfect, but the alignment had to be adjusted. No effort is felt when turning. In my opinion, this is not gud. Although I am completely satisfied with the behavior of the car on the track. It behaves predictably and is stable (before purchasing, while reading reviews, I came across such statements that when driving with oncoming trucks the car begins to throw), when driving along the highway there was heavy snowfall and a blizzard, in some places there was snow porridge, in places there was ice. Overall, handling is a solid 4.
Headlight. I don't think it's worth talking about him. It is good even on simple halogen lamps. The only thing is that from the factory the headlights shine low, right under the bumper. I had to lift it, although it is not easy, in the sense that finding the adjusting bolts is downright difficult. And for this you need a 6mm hex key. Thanks to the Internet.
About the salon. I won’t talk about hard plastic - everyone already knows that. The main thing for me is that it doesn't rattle (at least not yet). The panel is informative, all indicators are very easy to read, day or night.
The interior is quite roomy given my height, as I wrote above (183), there is still room for a passenger’s legs behind me. I won’t write much about the trunk - it’s big. There are some minor complaints about the transformation of the rear of the cabin when the seats are folded.
Firstly: before folding the seats, you need to remove the headrests, and they have stoppers, and with two, it is very inconvenient to do this alone. Second: the comment is not mine, but I read it in one of the reviews (but completely agree with the author) - weak seat fastenings. They are plastic, break very easily, and they are not available anywhere.
Engine. On my car it is 1.6 L 16 valve, according to the passport it is 106 hp. My mileage is still low, I’m in break-in mode. I don't turn the engine too hard. But its heavy-duty nature is already noticeable. I like that it spins up easily and there is enough power reserve.
Appetite, I think it’s too early to talk about it, at the moment I have 8.3 liters per 100 km in mixed mode. Let me make a reservation right away: it’s already winter here in terms of snow and ice, and there’s ice on the roads. Although the temperature has not yet dropped below -5. I start the car a couple of minutes before leaving the house.
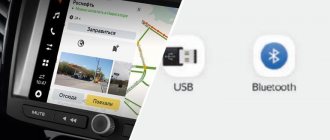
Lada Kalina Station Wagon Snow White › Logbook › Installing a standard antenna with GPS/GLONASS.
Greetings boys and girls!
As you remember from this post, Snow White and I received a standard antenna, which is installed on equipment with standard navigation. It has two wires: the first is connected to the MMC as a radio signal receiver, the second is used to receive a GPS signal. For work we will need: ● A Phillips screwdriver with a long blade and a magnetic tip. ● Socket wrench or socket with extension 8. ● Socket wrench or socket with extension 22. ● Electrical tape. ● Ties. ● Wire cutters. ● Puller for plastic parts.
So let's get started: first of all, we remove the lampshade. To dismantle the lampshade, carefully remove the glass by prying it in the corresponding recesses. Then we remove the plastic screen, carefully prying it off from the front and back; it is secured with three latches.
And before us appear two self-tapping screws securing the lampshade to the ceiling. We unscrew them, carefully remove the lampshade from the ceiling upholstery, unfasten the power supply and remove the lampshade completely. We see the mounting of the antenna and its wires. Using a size 8 wrench, unscrew the fastening nut, move the wire to the side and remove the antenna from the outside.
We isolate the wire just in case (I didn’t dismantle it, because it doesn’t interfere), then we pass the wires of the new antenna into the hole and install it. NB:
If you work alone, then secure the antenna on the roof with electrical tape, tape or something else, so that during the process of fixing it with a nut, it does not try to escape from us.
Then we carefully separate them. The antenna wire for the radio signal will go along the right post, and for GPS on the left. Why is that? Because for cars with standard navigation, the wire is connected through an extension cord. On the advice of sokol787, I took a different route, routing the wires to different racks. The wire is just long enough to reach the dashboard.
After the antenna is mounted, remove the passenger sun visor and its fastenings, unfasten the passenger pillar trim and the side panel trim. And we begin to carefully lay the wire under the ceiling, leading it to the rack, where we secure it with standard electrical tape.
Then, bypassing the side airflow nozzles, we bring it down and take it under the glove compartment. We put our hand under the glove compartment and feel the groove for securing the standard connector. We take it out, unfasten the old wire and connect ours. We have radio. We put the wire back into the groove, install the trim and sun visor back.
We perform similar manipulations on the driver's side. Then, using a puller, carefully remove the decorative lining and unscrew the self-tapping screw securing the lining of the shield. Don’t forget about the top two, after which we carefully pull it towards ourselves, having first lowered the steering column. We unscrew the four screws securing the instrument panel, bring it towards us and carefully unfasten the harness. It is secured with a lock, so be careful. Having removed the instrument panel we see. We see that the connector is “male”, just like on our antenna wire.
Since the GPS receiver is located in the device itself, an adapter was ordered for 250 rubles from Uncle Liao’s booth. I didn’t want to pay 850 rubles for a standard extension cable. Therefore, the instrument panel was returned to its place, the GPS cable was wound up and temporarily hidden under the counter, and the navigation still works as it did through the u-blox 7 whistle. When the adapter arrives, I will connect everything and test the antenna in action. So don't switch