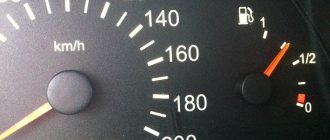
Depending on how loaded the vehicle is, the headlights can be directed higher or lower. To adjust the light flux, special devices are used - hydrocorrectors. If the car is loaded, the headlights should be turned down so that the flow of light is directed not upward, but onto the road. This ensures the necessary illumination of the road surface and prevents the driver of an oncoming car from being dazzled. In the case of a minimal vehicle load, when the rear part of the frame is raised, the headlights should be turned upward.
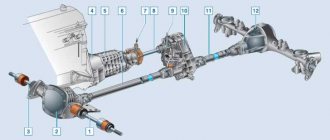
Design of headlight hydraulic correctors
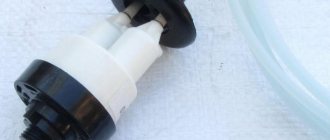
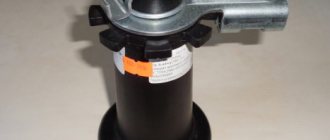
As a rule, the following components are included in the design of a hydraulic corrector:
- master cylinder mounted on the dashboard;
- actuator cylinders mounted on the headlights;
- connecting pipelines that are fixed with clamps;
- working fluid with increased frost resistance.
Typically, hydraulic correctors are made in the form of a non-removable structure that cannot be repaired. Therefore, if, for example, the hydraulic corrector of the VAZ-2114 headlights fails, it is repaired by replacing it with a new set.
The manufacturer provides a maximum operating pressure in the normal state of the corrector. To direct the luminous flux of the headlight downwards, the pressure in the system is reduced, as a result of which the actuator cylinder rod is retracted and the optics are rotated downwards. Thus, most of the time the device is under increased pressure.
Quite often, when temperature changes occur, especially in winter, the structure of the seals is damaged due to the poor quality of the rubber, which leads to leakage of the working fluid. In turn, this leads to jamming of the cylinder pistons in one of the positions.
Structurally, all hydraulic correctors that are installed on VAZ vehicles are made according to a similar design, with the exception of some differences in size, layout of cylinder fastenings and pipelines. Today the following modifications of hydraulic correctors are supplied to the market:
- “2105-3718010” - for VAZ 2105-2107;
- “2108-3718010” - for VAZ 2108-21099;
- “2110-3718010” and “2110-3718010-10” - for VAZ 2110-2112;
- “2114-3718010” - for VAZ 2113-2115;
- “21213-3718010” - for 21213 “Niva”.
Automatic headlight leveling
If the car has an automatic low beam correction system, then the driver does not need to adjust or turn anything himself. Automation is responsible for this. The system usually includes:
- Control block;
- body position sensors;
- actuators.
Sensors analyze the vehicle's ground clearance. If there are changes, a signal is sent to the control unit and the actuators adjust the headlight positions. Often this system is integrated with other body position systems.
The automatic system also operates in dynamic mode. Lighting, especially xenon lighting, can instantly blind the driver. This can happen when there is a sudden change in ground clearance off-road, when braking and suddenly moving forward. The dynamic corrector instantly adjusts the light output, preventing bright light from blinding drivers.
According to regulatory requirements, cars with xenon headlights must have automatic low beam level control.
How to repair a hydraulic corrector on a VAZ 2110 - 2115
Repair of the VAZ-2110 headlight hydraulic corrector is not provided by the manufacturer. Therefore, if it fails, the entire device, complete with pipelines and cylinders, is replaced.
If the angle of inclination of the optics is not adjustable when the vehicle load changes and it is not possible to achieve the optimal luminous flux using the adjusting screws on the headlights, you should check the functionality of the corrector as follows:
- First of all, it is necessary to inspect the device for the integrity of the pipelines and the absence of liquid leakage.
- If after these measures no malfunction is detected, we proceed to checking the performance of the actuator cylinders. To do this, remove them from the headlight unit and measure the stroke of the rods. Normal operation of the cylinders is ensured when the rod stroke is within the range of 6.5-7.5 mm.
- Since repair of the VAZ-2110 headlight range control is not structurally provided for, we replace the non-working device with a new device included in the kit.
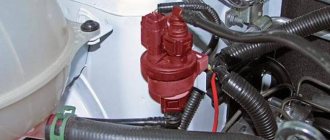
Malfunctions and diagnostics of hydraulic corrector
Despite the simplest design, the hydraulic corrector is considered one of the most unreliable systems in cars of the tenth family. Design flaws, quality of materials and workmanship force us to return to the problem of adjusting headlights almost every year.
In this case, neither the working nor the main cylinders can be repaired and require replacement if they fail.
The signs of a malfunction are clear - the headlights do not respond to the corrector knob and are frozen in one position . The most common problem is depressurization of the hydraulic system. This trouble can be easily calculated by the leakage of liquid from the system, and it is also easy to eliminate. It is enough to seal the joints (on the cylinders) of the hydraulic system and check its operation again.
Another problem is fluid leakage through the cuffs of the working cylinders . No one is going to repair cheap plastic cylinders; they are replaced with new ones. By the way, the price of a new hydraulic corrector for the VAZ-2110 and all cars of the family (article 2110–3718010 and 2110-3718010-10 ) is 450–550 rubles, depending on the manufacturer. The difference between them is the stroke of the working cylinder rod. For tens in a station wagon, a larger load and a larger adjustment angle are provided. Accordingly, a larger stroke of the cylinder rod.
You can check the operation of the headlight hydraulic adjustment system by measuring the working stroke of each of the working cylinder rods:
- 2110–3718010 — working stroke 6–7.5 mm for sedan and hatch;
- 2110-3718010-10 — working stroke 6–8.5 mm for a station wagon.
If the hydraulic cylinders do not work or the working stroke does not correspond to the nominal values, we replace them and install a previously purchased new hydraulic corrector of the appropriate modification.
Adjusting the headlight range control rod
Sometimes a malfunction of the headlight adjustment system can be caused by a misalignment of the adjustment lever with the lampshade rod. Therefore, if, for example, the hydrocorrector of the VAZ-2112 headlights does not work, do not rush to repair it by replacing it. First, make sure that the connection between the lever and the rod matches the operating position.
The rod of the corrector actuator cylinder rests on the lever, which, in turn, acts on a similar rod rigidly fixed to the headlight dome. The lever passes through the adjusting bolt, which is its fulcrum. The adjustment mechanism works on the principle of a swing. The corrector swings the lampshade, and the adjusting bolt allows you to raise or lower the support point of this swing. If the bolt is turned to the maximum position, the reverse end of the lever in the form of a ball may slip out of engagement with the lampshade rod.
In order for the VAZ-2115 headlight hydraulic corrector to work again, the device must be repaired by returning the lever to a special recess on the rod. To do this, first tighten the adjusting bolt until it stops, then press the lampshade down and insert the lever ball into the desired position.
Eliminating headlight shake
Many owners of the VAZ 2110 find that the light flickers when the car is moving. Such a breakdown most often occurs in Kirzhach headlights, but in Bosch parts such a breakdown rarely occurs. There is only one reason: reflector rattling. To eliminate light flicker, check:
- Is the reflector in place in the latch;
- The presence of an adjusting bolt rod;
- The emphasis is on the seating recess of the hydraulic corrector rod;
- We check the sagging of the thread (swap the high beam and low beam bulbs);
- Integrity of the tube in the hydraulic corrector (it may fray).
Replacing the hydraulic corrector for VAZ 2110, 2111, 2112 headlights
Replacing a faulty corrector yourself is not difficult. The replacement sequence is as follows:
- unscrew the screws securing the pipeline clamps to the mounting brackets;
- remove the handle from the master cylinder;
- Unscrew the nut securing the master cylinder to the dashboard;
- We disconnect the actuator cylinders from the headlamp;
- we push the actuator cylinders together with the seals inside the cabin;
- install the new unit in reverse order.
Many car enthusiasts, instead of the standard hydraulic corrector provided by the manufacturer, install a more practical and efficient electric headlight corrector. Its difference from a hydraulic device is that electric motors are used as a drive. For VAZ cars, a standard electrical corrector of the Silich-Zenit series is provided. It is easily mounted in the same places as a conventional hydraulic corrector. The installation procedure for the electrical corrector is as follows:
- disconnect the negative terminal from the AC;
- turn the master cylinder counterclockwise and remove it;
- replace the o-ring;
- install the electric corrector in place of the main cylinder;
- dismantle the master cylinder lever in the cabin;
- We connect the positive terminal of the corrector to the socket of block No. 20;
- We attach the negative terminal to one of the body studs under the dashboard;
- we lay the corrector wiring instead of pipelines or along the power supply harness;
- connect the corrector's electrical wiring to the actuators;
- connect the negative terminal to the battery;
- We check the functionality of the corrector.
After installing the corrector yourself, you will have an idea of how this device works. If necessary, repairing the electrical corrector will not be difficult.
Corrector installation
If your car does not have such a system, you can install it yourself. There are various sets available on the market (from electromechanical to automatic) at very different prices. The main thing is that the device matches the lighting system of your car. If you have special skills and tools, you can install the system yourself.
After installation, you need to make adjustments and adjust the luminous flux. To do this, you need to draw a special diagram on the wall or shield, which indicates the points of deflection of the beam. Each headlight is individually adjustable.
Headlight adjustment
Features of restoration of hydraulic correctors for VAZ 2107—2109
As a rule, on cars of the VAZ 2107-2108 series, a manual hydraulic headlight leveler is installed. With it, the driver can manually change the direction of the light flux depending on the load of the car, moving the headlights up or down within small limits.
The design does not provide for repair of the VAZ-2107 headlight hydraulic corrector, therefore, if it fails, it is replaced with a new device. The only thing you can try to do if it is impossible to adjust the angle of the headlights is to adjust the operation of the corrector in the order indicated above.
There are no fundamental differences in the optics adjustment device in the “nine” compared to other models. Therefore, the VAZ-2109 headlight hydraulic corrector is repaired using the replacement method.
Changing the type of optics (tuning)
Car enthusiasts often tune their car headlights to improve their appearance. High-quality tuning gives the car a fashionable look and beauty. If you choose the right accessory, the appearance of dozens will change completely . The most popular among car enthusiasts is tuning headlights in the form of tinting. It is carried out in a variety of ways that have virtually no effect on the brightness and quality of road lighting. Types of headlight tinting:
- Painting of the headlight mask;
- Glass painting;
- Glass tinting film.
The process of such tinting is best shown in a video. For those who don't want to paint or tint their headlights themselves, there are ProSport headlights. They are already sold in black or chrome. You just need to install them instead of the standard headlights. Only they cannot boast of high quality or bright light.
Depending on how loaded the vehicle is, the headlights can be directed higher or lower. To adjust the light flux, special devices are used - hydrocorrectors. If the car is loaded, the headlights should be turned down so that the flow of light is directed not upward, but onto the road. This ensures the necessary illumination of the road surface and prevents the driver of an oncoming car from being dazzled. In the case of a minimal vehicle load, when the rear part of the frame is raised, the headlights should be turned upward.
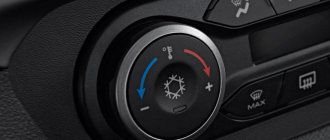
Operating principle
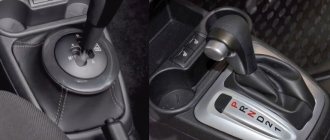
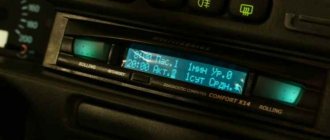
In order to adjust the position of the headlights, the driver should turn a special handle located in the cabin. It is this that allows you to control the pressure in the pipelines of the corrector. To lower the headlights, turn the handle down. It's a simple control system, but even that can break. What to do if the corrector turns out to be faulty?
Control knob for hydraulic headlight adjustment
Price
A hydraulic corrector for VAZ cars is quite inexpensive - from 300 to 500 rubles. An electromechanical device will cost approximately 1800-2000 rubles.
There are also universal types of autocorrectors suitable for installation on any make of car. For example, a system from the manufacturer Hella will cost from 14 thousand rubles.
Do not forget: for xenon headlights, regardless of the make and model of the car, only the installation of an automatic corrector is required.
Source
Installation of a new device
In order to install a new headlight hydrocorrector, there is no need to go to a service station. This is quite simple to do, so you can save time and money if you do the installation yourself. To get started, you will need a flathead screwdriver and an extension cord with a socket head.
Replacing headlight hydraulic corrector
Once these tools have been found, you should proceed to choosing a hydraulic corrector.
Today you can find a wide variety of models on the market:
- hydraulic, operating due to the pressure of the pistons and fluid;
- electrical;
- automatic, capable of independently adjusting the level of headlights.
The cheapest of them are hydrocorrectors. Their only drawback is frequent breakdowns.
So, in order to install a new hydraulic corrector, you need to remove the old one. Anyone can do this if you follow the simplest instructions, which are presented below in the text.
Instructions:
- First you need to find all the clamps securing the pipelines with liquid. They will need to be removed. To do this, you need to unscrew all the bolts.
- After this, you should return to the cabin and carefully remove the rotating handle from its seat. In this case, the rotating handle is located on the main cylinder.
- Now it's time to remove the main cylinder. This can be done using bolts. All bolts (which secure the cylinder) must be unscrewed and removed.
- When there are no more bolts left, you can start removing the cylinders from the headlights. The easiest way to pull them out is directly through the inside of the car. That's all!
Installing a new hydraulic corrector is as easy as removing the old one. To do this, all of the above steps should be carried out in reverse order, but before doing this, the O-ring must be replaced. Once the new device has been successfully installed, the entire system should be checked.
Warning! If the system is not checked for functionality in time, then while driving, light rays may be directed into the eyes of drivers of oncoming cars, and not onto the roadway. This may lead to an accident. In order to prevent such a scenario, you should check the operation of the lighting devices in advance.
Repair of old
Yes, we don’t care about the assurances of auto parts manufacturers, we will repair it. We stock up on free time, and you can spend the whole day on this procedure, be patient and let’s get started.
Here is a detailed video on repairing a VAZ hydraulic corrector:
- Savings on buying a new one
- Self-esteem that you did it yourself
- Efficient headlight range control
- A sea of wasted time and nerves
- There is no guarantee that it will work for a long time. There were cases that after repair the lifespan was a day, but there were cases - a year, a year and a half, depending on your luck and where your hands grow from
PTF adjustment
Draw a horizontal line on the screen 50mm lower than the height from the fog lights to the ground. The light spot should be positioned so that the upper border on the screen is at the level of the drawn strip. The adjustment is made by rotating the adjusting screw, which is located next to the fog lamp.
Let us remind you that we previously told you how to independently replace the lamps in the Priora headlights, as well as install PTF.
Keywords: Lada Priora headlights | external lighting for Lada Priora