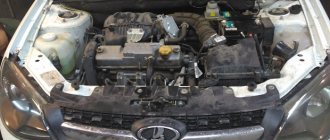
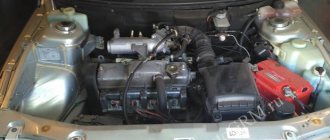
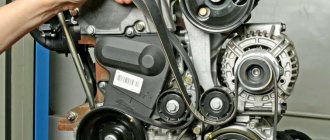
Today we had a three-year-old Lada Largus at our disposal, replacing the timing belt and pump. Although this is an AvtoVAZ, the long-known eight-valve Renault K7M engine, very reliable and unpretentious, is installed here.
The timing belt replacement interval is 60 thousand km. mileage or 4 years of operation, whichever comes first.
The timing belt (timing belt) easily lasts 80 thousand km on this engine. mileage, the highest mileage I saw was 97 thousand, but the belt was in terrible condition. It’s better not to let things get to this point, since a broken belt means at least a major overhaul of the head. In any case, adhere to the recommended replacement interval.
Important! When the timing belt breaks at k7m, the valve bends.
Frequency of checking and replacing the timing belt on them
For the Lada Largus there are 3 power plants, one of which is a 16-valve (“Renovsky” K4M unit) and two with 8 valves (VAZ-11189 and K7M from Renault).
All these power plants have already proven themselves well in terms of operation (reliable and unpretentious), but there is one unpleasant moment - they are all, as people say, “plug-in”.
That is, if the timing drive breaks, the pistons collide with the valves. And this already leads to severe damage to the power plant and the need for quite serious and expensive repairs.
To prevent this from happening, it is necessary to promptly check the condition of the drive belt and its tension, as well as after a certain period of operation of the power plant.
It is recommended to check the drive element every 15 thousand km, as well as when replacing spark plugs (it’s simply easier to turn the crankshaft without spark plugs, which needs to be done when assessing the condition of the drive).
As for the frequency of replacement, it depends on the power plant used.
Thus, for Renault engines (K4M and K7M), it is recommended to replace the timing belt every 120 thousand km. But for a VAZ engine, the drive should be changed every 75 thousand km.
But we note that the indicated frequency is recommended by motor manufacturers and this service life is the limit for the drive element.
Therefore, the replacement should be carried out a little earlier (for Renovsky installations it is 80 thousand km, and for VAZ it is 60 thousand km).
Description
The VAZ-21179 engine, created and put into production in 2022, was significantly different from its predecessors. First of all, the increased working volume. The elements of the connecting rod and piston group, timing, lubrication and cooling systems have received significant changes.
The VAZ-21179 is a four-cylinder in-line naturally aspirated petrol engine with a volume of 1.8 liters and a power of 122-145 hp. s and torque 170-184 Nm.
Installed on VAZ cars:
- Lada Vesta 2180 and SV 2181 (2021-2021);
- Lada Vesta Cross 2180 (2021-2021);
- Lada Vesta Sport 2180 (2021-2021);
- Lada X-ray (2021-2021);
- Lada X-ray Cross (2021-2021).
Additionally, it was planned to install this engine on other VAZ models (Largus, Kalina-2, Granta and Lada 4x4 NG), but the projects were not implemented.
The cylinder block is traditionally made of cast iron. The basis for the development was a block from the VAZ-21126. The improvements included the manufacture of an additional oil channel for lubrication of the valve timing control, improved cooling of the inter-cylinder jumpers and changes in the fastening of the bracket for the right engine support.
The engine crankshaft has undergone changes. The crank radius was increased to 42 mm instead of the previous 37.8, which affected the piston stroke. Now it has become 84 mm (was 75.6). To reduce friction, the diameter of the connecting rod journals has been reduced by four millimeters.
The lubrication of the main bearings began to be carried out according to a new scheme.
The pistons are standard, aluminum, with three rings, two of which are compression, one oil scraper (chrome-plated).
The connecting rods are shortened and interchangeable. Delivered from India.
The cylinder head has received significant improvements. Camshafts (2 pcs.) – composite design. Pressed cams (powder metallurgy). A valve timing regulator (phase shifter) is mounted on the intake camshaft. The head is installed on a metal gasket.
The intake module has also been modified - instead of the mass air flow sensor, temperature and absolute pressure sensors have been installed. In addition, an additional receiver with a system for changing the length of the air path was removed from the design.
The cooling system uses a pump from a Korean manufacturer (GMB). Overall, engine cooling has become more efficient.
The lubrication system is slightly increased in volume and has an oil pump with increased performance (like a water pump - from GMB). Aluminum crankcase, cast.
A more complete list of changes is presented in the figure.
Timing belt drive. The service life determined by the manufacturer is 180 thousand km. It must be remembered that if the drive belt breaks, the meeting of the valves with the piston is inevitable. The result is predictable - bent valves and a destroyed piston.
Despite innovative solutions in the design of internal combustion engines, the final result turned out to be far from what was planned, much less from the ideal.
The main “disease” of the engine is oil burning. There have been cases when it exceeded 3 liters. per 1000 km. mileage VAZ engine builders have repeatedly tried to solve this problem, but the attempts were unsuccessful.
Experts attribute the increased oil consumption to design flaws in the development of the power unit.
Firstly, the height of the cylinder block remained the same, but the connecting rods were shortened. As a result of this decision, the speed of movement of the pistons increased with a simultaneous increase in load.
Secondly, the quality of the valves is very low (they are supplied from China).
Thirdly, as a result of the manufacturer’s shortcomings, there are errors in the incorrectly designed lubrication scheme of the crankshaft-main liner assembly (the groove on the liner is less than 180°, and there are no counter grooves in the yokes at all).
Additionally, this may include the low quality of control during engine assembly (there are cases of increased gaps in the CPG).
The oil burn problem is eliminated by boring the block to the next repair size and replacing the pistons and rings. In other words, the engine needs a complete overhaul regardless of its mileage.
Signs of need for replacement
It should be noted that the service life of the drive also depends on the quality of its manufacture, therefore its condition should be checked periodically.
If you notice on the belt:
- Clear signs of wear;
- Cracks;
- Heavy wear;
- Undercuts;
- Delamination;
- Protruding cord threads.
This all indicates that the belt is already damaged and requires urgent replacement, since its residual life is unknown and it can break at any time.
Also, if traces of lubricant are visible on the belt, then it should also be changed, since oil negatively affects the rubber, which leads to delamination.
A timing drive failure on the Lada Largus would not be so terrible if, as a result, the pistons did not collide with the valves.
Moreover, this blow is strong, because of which the valves simply bend, and quite deep marks remain on the pistons.
As a result, to restore the performance of the power plant, it will be necessary to change the CPG and valves, as well as repair the cylinder head.
To avoid this, it is better to check the condition of the belt in a timely manner and replace it at the slightest signs of wear or damage. Financially, it will be much cheaper than repairing the engine.
Original
A belt positioned as original requires less frequent replacement. Usually it has a longer resource, the likelihood of it breaking prematurely is extremely low
It is only important to remember that there are many fakes on sale. It is important to carefully read the signs of such
Avoid purchasing low-quality goods.
| Name | vendor code | Price, rubles |
| Power Grip (original) | 130C17529R. | From 4 800 |
Not only individual belts are available for sale. But also whole kits for doing the work yourself. This kit includes rollers and some other components. It is advisable to check all components before purchasing. Sometimes stores make mistakes. There may be incorrect parts in the box. Moreover, this fact will be clarified during the work process.
Design features of engines
The complexity of replacement work largely depends on the design features of the power plant.
The 16-valve engine is considered more modern and has better technical performance, but it is more difficult to maintain and repair.
This is especially true for the gas distribution mechanism, the design of which includes two camshafts. And they are both installed in the block head, which significantly increases the complexity of the design.
Because of this, maintenance work is also complicated, since during this work it is necessary to correctly set the position of the shafts.
In 8-valve engines, replacing the drive is much simpler, since there is only one camshaft, which means it is easier to do the necessary installation work.
In general, replacing the timing belt on a Lada Largus with any type of engine is not a very difficult operation, and even a novice car enthusiast can do it.
When to contact a specialist
If the clutch fails in the middle of the road while driving, you must immediately head to the nearest car repair and maintenance station
Usually the clutch fails at the most inopportune moment while driving on the road.
If this happens, the main thing is to get to the garage or service station.
You can call a tow truck or put the car in gear with the engine off, and then start the car and drive at low speed.
You should contact a specialist if you have absolutely no knowledge of car repairs. Dismantling a gearbox is quite a difficult job. In addition, it is very difficult to perform the adjustment correctly without experience. You should also contact a specialist for a complete inspection of the clutch if the car has a mileage of more than 100 thousand km without replacing the kit.
In some cases, you can fix a car clutch problem yourself. The main thing is to correctly find out the cause of the breakdown.
Incorrect adjustment and excessive wear of the clutch elements can lead to failure of the entire assembly. Consider what is meant when they say “the clutch is moving”, and also in what cases the malfunction can be fixed with your own hands.
Tool
To carry out work on a 16-valve engine you will need:
- A set of wrenches (open-end and ring spanners of the most common sizes - 10, 13, 14, 16, 18);
- A set of heads with rods and a knob (same sizes);
- Torx type bits;
- Set of hexagons;
- Screwdrivers (flat, Phillips);
- Long power flathead screwdriver or pry bar;
- Wooden beam;
- Rags.
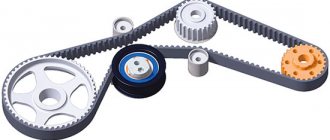
To perform the operation, you should stock up on a new belt, as well as tension and support (parasitic) rollers assemblies, since these elements also need to be replaced.
2163-13-12-07
If it is necessary to replace the tensioner (for example, if a spring breaks), use a 13mm socket to unscrew the two bolts securing the tensioner housing...
If it is necessary to replace the tensioner (for example, if a spring breaks), use a 13mm socket to unscrew the two bolts securing the tensioner housing devices...
If it is necessary to replace the tensioner (for example, if the spring breaks), use a “13” head to unscrew the two bolts securing the tensioner housing...
...and remove the tensioner assembly with the roller.
Replacing the timing belt on the K4M engine
Next, let's look at how to replace the timing belt on a Lada Largus equipped with a 16-valve K4M power unit.
Let us immediately note that there are two ways to carry out the operation - one of them is “official”, and the second is “folk”.
If you plan to perform the replacement using the “official” method, then you will need additional devices - fixing plates and pins.
You will also need new plugs installed at the end of the cylinder head and covering the camshaft end switches.
Downloading a book
After successfully completing the payment (by any method) and returning to the KrutilVertel store from the payment system website, you will be taken to the successful payment page:
The book you purchased will be in your personal account, from where you can always download it.
Please note that after making the payment, you need to return back from the payment system website to the KrutilVertel website. If for some reason you did not return back to the site and closed the payment system tab with a message about the successful completion of the payment, please let us know - we will send you a letter indicating access to download the book
If for some reason you did not return back to the site and closed the payment system tab with a message about the successful completion of the payment, please let us know - we will send you a letter indicating access to download the book.
Preparatory stage
The initial stage of work is the same for both methods and boils down to providing access to the drive belt.
For this:
- We place the car on the inspection hole, immobilize and de-energize the on-board network by removing the “negative” terminal from the battery;
- For the convenience of work, remove the right front wheel from the car (in the direction of travel), dismantle the protective elements of the engine compartment - the lower one and the mudguard;
- Remove the accessory drive belt. To do this, using a spanner wrench, press the belt tension roller, remove the drive element, and then completely remove it from the equipment pulleys;
- We unscrew the spark plugs and cover their mounting holes with a rag;
- We remove the load from the upper right support of the power plant. To do this, install a pry bar between the subframe and the pan, squeeze the motor up a little and fix it in this position with a block;
- Let's move on to the engine compartment. There, first we pull out the fuel lines from the holders located on the support and take them to the side;
- We disconnect the support bracket from the top cover of the timing drive, for which we unscrew the three fastening bolts (these fasteners are different in length, so you should mark which one was located);
- We unscrew the two bolts that secure the support to the car body and remove it;
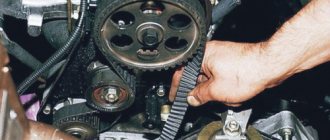
- We unscrew all the fasteners of the top drive cover (3 bolts and 2 nuts), after which we remove the cover. Please note that if you check the condition and tension of the belt, there is no need to disassemble anything further. After removing the cover, the belt will be clearly visible, so to assess its condition, all that remains is to turn the crankshaft a few turns and inspect the drive element. To adjust the tension, there is a special hatch on the bottom cover through which access to the tension roller is provided.
If the belt is replaced, then we continue to disassemble the power plant further; - We unscrew the bolt securing the auxiliary units pulley. To do this, ask an assistant to engage 5th gear in the gearbox and depress the brake pedal to block the crankshaft. If this is not enough to remove the bolt, then proceed as follows: remove the crankshaft position sensor from the flywheel housing.
We insert the pry bar into the resulting hole so that it fits between the teeth of the flywheel ring (starter ring).
The teeth that are used by the crankshaft position sensor (they are larger) must not be used as a stop; they must not be damaged under any circumstances. Thus, resting the pry bar against the flywheel housing, stop the crankshaft from turning and unscrew the bolt, and then remove the pulley; - We install the pulley bolt back, but first you should put a small bushing (a piece of pipe) or a pair of larger nuts on it;
- We dismantle the bottom cover of the drive by unscrewing its 4 fasteners.
Replacement in the “official” way
At this point, the preparatory work is completed, and then it is necessary to correctly install the crankshaft and camshafts. In this case, the sequence of actions depends on the chosen replacement method.
If the “official” method is used, then everything is done like this:
- Remove the air supply system resonator;
- 2. We look for two plugs at the end of the head on the flywheel side that need to be removed. To do this, simply punch them in the center with a screwdriver and pull them out;
- Next we install the shafts. To do this, turn the crankshaft by the bolt as it rotates (without spark plugs this will not be difficult) until the grooves made on the ends of the camshafts become horizontal (in one line), and the position line of these grooves should be below the axis of the shafts. This will mean that TDC has been installed in cylinders 1 and 4;
- We install the prepared locking plate in the grooves to fix the shafts and prevent them from turning;
- We fix the crankshaft. To do this, we find a plug on the block, unscrew it, and in its place screw in a fixing pin (instead, you can use a regular bolt of the required diameter and length of 75 mm).
After screwing in the pin, it will rest against the cheek of the crankshaft, preventing it from turning. It is important to ensure that the pin is completely inserted into the hole until its head stops in the cylinder block; - We remove the belt. To do this, loosen the fixing nut of the tension roller (key 13), turn it counterclockwise, loosening the tension of the drive element. Then we remove the belt from the roller, then from the pump, crankshaft, camshafts;
- We change the remaining elements. Unscrew the nut securing the tension roller and remove it.
Then use a Torx head (T-50) to unscrew the support roller mounting bolt. We put a new one in place of the old supporting element and begin assembly work; - The new belt is positioned with arrows marked on it in the direction of rotation. We first put it on the crankshaft, then the pump and camshafts. Next, we start it by the support roller, the last one will be the tension roller. This roller fits into place with the belt. That is, we put the belt behind the roller, and only after that the tension element is installed on its fastening axis.
- We tension the belt.
And then everything comes back together. It is important to remember to pull out the crankshaft locking pin.
After removing the fasteners, turn the crankshaft a few turns to make sure everything is done correctly.
Next, we reinstall the drive covers, crankshaft pulley, camshaft plugs, engine mount, spark plugs, etc. After assembly work, we check the performance of the power plant.
Part numbers
Since the engines installed in the piston bottom do not have grooves for the valves to prevent them from bending when the belt breaks, there is no need to save on this consumable. It is preferable to install an original belt or a replacement from Contitech and Gates.
Original
In the spare parts catalog of JSC AvtoVAZ, the required spare parts are indicated by the following numbers:
- 2108-01006040-82 for engine 11189;
- 8201069699 for engines 21129 and 21179.
The minimum price on exist.ru is 360 and 2500 rubles, respectively.
Substitutes
| Manufacturer | vendor code | Minimum price on exist.ru, rub. |
| For 2108-01006040-82 | ||
| Bosch | 1 987 949 095 | 340 |
| Contitech | CT-527 | 330 |
| Dayco | 94738 | 410 |
| For 8201069699 | ||
| Contitech | CT-1179 | 1050 |
| Dayco | 94847 | 930 |
| Gates | 5671 XS | 1800 |
| Npa | NP511-01622 | 450 |
| Renault | 8201069699 | 1700 |
"Folk" way
If the “folk” replacement method is chosen, then after the preparatory stage we do the following:
- We take two thin long rods and install them in the spark plug holes of cylinders 1 and 4 (an assistant must hold them strictly vertically);
- We turn the crankshaft, while looking at the (diamonds) marked on the camshaft pulleys. We rotate the crankshaft until these icons become a certain way, namely: the left pulley icon should be at the top, and the right one at the bottom;
- At the same time, the assistant should note that the pistons have become at TDC (the rods no longer rise and further rotation of the crankshaft leads to their lowering);
- To do everything correctly, you should put marks on the camshafts, marking their position, as well as on the flywheel and its crankcase;
- After applying the marks, you can remove the belt. This is done exactly as described above, but it is important to do everything carefully so as not to accidentally turn the crankshaft;
- After removing the belt, the camshafts will turn a little (due to the action of the valve springs), but this will not greatly affect the replacement process;
- After removing the belt and replacing the required elements, before installing a new drive, we check whether the crankshaft has moved. If necessary, we install it according to the applied marks;
- The belt should be put on starting from the crankshaft, then it goes over the pump. Before planting it on the camshaft pulleys, you need to install them according to the marks. To do this, an assistant, using two wrenches, turns the camshafts by the pulley bolts, overcoming the force of the springs, until the previously applied marks align. Next, the shafts are held in this position, and a belt is put on them;
- After that, the tension roller is put in place and the drive is tensioned.
After installing the drive element, turn the crankshaft 2 turns and check whether the applied marks match. If there is a displacement somewhere, we remove and reinstall the belt.
If everything is normal and the marks match, we install all the removed elements on the engine.
Note that both described methods can be somewhat combined, namely, when using the “folk” method, use a locking pin to block the crankshaft and prevent it from accidentally turning.
Replacing the timing belt on the K7M engine
Let's move on to 8-valve power plants. Replacing the timing belt with them is actually easier, and fewer tools are required.
To carry out the work you will need:
- A set of keys (open-end, end standard sizes);
- Set of heads with knob and rods;
- Special key for belt tensioning;
- Rags.
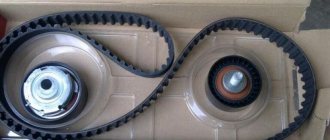
Naturally, a new drive belt and tension pulley will be required.
This tool kit is suitable for both the Renova K7M engine and the VAZ engine.
But first, let's look at the sequence of actions on the Renault power plant, since replacement on it is somewhat more complicated than on a VAZ.
So, we replace the timing belt on the K7M like this:
- We put the car on the inspection hole, immobilize it;
- We jack up the right front wheel, remove it, and also dismantle the protective lining of the wheel arch;
- We remove the candles;
- Remove the accessory belt;
- Unscrew the bolts securing the upper timing cover and remove it;
- We dismantle the crankshaft pulley (to do this, we lock the crankshaft by engaging the 5th gear of the gearbox and depressing the brake pedal, or we use a pry bar inserted between the teeth of the flywheel);
- Remove the lower timing cover;
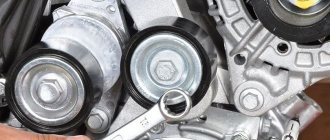
- We set the TDC on the first cylinder according to the marks. To do this, rotate the crankshaft until the mark on the camshaft pulley is located at the highest point. Some engines have markings on the top of the head. In this case, the mark must be aligned with the letter “D” (“Dachia”). In this case, you should also look at the crankshaft gear, since it also has a mark and it should be located at the lowest point. The photo shows all this more clearly;
- Loosen the tension roller nut, removing the belt tension. Next, we remove the drive element itself - first we remove it from under the roller, then we pull it off the crankshaft gear, then we remove it from the pump and finally from the camshaft pulley;
- We change the tension roller, but do not fix it (do not tighten the nut completely);
- We install a new belt (the arrows on it should point in the direction of rotation). First we put it on the crankshaft, then we put it behind the pump, then we put it on the pulley. The last one will be the tension roller. After winding the belt, we tighten it, for which you need a special key;
- After installing the belt, turn the crankshaft 2 turns and check the position of the marks. If they are as they should be, we put the engine back together.
Some manufacturers of belts for the K7M engine put additional installation marks on them, which makes the replacement process easier.
Two marks are applied to the belt and when putting on the drive element, they should be aligned with the marks on the camshaft pulley and the crankshaft gear (for orientation, the mark on the belt located near the arrows is intended to align with the mark on the camshaft pulley).
Markings on the drive element also make it easier to check for correct installation. If after two revolutions of the crankshaft everything is aligned, then the replacement was done correctly.
Features of replacement on a VAZ engine
Replacing the timing belt on an 8-valve VAZ engine, which is also included in the Lada Largus package, is performed in almost the same way as on the K7M, but there are some features, namely:
- Engine disassembly is easier because only one cover is used;
- Setting the TDC is also easier, since the marks are everywhere. To set TDC, rotate the crankshaft until the mark on the camshaft pulley aligns with the protrusion on the rear cover. In this case, the mark on the crankshaft gear must coincide with the groove on the cylinder block, as well as the mark on the flywheel with the mark on the crankcase.
And then everything is exactly the same as on the K7M - we loosen the tension roller, remove the belt, replace the tensioner with a new one, install the drive element and tension it.
Then we check that the marks match by turning the crankshaft 2 turns and put everything back together.
Change the release bearing on a Lada Largus car
- have holders and other tools for installation and dismantling
- be able to prepare a seat
- it is necessary to check the new bearing for play. You need to make sure that it rotates freely and does not jam. Installing a defective part is throwing money away
To eliminate any risks, it is easier to find a technician who has gained experience and has dealt with replacing a hydraulic or roller clutch bearing, including on a Lada (VAZ) Largus.
When replacing the release bearing in the clutch, it is necessary to partially disassemble the gearbox, which on a foreign car Lada Largus is carried out according to a certain technological scheme.
Checking and tensioning the belt
A few words about the process of belt tensioning. On a 16-valve engine, tension is checked by inspecting the tensioner.
There are indicators on it that must be aligned during normal tension of the drive element.
If the upper pointer moves to the side, this indicates a loose or overtightened belt.
To adjust the tension, you need to loosen the roller nut and use a hexagon to turn the roller so that the pointers align.
In 8-valve units, tension is checked by hand. To do this, we take the belt with our fingers in the middle of the area between the camshaft pulley and the pump (K7M) or the crankshaft gear (VAZ) and try to rotate it around the axis.
For a normally tensioned belt, the rotation angle should not exceed 90 degrees. Below is shown using the example of a VAZ 2110.
If the angle of rotation is too small or large, we tighten it by loosening the nut of the tension roller and turning the roller itself with a special wrench.
2163-13-12-02
We fix the roller bracket by inserting a “6” hexagon or a rod with a diameter of 6 mm into its hole and the recess in the tensioner body.
We fix the roller bracket by inserting a “6” hexagon or a rod with a diameter of 6 mm into its hole and the recess in the tensioner body.
We fix the roller bracket by inserting a “6” hexagon or a rod with a diameter of 6 mm into its hole and the recess in the tensioner body.