Causes of wheel misalignment
Camber adjustment may be required not only over time, but also for a number of reasons, these may include:
- forcing high curbs when parking;
- replacing racks;
- driving over bumps and holes;
- replacing tires.
In fact, any technical intervention in the chassis will require adjustment in the future. Manufacturers of the VAZ 2107 recommend adjusting the camber twice a year, when seasonal shoes are changed. Timely adjustment of the wheel alignment will save money and time.
↑ Angle of longitudinal inclination of the axis of rotation. What to do if it does not meet the norm?
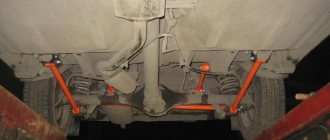
↑ Front suspension:
- front wheel hub bearings;
- hub cap;
- adjusting nut;
- washer;
- steering knuckle axle;
- wheel hub;
- stuffing box;
- brake disk;
- ball pin of the upper support;
- rounded fist;
- ball pin protective cover;
- upper support bearing;
- upper suspension arm;
- upper support bearing housing;
- compression progress buffer;
- compression stroke buffer bracket;
- shock absorber support cup;
- shock absorber mounting pads;
- cushion washer;
- suspension spring insulating gasket;
- suspension spring upper support cup;
- upper suspension arm axis;
- inner bushing of the hinge;
- outer bushing of the hinge;
- rubber bushing of the hinge;
- support washer;
- adjusting washer;
- spacer washer;
- bracket for fastening the cross member to the body side member;
- front suspension cross member;
- stabilizer bar mounts;
- stabilizer bar cushion;
- stabilizer bar;
- body spar;
- lower arm axis;
- lower suspension arm;
- lower arm axle mounting bolts;
- suspension spring;
- stabilizer bar mounting clip;
- shock absorber;
- shock absorber mounting bolt;
- nut securing the shock absorber bracket to the suspension arm;
- bracket for attaching the shock absorber to the lower suspension arm;
- suspension spring lower support cup;
- lower support liner clip;
- lower support bearing housing;
- ball pin race insert;
- lower support bearing;
- ball pin;
- front wheel rotation limiter.
If, when checking, the angle value does not correspond to the data given above, change the number of adjusting washers 27 installed between the axis of the lower arm and the cross member.
Car problems associated with incorrect adjustment
Poorly adjusted wheel alignment on the VAZ 2107 makes it difficult to operate the vehicle. Serious problems can arise if adjustments have not been made or have been done incorrectly.
Road instability is one of the common problems. In this case, the car is driven in different directions and in order for the car not to swerve, the driver has to apply force. Such a trip gets tiring very quickly and only causes discomfort.
In addition, tires are subject to excessive wear due to the camber angle being too high, depending on which angle is greater, the inner or outer side of the tire is subject to wear. Also, a tire can quickly fail if it has insufficient or too much air.
Also, if the toe is adjusted incorrectly, damage to the oil seal, suspension, bearings and steering may occur.
Controlling the camber angle on the front wheels
It should be noted that it is quite problematic to set the camber angles yourself, since there are many difficulties. But you can check how much the angle deviates from the normal position without much difficulty. To do this, you need to follow the following algorithm:
- Place the car on a level surface and secure its position by placing chocks under the rear wheels.
- Sit in the car and turn the steering wheel until it is level. The wheels must be parallel to the car body.
- Press the shock absorbers 2-3 times until the car's suspension is in its normal position. The force should be approximately 40-50 kg. The operation is carried out on all four shock absorbers.
- Take the thread and fix it on the top of the car's fender so that it passes clearly through the center of the wheel. To achieve a vertical position, tie a weight to the lower end. Measure from the top and bottom edges of the wheel to the thread. The difference in values is the wheel camber.
For example, the difference is 2 mm. This means the camber angle is 20 minutes (not degrees). Normally, the angle should be 4 degrees and 30 minutes. An upward deviation of no more than 20 minutes is permissible. But this is the case when the car is loaded with a mass of 320 kg. If there is no load, the angle should not deviate by more than 20 minutes. from 0 degrees and 5 minutes.
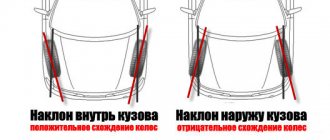
The concept of wheel camber and toe
Camber is the angle between the vertical and the plane of the wheel. Proper camber ensures close contact between the tires and the road surface.
When the top of the wheel deviates from the vehicle's running axis, this is considered positive camber; if, on the contrary, it is negative. It is possible to accurately determine the camber angles of the "seven" wheels only when the vehicle has a load of 320 kg - this is the approximate weight of 4 people in the cabin + cargo in the luggage compartment + full tank:
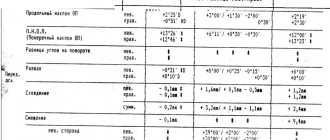
- 430'+20′ - for a loaded car;
- 05'+20′ - for empty.
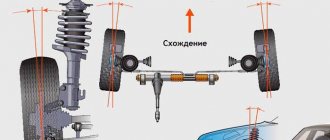
Toe is the angle formed by the plane of rotation of the wheel and the direction of movement of the machine.
With high-quality toe-in, the car will behave confidently when cornering, and its tires will not wear out ahead of time.
If the front part of the wheel is turned towards the longitudinal axis of the VAZ2107, then this is a positive toe-in, if on the contrary, then it is negative. A positive angle is considered common, but sometimes a negative angle should be used, then the stability of the car increases, although at the same time tire wear also increases.
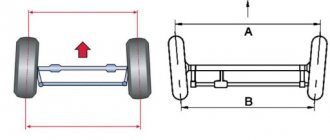
The normal toe-in for the “seven” is considered to be:
- from 2 to 4 mm for a loaded car;
- from 3 to 5 mm for empty.
There is also a longitudinal inclination angle - this is castor.
Caster is considered positive when the wheel's turning axis is deflected back in relation to the direction of movement, and when it is negative, the opposite is true.
How to do a wheel alignment on a VAZ 2107
Wheel alignment is a fundamental feature of a car. If the alignment is incorrect, the car loses power, fuel consumption increases and overall tire wear accelerates.
If the damage is set incorrectly, then the car’s maneuverability decreases, it begins to “pull” to the side, and the tires wear out very quickly, and only on one side.
You can check the wheel alignment of the VAZ 2101-2107 without the help of others without any special devices. You can adjust the toe yourself. To carry out destruction, you should contact Special 100.
What is camber and toe?
Toe is the angle between a pair of opposing wheels. It can also be characterized as the angle of deviation of the longitudinal plane of the wheel axis from the longitudinal axis of the car. The maximum permissible deviation from the norm is 0.5 degrees.
How to check wheel alignment?
First of all, you need to check the tire pressure - it should be the same for each pair of wheels. You can check the wheel alignment on an unloaded car, but there may be a slight error in the measurements. The steering wheel must be level and all wheels must be parallel to the longitudinal axis of the vehicle.
Do-It-Yourself Camber
Camber alignment with your own hands. It is clearly demonstrated how to make an alignment
-
-yourself collapse
In order to check the camber, you will need a thin thread with a weight, which must be used as a plumb line. We strengthen the thread on the wing so that it is located exactly opposite the middle of the wheel.
Then you need to measure the distance between the thread and the top and bottom of the disk. If the difference in the obtained distances is 3 mm, then this corresponds to a deviation from the vertical of 0.5 degrees.
If the difference is more than 3 mm, you should contact a specialized service station and have the alignment done.
Checking alignment is a little more difficult. To do this, you will need a thin thread with a metal hook made in such a way that it can be hooked onto the front of the front wheel. You need to attach the same hook to the other end of the thread so that it can be put on the back of the rear wheel.
The thread should be tensioned so that it runs opposite the center of the wheel. Under the thread on the back of the rear tire you need to place a small block of 22 mm thickness. In this case, the thread on the front wheel should touch both sides of the tire - rear and front. Then, instead of the block, put another one, 28 mm thick.
The thread on the rear wheel should not touch the front of the tire. If everything happens this way, then the toe is set within normal limits.
How to adjust toe?
This way we will move the tie rod relative to the steering tip and turn the wheel a little. Now you need to check again whether the thread touches the tire in two positions (with bars of different thicknesses placed). If with a 22 mm bar the thread touches both sides of the tire, but with a 28 mm bar it does not, then the toe is set correctly and the clamps can be tightened.
If this does not happen, we repeat the procedure with the coupling and achieve the desired result.
Finally, I would like to say that the wheel alignment needs to be checked periodically, and especially after work on the chassis. It must be remembered that every time the camber is adjusted, the toe must be adjusted. Therefore, you should not do toe-in if the camber angle is too large.
Adjusting wheel alignment in a car service
If you are afraid to make the adjustment yourself, then it is better to take the car to a service center.
In well-equipped service stations, three types of stands are used during repair work: computer, laser and optical.
At the optical stand, special tubes are attached to the wheels of the machine, which direct the light beam onto a plane with scales located vertically and horizontally. The slant angle can be determined by the location of the light point relative to the scale.
Optical stands have one drawback - they can determine camber on only one pair of wheels; with such a stand, setting all four wheels at the same angle is a labor-intensive process that has a high error.
One step above optical stands are laser ones.
They work on the same principle, but instead of a light beam, a laser beam is used. Initially, laser emitters are installed on the car, and mirrors located parallel to the plane of rotation are attached to the wheels. The measurement scale is installed opposite the mirror surface, then with proper adjustment, the laser beam from the zero parameter of the scale should return to its place from the mirror.
If the laser beam returns to a different point, adjustment is required. A laser stand is one step higher than an optical stand in accuracy, but is inferior in this parameter to a computer stand.
The most modern equipment for wheel alignment is a computer stand.
He is able to determine all values using special sensors that are installed on the wheels. The sensors transmit the received information to a computer, where it is compared with standard parameters for a specific brand, for example with a VAZ2107. After computer analysis, automatic balancing is performed.
Controlling the camber angle on the front wheels
It should be noted that it is quite problematic to set the camber angles yourself, since there are many difficulties. But you can check how much the angle deviates from the normal position without much difficulty. To do this, you need to follow the following algorithm:
- Place the car on a level surface and secure its position by placing chocks under the rear wheels.
- Sit in the car and turn the steering wheel until it is level. The wheels must be parallel to the car body.
- Press the shock absorbers 2-3 times until the car's suspension is in its normal position. The force should be approximately 40-50 kg. The operation is carried out on all four shock absorbers.
- Take the thread and fix it on the top of the car's fender so that it passes clearly through the center of the wheel. To achieve a vertical position, tie a weight to the lower end. Measure from the top and bottom edges of the wheel to the thread. The difference in values is the wheel camber.
For example, the difference is 2 mm. This means the camber angle is 20 minutes (not degrees). Normally, the angle should be 4 degrees and 30 minutes. An upward deviation of no more than 20 minutes is permissible. But this is the case when the car is loaded with a mass of 320 kg. If there is no load, the angle should not deviate by more than 20 minutes. from 0 degrees and 5 minutes.
How to disassemble a generator in a VAZ-2107
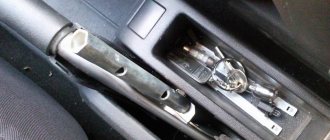
To quickly disassemble the VAZ-2107 device you will need the following set of tools:
- open-end or socket wrench designed for 19;
- ratchet equipped with an extension;
- heads size 8 and 10;
- hammer.
After they are unscrewed, follow these step-by-step instructions:
- Turn the unit over and lightly press the ends of the bolts. Your task is to ensure that the fastener heads penetrate between the pulley blades; this is the only way to secure it in a stationary state.
- Armed with wrench 19, unscrew the pulley fixing nut, securing the VAZ-2107 generator well in a stationary position.
- Next, separate the 2 parts of the device; this is easy to do if you tap the ear of the fastener with a hammer. You should have two parts left in your hands: the rotor and pulley, as well as the stator and winding.
- There is a pulley in the rotor that needs to be removed by pulling it towards you.
- Be vigilant - after removing the pulley, the key is no longer fixed and may get lost, so remove it carefully and set it aside for now.
- Pull out the rotor with bearing. If you need to replace the old rotor with a new one, now is the time to do it. A new device costs 350 rubles in auto stores. If you need to replace the winding and stator, then you will have to pay a little more - 400 rubles.
Let's sum it up
You need to set the correct front suspension geometry on a level surface using the following tools:
- Template for determining the castor angle.
- Plumb line and string with hooks.
- Caliper or ruler.
- Bar 28 mm thick.
- Set of keys.
Having adjusted the caster by rearranging the washers, you can begin adjusting the angles of the front wheels in the following sequence: adjusting the camber by adding/removing washers and adjusting the toe by rotating the steering linkages.
Wheel alignment adjustment is a job that must be done after repairing the suspension with replacing tie rod ends, ball joints, and silent blocks. Before you learn how to make a wheel alignment with your own hands on a VAZ 2107, you should get acquainted with the essence of the terms and why their correct adjustment is so important.
How to understand that you need to set a wheel alignment
The following may make you think about the need for such a procedure:
- While driving, the car pulls to the side and you constantly have to correct the course. Make no mistake, a similar effect can occur when driving on uneven or inclined roads. Ride in different places and in different directions on a flat road so as not to be deceived.
- There is rapid and uneven wear of tires and suspension parts. The car began to react more harshly to bumps. Fuel consumption has increased unjustifiably.
- If the car is involved in an accident, even not a very serious one, it is recommended to at least check the toe angle of the wheels, since the shock impulse, even when hitting a hole, can throw off the suspension settings.
- Checking is also recommended after traveling 15,000 km.
We have already written that replacing some suspension parts also requires subsequent adjustment of the wheel alignment. These do not include:
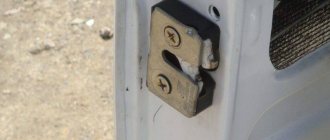
Stabilizer bushing for VAZ cars
- Stabilizer bushings;
- Stabilizer assembly;
- Shock absorber bushings and itself;
- Wheel bearings.
But after replacing the following parts, checking is strictly necessary:
- Steering ends and rod assemblies;
- Shortened or extended springs;
- Steering pendulum;
- Steering column;
- Upper and lower arms;
- Beams assembled;
- Silent blocks;
- Spacers.