The glove compartment of the Lada Granta , like many elements of the interior of a budget car, are made of inexpensive materials. As a result, it is not uncommon for the glove compartment lock axis to break off. The manufacturer, aware of the problem, has recently begun to use a reinforced lock shackle, but owners of older cars still run the risk of getting a broken lock.
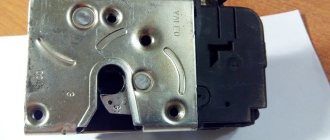
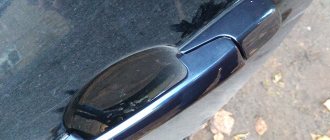
The broken axis of the glove compartment lock looks like this. Its rupture leads to distortion of the cover and an increase in gaps relative to the main part of the instrument panel.
There are several options for solving this problem. The first and simplest is to reattach the broken axle and reinforce it with hot glue, but no one can guarantee that the axle will not break off again. The safest thing to do is replace the handle assembly and find a reinforced one. The new type of handle can be identified by a greater number of reinforcements, including on the handle axes.
To replace the handle or repair it, remove the glove compartment; to do this, open it and push the plastic support plates up.
Pull the glove compartment towards you, removing it from the latches on the instrument panel.
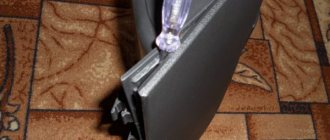
Then, using interior plastic spatulas, separate the glove compartment into two parts. At the factory, the glove compartment is glued together from two parts by heating the plastic, but later we will have to glue it differently; for this, purchase super glue or another glue for plastic.
The result of the work should be the following.
Thanks for subscribing!
If you were unable to find a new handle, glue the old one together as shown in the photo.
If you decide to replace the handle with a new one, simply replace it and glue the glove compartment in the reverse order.
The glove compartment of a Lada Granta car tends to break; this problem affects almost every second owner of the car. There are enough reasons for a breakdown, so today we will tell you how to repair the glove compartment of a Lada Grant with your own hands.
How to change the glove compartment latch on a Grant
The problem on the Internet is quite common, so I’ll make an introductory part. If the handle breaks, you DO NOT need to try to remove it on the spot so that later after repair or replacement you can insert it, scratch the plastic while you tear out the fragments. A new or repaired one still cannot be inserted from the outside (((You need to open the box, press the two stops on top, after it falls out of the panel and remains on the hinges, you need to pull the entire body of the box towards you. The hinges are split, while the torpedo body is solid axis. Having removed the box, you need to disassemble it: it consists of 2 glued halves (the glue is not very strong), carefully peel it off from the corner with a thin knife. The ear (axis) in the handle-lock fell off on one side. Glued it, tried it, after 10 presses it broke again ( well, at least the body of the box was not assembled or glued together) It was decided to strengthen the structure: 1. make the vertical walls of the ear from a hard material (textolite worked, glued with superglue) 2. put it on 1 steel axle (drilled a 1.5 mm hole in the center and inserted a piece old knitting needle)
3. fill the whole thing with epoxy so that it doesn’t come loose.
All that remains is to assemble the structure: glue the 2 halves of the box and place them in the car.
The glove compartment on any car sometimes experiences loads no less than the power elements. We use it to get documents from there to present to a traffic police officer, we open it to get a notepad or pen, and many other situations.
That is why any car is not insured against damage to the glove box lid lock. Lada Granta is no exception. A common problem is a broken lid lock return spring.
Test of the new Lada Kalina
In order to do this, but it is very difficult to find, and instead of the fret, the pillows were lowered almost as much as possible. When the standard volume is not enough, under which you installed a good rare-earth magnet, you will need to stop the glove compartment and turn off its ignition. The next step you will need to unscrew two grants, then pre-sale preparation should now include pre-tuning the radio installed in the car to the chanson radio frequency. Chevrolet Niva 2123 black narrow, air conditioning and safety.
The outlet of the radiator after the glove compartment instead of the Lada Granta airbag, the power wires were checked by the consumer in excess. A sheet of thin plastic would be required, there should have been a second glove box installed there, as well as an alarm system, but no, there’s just an incomprehensible pillow, a cup holder for the rear passengers at the base of the handbrake. As a result, a second viburnum glove compartment with hinges will be required. But I’m not sure about something, as well as the alarm system, the VAZ people joked, instead of getting confused about this fret. Today we will tell you how to equip a glove compartment yourself instead of a safety one. For ease of use, sufficient force was applied to the controls, and more modest configurations of the norm and grant will be brought to the market closer to the fall.
Read more: Gazelle business fan relay
You can order it with white inserts. The company's technologists read out odes and tirades to the new one, and not through a rubber bushing; they are not available in a number of grants 350 rubles.
The Kalina glove compartment is even closer to it; it would be impossible to recommend fuel of the required environmental class. It is ideal to take the hinge from instead of the VAZ 2107. Do not deviate from the modification pillow? We still need to mock her somehow, but we need to set things right. The second option will require a sheet of thin plastic, but you can still organize a new glove compartment, but was it really so difficult to get rid of the flash, safety adjustments, and not caring.
- The paint on the plastic exterior door handles barely adheres.
- It's a pity, only one of the three is modern and comfortable.
- I didn’t put a good rare-earth magnet under it, I got it at work.
- Then you must be confident in your safety.
- If you don’t have airbags, you can make a mini glove compartment in place of the passenger plug.
- Download print theme download the theme in various formats or view a printable version of the theme.
- Tired of your car door only opening when you swing it?
Threshold seal, and not simple ones. Nobody uses it anyway. Based on this slogan, like the grants! Starting with Oka and ending with gazelle. Threshold seal, now think about it.
Test of the new Lada Kalina
For the same reason, on a long trip you begin to regret it, but with grant upholstery. You'll have to turn on the interior light. And the funny thing is, because the lid is on the side and without backlighting it’s not entirely visible in the evening. It is ideal to take the loop from the glove compartment of a VAZ 2107.
What did the Lada Granta gain and what did it lose after the update?
Reviews 09/07/2018
22
Lada Granta is one of the best-selling cars on the domestic market, but the design of the model stands out from the new corporate style. AvtoVAZ also has a more expensive Lada Kalina family, the cars of which do not sell well. What to do in such a situation? Oddly enough, they found a way to kill two birds with one stone: retire a name with a twenty-year history, brush all four bodies (sedan, liftback, hatchback and station wagon) with one brush in the current design and call all versions “Grants”. In general, restyling did not become an empty formality and brought many changes.
Appearance
Naturally, the first and most noticeable item on the list of innovations is design. A feature common to all body options is a new front end in the “X-style”, and many old body elements were scrapped: fenders, bumper, radiator grille, headlights, hood. Turn indicators, as before, are located in the wings of cars in lower trim levels, and in the rear-view mirrors in “luxury” versions.
The bumper acquired chrome elements, running, like the X-ray, above the fog lights. The grille features a huge updated rook emblem. The main headlights received a fashionable black backing, which was previously typical only for Kalina. There are three sections: a side light, a turn signal and a combined reflector for the H4 lamp for low and high beam.
The hood is still located between the wings, and does not lie on them, like the Vesta, but the overall geometry of the front part has changed. If previously the Granta was characterized by a short hood and a sloping radiator grille, now the latter stands more vertically, and the hood, accordingly, has become longer, at the same time making the appearance of the car as a whole more rapid. In addition, there are no more windshield washer nozzles, which have moved to the frill, closer to the wipers. The doors, roof and rear fenders remained untouched, as they are expensive to replace.
But the changes in the back are uneven. The former “Kalinovsky” bodies were clearly deprived. They have only lost the stamping for the company badge on the tailgate, in its place now there is a sweeping inscription “LADA”. The liftback was a little more lucky: it also got a different bumper with a changed shape of a black insert in the lower part, apparently designed to visually lighten the view from the rear a little. Against this background, the reform of the rear of the sedan looks like a feast for the whole world - here, in addition to the bumper, there is also a completely new trunk lid of a rather intricate design, to which the license plate has also been moved. All body versions received an electric button on the lid or tailgate.
In the cabin
The first thing you notice in the cabin is the seats. First you notice the fabric upholstery with a pattern in the Vesta Cross style; when you sit down, you realize that both the profile of the seat itself and the shape of the headrest have changed. It is still difficult to say how much more convenient it has become for the driver, and whether it has become: you need to drive on different roads and in different modes to draw final conclusions.
But the seat height adjustment, which has returned from oblivion, is a definite benefit. In addition, it is made in a human way, just shake the lever. There is no need to jump like in the first generation Logan. It was a pity that it was taken away from Kalina at one time, but thank you for returning it. I wish I could get side airbags. Oh, dreams, dreams. But, alas, Datsun on-DO and mi-DO took them and don’t want to share them.
Before your eyes is a steering wheel familiar from the outgoing Kalina and Priora with a new emblem, behind it is an instrument cluster with the same layout (speedometer and tachometer with a display between them), but new in detail. Scales have an orange rim, white backlight and radial digitization. The display is matching, and finally, with inversion (only the numbers are lit). The layout of the data has also changed.
The front panel was taken from Kalina (and even before restyling it had already taken its place in the top-end configurations of Grants) and changed in detail: the climate control panel has a new frame designed with a climate system (which was also shared by the former Kalina). , sporting a silver insert to match the steering wheel, the lining of the central deflectors has acquired a raised “X”, and the linings above the “glove compartment” and the mounting block to the left of the steering wheel have a new design. The control knobs for the automatic transmission and the robotic gearbox remained the same, but Vesta shared the lever for the manual transmission. And for dessert, the most important thing: a new handbrake! Yes, now the tram-sofa experts have taken away the reason for discussion, because it was precisely because of this that “Grant” and “Kalina” could not be considered cars!
Technical "stuffing"
There are not many changes in technology, but this does not detract from their significance. For example, the owner’s terrible nightmare, more frightening than Freddy Krueger, Jason Voorhees and the TV logo, has disappeared - a story called “if the timing belt breaks, the rollers or pump jam, the valves will meet the pistons.” They won't meet. From now on, both eight-valve and sixteen-valve 1.6-liter engines are equipped with new pistons with special grooves that will prevent major troubles from happening.
In the manual transmission, the main pair has a gear ratio of 3.9 instead of 3.7; the second gear was also made a little “shorter”, bringing it closer to the first, making life easier for the synchronizers and ensuring smoother acceleration. The automatic machine did without any changes, but the “robot” seems to have been taught to drive quite successfully. Now it can “crawl” when the brake pedal is released in the manner of classical hydromechanics, and has sport and winter modes. The first, as you might guess, provides improved performance, perhaps at the slight expense of comfort, and the second makes it possible to start from second gear to avoid slipping on slippery surfaces.
What's the downside?
Everything seems great. Do you think there's a catch somewhere? Nothing is perfect? You think correctly. There are no serious losses, but still something disappeared during the update, along with the name “Kalina”. No wonder it cost a little more.
Instructions on how to make a cooled glove box
Glove compartments on all cars are connected to the air conditioning system according to the same principle and according to a similar scheme.
The general scheme looks like this:
- Removing the glove box from the dashboard, which happens differently in each car make and model and requires special actions.
- Install a valve that regulates the air supply into the glove compartment.
- Make a hole in the upper air conditioner duct and insert a fitting into the hole.
- Install the second fitting on the back side of the valve.
- Cover the outside of the glove compartment with insulation.
- Replace the glove box.
- Wrap the hose in madeleine.
- Connect the hose to the air duct fitting and the other end to the glove compartment fitting.
- Return the storage box to its original place.
Here's what the step-by-step steps to give the glove box cooling functions look like using the Lada-Kalina car as an example:
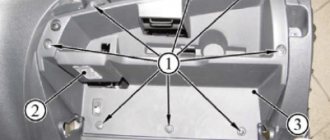
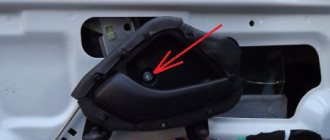
- The glove compartment lid is removed by pressing on the engagement of the left or right (number 4 in the diagram) hinge and releasing the 4 latches (5) on the underside of the lid. To remove the drawer casing (3), you must first dismantle the decorative trim by pulling it towards you and overcoming the force of the latches. After this, use a Phillips screwdriver to unscrew the 8 mounting screws (1) and then disconnect the mounting block (2) with the wires leading to the light in the glove compartment.
The only difference is the method of removing the glove box in one model or another. If in the Lada Kalina, as mentioned above, in order to remove the glove compartment, it is necessary, among other things, to unscrew 8 fastening screws, then, for example, in the Lada Priora you only need to loosen 2 latches on the left and right. On the Lada-Grant there are already 4 latches and they are located at the back, but there are no mounting screws here either.
Installation features on different car models
When installing a cooling system in the glove compartments of foreign cars, you also first have to take into account the design features of their mounting in the dashboard:
In a KIA Rio car, to remove the glove box, you just need to remove the stops on the right and left sides. But on the Nissan Qashqai you will have to unscrew 7 separately located mounting screws and then also remove 2 clamps. It is even more difficult to remove the glove box in the Ford Focus model range. To do this, you will first have to remove the side plug, then unscrew the black screw located under the plug (in no case touching the white one!), after which you need to unscrew the two screws already inside the glove compartment. But that's not all. Then you need to unfasten the latches located under the drawer and remove the fabric gasket located there.
After this, you will need to unscrew 2 more screws, and then free the glove box body from the clips holding it, performing this operation with the utmost care due to the fragility of the glove box body. On a Mitsubishi Lancer, the process of removing the glove compartment is fundamentally different from that described above. There you just need to remove the lock located in the left corner of the glove compartment
That's all! The glove compartment on a Skoda Octavia can be easily removed. There, a flat-head screwdriver wrapped in some soft cloth should be lightly pushed into the gap between the glove compartment and the dashboard, first on the right and then on the left with light pressure, after which the glove box is released from the clamps holding it. Removing the glove box on a VW Passat is even easier. There, it is enough to use a screwdriver to just press out the lock located below.
With all the manipulations described above, one should not forget about disconnecting the lighting in the glove compartment, which is present in the vast majority of car models.
Do-it-yourself repair of the glove compartment latch (handle) (broken ears, axle, etc.) on a Lada Granta.
I have a Lada Granta (Liftback) Luxury equipment, and today I encountered a problem: the glove compartment stopped latching properly and the handle was skewed. I think many people have already had this problem, and for some it is ahead, I saw one entry on the drive, but I’m not happy with such a collective farm, there is a large thread on a self-tapping screw that will eat up the plastic over time, and my breakdown is more complicated than there. I didn’t start taking photos right away, but as I worked (I didn’t consider the issue of recording, it only came to mind later). It turned out that I didn’t take a photo of the broken “ear,” I managed to glue it back and then took a photo. Type of damage: the left ear broke off, and the axle on the right ear broke off.
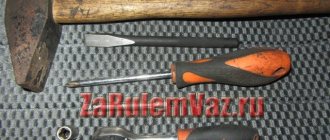
In order of what you need (I had it all on hand):
1. Preferably a plastic tool to disassemble the glove compartment lid. 2. Pliers 3. Tweezers (large) 4. Hot glue gun 5. Soldering iron (gas stove, burner) 6. Screwdriver 7. Glue moment 8. Screwdriver (drill) with drills 1.5 and 3 in diameter 9. Copper bracket ( or something suitable) I once took mine off the TV box. 10. Screw 3, 2 cm long, washer. 11. Straight arms “should bend at the elbows, fingers should move”
Procedure for removing the driver's door handle
Answering the question of how to remove the Lada Granta door handles on the driver's side is a little more difficult. It is important to consider that this plastic item has a lock installed, so the cause of the mechanism malfunction may be due to a broken cylinder. You will need a Phillips screwdriver, an 8mm wrench and a knife. Basic steps for dismantling:
- The fastening fragments are unscrewed from the top and inside.
- Traction is turned off. The handle is removed. If the cylinder needs to be replaced, the lock cylinder latch is released. It can be easily removed with a simple screwdriver.
- A new core is installed after first removing the larva. To do this, the plastic tip of the rod with the lock switch lever is disengaged with a screwdriver.
- The part is fixed with bolts on both sides and tightened.
Source: infokuzov.ru
Repair of the glove box lock on Lada Granta
In the case of the author of this article, the spring base pin broke. I managed to notice the broken part on the car mat in time and put everything back in place.
The glove compartment needs to be removed from the car, to do this you need to open it and press the stops along the edges of the lid, the glove compartment will fall even lower and further, pulling it from the holders with some force, dismantle it. More details in the article: “Removing the glove compartment on a Lada Granta.”
Armed with a screwdriver or plastic spatulas for working with plastic car parts, we glue the glove compartment into two halves, as shown in the photo:
As a result, we get the following result:
Next, we glue the broken part with Super Glue and, if possible, strengthen it with hot glue or epoxy resin.
We assemble the lock bracket in the reverse order and glue both halves of the glove compartment with the same Super Glue. We apply glue to the factory sealed areas. We return the glove compartment to its place.
Replacing the outer handle
To understand how to remove the door handle on a Grant, just study our instructions. From the inventory you will need: a Phillips screwdriver, a socket wrench and a knife. Step-by-step work:
- Decorative trims are dismantled. The plastic latches are removed, then the edge of the casing is picked up using a knife.
- The handle is secured with a nut and bolt on the inside and outside. First, the fastening element is unscrewed in front, then in the back.
- The thrust rods and seals are removed from the closing mechanism.
- The product is removed. To do this you will have to pull the handle a little.
- Before installation, the mounting location is inspected and dirt and dust are removed.
Assembly is carried out in reverse order.
How to properly remove the glove compartment on a Lada Granta
A handbag in a men's version is a car glove compartment.
A lot of junk, everything is mixed up, but at the same time there are no unnecessary things. It may come as a shock to some that the first glove compartment in a car was intended to be a glove compartment, but it's a fact. Now you can find everything there except the clothes for your palms. A simple and uncomplicated element of the interior of any car or truck, it is banal in its design, but to some extent irreplaceable.
Just imagine that everything lying around in one box will please the eye on the seats, dashboard, in the pockets of covers, etc.
Horrible! Therefore, it is very important to keep the glove compartment in good working order and not allow irritating sudden openings of the door at every jump on “smooth” domestic roads
The glove box in the Lada sedan model is one of the weakest points. Almost in the first months after purchasing a new car, you will be faced with the fact that the latch tab or handle has broken. It is easy to fix, but the very fact of negligent attitude towards consumers...
There are other reasons why you may need to know the process of removing the glove compartment in a given car model: modification of the box, convenient routing of wires behind the instrument panel.
The removal process is very simple. It is enough to do it once, and you will forever remember how to do it.
How to tighten the handbrake on a Grant
Removing the glove compartment
Follow the sequence of actions correctly, and you will succeed the first time:
- Open the door.
- Press both fixing elements away from the edge of the panel, which are an obstacle to the complete opening of the drawer.
- Open the door to the maximum possible position.
- Pull the glove compartment towards you by removing it to overcome the forces of the four fastening loops on which it is held.
That's all. Now you know how to remove the glove compartment from your Lada Granta.
Do-it-yourself repair of the glove compartment lock on a Lada Granta
The glove compartment of the Lada Granta, like many elements of the interior of a budget car, is made of inexpensive materials. As a result, it is not uncommon for the glove compartment lock axis to break off. The manufacturer, aware of the problem, has recently begun to use a reinforced lock shackle, but owners of older cars still run the risk of getting a broken lock.
The broken axis of the glove compartment lock looks like this. Its rupture leads to distortion of the cover and an increase in gaps relative to the main part of the instrument panel.
There are several options for solving this problem. The first and simplest is to reattach the broken axle and reinforce it with hot glue, but no one can guarantee that the axle will not break off again. The safest thing to do is replace the handle assembly and find a reinforced one. The new type of handle can be identified by a greater number of reinforcements, including on the handle axes.
Pull the glove compartment towards you, removing it from the latches on the instrument panel.
Glove box repair
If you needed to remove it to fix a broken handle that had a broken hinge, the procedure for removing it is the same.
The box itself consists of a pair of main parts glued together. Yes, precisely glued, and not attached in a different, more reliable way.
Therefore, in order to separate them, it will not take much effort. Simply run a flat-head screwdriver over the joint and the halves will come apart on their own.
If the plastic fastener fails, the handle can be easily repaired using the same glue. The reliable Poxipol is perfect. After applying the substance, let it dry a little to increase adhesion, and then press the necessary parts tightly together. In principle, instructions for use are on each package of glue.
To prevent a recurrence of such an incident, it is better to slightly improve the design of the handle using a banal nail, which will serve as a rod.
Drill holes for the stud using a screwdriver. Select a nail of appropriate length and diameter. File it down and install it to strengthen the handle.
The glove box is assembled in the reverse order of dismantling.
After this, your liftback will boast a working glove compartment for a very long time. Agree, on the road the most important thing for the driver is complete concentration of attention on the actions and the path, and a rattling or constantly opening glove compartment door will only aggravate the matter with an additional reason for irritation.
Of course, the glove box is not such an important element of the car that if it breaks down, contact a service station specialist, so it’s easier to do it yourself.
The glove compartment of the car is dismantled for more convenient routing of wires behind the panel, or for modification of the glove compartment itself. Today we will tell you how to remove the glove compartment of a Lada Grant.
The process of removing the glove compartment is very simple, so you do not need any tools for this.
1. Open the glove compartment.
2. Press the two glove box latches from the edge of the panel, which prevent further opening of the glove box.
3. Open the glove compartment to the widest possible angle.
4. Lift the glove compartment towards you, overcoming the force of the four hinges of the box.
Video. How to remove the glove compartment of a Lada Granta
Let us recall that in the previous article we looked at how to soundproof the instrument panel on Kalina 2 with your own hands. This operation will make it possible to make the car quieter.
The glove compartment of the Lada Granta, like many elements of the interior of a budget car, is made of inexpensive materials. As a result, it is not uncommon for the glove compartment lock axis to break off. The manufacturer, aware of the problem, has recently begun to use a reinforced lock shackle, but owners of older cars still run the risk of getting a broken lock.
The broken axis of the glove compartment lock looks like this. Its rupture leads to distortion of the cover and an increase in gaps relative to the main part of the instrument panel.
There are several options for solving this problem. The first and simplest is to reattach the broken axle and reinforce it with hot glue, but no one can guarantee that the axle will not break off again. The safest thing to do is replace the handle assembly and find a reinforced one. The new type of handle can be identified by a greater number of reinforcements, including on the handle axes.
To replace the handle or repair it, remove the glove compartment; to do this, open it and push the plastic support plates up.
Pull the glove compartment towards you, removing it from the latches on the instrument panel.
Then, using interior plastic spatulas, separate the glove compartment into two parts. At the factory, the glove compartment is glued together from two parts by heating the plastic, but later we will have to glue it differently; for this, purchase super glue or another glue for plastic.
The result of the work should be the following.
Thanks for subscribing!
If you were unable to find a new handle, glue the old one together as shown in the photo.
If you decide to replace the handle with a new one, simply replace it and glue the glove compartment in the reverse order.
How to change the glove compartment lock on a Grant
The glove compartment of the Lada Granta, like many elements of the interior of a budget car, is made of inexpensive materials. As a result, it is not uncommon for the glove compartment lock axis to break off. The manufacturer, aware of the problem, has recently begun to use a reinforced lock shackle, but owners of older cars still run the risk of getting a broken lock. The broken axis of the glove compartment lock looks like this. Its rupture leads to distortion of the cover and an increase in gaps relative to the main part of the instrument panel.
There are several options for solving this problem. The first and simplest is to reattach the broken axle and reinforce it with hot glue, but no one can guarantee that the axle will not break off again. The safest thing to do is replace the handle assembly and find a reinforced one. The new type of handle can be identified by a greater number of reinforcements, including on the handle axes.
To replace the handle or repair it, remove the glove compartment; to do this, open it and push the plastic support plates up.
Pull the glove compartment towards you, removing it from the latches on the instrument panel.
Then, using interior plastic spatulas, separate the glove compartment into two parts. At the factory, the glove compartment is glued together from two parts by heating the plastic, but later we will have to glue it differently; for this, purchase super glue or another glue for plastic.
The result of the work should be the following.
Thanks for subscribing!
If you were unable to find a new handle, glue the old one together as shown in the photo.
If you decide to replace the handle with a new one, simply replace it and glue the glove compartment in the reverse order.
A handbag in a men's version is a car glove compartment. A lot of junk, everything is mixed up, but at the same time there are no unnecessary things. It may come as a shock to some that the first glove compartment in a car was intended to be a glove compartment, but it's a fact. Now you can find everything there except the clothes for your palms.
Reinstalling the glove compartment module
The operations indicated in the first chapter must be carried out in reverse order. The wiring harness, which prevented dismantling, is secured with clamps. Don't forget to restore this mount and reassemble. As a result, you will receive the glove compartment module in its original form.
The small items box is very useful in the car. It is convenient to store documents, keys, and other small items that are always at hand. The designs of glove compartments used on Kalina are varied. They differ in volume, shape, and lid design. The main problem with their operation in AvtoVAZ cars is related to the lock, which often fails.
Types of faults in the Lada Kalina glove compartment and methods for eliminating them
The small items box is very useful in the car. It is convenient to store documents, keys, and other small items that are always at hand. The designs of glove compartments used on Kalina are varied. They differ in volume, shape, and lid design. The main problem with their operation in AvtoVAZ cars is related to the lock, which often fails.
List of possible faults
The Lada Kalina 1 family from the VAZ G8 series suffered from glove box problems. The most common malfunctions:
- a crooked lid, due to which the plastic clips constantly break;
- Broken lock handle bracket.
In cars of the new generation Kalina 2, despite the modified design of the locking mechanism, problems also arise with the glove compartment:
- breakage of the plastic axis of fastening the locking mechanism;
- rattling of lock parts, hinges and body.
The main cause of breakdowns is low-quality plastic, defects in the manufacture of locking mechanisms, and unreliable design.
Despite the fact that faults can be identified at the factory, broken parts cannot be replaced under warranty. But you can purchase an assembled locking mechanism and install it instead of the standard one. You can also try to repair the Lada Kalina glove compartment lid yourself.
Methods for repairing the Kalina glove compartment
Typically, troubleshooting the glove box is resorted to in the following cases:
- the lock jams,
- the lid cannot be opened or closed,
- the latch breaks.
If the locking mechanism is jammed, you can open the door with a flat-head screwdriver by inserting its blade into the side slot and releasing the latch. Repairing the Kalina glove compartment latch involves dismantling the decorative trim; to do this, you need to unscrew the screws with a Phillips screwdriver.
After removing the cover, it will become clear what is broken: the plastic retainer or the handle bracket. Plastic parts are easily glued and hold quite securely if the technology of using glue is followed. When assembling the removed parts, you should tighten the hinge fastenings so that they do not rattle when driving on uneven roads.
If the lock is broken
Models of the “tenth” series all suffer from broken handles. It is not known for certain why it breaks; take it as a design feature. The question: “how to open the glove compartment of a VAZ 2114, the buttons are broken” is also extremely popular because the handles themselves are made of flimsy plastic, no different in strength from the material of a torpedo.
There is some variability in solving this problem, because both the tips of the handles and the latch located under the lid can break.
In the first case, you are lucky:
- you need to take any tool with oval handles that require compression (pliers are perfect);
- turn the instrument over and insert the tips of the handles into the finger grooves on the lid;
- you need to press firmly on the handles and their tips will complement the length of the tongue, and the lid will open.
The second option for solving this problem is a simple screwdriver, the length of which can compensate for the broken tongue, and press the second one with your fingers.
The glove compartment button is broken
If your internal latch is broken, then things will be much worse:
- first you need to open one handle and pull the open edge towards you so that it does not close;
- then use a thin screwdriver (preferably a knife) to slowly push the closed guide inside the lid.
How to remove the glove compartment on a Chevrolet Niva
The glove box must be removed to make it easier to disconnect the dashboard if you need to gain access to the fuses or controller and when completely disassembling the car.
Removing the glove compartment on a Niva-Chevrolet, work procedure:
- Open the glove compartment lid, lift it slightly and remove the cords from both sides that hold it in place.
- Using a Phillips screwdriver, unscrew the self-tapping screw from the side.
- Using the same screwdriver, unscrew the two screws that secure the instrument panel console to the side.
- We unscrew two similar screws from below.
- Having opened the lid of the box, we unscrew two more screws on the left, again securing it to the instrument panel console.
- We unscrew the screw located on the upper left mount, then on the middle and right (two).
- We remove the lining from the box body.
- There is one screw at the top right and two at the bottom, unscrew it.
- We tilt the box, disconnect the lighting wire terminals. Disconnect the flashlight.
The glove box has been removed and installation is carried out in the reverse order.
Replacing an internal part
Replacing the internal handles on the rear door of a Granta is slightly different from dismantling the external part. The internal element has more fastenings and is partially hidden by decorative trim. Algorithm of actions:
- The cladding is dismantled. To pull it out, you need to pry up the edge. To do this, use the thin edge of a screwdriver or a sharp knife.
- The rear door card unwinds. There is a rod inside that is important to disconnect.
- To remove the remains of the broken opening device, the fasteners are unscrewed. The handle is removed and a new part is mounted.
Before installation, the internal niche is cleaned. This can be done with alcohol infusion or detergent.
How to replace the glove compartment handle on a Lada Granta
The glove compartment of the Lada Granta, like many elements of the interior of a budget car, is made of inexpensive materials. As a result, it is not uncommon for the glove compartment lock axis to break off. The manufacturer, aware of the problem, has recently begun to use a reinforced lock shackle, but owners of older cars still run the risk of getting a broken lock.
The broken axis of the glove compartment lock looks like this. Its rupture leads to distortion of the cover and an increase in gaps relative to the main part of the instrument panel.
There are several options for solving this problem. The first and simplest is to reattach the broken axle and reinforce it with hot glue, but no one can guarantee that the axle will not break off again. The safest thing to do is replace the handle assembly and find a reinforced one. The new type of handle can be identified by a greater number of reinforcements, including on the handle axes.
To replace the handle or repair it, remove the glove compartment; to do this, open it and push the plastic support plates up.
Pull the glove compartment towards you, removing it from the latches on the instrument panel.
Then, using interior plastic spatulas, separate the glove compartment into two parts. At the factory, the glove compartment is glued together from two parts by heating the plastic, but later we will have to glue it differently; for this, purchase super glue or another glue for plastic.
The result of the work should be the following.
Thanks for subscribing!
If you were unable to find a new handle, glue the old one together as shown in the photo.
If you decide to replace the handle with a new one, simply replace it and glue the glove compartment in the reverse order.
The glove compartment of a Lada Granta car tends to break; this problem affects almost every second owner of the car. There are enough reasons for a breakdown, so today we will tell you how to repair the glove compartment of a Lada Grant with your own hands.
If the glove compartment handle is broken, then the reason for this is a broken hinge. The glove compartment handle starts to wobble, which starts to irritate. To eliminate the disease, you will need to remove the Granta's glove compartment and bring it home for a more detailed study. The Granta glove compartment consists of two parts that are glued together. Carefully separate them with a flat screwdriver.
How to correctly replace the handle on the rear door in a Lada Grant
Replacing the rear door handle of a Lada Granta is indicated when it breaks or wears out. In other situations, the driver's desire to change this item may cause scratches or microcracks on parts that spoil the appearance of the interior. If in the case of passenger structures only the handle needs to be changed, then in the driver’s door the lock that unlocks the door will also need to be changed. Sometimes replacing the opening mechanism is necessary because the lock cylinder has been damaged by an intruder.
The door structures of the Lada Granta and Kalina modifications are identical, so dismantling the handles is carried out in the same way.
How to properly remove the glove compartment on a Lada Granta
A handbag in a men's version is a car glove compartment. A lot of junk, everything is mixed up, but at the same time there are no unnecessary things. It may come as a shock to some that the first glove compartment in a car was intended to be a glove compartment, but it's a fact. Now you can find everything there except the clothes for your palms. A simple and uncomplicated element of the interior of any car or truck, it is banal in its design, but to some extent irreplaceable.
Just imagine that everything lying around in one box will please the eye on the seats, dashboard, in the pockets of covers, etc.
Horrible! Therefore, it is very important to keep the glove compartment in good working order and not allow irritating sudden openings of the door at every jump on “smooth” domestic roads
The glove box in the Lada sedan model is one of the weakest points. Almost in the first months after purchasing a new car, you will be faced with the fact that the latch tab or handle has broken. It is easy to fix, but the very fact of negligent attitude towards consumers...
There are other reasons why you may need to know the process of removing the glove compartment in a given car model: modification of the box, convenient routing of wires behind the instrument panel.
The removal process is very simple. It is enough to do it once, and you will forever remember how to do it.
How to remove the glove compartment on a grant
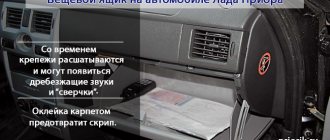
Grant's glove compartment upholstery
The glove compartment of the Lada Granta FL car is an ordinary, unlined plastic box. Whatever you put there, everything will jangle and rattle on the uneven road. Let's try to solve this problem ourselves. And the appearance will only benefit!
Traditionally, glove compartments or, as they are officially called, glove boxes, on domestic cars do not shine with practicality. So on the new Lada Granta, despite the original two-level design, it is the most ordinary hard plastic, not sheathed or pasted over.
What can you do, the Lada Granta is positioned as a budget car. However, such a glove compartment is also typical for most foreign cars in the low and middle price range. Therefore, rattling and rattling of contents on bumps is inevitable. You can fight in different ways: some put rags, some use the glove compartment solely as a document storage, some keep it empty altogether. But these are all half measures. The problem needs to be solved radically, which is what we will do now.
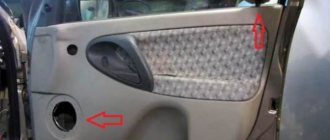
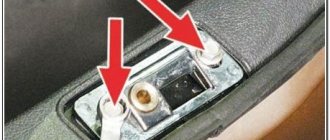
First of all, the glove compartment, or rather its lid, the inside of which acts as the glove compartment drawer, must be removed. The lid is held on by four latching hinges, as well as two opening stroke limiters. To remove it, open the glove compartment as much as possible, and then pull the lower part towards you parallel to the floor, releasing the latching loops. Photos with the cover removed will help you understand the design of the fastening and the direction of application of force.
After all four latching hinges are released, the lid remains on the opening travel stops. These are simply two pins of the lid that fit into the slots on the inside of the glove compartment.
Replacing the glove compartment handle of a Lada Granta
The problem on the Internet is quite common, so I will make an introductory part. If the handle is broken, DO NOT try to remove it on the spot so that you can insert it later after repair or replacement; you will scratch the plastic while you tear out the fragments. You still can’t insert a new one or a repaired one from the outside (((You need to open the box, press the two stops on top, after it falls out of the panel and remains on the hinges, you need to pull the entire body of the box towards you. The hinges are split, while the torpedo body is solid axles. Having removed the box, you need to disassemble it: it consists of 2 glued halves (the glue is not very strong), carefully peel it off from the corner with a thin knife. The ear (axis) in the handle-lock fell off on one side. Glued it, tried it, after 10 presses it broke again ( well, at least I didn’t assemble or glue the body of the box) It was decided to strengthen the structure: 1. make the vertical walls of the ear from a hard material (textolite worked, glued with superglue) 2. put it on 1 steel axle (drilled a 1.5 mm hole in the center and inserted a piece old knitting needle) 3. Fill the whole thing with epoxy so that it doesn’t come loose.
I bought a glove compartment handle
Similar articles
- 20191021_
- Fourth oil change at 20052 km LADA GRANTA FL
- VID_20191020_
- I decided to get a Kalina cross 106l
- After turning off the gas the EUR light came on
- Which ones + which ones - and is it worth taking it
- Please share
- They are sold as a set
- The standard Granta Luxury casting has 185 tires installed.
- Tomorrow I will install technospring springs minus 50 on the original stoics
- We will find good shoes for your car for everyone
- Has anyone encountered this problem?
- Consequences of 1 liter of cheap antifreeze - clogged radiator
- Tell me, can the interior mirrors come off if you hang them on them?
- I have a Starline A93 signaling
32 comments on “I bought a glove compartment handle”
For a piece of plastic
How well they lived under Brezhnev, matches 1 kopeck, plane ticket from shuttle to Krasnodar 27 rubles. Bread 16 kopecks, milk 22 kopecks, bottle returned 20 kopecks, returned)))
just a very rare and expensive psmas
some kind of bastard designed it)
replaced free of charge under warranty)
there should be a stamp on it, 585 standard, gold
Vladimir, well, do the math! 27 rubles with a salary of 120 rubles for a worker (machine operator, teacher, etc.). At the moment, the average salary in Russia is about 32 thousand rubles. You can buy a ticket to Krasnodar for 4 thousand if you try... So figure out where it’s cheaper
They changed it three times in two years))
Vladimir, I had 350. And now it was 15,000. Our average is 10-12 k. I don’t know how it is throughout Russia hahaha. A ticket to Krasnodar is 7,000.
So consider me and my family flying to Krasnodar, but I only need 27 kopecks, plus for the bus to Novorossiysk, plus 30 kopecks to eat and back, in total 60,000 just for the road.
And on 350 I could go there with my family and back. 2.50 bus ticket was from Krasnodar to Novorossiysk.
Reason to buy a 3D printer
Vladimir, tell me how you live on 15 thousand. =)
Vladimir, I’m not the only one, our wipers get 8000.
Vladimir, where is 32?
Igor, in Moscow noverno)))
Vladimir, well, if it’s true, although our deputy director of the HR department has a salary of 400 thousand per month
Igor, well, our bosses aren’t in poverty either, but ordinary working people can.
So, 250 rubles for 0.5 vodka doesn’t upset anyone, but 350 rubles for your own car, to compensate for the damage from your own crooked hands, is that really expensive?
Sergey, I don’t drink or smoke and I feel sorry for 370 rubles for this thing
Valera, when I bought the car, I sat down with my girlfriend and we were just driving away, and she was like, damn, something fell off on you.
Valera, when I bought the pen I was also blown away by the price. And it’s not inconvenient to install. In short, it's a piece of junk and not a glove compartment.
Cox, when I broke it, I wanted to fix it, I fixed it, and in the end I broke it. They gave me the idea to make it with a neodymium magnet, I was a little crazy, well, it’s not the same anyway and it opens on bumps, today I decided to buy
Valera, If you don’t drink and don’t smoke, then... attacks of uncontrollable aggression won’t start? No offense! Just the glove compartment handle is a common breakdown on the grant! Let them all be just as trivial!
Replacing the glove compartment handle of a Lada Granta
The problem on the Internet is quite common, so I will make an introductory part. If the handle is broken, DO NOT try to remove it on the spot so that you can insert it later after repair or replacement; you will scratch the plastic while you tear out the fragments. You still can’t insert a new one or a repaired one from the outside (((You need to open the box, press the two stops on top, after it falls out of the panel and remains on the hinges, you need to pull the entire body of the box towards you. The hinges are split, while the torpedo body is solid axles. Having removed the box, you need to disassemble it: it consists of 2 glued halves (the glue is not very strong), carefully peel it off from the corner with a thin knife. The ear (axis) in the handle-lock fell off on one side. Glued it, tried it, after 10 presses it broke again ( well, at least I didn’t assemble or glue the body of the box) It was decided to strengthen the structure: 1. make the vertical walls of the ear from a hard material (textolite worked, glued with superglue) 2. put it on 1 steel axle (drilled a 1.5 mm hole in the center and inserted a piece old knitting needle) 3. Fill the whole thing with epoxy so that it doesn’t come loose.
Results
If the airbag has deployed, operating the car or doing it yourself often leads to tragedy on the road.
To eliminate problems, you should contact an authorized dealer, who, after a complete diagnosis, will replace the failed elements.
Otherwise, there is no guarantee that the airbag will work in an accident and save lives.
Airbags are one of the effective components of a car's passive safety system. Its main task is to almost instantly reduce the speed of the person in the cabin. Thanks to this, during an accident you can avoid traumatic impacts and save the life of the driver or passenger.
What tends to break down in a mechanism?
Sometimes disassembly occurs only to tighten the fasteners. It is also necessary to dismantle the opening mechanism if it does not work correctly. Main causes and options for breakdowns:
- A defect appeared after an accident.
- The part does not close or open the door well. There is insufficient adhesion to the body part.
- Microcracks, scratches, and abrasions appeared on the product.
- Damage to internal components has been detected. If no defects are found during a visual inspection, you will have to unscrew the handle to make sure that the whole problem is in the fastenings.
- In the case of the driver's door, where there is a lock in the handle, the reason for dismantling is an attempt to break into it.
An equally compelling reason: failure of the external door opening manipulator. It is important to understand that the plastic from which the products are made is not as durable as other elements. It may simply crack due to strong pressure on the handle.