Many owners of front-wheel drive VAZs are concerned about the problem of why the timing belt is eating? Most often this question is asked by owners of the following VAZ models - 2108, 2109, 2110, 2112, 2114, Kalina, Priora, Grant (and this problem occurs on engines with both 8 and 16 valves). There is only one general answer to the question raised: the belt is skewed. And this, in turn, can happen for a number of reasons - the pump is installed unevenly, the roller is of poor quality, a washer of the wrong size is installed between the roller and the block (or it is missing altogether) and some others. Each of the listed problems is solved in its own way. In most cases, work to eliminate the causes can be carried out independently, provided you have the appropriate experience and tools. This will save money, and the repair work itself does not take much time and effort.
Setting timing marks on a 16-valve VAZ-2112 with your own hands
Car: VAZ-2112.
Asks: Kostikov Vladimir Igorevich. The essence of the question: I can’t correct the timestamps, how to set TMV tags? I have a problem. When replacing the timing belt, the upper pulleys were not blocked and now it is not clear how to expose them. The marks on the pulleys do not "point" in exactly one direction. Maybe it would be easier to turn all the pulleys to TDC in cylinder 1? If we are talking about 16 valves, then the markings on the VAZ-2112 are familiar to me: I performed this operation on timing belt 21124. Well, I have a 1.5 engine. Are there any differences?
Brief history of the family
Lada Kalina is a car with fairly high technical performance and driving characteristics.
Another feature of the line is its stylish appearance. And the Kalina Universal car is also quite roomy, this is definitely a big plus. This family of models is a good choice for those who value original design, ride comfort and useful options. "Kalina" was produced in several bodies. This is a station wagon - VAZ-1117, a sedan - VAZ-1118 and a hatchback - 1119. All modifications are distinguished by a spacious interior and good ergonomic characteristics.
AvtoVAZ designers and engineers combined the most modern technologies, style and reliability in Kalina. All this is a guarantee of safe and, most importantly, pleasant travel. Development of the series began back in 1993. And the model range received its name only in 1998. AvtoVAZ was able to present the first ready-made prototypes to the automotive public and journalists only in 1999, and in 2001 they showed the VAZ Lada Kalina Universal car.
About timing marks and their displacement — Lada 2111, 1.6 l., 2005 on DRIVE2
I have been looking for information about the valve timing of 124 internal combustion engines for a long time, and now I came across this material completely by accident. In general, I understand what is being said here. But it would be nice if someone thoroughly chewed on what exactly a change in one or another direction of pulsations, the angle of inclination of the first peak, passing through zero and the maximum value of the vacuum vacuum mean.
From my own experience, I can say that shifting the entrance 1 tooth to the right adds elasticity. And also the intake and exhaust are shifted to the right. And shifting the descent to the left gives a noticeable jerk (acceleration) somewhere around 3500 rpm.
Timing PHASES on a VAZ 2112. The belt is specially moved to one tooth, forward and backward. Engine 21124 (1.6 16kl.) Gearboxes:
Gear 2112
.
Norm
• ХХ = 840 rpm (engine is warm, measured after turning off the fan, t = 97 degrees) • the difference between DR and DPKV is 0.32 degrees; First, auto-tuning is performed according to DPKV, then an indicator (1 or 2) is set at the beginning of the line (i.e., the value of the marker displayed on the line will be equal to 0). Auto-tuning is then performed based on DR and the marker value (on the ruler) previously set at the beginning of the ruler. The displayed value will be considered the difference. 2) the difference between DPKV and DR is calculated as in point 1, but vice versa. First, auto-tuning is performed using DR, then using DPKV 3) Real UOZ - UOZ according to the scanner 4) As a result of all experiments, the ECU did not generate a direction finding error (phase sensor
Release the norm of tooth 0; 1 posterior tooth entry
Release the norm of tooth 0; 1 posterior tooth entry
Signs: • ХХ = 840 rpm (t = 92 degrees) • The angle of inclination of the 1st peak has increased, it has become softer • Pulsations have decreased • The maximum values of vacuum and vacuum have decreased • Extra transitions from 0 to appeared) Automatic adjustment by DR • the difference between the DR and DPKV is -8.44 degrees • SOP 25 degrees (real 15 degrees) • the closing degrees of the exhaust valves have shifted slightly to the right • the phase overlap has shifted slightly to the right side b) Auto-tuning for DPKV • the difference between DPKV and DR is +8, 27 degrees • SOP 16 degrees (actual 15 degrees) • Exhaust valves close late and intake valves open later • Overlap phase shifted to the right
Release the norm of tooth 0; Input 1 tooth forward
Release the norm of tooth 0; Input 1 tooth forward
• ХХ = 850 rpm (t = 92 degrees) • The angle of inclination of the 1st peak has decreased, it has become steeper • The pulsations have become larger • The maximum values of vacuum and vacuum have become much larger • There are extra transitions through 0 a) Auto-tuning in accordance with DR • difference between DR and DPKV is +15 degrees • UOZ 3 degrees (15 real degrees), missing in DR waveform b) Auto-tuning according to DPKV • difference between DPKV and DP – 15 degrees • UOZ 16 degrees (15 real degrees) , missed within the DR waveform • Exhaust valves close earlier and intake valves open earlier • Overlap phase shifted to the left Release 1 tooth forward; Normal input 0 tooth • XX = 840 rpm (t = 92 degrees) • The inclination angle of the 1st vertex has remained virtually unchanged • Pulsations have decreased • The maximum values of vacuum and vacuum have decreased slightly DPKV to + 3 degrees • SOP according to DR 12 degrees ( real 15 degrees) b) Auto-tuning by DPKV • difference between DPKV and DR is -3.47 degrees • UOZ by DPKV 15 degrees (real 15 degrees) • Drain valves close a little earlier and inlet valves open a little earlier • The overlap phase is shifted to the left
Release 1 tooth forward; Standard input 0 teeth
Release 1 tooth forward; Standard input 0 teeth
Set the timing marks correctly - otherwise you will bend the valves!
The VAZ-21124 engine has a peculiarity: no matter how its pulleys rotate, it does not bend the valves. With the 21120 engine (16v 1.5l) such bits will not work! If the pulley positions do not drop too far, try putting on the belt and moving the mechanism to the "TDC 1 and 4" position. And from now on, always use the instructions:
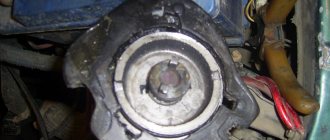
- The crankshaft is brought to the required position by checking the mark on the generator transmission pulley (photo 1) or on the crankshaft pulley (photo 2);
Alternator drive pulley and crankshaft pulley
Exhaust and inlet pulley
Theoretically, the marking on the VAZ-2112 is the same, regardless of what type of engine we are talking about. Here is a photo of engine 21120.
What it all looks like in reality and in the instructions
Take the time to locate the inspection window on the gear housing. There is another sign under the thorn.
The last step is optional. And they do this so as not to redo all the work from scratch.”
- The mark on the crankshaft pulley sometimes breaks: use control method “1” (photo 1) or “3” (photo below).
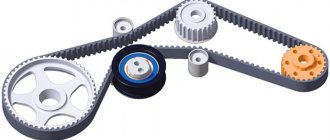
- The number of belt teeth between o is 16;
Updates for VAZ-21124
On the 1.6 engine, all actions are performed as described above. There is one exception: the generator drive pulley is installed according to the mark on the casing (see photo).
Generator drive pulley, engine 21124
However, if this sign is not present, then use the proven method - count 20 teeth from the body of the DPKV. Instead of 21 there should be "pass".
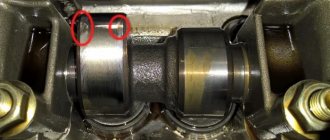
The timing pulleys can be turned at will - the pistons never touch the valves. Compare the appearance of the pistons of two different engines - it will become clear what we are talking about.
Two different 16-valve valves
For those who don't understand anything
The number of teeth on the crankshaft pulley is 21, on the camshaft pulleys – 42. When the crankshaft is rotated 360 degrees, the camshafts rotate 180 degrees. Typically, a complete engine cycle consists of two revolutions of the crankshaft (720 degrees).
In theory, an alternative tuning method could be used. Place the marks on the camshaft pulley down. Then the mark on the crankshaft pulley should point upward (TDC 1 and 4).
If there is no clasp, you can make one yourself. A suspension spring remover will also work (see photo).
Lada Granta - technical specifications
For the Lada Granta liftback, a line of engines consisting of three power units is presented. The first of them, which is also the weakest in the line, works in tandem only with a manual transmission, the second only with an automatic one, and the third can work with both a robot and a manual transmission. The car's suspension is standard for its class. The front is independent, MacPherson spring type. The rear is semi-independent, torsion beam.
1.6 (87 hp) - the base naturally aspirated gasoline engine, which can be seen on all models of the company. Its main advantage is efficiency. At the same time, in combination with mechanics, it shows good dynamics for a state employee. Acceleration to 100 km/h takes 12.4 seconds. The maximum torque is 140 Nm at 3800 rpm.
1.6 (98 hp) – naturally aspirated petrol engine, which is paired only with a 4-speed automatic transmission. It provides the best efficiency and driving comfort, but at the same time reduces dynamic performance. In this aspect, this is the least dynamic engine in the lineup. Acceleration to 100 km/h is carried out in 13.7 seconds. The maximum torque is 145 Nm at 4000 rpm.
1.6 (106 hp) - the most dynamic and economical engine. Excellent economy figures in combination with a robot and even more excellent dynamics with mechanics. Has good pickup. Acceleration to 100 km/h takes 10.9 seconds with mechanics, and 12.3 seconds with robot. The maximum torque is 148 Nm at 4000 rpm.
More details about the technical characteristics of the Lada Granta liftback in the table below:
| Technical characteristics of Lada Granta liftback | |||
| Engine | 1.6 MT 87 hp | 1.6 AT 98 hp | 1.6 AMT 106 hp |
| general information | |||
| Brand country | Russia | ||
| Car class | IN | ||
| Number of doors | 5 | ||
| Number of seats | 5 | ||
| Performance indicators | |||
| Maximum speed, km/h | 166 | 179 | 167 |
| Acceleration to 100 km/h, s | 12.4 | 13.7 | 12.3 |
| Fuel consumption, l city/highway/mixed | 9/5.8/7 | 9/5.2/6.6 | 10.1/6.1/7.6 |
| Fuel brand | AI-95 | AI-95 | AI-95 |
| Environmental class | – | – | – |
| CO2 emissions, g/km | – | – | – |
| Engine | |||
| engine's type | petrol | petrol | petrol |
| Engine location | anterior, transverse | anterior, transverse | anterior, transverse |
| Engine volume, cm³ | 1596 | 1596 | 1596 |
| Boost type | No | No | No |
| Maximum power, hp/kW at rpm | 87 / 64 at 5100 | 106 / 78 at 5800 | 98 / 72 at 5600 |
| Maximum torque, N*m at rpm | 140 at 3800 | 148 at 4000 | 145 at 4000 |
| Cylinder arrangement | in-line | in-line | in-line |
| Number of cylinders | 4 | 4 | 4 |
| Number of valves per cylinder | 2 | 4 | 4 |
| Engine power system | distributed injection (multipoint) | distributed injection (multipoint) | distributed injection (multipoint) |
| Compression ratio | 10.5 | 11 | 11 |
| Cylinder diameter and piston stroke, mm | 82 × 75.6 | 82 × 75.6 | 82 × 75.6 |
| Transmission | |||
| Transmission | Mechanics | machine | robot |
| Number of gears | 5 | 4 | 5 |
| type of drive | front | front | front |
| Dimensions in mm | |||
| Length | 4246 | ||
| Width | 1700 | ||
| Height | 1500 | ||
| Wheelbase | 2476 | ||
| Clearance | 160 | ||
| Front track width | 1430 | ||
| Rear track width | 1414 | ||
| Wheel sizes | 175/65/R14 185/60/R14 | ||
| Volume and mass | |||
| Fuel tank volume, l | 50 | ||
| Curb weight, kg | 1085 | 1085 | 1085 |
| Total weight, kg | 1560 | 1560 | 1560 |
| Trunk volume min/max, l | 440/760 | ||
| Suspension and brakes | |||
| Front suspension type | independent, spring | ||
| Rear suspension type | semi-independent, spring | ||
| Front brakes | ventilated disc | ||
| Rear brakes | drums |
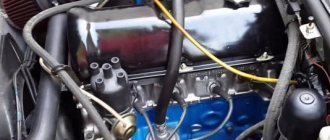
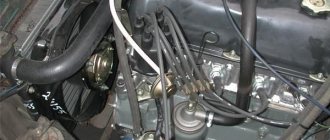
Replacing the timing belt 16 cl engine — Lada 2112, 1.6 l., 2007 on DRIVE2
Replacing the timing belt VAZ 2112 1.6 16 cl.
1. Remove the timing belt cover. Timing belt guard secured with six bolts. Remove the chip from the crankshaft sensor, unscrew the bolt and remove the sensor.
2. There is a missing tooth on the pulley, this is not without reason, this allows the crankshaft sensor to determine the top dead center, and also allows you to block the crankshaft, unscrew and tighten the pulley bolt.
3. The pulley is then aligned with the crankshaft sensor hole and a suitable tube or other suitable object is inserted through the sensor hole, in my case it is a hex wrench, the pulley is locked and then unscrewed and removed.
4. Loosen the tensioner pulley nut and remove the old timing belt.
5. Install a new belt, the belt can be installed by moving the right camshaft with a wrench, or you can remove the tensioner roller in any way you like.
6. Tighten the pulley bolt back and align the timing belt drive gear to the marks. If there are no marks on the oil pump body, put marks on the flywheel and for one make a mark on the oil pump with a chisel, this will be more convenient.
7. We join the marks of the camshaft pulleys so that the timing belt drive gear does not get lost
8. Use a special wrench to tighten the belt with the tension roller. If there is no key, don't worry, you can tighten it with two nails and a screwdriver between them, or you can take a steel fork, remove the two center prongs completely, shorten the outer two in half and fold them over. Don't forget to tighten the tensioner nut. (To tighten the belt, turn the tensioner pulley counterclockwise (about 10-15 °), to loosen it clockwise)
9. We check the crankshaft two full turns and check the marks, if all three marks match, put the pulley in place, do not forget the generator belt and crankshaft sensor, then the belt cover and you can start the engine.
Timing belt tension
1. Check the belt tension. A correctly tensioned belt should rotate 90 ° from the finger force (1.5-2 kgf) in the middle between the crankshaft and camshaft pulleys.
2. I run two fingers between the camshafts and up and down. 5-6 mm swings back and forth, then I go away.
3. Adjust the timing belt tension using a suitable tool. The most correct belt tension is 2 kgf. Having achieved this, fasten the fixing nut.
4. The manual inspection method is described in detail in the "Manual". It involves checking the tension of the timing belt at the center of the branch between the camshaft pulleys. It should be such that the belt deflection is 5.4 mm under the influence of an object 3 mm wide with a force of 10 kg. Deviations in any direction are allowed no more than 0.2 mm. The engine must be at “ambient air” temperature (+ 15-30 ° C). A belt that is too tight will break - the strength of the strings is limited. And the tighter the belt is, the faster the threads will break. Even a weakened belt will not run for long, because when entering the pulley, the belt teeth do not fall into the grooves of the pulley teeth - undercutting occurs and the subsequent separation of the teeth from the base.
Step-by-step instruction
To replace the timing belt on a VAZ 2112, you can use the video or regular instructions. The following describes the procedure for servicing a car according to the standard plan.
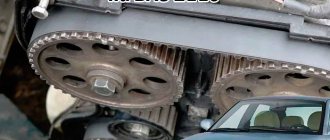
Timing belt marks for VAZ 2112 16 valves
Before attaching the new unit, fix the camshaft and crankshaft taking into account the markings. The gears are fixed at zero. Points in the range from A to F must strictly match. When everything is ready, set the marks of the belt casing and shafts in a single specified position.
Find the plug installed under the thermostat on the box, remove it, then find the flywheel. When the marks on the camshaft and the casing match, you need to check the correspondence in the section of the flywheel, on the iron casing.
Installation
Installation procedure for the node:
Reassemble in reverse order. Finally, remove the screwdriver that was previously clamped in the crankcase.
Belt tension
The VAZ 2112 timing belt is tensioned by rotating the roller element clockwise using a special key until the optimal marks are reached. You can check the tension without special tools - simply by grabbing the unit in the area between the crankshaft and camshaft pulleys. The optimal values are those at which the mechanism can be rotated 90 degrees or more.
Injector types
The injector controls fuel injection and can also control the ignition. On all new injection machines, the ignition is set by a computer and adjusted by compiling various firmware. But this was not always the case, and on old cars, the same Japanese ones from the 90s, the ECU only regulates fuel injection, and the ignition timing is set using a distributor and set in the same way as on old models. Lada, but depending on the speed, the ignition timing is adjusted using a more complex vacuum system than the Zhiguli carburetor. Sometimes a pipe breaks during operation and the traction is lost; you will have to look for and correct this defect.
Signs of the need for internal combustion engine repair
The reasons why the operation of the engine is disrupted are arranged in a small list, starting with refusal to start and ending with floating idle speed (this problem was removed on the 127 “engine”). Not all breakdowns end in capital damage - sometimes it’s enough to add oil, sometimes it’s enough to adjust the ECU settings.
Compression reduction
A decrease in cylinder compression below 16 atmospheres is a bad sign. Such a high limit corresponds to a compression ratio of 11.
Knocks in the engine
Engine knocks can come from several points. These could be hydraulic compressors, timing belt rollers or pins. The knocking noise could also be caused by low oil level. The answer to the question will be given by a thorough detailed inspection of all parts of the unit and checking the oil level.
Blue smoke from the exhaust pipe
The blue smoke that comes from the exhaust pipe appears when oil enters the combustion chamber. It can leak either from the valves or from under the piston. The result is the same: the oil is eaten up and blue smoke pours out of the chimney. Once the leak is located, half the problem will already be solved.
Troit motor
Sometimes in the cold the engine may stall - don’t be alarmed by this, because it may simply be one of the spark plugs that fails. In this case, we advise you to simply restart the engine and it will stop running.
How much does it cost to overhaul a Priora engine - average price
Self-repair of a Priora engine with 16 valves costs an average of 16-20 thousand rubles. The cost depends on the severity of the breakdown and may be lower or higher than this average range. Repairing a Priora engine can be entrusted to the wrong hands, but then you will have to pay for the work - sometimes the cost of repairs reaches as much as 40 thousand rubles.
This is an unreasonably inflated figure, because, as practice shows, you can rebuild the engine on a Priora, working at a moderate pace, in just three days - and three days of work is definitely not worth that kind of money. Don’t be afraid of not being able to cope - your Lada is easy to repair, and using the advice and “tutorials”, you will conquer even such a task that is impossible at first glance.
Ignition system sensors and marks
For the ignition system to work properly, the computer must read the correct information from the sensors. In the future, this information will be processed using fuel maps embedded in the injector.
The main signal comes from the crankshaft sensor. This sensor shows the position of the crankshaft at a given moment and, guided by it, calculates at what moment it is necessary to inject fuel and at what moment the same fuel should be ignited, depending on the engine speed, which is also determined by this sensor.
1 – drive shaft of the drive disk; 2 – crankshaft position sensor; 3 – angle of rotation of the crankshaft; 4 – output signal of the crankshaft position sensor
And here is what a typical signal looks like when the computer receives it from the crankshaft sensor. Notice the 270°: this is like the zero point, which tells the computer that the motor has turned and that a new cycle is starting. This is achieved by missing a tooth on the crankshaft sprocket.
Replacement process
When does a belt need to be replaced? If you naively trust the manufacturer and hope that it will last all 100 thousand kilometers, then problems cannot be avoided. An experienced and knowledgeable driver will always conduct a visual inspection, noting signs of replacement, such as:
- the appearance of hanging threads and loosening of the belt.
- various folds, cuts, ligaments, etc.;
- traces of oil on the belt;
- excessive wear of teeth located on the inside of the belt surface or cracks;
Note. It would be a good idea to check the tensioner pulley, which, if it malfunctions, can cause colossal damage not only to the belt, but also to the main parts of the internal combustion engine.
Replacement is carried out using the following tools:
- long lever or screwdriver.
- special circlip remover;
- keys 15 and 17 (normal and ringtone);
- a special key with which you can adjust the take-up reel;
Belt removal
Let's proceed with the replacement, presented here in the form of detailed instructions:
- place the piston of the first cylinder at the top dead center position;
- remove the generator drive belt;
- de-energize the battery;
- subsequently turn the tensioner roller slightly to reduce the timing belt tension;
- take a 15 mm wrench and unscrew the bolt securing the tensioner pulley;
Note. To easily unscrew the generator drive mounting bolt, you need to rest the support against the crankshaft so that it does not rotate. It is best to use the services of an assistant who will prevent the crankshaft from turning when the bolt is loosened.
- remove, but very carefully, the washer from the drive pulley;
- remove the generator drive pulley;
- then take a 17mm wrench and unscrew the bolt securing the crankshaft pulley;
- remove together with the washer;
- remove the timing belt from the crankshaft pulley.
Installation
Before you begin installing a new timing belt, you should carefully prepare everything. First of all, this concerns cleaning the pulley from oil and dirt, as well as cleaning the take-up reel.
Note. If the parts are very dirty, it is recommended to use a cloth soaked in gasoline or white alcohol.
Like:
- we mount the generator drive pulley in place (there is a special recess on it that needs to be placed);
- put the new belt in place.
Note. When installing a new belt, pay attention to the tension of the drive branch.
- take a 15 mm wrench and tighten the bolt that secures the tensioner pulley.
- turn the roller until the notch on the disk coincides with the protrusion on the inner sleeve of the tension roller (rectangular protrusion);
- We arm ourselves with a special key and extractor;
- insert the key into the grooves of the tensioner roller located outside;
Note. If after installing the belt you hear a characteristic noise in the camshaft, there are probably problems with the tension roller bearing, which is also of great importance for internal combustion engine mechanisms.
To check this, you need to disassemble the rollers and begin to slowly rotate the bearing, making sure that there are no gaps or jams. In addition, you need to pay attention to traces of oil leaks. If the above malfunctions are detected, it is necessary to replace the roller itself.
We change this part too
To replace the tension roller you will have to buy a new one, which is not that expensive. It is also recommended to watch this video.
Note. When installing a new tension pulley, make sure the holes for the special wrench are facing outward.
Using shims when the belt slips
You can make washers yourself, for example, from the body of aluminum beer cans, coffee tins, or use ready-made ones from the factory. The main thing is that the washers are the same size as the spacer ring installed between the block and the tension roller eccentric. There are two options. The first uses factory washers. The thickness and quantity are selected experimentally. The use of this method is ambiguous, since the washers are flat and, accordingly, the contact plane of the roller will remain parallel to the same. However, this method has helped some car enthusiasts.
1 - if the belt is sliding towards the engine, 2 - if the belt is sliding away from the engine
Another method is to make your own crescent-shaped washers. The number and width of washers are also selected experimentally. The use of such washers is more expedient, since with their help it is possible to change the angle of inclination of the pin and roller so that it forms a normal to the plane of the cylinder block body.
The washer must be installed according to the diagram shown in the figure. In particular, if the timing belt is slipping towards the engine, then the washer/washers should be installed closer to the center of the block. If the belt moves from the engine, then vice versa, closer to the edge of the block. When installing washers, it is recommended to use a heat-resistant sealant that will keep them from sliding to the side with or without load.
Do not overdo it so that when the engine is running, the belt does not “go” in the other direction, opposite to the one where it was sliding before. The main thing is that the belt works evenly across the entire width and does not slip off the roller.
Installed washers
Finally, I would like to note that in rare cases, the cause of the belt shifting to one side or the other and its eating can be caused by not one, but several of the reasons described above. As a rule, the method of using shims is universal and can save the situation in even the most “neglected” cases. However, it makes sense to inspect the belt, roller and pump in order to identify shortcomings in their operation, and, if necessary, replace the listed components. This will save you from having other problems with these parts in the future.
Ignition control
Electronic ignition control
How to set the ignition angle? In systems with electronic ignition control, this can be done using computer diagnostics that are connected to the electronic control unit (ECU) or "brains" of the car. And there you can see how the engine operates in real time: what signals the sensors receive, what engine speed, fuel consumption, injection time, ignition time and other input and output data.
Essentially, you don't need to change anything while running unless you change the firmware. That is, if the machine somehow began to work incorrectly, then most likely there could be several reasons:
- An incorrect signal is received from the sensors: in this case, you can replace the supposedly faulty sensor with a replacement one that is known to be good, and see if the result changes.
- The mains voltage is incorrect and as a result the sensors produce an incorrect signal. The input signal to the sensor is 5 V, if this value is different, the ECU will receive incorrect input data and the engine will not be able to operate normally.
- Faulty ECU. Quite often it happens that, having considered everything possible, it turns out that the brain has flown. But it’s not scary, they are cheap at VAZ.
Therefore, the ignition itself is not installed on injection machines; it is already included in the system, but it is worth checking whether the signs are set correctly.
Adjusting the ignition marks on the VAZ-2110 injector
When the engine is running, some phases must work synchronously, the camshaft must coincide with the crankshaft, and the timing of fuel injection and ignition must be associated with them. Let's look at all this using the VAZ-2110 as an example.
How to set the ignition on a VAZ 2110 injector
If the car does not start, shoots, sneezes and everything is in the tube, then there are no signs somewhere and this needs to be solved.
On any car, the timing marks must be set perfectly, only then it will work normally. On the VAZ-2110, the crankshaft mark is located on the flywheel. You need to look through the inspection window on the gearbox housing, through which you can see the flywheel. It's better to use a flashlight because it's not that easy to see.
Lada granta 2022 – 2022, generation i
Lada Granta is a new product from the AvtoVAZ plant, claiming to be the “people's car”. On the assembly line of the flagship of the Russian automobile industry, this car should replace the “classic” model range. Thus, in the near future there will be no rear-wheel drive models at VAZ. Will the outdated Lada Samara be discontinued? and subsequently the Lada Kalina from which the Granta comes.
The specialists of the Togliatti plant tried to make a car that meets all modern requirements for a car, and at the same time remain within the minimum prices for the automobile market. As a result, Granta was a significant step forward both in terms of design and equipment.
True, in the minimum “standard” configuration, the Granta’s equipment includes only a driver’s airbag, child seat mounts and daytime running lights. The engine in this version is an old 80 horsepower from Lada Kalina. But this level of equipment is already much more than could be obtained in the “classic”.
The “second level” “norm” configuration already includes electric power steering, an on-board computer, front electric windows, central locking and an anti-theft system. In addition, an engine is installed here, according to the developers, specially designed for the new product 1.6 liter 90 hp. and 140 Nm of torque starting from 3800 rpm.
Finally, the third, most expensive version, which should appear only in the summer of 2022, will provide the owner with such elements as ABS with Break Assist, seat belts with pretensioners, two front airbags, heated front seats, air conditioning, heated and electrically adjustable mirrors, athermal glass, electric windows on all doors, and in addition, alloy wheels.
This version will also receive the most powerful engine of 98 hp. The fuel consumption declared by the manufacturer is the same for all modifications of 7.2 liters in the combined cycle. The base for Granta will be a five-speed manual transmission, but in the future there will also be a four-speed automatic transmission produced by the Japanese company Jatco.
The “innovation” doesn’t stop there. The rear suspension of the Lada Granta received a “negative” camber angle. Along with an optimized front suspension, this should provide greater stability of the car both on a straight line and in corners, compared to previous front-wheel drive models.
Despite the fact that the Lada Granta is built on the Kalina platform, it is 24 cm longer than its predecessor. The wheelbase has also been increased. In order to reduce the cost of the design, some simplifications have been made that have allowed a significant reduction in the number of parts. In the future, the Lada Granta line may be supplemented with hatchback station wagon bodies.
How to set the ignition on a VAZ 2110
Among the most popular domestic cars, it is worth highlighting the VAZ 2110, or as it is also called “Ten”. This car was produced from 1995 to 2007. The 8-valve VAZ 2110 was a kind of replacement for the usual carburetor. The main difference between the models is the method of supplying fuel to the fuel cylinders. In the injection machine, everything happened under pressure.
The VAZ 2110 has 8 valves and the engine is more powerful. In this case, fuel consumption is lower. Repairing a car requires the use of additional equipment and painstaking work. Engine capacity 1.5 – 1.6 liters. How to correctly set the ignition on the valve injector of a VAZ 2110 8? To do this, you need to know the technology of work, and then all the actions will seem simple. This will be discussed further.
Which Euro 4 cars are left on the market?
Euro 4 is an environmental standard of the European Union, introduced in 2005, and replaced by the more stringent Euro 5 in 2009. According to its standards, emissions of fuel combustion products into the atmosphere should not exceed the following values: CO - 4 g/kWh, CH - 0.55 g/kWh, and NO - 2 g/kWh. In Russia, this standard has also replaced the more stringent Euro 5 since 2022, but most cars on the market (especially inexpensive ones) still comply with the older environmental class.
Therefore, we have compiled a list of popular cars that meet Euro 4 standards. In it, we will tell you about the advantages and disadvantages of each model, so with its help you can easily choose the right car. It is worth noting that automakers are gradually moving to modern environmental standards, so the market situation is changing quite quickly.
When to tension the timing belt
The timing belt tension on the VAZ-2112 and other VAZ models is carried out in the following cases:
- Installing a new belt;
- Loose belt;
- “Slipping” of the belt with a violation of time;
- Replacement of the tension roller and other timing drive mechanisms.
If the reason for the operation is a break or “slippage” of the belt, you must first make sure that the valves are in good condition. Failure of the gas distribution mechanism (drive) leads to engine failure on 16-valve 1.5-liter power units. However, if the drive fails at high speeds, the valves and CPGs also fail on other engines.
Check the functionality of the timing belt on the VAZ-2114 and other models equipped with 8-valve units by turning the camshaft manually. The operating mechanism should turn with some effort. This usually does not affect the faulty one.
During the procedure, it is necessary to check the compression in each of the cylinders. The easiest way to do this is to cover the candle hole well with paper. If there is pressure in the cylinder, the pin will be pushed out of the seat at some point during the firing of the camshaft. It is not recommended to carry out such a test on 16-valve engines. The risk of damage to initially good fittings is too great. There are no holes in the pistons of one and a half liter engines of this type. Consequently, the downward moving valves bend as they contact the piston surface.
Which clutch should you choose?
There are several types of clutch, differing:
- principle of operation: electrical, mechanical and combined;
- working medium: air and oil bath;
- mechanism: closed and alternately closed groups of mechanisms;
- number of disks: single-, double- and multi-disc;
- number of springs: with one or several;
- two-stream.
The clutch is a complex mechanism, so before replacing it on your Lada Kalina yourself, you should carefully study the design and features of the mechanism.
Lada Kalina clutch
On VAZ 1117, 1118 and 1119 clutches of 190 and 200 mm are installed. The diameter can be determined by the number of starter mounting bolts. For 190 mm there are 3 of them, and for 200 mm – 2. The clutch kit includes a clutch disc, basket and release bearing. The most popular brands are: Valeo, Sachs, Luk, VIS, Kraft.
Loading …
When using a drive from other models, you need to pay attention to the flywheel, the type of which is determined by the number of starter pins. There are two of them in the Lada Kalina, three in the VAZ 2108
The clutch resource depends on the components and operating conditions. A high-quality drive can last for 100 thousand kilometers.
If troubles occur with the clutch on the road, it is better to call a tow truck or have the car towed by another vehicle, otherwise this may lead to gearbox failure.
Work order
Before starting work, you need to enter information into the control unit. Sensors will help with this.
To set up the ignition on the 8-valve injector of a VAZ 2110, you need to have some skills related to car repairs:
- Find the gas distribution mechanism and remove it from the case.
- The distance between the sensor and the crankshaft toothed disk should be no more than 0.5 - 0.7 mm. This is necessary so that the pulse from the sensor can pass without continuous sparking.
- The crankshaft pulley should remain in place. How can I check this? The marks located on the flywheel will help with this. They should match the marks on the gearbox. To do this, you need to turn the crankshaft.
- Make sure the mark on the oil pump aligns with the cylinder block protrusion.
- The mark on the camshaft drive wheel should align with the rib on the timing belt cover.
- Pistons 1, 4 cylinders, while all points are aligned, will be in the upper position. The distance between the teeth should correspond to the protrusion on the cylinder block. The tooth located in the 20th position will coincide with the crankshaft sensor.
- The signal will be sent from the sensor to the internal combustion engine control system. This will mean that the piston of the first cylinder is in the upper position in a compressed state.
Need to know
What is important to know about VAZ engines in the context of history? The very first tens of engines produced by the plant also had 8 valves, volume 1.5 and 1.6 liters. On these ones, the valves did not bend when the belts unexpectedly broke.
But this happened (or rather, did not happen) due to the design of these engines. In the event of a crisis break, the pistons did not meet the valves. For which the designers have great respect. This allowed many owners of the first ten cars to avoid additional engine repairs in the event of timing outbursts on top of everything else.
With the advent of the 2112 model, a new engine began to be installed on the car - 1.5 liters in volume, but with 16 valves (although the problems with the engine on the 2112 were not resolved). For those times - quite progressive. The engine power and throttle response have increased. The design of the head has also changed. During the change, annoying flaws were not immediately discovered (but after some time). Among which is our problem under consideration.
The fact is that in the event of an unplanned timing break in this engine model, the meeting of pistons and valves became inevitable due to the design of the engine itself. The pistons did not have special grooves and in this case hit the valves hard.
As a result:
the latter were bent, and restoration repairs had to be made. This situation, of course, was unlikely to please the owners of this vehicle. What to do?
Setting the piston of the first cylinder to the TDC position of the compression stroke
Setting the piston of the first cylinder to the TDC position
When carrying out work related to removing the camshaft drive belt (timing), the valve timing can be interrupted, to prevent this from happening, the piston of the 1st cylinder is set to the TDC (top dead center) position during the compression stroke. If the valve timing is incorrect, the engine will not run smoothly and will not perform properly. Set TDC according to the mark on the camshaft pulley (when installing according to the marks on the flywheel or crankshaft pulley, the piston of the 1st or 4th cylinder may be in this position). Then make sure the marks on the flywheel or crankshaft sprocket are aligned (if the alternator drive pulley was removed). If the marks on the flywheel or crankshaft pulley do not match, the valve timing is incorrect (the piston of the 1st cylinder is not installed at TDC). In this case, you need to remove the camshaft drive belt and rotate the crankshaft until the marks match. Important! Rotate the crankshaft only by the pulley bolt (do not rotate the crankshaft through the camshaft pulley itself).
TIP Since it is inconvenient to turn the crankshaft using the pulley bolt, there are two ways to do this
- Engage any gear and suspend the front wheel. Then rotate the suspended wheel until the mark on the camshaft pulley aligns with the mark on the rear camshaft drive belt cover.
- Engage any gear (preferably IV) and slowly move the car until the mark on the camshaft pulley aligns with the mark on the rear camshaft drive belt cover.
TDC marks VAZ 2110 2114 8 valves
The TDC marks are located on the camshaft sprocket (lug) and on the camshaft drive belt rear cover (screw).
In addition, the markings are located on the flywheel (risk) and on the scale of the rear cover of the clutch housing (triangle cutout). For clarity, the gearbox has been removed.
In addition, marks are located on the crankshaft sprocket (dot) and on the oil pump cover (V-groove). These marks are only visible when the generator drive pulley is removed.
You will need: 17" wrench, 10" socket wrench. 1. Disconnect the cable from the “-” terminal of the battery.
2. Set the gear shift lever to the neutral position, place stoppers under the car wheels.
3. Remove the right front wheel and the right fender in the engine compartment.
4. Open the hood and remove the three screws that secure the front camshaft belt housing. Note. Screws on the mounting side of the cover also secure the cable clamps. Remove the front cover.
5. Rotate the crankshaft using the bolt securing the generator drive pulley until the marks on the camshaft pulley and the rear cover match.
6. Remove the plug from the hole in the clutch housing and check the alignment of the marks on the flywheel.
TDC marks VAZ 2112 2111 16 valves
About the engine mod. 21126 (16 cl) are located on the camshaft sprockets (lugs A) and on the rear camshaft drive belt cover (slots B).
In addition, the markings are located on the flywheel (risk) and on the scale of the rear cover of the clutch housing (triangle cutout). For clarity, the transmission has been removed.
Also, all engines have marks on the crankshaft sprockets (dot) and on the oil pump cover (V-groove). These marks are only visible after removing the alternator drive pulley.
You will need: 17" wrench, 5" hex wrench, T30 TORX wrench, Phillips screwdriver.
1. Disconnect the cable from the negative terminal of the battery.
2. Using a Phillips screwdriver, remove the screw that secures the right fender to the wheel arch trim
3. Using a torx t30 wrench, remove the two screws that secure it to the case
4. Remove the screen.
5. Open the hood and use a 5-point hex wrench to remove the five bolts that secure the upper front timing belt cover 6 . and remove the cover.
7. Using a 17-inch wrench, rotate the crankshaft by the bolt that secures the alternator drive pulley to it until the marks on the camshaft pulleys and the rear cover line up.
8. Remove the plug from the hole in the clutch housing and check the alignment of the marks on the flywheel (the thermostat has been removed for clarity).
see also
Comments 49
Good afternoon Tell me, when replacing the belt I discovered that there was no washer (crankshaft spacer washer). How important is it?
I don’t know what they write about here regarding belt tensioning on 2112; on PRIOR everything is tightened bit by bit through the tension roller. The right branch of the belt must already be laid through the guide roller: - through two camshaft pulleys, a crankshaft toothed pulley, through the pump and have sufficient tension. In this case, the marks on the camshaft pulleys and the crankshaft toothed pulley must be fixed to the corresponding counter marks. In this position, holding the belt with your hand on the left side of the branch, on the side of the tension roller, so that it does not weaken and does not jump over the teeth, no matter where and in what place (and this is possible even for one tooth), we place or slip the tension roller under the belt , insert its bolt and tighten everything with such a turn of the roller by hand that the belt does not loosen and does not jump over the teeth.
Next, spin the engine several times, or maybe it’s better, by the wheel with 4-5 gear engaged, and make sure that all the marks on all the pulleys match perfectly. How to recognize the mark on the gear ring of the generator drive pulley on the crankshaft, I have already written below and given a drawing. With the wheel removed and the stand hanging up with the steering wheel turned, this crown and the DPKV are clearly visible, or almost well, through the mirror.
Then, after cranking the engine several times by hand, carefully, slowly - and what the hell is not joking, the marks didn’t match when parked and the valves were bent with the starter, yikes, then you begin to tighten the roller to working condition.
At the moment when, when cranking the engine, the right branch self-tensions when viewed from the side of the pulleys - and the left one weakens, this is where you need to tighten the roller - like how everyone around writes and rips off each other. On a Priora, the tension of the roller may be weak or weak, the belt will jump, or the roller may be pressed against the belt so that it and other damn spare parts will become sick.
Don't be afraid to start the engine to see how your video lives when the engine is running. Nothing will happen to either the belt or the roller when adjusting in a tightened state. The main thing is that the belt does not dangle too much, otherwise it will either fly off or fly like plywood over the toothed pulleys and damn it, bend the valves. If the tension roller is dead, overtightened, the belt may hum a little from the tightening, which in turn will affect the PUMP because it will not last long from a strongly overtightened belt (of course it will not immediately fall apart) - then we begin manipulations to tension the roller . The ROLLER on a Priora should be alive when the engine is running. It should vibrate inconspicuously on the tension spring and this is clearly noticeable, and when you press the gas sharply it jumps, pushing up well with the belt and this can be seen even by a blind mole.
What is written in the Talmuds about how to pull a roller does not always coincide with reality. Therefore, it may be that when you set it up as written in the bible for dummies, the roller will simply rest in peace and will not work properly. Therefore, everything is relative to different manufacturers and defects.
In general, honestly, it’s better to under-tighten the roller a little than to over-tighten it. The roller, the pump and the belt will live. The main thing is to watch and listen for extraneous sounds in the timing belt area.
More than once I had cases where the belt was about to fly off, dangled and shouted, pull me up, even rubbed the protective cover. The casing probably saved the day because the belt did not fly off and the piston did not stick into the valves.
But for those who have plugless pistons, they are destined to drive on loose belts. Well, just think, it went haywire, but everything lasts a long time and doesn’t break. By the way, the tenth cans have 2110 and some others may have rollers with flanges, they don’t have to worry too much about it, these rollers won’t let the belt fly off just because of the slack. — It’s okay to slip over the teeth of the pulleys, well, just think, the traction has dropped or it’s completely stalled, corrected it, tightened it and again the gas is up to the limit. The main valve head and pistons cannot be killed. They already write on the internet that AvtoVAZ has started producing engines with 98 hp. and 106 hp with plugless pistons – Freebie please! But the engines are 1.8 liters 122 hp. Not yet, just look for and install such pistons yourself.
How to evaluate the work already done
Accurate diagnosis is carried out using a computer. However, you can also independently evaluate the correct operation of the circuit.
- With the ignition off, check the contacts.
- Find the voltage inside the module at terminals C and B.
- Check the high voltage cable. To do this, you need to take a candle and put it in the cap. In this case, it should be secured to the cylinder block. If you start the internal combustion engine with the starter, a spark will appear. The check is carried out for all wires. If the spark does not appear, the entire ignition system must be checked or even replaced.
- If the engine continues to run poorly, the fuel system needs to be checked.
For the VAZ 2110 carburetor model, markings are also made to adjust the ignition system.
If the ignition of the 8-valve injector of the VAZ 2110 occurs earlier or, conversely, late, then the ergonomics of the entire engine deteriorates. Power is also reduced. The engine is exposed to high temperatures and excessive loads. Among other things, detonation may occur. All this can lead to loss of ignition in the VAZ 2110.
Consequences of untimely shift
If the timing belt is not changed in a timely manner, it may break. While driving on the highway, this can lead to an accident. If the accident was avoided, you will have to spend money on a tow truck to deliver the car to the repair site. If the belt breaks, the movement of the camshafts and valves will stop, but the movement of the crankshaft will continue, which may result in damage to the valves as a result of the impact of the pistons. Repair may be limited to replacing the timing belt and rollers. But only if an 8 valve engine or 16v 1600 cc is installed. cm, that is, safe from the point of view of bending the valves (21114, 21124 or simply 124).
If the valves are bent, a major overhaul of the engine will be required, which will cost from 20–30 thousand rubles. In some cases, it will be cheaper to purchase a new engine, although this will lead to other problems - registration. Based on the above, it is much easier, safer and cheaper to change an inexpensive part on time.
Checking the ignition coil with a multimeter
Checking the voltage at the wire terminal block
:
- Disconnect the block with wires from the ignition coil (on the H4M engine, to access the coils of cylinders 1 and 2, remove the intake pipe).
- Turn on the ignition and measure the voltage at terminal 3 of the block (the pin numbering is indicated on the ignition coil).
- The output voltage must be at least 12 V. If it is less or less, the battery is discharged, there is a fault in the power circuit, or the engine control unit (ECU) is faulty.
- Turn off the ignition.
Setting the ignition timing
Required for carburetor models only. To work you will need a tool - a strobe light. It is sold in almost all car dealerships and at a reasonable price. It is also advisable to have a wrench to unscrew the nut that secures the distributor.
When choosing the correct ignition timing, mark 1 on the flywheel should be between the central division (notch) 2 and the previous division 3 of the scale. If not, adjust the ignition timing.
To adjust the ignition timing on a VAZ 2110 you need to:
- Do minimal work. The crankshaft should rotate at a maximum speed of 820-900 rpm. The tube coming from the carburetor and connecting to the vacuum valve must be disconnected.
- Take a strobe light and connect the cables to the “-” and “+” terminals of the battery. The tip of the high-voltage wire must be removed from the socket and the wire coming from the strobe inserted.
- Remove the rubber plug from the slot in the crankcase and point the strobe light at the free space. Next you need to start the car. During its operation, it is necessary to apply a mark to the flywheel. As soon as the engine starts, the strobe light starts. Flashing will indicate a sign. The flashing will be fast and the sign will remain stationary. However, if you move the dispenser, the label will move.
- To move the label and dispenser, you must loosen the top nut securing the dispenser, as well as the 2 lower nuts. Subsequently, the distributor can be turned slightly. At this time, the mark will also move with the strobe light.
To understand the process of adjusting the ignition in more detail and clearly, it is recommended to watch the corresponding videos. To resolve the issue of how to set the ignition on the VAZ 2110 8 injector, you can also consult with experienced car owners.
Features of engine 21126 for Priora
16-valve engines began to be installed on the VAZ 2110 and it was a one and a half liter engine of the 2112 brand. A little later, the designers revised their decision and increased the engine volume by 100 grams. This had virtually no effect on the power or dynamics of the car, however, the modification already required taking into account some design nuances.
Actually, motors 21124 and 21126 from Priora practically do not differ from each other in design and technical characteristics. The Priorovsky engine became 9 horsepower more powerful, and the cylinder blocks differed only in the technology of honing the liners using the clever Federal Mogul technology. Naturally, this made it possible to obtain better cylinder surfaces, which affected the service life of the engine. But that's not all the differences. Thus, the Priorov engine has a lighter cylinder-piston group due to a new piston matrix. The mass of the piston, pin and connecting rod with liners in the 21126 engine was 796 grams, in contrast to 1200 g in the 2112 engine. However, there were also dangerous moments.
Thus, having achieved a relatively light piston by reducing the mass of the piston and reducing the thickness of the bottom, the designers received a new problem in the form of burnt-out pistons at a fairly short mileage. The fire zone decreased, the compression ratio increased, and the piston design became much flimsier, so the new Priora engines did not like high speeds and poor fuel. The design of the cylinder block gasket has also changed; it is almost a millimeter thinner than the old non-asbestos gasket, and the crankshaft liners have become wider and thinner.