For the domestic market, the appearance of an all-terrain vehicle was a real breakthrough.
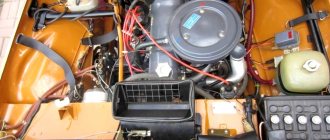
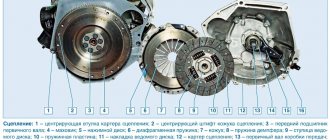
The VAZ-21214 model, which later received the name “Lada 4×4”, and is popularly called “Niva”, is a modification of the VAZ-2121 car. This four-seater passenger car, with increased cross-country ability, belongs to the class of SUVs. It is equipped with all-wheel drive, a five-speed gearbox, a transfer case, a locked center differential, has fairly good ground clearance (22 cm), a short wheelbase and small body overhangs.
The car is capable of accelerating to a speed of 142 km/h, fuel consumption (AI-92) is 10.8 l/100 km (combined cycle).
The Lada injection power unit has:
- power 80 hp;
- four cylinders (two valves each);
- volume 1.7 l;
- torque 127.5 Nm at 5200 rpm;
- distributed fuel injection (electronically controlled).
Over the years, the engine has been modernized to Euro standards. So, since 2011, it began to comply with Euro-4 toxicity standards (models for the foreign market - Euro-5).
The guaranteed resource of the power unit is 80 thousand km, but usually up to 150 thousand km major repairs are not required.
What kind of oil should I use and how much?
Niva owners can fill their engines with synthetics with a viscosity of 5W-30 or 5W-40. The exact selection of viscosity should be based on the temperature conditions of the region in which you live and operate the car. The choice of brand is not important; you can take any normal market brand (Motul, Lukoil, Liquid Molly - Shell).
For older engines that have driven more than 150,000, it is better to use semi-synthetic.
When replacing, be aware that 3.7 liters of oil will immediately be poured into the engine. Therefore, you will have to buy a 4-liter canister. Also remember to monitor the level daily and top up if necessary.
What factors to consider
Of course, you need to read what recommendations the manufacturer gives. But you should keep in mind: factory designers take average indicators of vehicle operating conditions as a basis. These same conditions can vary greatly: in terms of air pollution, fuel quality, and temperature changes in different climatic zones. This issue is especially relevant for 4x4 vehicles, because they are most often used off-road. So:
- The service recommendation is expressed in terms of time and mileage of the vehicle. For example: VAZ 21214 - an engine oil change is required after 20 thousand kilometers, but not less than after 12 months. At the same time, idle time in traffic jams when there is no mileage and the engine is running at idle speed is not taken into account.
- What is good for the city is not good in the countryside. So here too - there is no universal formula. If you think carefully, it will become clear that for any manufacturer of equipment the only thing that is important is that the sold machine works properly while it is covered by the factory warranty.
- Nobody cares what happens next. On the contrary, the more often you visit the service center, purchase original spare parts, or buy a new car, the more profitable it is for the manufacturer. So there is no need to rely heavily on his recommendations.
- A long oil change interval may just be a means to attract customers, that is, buyers. The same can be said about oils that are advertised as “longlife” (extended service interval), as in the photo.
Longlife engine oil
- In fact, it would be a mistake to think that changing the oil in a VAZ 21214 engine with longlife saves you money and extends the life of the engine. Such oil can only be used in cases where it is certified by the manufacturer for a specific unit, and if the modes of use of the oil and the engine coincide.
- In our country this is hardly possible; here city streets are not washed in the morning, as in Europe. Under severe operating conditions, the engine oil needs to be changed more often. In reality, it is better to halve the interval recommended by the manufacturer, or replace it every 10,000 kilometers.
Preparing for work
- Changing the engine oil of a VAZ 2121, as well as any other engine, can be done using a vacuum method. Its only advantage is that it saves time on replacement. But there are also disadvantages.
- Vacuum replacement cannot provide one hundred percent drainage; the remaining used oil in the engine is much greater than with the traditional method. In addition, sediment accumulates on the oil pan, which cannot be removed with a vacuum.
- Therefore, if such an express method can be used, it can only be done alternating with the traditional method of draining engine oil. This is what we will tell you about.
- In principle, the service book always contains the corresponding instructions, because the scheme for draining used oil is individual for each car. It will also indicate what kind of oil is required for your car.
- When purchasing, its quantity should, with a small margin, exceed the engine capacity. To carry out this work with your own hands, in addition to the oil itself, you need to purchase a new oil filter and stock up on the necessary tools.
- You will need: a container for draining, a flashlight, a spanner for the oil pan mounting bolts and a hexagon for the drain plug . You may have to use a special puller to remove the oil filter.
How to prepare for work?
Changing the oil on a Niva, as on other cars, can be done using special equipment using a vacuum method. The advantages of the technology include saving time, but there are also disadvantages. First of all, in this case it is impossible to drain all the oil without leaving a residue. In addition, sediment always collects in the oil pan, which cannot be sucked out with a vacuum.
Therefore, if this express method can be used, it should not be used every time, but rather alternated with the traditional draining of the oil, which we will discuss in more detail below. In the service book for the Niva you can find instructions for draining the oil, but they are not detailed enough.
Complete oil change for VAZ 21213 in all units
The service life of the vehicle directly depends on timely maintenance. Changing the oil is one of the operations that is performed in accordance with the regulations specified in the vehicle maintenance instructions. Changing the oil and consumables on a VAZ 21213 is easy to do yourself, following the step-by-step instructions. But this makes it possible to save time and money on visiting a service station.
Replacing the lubricant in the power unit
According to the regulations, the oil on the VAZ 21213 must be changed every 10 thousand kilometers or every 2 years of operation. In addition, it is necessary to periodically check the condition of the lubricant. If the car is used in difficult conditions, the replacement period is halved to 5 thousand kilometers.
The frequency of replacement is influenced by the following factors:
- quality of fuels and lubricants;
- driver's driving style:
- terms of Use;
- technical condition of the vehicle.
It is recommended to fill in the same brand of oil that was filled previously. When changing the brand of lubricant or when purchasing a used car, you need to flush the engine system with a special flushing agent or new lubricant before replacing it. To flush, the old oil is drained and flushing or new lubricant is added. Next, start the engine and let it run for about 10 minutes. Next, drain the waste and begin the usual procedure for changing the oil.
The oil filter is changed along with the lubricant if it has run out of service life, which is the same as that of the oil - 10 thousand km. When replacing the lubricant ahead of schedule, the oil filter can be left, but experts recommend changing it at each replacement.
To carry out the procedure, you should prepare:
- new consumables: lubricant and filter;
- five-liter bottle for draining waste liquid;
- watering can;
- hexagon to “12” or wrench to “17”;
- screwdriver;
- oil filter puller;
- clean rags;
- gloves.
Frequency according to regulations
According to the regulations, the oil should be changed every 10,000 kilometers. If the car is not used very often and has low mileage, then the oil still needs to be changed at least once a year. In the following cases, an additional oil change may also be necessary:
- The engine starts very poorly at the start;
- The engine is running loudly and/or there is unusual noise;
- During movement, vibrations begin to occur;
- The lubricant level has dropped sharply;
- Upon inspection, traces of dirt and/or sand were found in the oil;
- The main fuel contains a large amount of sulfur.
Leaks and problems
The higher the mileage of the VAZ Niva, the more problems appear, as in principle with any car. Most often this is due to natural wear and tear of the engine, causing oil to burn. Although the manufacturer allows for a small consumption.
There can be many reasons why an engine eats oil. And in each case they can be individual. But, over the years of the model’s existence, we can talk about the most common places where leaks occur.
If the breather is spewing or throwing oil, or if there is oil in the exhaust manifold, this may indicate a serious problem with the oil rings. In this case, you can try decoking with dimexide. But it is better to use special auto chemicals designed for these purposes.
A leak from under the valve cover may be due to a worn gasket. Sometimes simply replacing the gasket does not solve the problem. Since the cover itself may have significant curvature. Therefore, in some cases it will have to be replaced.
A white emulsion in the engine or on the oil filler cap may indicate condensation. This is a common occurrence when temperatures change from minus to plus, mainly in autumn or spring.
But if the emulsion is also observed on the dipstick, then this is already a sign of more serious problems. Most often we can talk about a broken cylinder block gasket. And in rare cases, a cracked cylinder head may be to blame.
Also, with this problem, you can find oil in the expansion tank. Sometimes, simply replacing the gasket is not enough. It may be necessary to grind the head itself, and this is completely different money for repairs.
All this is general information, which may manifest itself differently on each specific vehicle, since everyone’s operating modes are different. The same applies to leak locations; it is impossible to identify the cause from a distance.
Determining the level
Before refueling, it is recommended to determine the oil level in the car:
1. Open the hood and find the inspection hole - there you will see a dipstick for measuring the oil level in the engine (it is located in the middle of the cylinder block on the breather cover of the crankcase ventilation system); 2. Remove the dipstick and wipe it with a cloth to remove any remaining oil;
3. Insert the dipstick back, and after 5-10 seconds, remove it again - normally the oil should be between o and “MAX”.
Replacement procedure
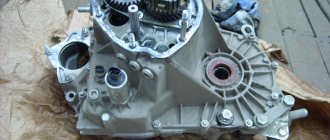
Let's look at changing transmission oil using the example of a gearbox. The first thing you need to do is take a short trip so that the fluid in the components warms up. Thanks to this, it will become thinner and flow out of the nodes faster. After this, we drive the car into a pit or overpass where the work will be carried out. You also need to prepare a minimum set of equipment to perform the replacement:
- 6 liters of gear oil
- Processing container
- Tool set
- Special syringe for filling fresh oil
- A small amount of gasoline or kerosene
- Clean rags
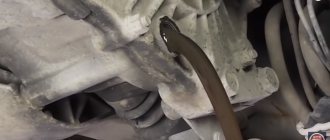
Next, we go down under the car and find the drain plug at the gearbox. You need to unscrew it with a hex socket wrench. This will prevent you from getting dirty and dropping the plug into the used oil. As soon as it is removed, you need to let the oil drain. This will take about 10-15 minutes. After this, wipe the plug with a rag soaked in gasoline and screw it back on.
Next, find the filler hole and unscrew the bolt from there. Then you need to fill the volume of a special syringe with oil and pour it into the gearbox. Fill until excess lubricant flows out of the hole. After this, tighten the plug.
In exactly the same way, change the oil in the transfer case, front and rear axles. Remember that a small excess of transmission oil will not impair the performance of transmission components, and in some cases, for example, when operating a car in difficult conditions, it will even make the work easier.
Instructions
- We warm up the engine to 45-50 degrees. Warm oil has better fluidity and will drain better from the engine during a complete replacement. Our task is to remove as much as possible the old dirty and used fluid that no longer has useful properties from the engine and fill it with new one. If a lot of old dirty oil remains in the crankcase, it will be swept away with the new one and will worsen its beneficial properties. Warm up the engine for 5-7 minutes before starting, this will be sufficient.
- For easy access to the drain plug (and in some models the oil filter is also attached from the bottom) and the bottom of the car as a whole, you need to jack it up or drive into an inspection hole (the best option). Also, some models may have engine crankcase “protection” installed.
- We open air access to the crankcase by unscrewing the filler cap and dipstick.
- Place a large container (equal to the amount of oil being poured).
- Unscrew the drain plug with a wrench. Sometimes the drain plug is made like a regular “bolt” under an open-end wrench, and sometimes it can be unscrewed using a four- or hexagon. Don't forget to wear protective gloves, the oil will most likely wake you up warm, but you need to be careful.
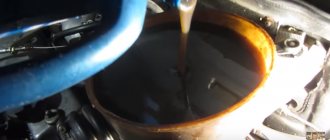
- We wait about 10-15 minutes until the waste flows into a basin or cut-off plastic canister.
- Optional but very effective! Flushing the engine with a special liquid is not included in the maintenance regulations and is not mandatory - but. By getting a little confused, you will be much better at flushing out the old, black oil from the engine. In this case, wash with the old oil filter for 5-10 minutes. You will be surprised at the black oil that comes out with this liquid. This liquid is very easy to use. A detailed description should appear on the flushing fluid label.
- Changing the sedum filter. In some models, it is not the filter itself or the filter element (usually yellow) that is changed. Do not forget to “impregnate” the filter with fresh oil. Pour approximately 50-100 g directly into the filter. These simple manipulations will help avoid the so-called “oil starvation” of the engine in the first seconds of operation. Also remember to lubricate the rubber O-ring before installation.
- Fill in new oil. Having made sure that the drain plug is screwed in and a new oil filter is installed, we can begin to fill in new oil using the dipstick as a guide. The level should be between the minimum and maximum marks. Also, you need to remember that after the first start of the engine, some oil will leave and the level will drop.
- In the future, when the engine is running, the oil level will probably change; be careful during the first few days of operation. Recheck the oil level using the dipstick after the first start.