Some owners of practical LADA Kalina have a problem caused by poor unlocking of the rear doors. This malfunction can occur not only in older LADA Kalinas, but also in completely new ones. This defect can rightly be characterized as a manufacturing defect. The manufacturer, it seems, has not yet taken measures to eliminate this defect in the handle mechanism, so the problem is still very relevant today.
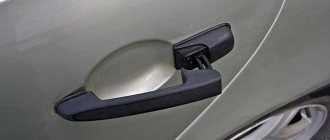
Note that the front door handles do not suffer from such problems, but the rear mechanisms are much less fortunate.
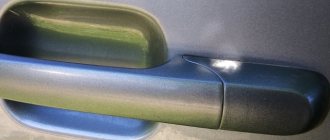
So on this particular Lada Kalina, after several attempts to open the rear door, applying increased force to the handle, it broke. It is unlikely that a repair kit for this mechanism can be quickly found, so the only rational measure would be to purchase and install a new handle. The price is not high - about 350 rubles. In this article we will tell you how to remove and replace a broken door handle.
Replacing the outer handle on the rear door of a Lada
To carry out repairs, we stock up on the following tools:
- An “8” size head paired with a ratchet or wrench.
- Extension cord.
Let's start removing.
- First, we dismantle the inner trim of the door card.
- Unscrew the nut located on the inside of the door.
- Unscrew the bolt at the end of the door.
- The handle is removed from the outside of the door panel. We remove the assembled mechanism!
- We install the new product in strictly reverse order.
- We return the previously unscrewed fasteners (nut and bolt) to their original places. We tighten, observing the required torque. Let's not overdo it.
The rear door handle replacement is complete.
Review of spare parts prices
| Name/article | Price, rub.) |
| 00001003833121 Bolt M5x10 with serrated shoulder | From 100 |
| 00001003831801 M5 nut with serrated shoulder | From 100 |
| 00001002624101 Washer 5 mm | From 50 |
| 00001003275901 Screw M6x10 | From 50 |
| 00001002605371 Lock washer 6 mm | From 50 |
| 21230610542000 Lock cylinder | From 550 |
| 11180610515000 External front right handle | From 650 |
| 11180610515100 External front left handle | From 650 |
| 21900610518000 Inner front right handle assembly | From 950 |
| 21900610518100 Inner front left handle assembly | From 950 |
*prices are current as of November 27, 2018.
When choosing spare parts, always give preference to original ones. Good, high-quality parts are always 10 - 15% more expensive than analogues. At the same time, by purchasing a factory part, you can count on a long service life of the mechanism.
A cheap counterfeit does not provide even a third of the required resource. The final choice is up to the owner of the technical device. The deciding factor is the budget.
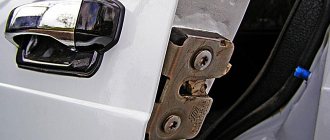
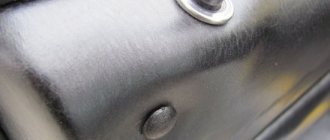
What tends to break down in a mechanism?
Sometimes the iron tongue breaks off. It is necessary to drive the lock rod. Through this action, the handle unlocks the door.
Visual view of the breakdown:
If you can find a repair kit, then only the part needs to be replaced, and there is no need to replace the handle assembly.
Work progress
Let us immediately note that before removing the door handle of the Lada Kalina, it is necessary to dismantle the trim.
Front door
First of all, you need to use a flat screwdriver to pry the plastic end of the rod together with the lock switch lever to disengage it.
Next, the lock drive rod is disconnected from the lever of the external handle - it also needs to be pryed off with a screwdriver.
Then you need to unscrew the nut securing the (front) handle.
Behind it, unscrew the mounting bolt (rear).
When this is done, all that remains is to remove the Lada Kalina door handle.
If you need to replace the lock cylinder, you will need to press out the lock cylinder retainer using a flat-head screwdriver.
Backdoor
Removing the rear door handle of the Lada Kalina is even easier.
First you need to unscrew the front handle mounting nut.
Then the rear mounting bolt.
All that remains is to pull the handle forward (in the direction the car is driving) and remove it.
Installation occurs in reverse order.
Note. If you tighten the fastening bolt during installation, the handle will become crooked - there will be a large gap, which is shown in the photo below. In this case, you only need to adjust the tightening force.
The process of replacing the Lada Kalina door handle is demonstrated in more detail in the video.
Causes
Replacing the Kalina door handle in the driver's seat accounts for less than 1% of all body damage to the first generation configuration. The mechanism for opening the rear element is less reliable; craftsmen note that every tenth Kalina has a problem opening the rear left or right door, this is about 10% of all body repairs. Reasons for handle breakage:
- mechanical damage to the latch;
- breakage of the lock cylinder;
- defective components.
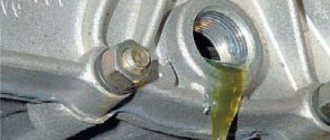
In severe frost, due to the ingress and freezing of moisture in the lock drive, it is necessary to apply an inappropriately large force to the outer handle to open the door. As a result, its opening mechanism fails.
It is recommended to spray the lock with anti-freeze or anti-ice spray, which is used to clean the windshield, before opening the door.
The external elements of opening the rear doors of the Lada Kalina deserve attention. As practice shows, they break much more often than the front ones. And the reason for this is a factory defect in one of the parts of the handle mechanism.
Removing the rear door trim
Unscrew the lock button by hand
Having turned the inner handle so that the screw securing it to the lever is accessible, use a Phillips screwdriver to unscrew the screw and remove the handle.
Using a screwdriver with a thin blade, pry up two decorative plugs and remove them from the holes in the armrest handle.
Using a Phillips screwdriver, unscrew the two screws securing the armrest handle
Use a screwdriver to press out the window handle socket.
Pull out the latch and remove it.
Remove the handle and socket from the shaft.
Using a screwdriver, placing soft material under it, we press the lower edge of the upholstery away from the inner door panel, overcoming the resistance of the pistons.
It’s better to start from the bottom, gradually moving the screwdriver around the entire perimeter of the upholstery.
Removing the rear door trim
The location of ten pistons on the inside of the upholstery
Install the rear door trim in the reverse order.
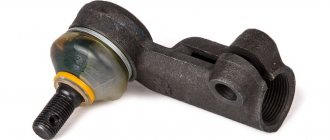
Design of VAZ-2109 locks and disadvantages
The lock cylinder is a cylinder that is equipped with a secret mechanism. In all locks with a flat key, the cylinder is replaceable. For example, on VAZ-2109 cars it is replaced like this.
Door mechanism VAZ-2109
The rotating part that is connected to the rod is called the “drive”. As we can see, this drive has a hole for removing the cylinder. By applying pressure with a thin axle or an awl, the larva is pulled out.
Actions after releasing the fastener
There is only one drawback - it is hardly possible to complete the steps indicated here without first removing the lock completely.
It should be noted that even when the mechanism is removed, it will not be easy to pull the larva out of it.
Therefore, before dismantling, be sure to insert a key into the cylinder and turn it left or right 90 degrees. The purpose of this action is to be able to dismantle the larva. This action is performed effortlessly, and the key is then simply pulled towards you.
Replacing the larva in Kalina
First of all, replacing the lock elements means that the door trim will be completely missing. Therefore, first we will figure out how to dismantle the trim on Lada Kalina cars. The second chapter is devoted to how to remove the larva and install a new one in its place. The last step will actually be the simplest.
Removing the door trim yourself
The casing is attached not only to screws, but also to plastic pistons. The number of screws holding the part in question is four:
Front door trim 1118
Numbers here indicate all fastening elements. But to get to them, you need to remove the screw cap “3”, as well as the inner door handle. The pawl handle also needs to be unscrewed.
If these actions are completed successfully, the casing begins to be dismantled, moving it away from the metal. Dismantling is carried out starting from any of the corners, but care must be taken: the pistons holding the plastic are fragile.
How to remove plastic trim
If the package includes power windows, you will need to disconnect the connector connected to the button block. Also, another similar connector is present in most trim levels - where there is a central lock. Both connectors must be disconnected.
All the steps described here involve electronics in any case.
Therefore, at the stage before dismantling the trim, you need to open the hood, take the “10” key and unscrew the negative terminal. We are talking about the battery terminal, which can be connected last (when the last screw is screwed in). Anyone who breaks this rule will look for blown fuses. Draw a conclusion.
How to get to the door mechanism
According to the recommendation of the magazine "Behind the Wheel", in the absence of casing, access to the lock is always available. Simply put, there will be no need to remove the inner lining made of metal. The steel sheet is simply bent to the side.
Lock mechanism
The rotating part with the protrusion is called the “drive”, and this is what you will need next.
Replacing the larva will be easy:
- The key in the cylinder currently fixed in the door is turned 90 degrees;
- Using a steel ruler, knife or thin screwdriver, you need to press the locking tongue located opposite the slot in the body of the cylinder. You need to place a screwdriver between the rotating and stationary parts of the mechanism. Know that in the driver's door the slot is made from the bottom (looks “to the floor”), in the passenger doors - from the top!
- By pulling the key towards you, the larva is pulled out;
- The new cylinder is installed like this: with the key inserted, it is pushed into the lock until it stops. The locking tab will need to be pushed inward.
The following photo illustrates the “second step”.
Slot above the locking tongue
The slot itself, when the mechanism is assembled, is located between the drive and the lock body (at least that is how it is designed). You need to manage to squeeze a screwdriver into the space between these parts. Sometimes this action does not lead to a positive result, and then the lock has to be removed as an assembly.
DIY repair option
One of the common reasons for replacing handles is play and rattling. This occurs due to a poor-quality plate located inside the structure. A fixation screw is screwed into its hole. After a certain period of operation, the porous metal is damaged and backlash appears.
Option to temporarily eliminate the defect:
- Remove the handle.
- Disassemble it and remove the steel plate.
- Make a hole in it and on the plastic cover for the screw.
- Connect the structures and check for any play.
The screw needs to be cut to 3-4 turns, since the installation depth will be small. The head is semicircular, but does not extend beyond the plane of the plastic cover.
Recommendations from the magazine “Behind the Wheel”
Let’s turn again to the “Behind the Wheel” review, which discusses how to remove door locks in a VAZ-1118 Kalina. If the casing has been dismantled, this is not bad. Next, according to the recommendations, unscrew the screw securing the inner handle:
The door handle is attached here
The lock mechanism is connected to two rods made in the form of rods. Both of them are dismantled by disconnecting the plastic clips:
Disconnect the rods from the lock
To disengage the latch, press on the plastic tab with a screwdriver.
At the last step, as you might guess, all that remains is to unscrew the screws holding the mechanism motionless.
Three screws, cross head
But first, you need to dismantle the external handle. To do this, unscrew two bolts equipped with an “8” hex head.
Two bolts hold the handle
By the way, if the central locking connector is attached to the mechanism module, it is also disconnected.
Central lock connector built into the module
Let the wiring harness for the central locking drive remain in the door.
Of course, all door locks must be unlocked with one key, which is supposed to be used in the future.
The work indicated here is carried out on each of the four doors. In addition, it is very desirable that the ignition key also unlocks the doors. However, replacing the cylinder on the steering column will not be so easy. Can you handle the total amount of work that needs to be done? Decide for yourself.
Reviews
| № | Positive |
| 1. | Vasily: after two years of active use of the car, there are no complaints about the body or its elements. The doors close easily and the locks are also in good working order. I try to treat equipment with care and carry out diagnostics in a timely manner. |
| 2. | Kirill: at 65,000 km I adjusted the hinge once on the right side. Obviously there was a bad fixation from the factory. There are no more complaints, I am satisfied with the build quality of the domestic car. |
| 3. | Ivan: for the first time, a Russian car turned out great. Of course, there are complaints about the technology, but they are insignificant. Those who are familiar with a screwdriver can easily eliminate defects on their own. |
| 4. | Gennady: I haven’t noticed anything like this in a year and a half of driving. All mechanisms are operating normally, lubricated and secured. |
| 5. | Dmitry: after buying the car, I immediately re-tightened all the moving elements myself, lubricated them additionally, and adjusted the gaps. I haven't had any worries for more than a year. |
| 6. | Alexander: I bought the car two years ago from a dealership, drove more than 80,000 km, no comments. There were minor breakdowns, but I fixed them myself. There were no major breakdowns. |
| 7. | Ignat: in a year and a half of active operation of the machine, I adjusted the hinges twice and lubricated them additionally. In general, there were no serious breakdowns. |
| Negative | |
| 1. | Kirill: I’ve only driven 75,000 km, but I’ve already adjusted the hinges, changed the seals, and ordered soundproofing for the interior. |
| 2. | Gennady: the dashboard is systematically fastened on the paving stones, I can’t do anything. I contacted specialists and repaired it myself, but it didn’t help. |
| 3. | Vladlen: there are more shortcomings in Grant than advantages; the manufacturer is in no hurry to eliminate defects. |
Conclusion The door lock is replaced only if it is damaged, deformed, or defective. The design of the mechanism is not complicated, and the operating principle is intuitive.
Removing and installing the outer rear door handle on Kalina
So, before starting this repair, you will need to perform a procedure such as removing the door trim. After this you need to do the following:
- Unscrew the fastening nut from the inside of the door
- Unscrew the bolt from the end of the door
- Remove the handle assembly from the outside
- Install the new part in reverse order
- Secure the bolt and nut into place
What exactly breaks down in the mechanism?
In this case, the metal tongue that moves the lock rod was broken off, thereby opening it. This breakdown looks like this:
If you had repair kits, you could easily replace the broken part and that’s it, but I personally couldn’t find one.
I had to change the handle assembly, about which there will be a detailed report below in the video.
Since the problem is quite common, we hope that the material will be more useful for Lada Kalina owners. Now we realized that the rear door handles of the car we reviewed should be handled especially carefully so that the rear door handle does not need to be replaced.
Installation details
Very often, even the so-called silent locks (which are usually installed instead of old, noisy ones) are further modified.
There are several methods, but it is important to install a gasket between the body and the mechanism, since there remains a gap that affects the penetration of air, dust, and also the volume of sound. If it suddenly turns out that after installation the door does not latch, you can solve the problem in several ways:
If it suddenly turns out that after installation the door does not latch, you can solve the problem in several ways:
Removal and installation of the outer handle on Kalina
Regardless of the body configuration or year of manufacture, reinstallation and repair of locks and handles remains the same for hatchbacks and station wagons. The order of work differs when repairing the front and rear elements. The arrangement of the parts is considered simple, so it takes about 30 minutes to reinstall one element. For independent work you will need the following tool:
- crosshead screwdriver;
- flat screwdriver;
- knob;
- head at 8;
- extension;
- sharp knife or awl.
Front door
The procedure for performing the work necessary to remove and install the outer front door lever on the Lada Kalina:
- Disconnect the negative terminal from the battery.
- Remove the inner trim of the outside rear view mirror by first prying it off with a screwdriver.
- Unscrew the locking lock.
- Using an awl or sharp knife, remove the plug.
- Use a Phillips screwdriver to remove the armrest mounting screw.
- Pull the inner handle of the lock and unscrew the screw using a Phillips screwdriver.
- Remove the inner lever.
- Unscrew the armrest mounting bolt located in the niche.
- Unscrew the two pocket screws.
- Wrap a flat-head screwdriver in a rag and insert it between the trim and the door frame. Carefully pulling the screwdriver towards you, unclip the first clip that holds the trim. Also unclip all the other clips, there are 8 of them in total.
- Carefully remove the trim from the iron door frame.
- Disconnect the two wire connectors from the power window assembly.
- Move the trim to the side.
- Disassemble the lower link of the outer door handle drive.
- Unscrew the handle fastening bolt located at the end; for this, use a 8-mm socket and a knob.
- Disconnect the outer arm drive upper link.
- Remove the faulty part and replace it with a new one.
Lubricate all moving parts of the lock drive and assemble everything in reverse order. Most often the tongue or pawl breaks. Experts do not recommend replacing the element separately; it is better to reinstall the entire assembly, since the lock rod loses its performance characteristics over time.
Backdoor
Step-by-step repair of the rear door handle:
- Unscrew the locking lock.
- Using a flat-head screwdriver, press out and move the window regulator lever lock to the side.
- Remove the retainer and window lift lever from the shaft.
- Unscrew the fastening screw by pulling the lock handle.
- Remove the lock handle.
- Remove the two plugs using a sharp knife.
- Unscrew the two fastening screws that were under the plugs and remove the inner handle of the lock.
- Wrap a flathead screwdriver with a rag or electrical tape. Slide it between the door trim and frame.
- While pulling back the screwdriver, unclip the clips located along the perimeter of the casing one by one.
- Remove the casing and set it aside.
- Using a socket 8, a wrench, unscrew the nut that holds the handle on the inside of the door.
- Using the same head with a knob, remove the bolt, which is located at the end.
- Remove the old faulty part and replace it with a new one.
Ways to remove trunk lock
A car trunk is a specific space in the cabin that is intended for transporting goods. The lock that is part of the central locking system, although a reliable element, can sometimes fail. The method described above of getting into the trunk of a car through the interior and then opening a faulty lock is, of course, good. However, due to the design features of some cars, it is not always possible to use this method.
It is best suited for station wagon models where there are no dividing partitions. But owners of sedans were much less fortunate.
In any case, it is very important to determine the reason why the trunk lock is jammed. And as already noted, first of all, breakdowns are associated with dirt getting into the mechanism. In addition to this, foreign objects can get into the lock. If your own attempts to pull out a foreign object or clean the mechanism of dirt do not lead to anything, then you will have to sign up for one of the car service stations, where experienced specialists will perform a series of manipulations with the faulty lock to return the mechanism to normal operation.
This is interesting: What types of lubricants are there for calipers and guides: what to look for when choosing
However, it is not uncommon for the problem of a malfunctioning luggage lock to be associated with temperature changes outside the window. This problem becomes especially relevant after visiting a car wash during the winter months. Moisture is not completely removed from the sealing rubber and, when frozen, leads to the fact that the luggage compartment lid does not open. Naturally, in order to solve the problem you do not need to go to the service center. It’s enough just to find a warm garage or box, drive the car into it for a few hours and, after thawing the rubber band, remove any remaining moisture from it.
It is important to remember that any work must be carried out without panic and with appropriate care. Only in this way can you get a high-quality result and save yourself from additional financial costs.
If the trunk lid lock is completely jammed and none of the possible solutions to the problem does not help, then you will have to open the door from the passenger compartment. This option is well suited for people with a medium or thin build. But what should a person whose height reaches two meters and whose weight exceeds a hundredweight do? Such people will have to ask for outside help. But, in any case, you also need to know how to open the trunk lock from the passenger compartment. In the first option, to independently carry out the measures that allow you to open the lock. In the second option, to correctly advise the person who will be doing this.
To solve the problem, you need to get into the car through the left rear door. We lay the backs of the rear row seats on this side. Through the resulting “window” we pull out all unnecessary objects from the trunk, which in the future may interfere with free access to the lock mechanism. To work, you will need to find a long flat-head screwdriver, a wrench, and an asterisk-shaped socket wrench. To gain access to the locking mechanism of the trunk door, you will have to move the decorative trim to the side. It is almost impossible to completely dismantle it with the tailgate closed.
The casing is secured using plastic latches and several screws that are screwed into the metal base. Both screws are located in the corners of the casing and several more fasteners must be found in the handle located on the panel. To remove fasteners, you will need the help of a wrench and an asterisk wrench. We will need a screwdriver to quickly and accurately remove the decorative panel from the door.
First of all, we unclip the fasteners that are located at the top of the casing. Now we carefully move down, disconnecting each latch. As soon as the panel is moved to the side, a wire lever will be revealed in all its glory, which is the main tool for unlocking the button and opening the lock mechanism.
This part is in a vertical position and very close to the windshield wiper motor. To finally unlock the button and open the tailgate, you need to simultaneously press the lever and push the door out. If the lever does not respond to the applied efforts, you can use a hammer with a wooden handle. It is with the handle that you need to press the lever and the door will open.
This is interesting: How to make a beautiful interior of a VAZ 2107: how to remove door trim, recommendations and tips
The final stage of the work consists of completely dismantling the trim and searching for the reasons why the trunk lock could be jammed. If you can find the cause, then it will be possible to repair the faulty mechanism. Otherwise, the lock will have to be completely replaced.
As it becomes clear, the problem with a faulty trunk lid lock can be solved in the shortest possible time, and it does not require the help of specialists from the car owner. The most important thing is not to try to open the lock with excessive physical force or using improvised tools. In addition, in the process of dismantling the casing, great care is needed in your actions so as not to break the decorative element.
Removing the door trim of the Lada Kalina with your own hands
The doors of any passenger car, including the Lada Kalina, are lined from the inside with special decorative panels. For various reasons, sometimes it becomes necessary to remove this trim, and here ignorant motorists are faced with a problem - there are no fastenings for the door card on the outside. In reality, the disassembly technology is not complicated, although it does include a couple of nuances that need to be taken into account.
Why is the door trim removed?
Most often, the trim of the rear or front doors is dismantled in order to get to the internal cavities where the window lift mechanisms are installed. Although during the entire period of operation of the car there are other situations when it is necessary to remove the trim:
- for installing acoustic speakers built into door cards;
- in case of failure of the electric window lift buttons;
- for dismantling glass for the purpose of tinting or replacement;
- to repair or lubricate window lift mechanisms;
- to replace facing panels that have become worn or scratched over the years of use of the machine.
Front door cards Lada Kalina
It is also necessary to remove the trim during body work, when it is necessary to weld rotten elements, renew the car’s paintwork, or carry out anti-corrosion treatment.
Note. Many motorists remove the upholstery to make additional vibration and sound insulation of the body themselves.
Lada Kalina rear door trim
Preparation for dismantling
To unscrew the fasteners and remove the door trim, you need to prepare a simple set of tools:
- screwdriver with cross slots;
- long flat screwdriver;
- a pointed tool, such as an awl.
Door disassembly tool
Adjustment process
If the gap is smaller, lower the glass all the way down. Then close it with one click, take it by the top edge and push it towards you a couple of times with a little effort. And if the gap on the front door turns out to be wider, then you need to open it with the window down and, resting your foot on the trim, pull the door to the inside several times. Then it will be possible to move on to the main problem associated with the poor functioning of the lock.
- special screwdriver;
- Silicone Grease;
- limiters.
When there is a slight bulging outward, you need to put a soft and durable gasket in the opening and on the central post, in the place where the hinges are, and then try to close the door. If the door is slightly recessed relative to the body itself, then you need to support the outside with your knee in the hinge area and pull the open door towards you. By making such adjustments to the rear doors, you can achieve soft operation without various side effects.
You can install them either on the opening or on the door itself. Due to the presence of springs, closing/opening will be smooth and the sound will not be too loud. Basically, those who are faced with a similar problem most often try to solve it with the help of lubricant. In a way it helps, but only for a short time. And it can only get worse in the future.
The article describes the process of removing the exterior door handle of a car. The handle is removed when replacing it, as well as for the convenience of replacing the lock cylinder.
You will need: an “8” wrench, flat-blade and Phillips-blade screwdrivers.
Removing the front door trim
Required tool : Phillips and straight screwdrivers. Disconnect the negative terminal from the battery.
- Use a screwdriver to pry off the cap of the screw for the upper fastening of the upholstery;
- Remove the plug;
- Unscrew the screw;
- Unscrew the screw securing the upholstery inside the door pocket.
- Pry off the door handle trim with a flat screwdriver;
- We remove it and unscrew the two screws located under the cover;
- Unscrew the two screws at the bottom of the door trim;
- Unscrew the door lock lock;
- On car versions that do not have power windows, remove the joint lever seal;
- We insert a long slotted screwdriver between the trim and the door, one by one snapping off the clips along the entire perimeter of the trim;
- We remove the upholstery from the door;
- Disconnect all connectors with wires from the control unit.
| The door trim is held on by 9 pistons (clips). Remember their location, then removal will be much easier. |