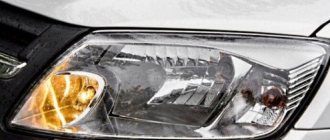
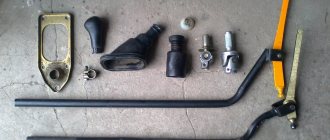
How it all started: I decided one month ago, namely on June 26, to reseal the housings and, at the same time, paint the headlight masks - the reason for which was the constantly fogging up left glass.
Well, actually, I quickly took everything off, I thought I’d take it apart right away, paint it and assemble it the next day. (Yeah, yeah)
Turning the headlight in my hands, I saw the screws on the body, unscrewing which, I thought that the glass would come off (naive little guy), the screws turned out to be difficult, but torx, so I bought a screwdriver with a set of bits to disassemble the headlight.
After 3 screws on each headlight were removed, to my regret, the glass did not want to give up, after reading the Kalino forums, I made sure that, in my case, the headlight was not removable (Kirzhach with polycarbonate glass). After listening to a lot of advice about how the headlight should be “ bake" in the oven - it was sent there for 10 minutes at 180 degrees.
From that moment on, the most interesting thing began... I regretted 10 times that I took on this idea.
After the headlight had warmed up, I pulled it out and, I thought, well, that’s it, now I’ll work with a screwdriver for 5 minutes and the glass will separate... Here I was very wrong. Having started this work at 10 pm, I disassembled the headlight only at 4 am... I heated it in the oven once 10, as a result, the entire rim is deformed, because the sealant did not soften, only the plastic (I pricked the glass with great effort until the plastic hardened and went back into the oven), but even worse, the headlight mount melted... well, what can you do.
On this note, I went to bed at dawn and the next weekend I was disassembling the second headlight, I decided to just pry it off with a screwdriver first, without resorting to the oven. To my great surprise, the sealant was not pressed against the headlight body at all, naturally the glass snapped off instantly - it was the left headlight, which I disassembled in 5 minutes, unlike the first one (I spent 6 hours fiddling with it).
What conclusions did I draw at this stage?
: 1.
Never, ever undertake to disassemble a Kirzhach headlight on a viburnum (it’s easier to throw it away and buy new ones) , but since you are as desperate as I am, then God help you. 2. The reason for the fogging of the left headlight is a defect from the factory (the sealant was not pressed in)
, and the car was like that for four years with a whiny little eye... 3.
Heating the headlight in the oven is a very bad idea - the sealant on this headlight, like rubber, does not respond to temperature at all
(it is necessary solder or saw the outer edge to separate the glass, and then build it up again)
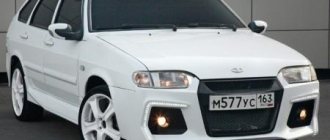
The next stage was painting the headlight masks, well, there’s nothing to tell here, just appreciate the abundance for creativity (by the way, there is material here not only for the headlights - keep an eye on the bulletin board) I painted it with heat-resistant KUDO in two layers, without primer, having previously removed the chrome using Pemolux and brushes and degreasing the surface.
Then I bought a hot air gun, I thought I would assemble the headlights (I first straightened the edges on the deformed headlight with it), because it was no longer possible to ride such a tramp for more than a week
Key points of improvement
The ProSport headlights for the Lada need improvement, as they do not shine well. Please note that there are several models of this optics. The standard equipment of the Lada Kalina includes lighting fixtures of the Agressor and HL-2 types. These units are a monoblock, including 2 low and high beam headlights.
In order for such lights to shine well, you will need to modify the curtain. To improve the low beam, it is wrapped in foil or trimmed.
You can solve the problem with headlights by installing xenon optics on the car and tuning the engine. To do this, you will need to remove the standard lighting fixtures. In some cases, car enthusiasts install alternative lenses with their own hands. When choosing these elements, their size is taken into account. It should coincide with the same indicator for standard models. Then car owners think about how to fix the new headlights in the appropriate block. Usually, to do this you will need to make a special fastening yourself using additional bolts.
If “angel eyes” are installed on the Lada Kalina, it means that their rings are dull. ProSport optics are equipped with conventional bulbs that need to be replaced with LEDs. However, it is necessary to take into account that such modification leads to uneven illumination of the ring.
The presence of additional holes for LEDs in the optics does not contribute to the formation of uniform illumination. Some areas will be highlighted more than others. In this case, auto mechanics advise installing the LED strip yourself. It is fixed with special glue. If the problem is solved by installing neon rings, their diameter should be 90 mm.
Standard diodes on Lada Kalina usually burn out after 6-12 months. The problem can be solved by installing a voltage stabilizer on the car. The factory wiring is replaced with more durable wire. When choosing it, the power of the Lada engine is taken into account.
Privacy Policy
Maintaining your privacy is important to us.
For this reason, we have developed a Privacy Policy that describes how we use and store your information. Please review our privacy practices and let us know if you have any questions. COLLECTION AND USE OF PERSONAL INFORMATION
Personal information refers to information that can be used to identify or contact a specific person. You may be asked to provide your personal information at any time you contact us.
Below are some examples of the types of personal information we may collect and how we may use such information.
What personal information do we collect:
When you submit an application on the site, we may collect various information, including your name, phone number, email address, etc. How we use your personal information:
The personal information we collect allows us to contact you with unique offers, promotions and other events and upcoming events.
From time to time, we may use your personal information to send important notices and communications.
We may also use personal information for internal purposes, such as conducting audits, data analysis and various research in order to improve the services we provide and provide you with recommendations regarding our services.
If you participate in a prize draw, contest or similar promotion, we may use the information you provide to administer such programs.
DISCLOSURE OF INFORMATION TO THIRD PARTIES
We do not disclose the information received from you to third parties.
Exceptions:
If necessary - in accordance with the law, judicial procedure, in legal proceedings, and/or based on public requests or requests from government authorities in Ukraine - to disclose your personal information. We may also disclose information about you if we determine that such disclosure is necessary or appropriate for security, law enforcement, or other public importance purposes.
In the event of a reorganization, merger, or sale, we may transfer the personal information we collect to the applicable successor third party.
PROTECTION OF PERSONAL INFORMATION
We take precautions - including administrative, technical and physical - to protect your personal information from loss, theft, and misuse, as well as unauthorized access, disclosure, alteration and destruction.
MAINTAINING YOUR PRIVACY AT THE COMPANY LEVEL
To ensure that your personal information is secure, we communicate privacy and security standards to our employees and strictly enforce privacy practices.
Regulation rules
Another headlight design option
Another equally important disadvantage of the optics in question is the difficulty in adjusting it. The mounting bolts used do not turn well (a special wrench is used for this). But raising the light to the required level will not work in any case.
When finalizing the adjustment of such a headlight, a long self-tapping screw is inserted into its body. It should rest against the plate responsible for adjusting the lens. Now you can raise it.
There is another method for adjusting this element. It consists of installing a washer or nut 3-4 mm high in the upper part of the lantern. The final stage is adjusting the height of the Lada Kalina headlight lenses. Refinement of ProSport light optics should be carried out comprehensively. In this case, state standards should be taken into account. If necessary, perform engine tuning.
We connect the LEDs. How and which ones are best to install on Kalina 2
Many motorists love to spend their free time alone with their iron friend. And, if there are no problems with the car itself, then they are engaged in tuning it. In such cases, almost everything can be replaced, from the appearance of the car to the parts of its engine. It is quite common to replace manufacturer-installed side lights with LEDs. However, this decision is quite wise, since LEDs are much more durable and consume less energy. But, on the other hand, they do not glow like lamps do. In addition, they are safer than standard lamps, since the power supply of the LED lamp is instantaneous, which allows the driver behind to react to the light faster.
However, replacing an LED is a little more difficult in reality than in the text, since you can simply buy an LED cluster and replace standard lamps with it. Replacement will require some effort. Now we’ll figure out step by step how to replace LEDs and which ones are best to choose for installation on Kalina 2.
Among the many LED options, the best ones for Kalina 2 are those marked W21/5W, P27/7W (3157, 7443) and the abbreviation SRCK. You shouldn't have any problems installing these LEDs. An important advantage is that these LEDs do not create that bluish tint, for which you can be fined. They distribute their light evenly, which helps them illuminate the entire reflector area (while this does not happen with standard lamps).
But, in order to install them correctly, you must first select the right diodes when purchasing. However, it is possible to modify the existing ones, but they are not quite suitable. But it is worth remembering that when purchasing high-quality diodes assembled by professionals, the operation of the LEDs will be longer, of higher quality and more stable.
So, having figured out the 2 LEDs suitable for Kalina, you can proceed to their direct installation. In order not to make a mistake when purchasing, it is advisable to remove one standard light bulb and bring it with you, that is, you will have something to focus on when purchasing. Then all that remains is to choose a light bulb that is suitable in terms of power and size. The rest is a matter of technique. Insert the LED bulb into its rightful place and - voila, your car is shining with new lights.
Price: 800 rubles.
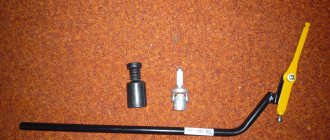
Revision – removal of unnecessary contacts
So, it was decided to modify the cartridge, in which the contact conductors are two U-shaped plates. We have already said that it will be enough to remove the lower left and upper right contact, and then the LED lamp can be turned on without redoing it. But in order for the lamp to remain in place, it is necessary to use two plastic tubes that serve as spacers between the socket and the base.
Remaking the socket or lamp
You can do it differently. If the light source is equipped with flexible leads, then two of them can be removed (bited off). In this case, there is no need to modify the cartridge. The main thing is not to confuse anything. First remove the pin labeled
Positive Dim Mode.
You can determine the purpose of the pins using a conventional tester (switch the device to the “diode” position). Remember that a voltage of 12-15 Volts cannot damage the LED assembly. We wish you successful tuning.
LED flashlight that duplicates the “dimensions” and brake light
There are several useful tuning options suitable for the Kalina-2 car in any configuration. A common modification method is to install an additional brake light located behind the rear door glass. An LED flashlight rated for 12 Volts can be purchased ready-made.
The easiest way to connect the LED assembly is to the wire of the standard brake lights. The negative contact coming from the LEDs is connected to the neutral wire. As a result, the brake light will perform its function, that is, it will light up when you press the brake. In this case, the electrical circuit should not contain additional parts, and what is shown further in the video corresponds to a more complex option. Let it be required that the additional brake light burns along with the side lights. It is then that the circuit will contain diodes.
It must be remembered that introducing additional load into any electrical circuit can lead to undesirable consequences.
The wiring cross-section is selected with a reserve, and the fuses in the car are designed for a slightly higher current strength than the standard equipment consumes. However, the possibility of tuning was not initially included in the design of the car, and we must not forget about it. Many companies produce equipment designed for installation in VAZ cars. But you need to use such tempting offers wisely.
Another common misconception is that LEDs, since they have high efficiency, hardly heat up during operation. As practice shows, any LED will heat up, and noticeably. Course optics, the light source of which is LEDs, are always equipped with fans. This fact cannot be considered a coincidence, and when working with any electric light sources, special care must be taken.
How to adjust the light output
After installing new headlights or removing the front bumper, the car owner needs to adjust the light output.
The luminous flux for each headlight is set separately
The fact is that fog lights have a completely different principle of illuminating the road surface:
- PTFs have a clear upper boundary (cut);
- This is due to the physical properties of fog.
For reference: the whole point is that drops of moisture literally hang above the road, but do not touch the road surface. It is in this narrow space that the fog lights shine. If the luminous flux is higher, the light will be reflected in the drops like in a mirror and blind the driver.
The best solution to the problem would be to visit service stations that have special adjustment stands designed for any car model. But if this is not possible, or the fog light on Kalina was replaced and removed from its original location, then you can do this operation yourself.
The algorithm will be as follows:
- Place the car 3 meters from a blank wall (residential building, garage);
- Check the tire pressure and bring it to factory settings;
- Using chalk and a ruler, mark two vertical lines on the wall opposite each wheel;
- Measure the distance from the ground to your car's headlights. This will be the parameter – h;
- Draw a horizontal line on the wall at the calculated height;
- Turn on the fog lights and cover one of them with a cloth or newspaper;
- Use the adjusting screw to set the luminous flux;
- Repeat the operation for the other headlight.
That's it, the work is finished, and the best part is that the price of the work is minimal.
What can you buy?
Despite the wide variety of fog lights in auto parts stores, many owners do not understand what to choose and which fog lights are best for Kalina.
Many are also confused by the different terminal blocks, which forces them to look for adapters to integrate the PTF with the standard electrical wiring system (see also the article Wiring diagram VAZ 21074 - injector: we understand the intricacies).
The classic ones have lamps with an HB4 base, and the lensed ones have H11.
If you approach the choice from a practical point of view, then for the Lada Kalina, without additional alterations and changes to the standard electrical circuit, the following are suitable:
- Fog lights Kirzhach on Kalina (lensed);
- Classic PTF made by Bosch (headlight with reflector);
Advice: we can also recommend Luch foglights, since they are a copy of the German ones. But their main advantage is the price, while the quality is much worse.
Among the advantages of these models is the fact that the adjustment of Kalina’s fog lights will be simpler and more understandable due to their installation in the standard mounting locations of the front bumper.
Here's how to adjust fog lights on Kalina if the recommended models are installed