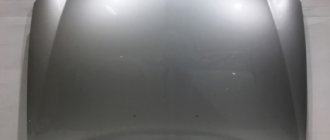
In a Priora car, the steering wheel comes in two types: a 4-spoke pre-restyling one and a three-spoke restyled one. In addition, you can install a multifunction steering wheel from Vesta on the Priora. The steering wheel of a Lada Priora car is rarely removed - for work in the cabin to soundproof the panel, replace the electric booster, and when the steering wheel itself is changed. You can remove it in 7 simple steps described below in this article! The price for the Priora 2 steering wheel is different from the first version, a little more expensive. The diameter is the same. In order to make the steering wheel thicker, a braid is placed on it, and to enhance it, it is covered with leather.
Everything in your favorite car should be good: dynamics, sound, comfort. Everything can be customized, that is, you can change the components in your own way. As an example, in the old Priora the usual four-spoke multi-steering wheel can be replaced with a new, three-spoke one.
The steering wheel on the Priora was adopted from other AvtoVAZ cars, the same style and simplicity. The Priora 2 steering wheel added modernity to the car interior - the design of the steering wheel that owners of foreign cars have long been accustomed to seeing in front of them has become available to lovers of domestic cars. Pleasant in feel, modern - it’s not in vain that they are trying to put it in pre-restyling Priors. The Priora was not equipped with a multi-steering wheel, but even in the new format it looks quite presentable, better than before.
Steering wheel on Priora - pre-styling version
Removing the steering wheel with airbag Lada Priora
Hello. We will carry out the procedure for removing the steering wheel with an airbag on a Lada Priora.
Tools:
- five hexagon
- flat screwdriver
- twenty-four head and knob
Photo report on removing the steering wheel yourself
First of all, read the material on removing the driver's airbag on a Priora. Then, when you have dealt with this, you can proceed further. Disconnect the power wires to the sound signal.
Then we put the head on 24 and rip off the nut, but don’t unscrew it completely yet. Before you start knocking it off the shaft, you need to mark the position of the steering wheel relative to the shaft - you can make marks on the steering wheel and casing.
When the nut is loosened, leave it on the shaft for now. Then we take and knock down the steering wheel from the reverse side, tapping it with medium force - on both sides.
When it comes off the splines, you can finally unscrew the nut and remove it from the shaft.
Carefully thread the horn power wires, as well as the airbag power wires, through a special hole.
And now the steering wheel is finally freed and you can remove it completely from the Priora.
If there is a need for replacement, then we perform it in the reverse order. Of course, the installation is carried out according to the marks that were originally set. The fastening nut must be tightened with a torque of 31 to 41 Nm. But you can take the average value and tighten it with a force of 40 Nm.
Video review on removing and installing the steering wheel on a Priora
The video repair report shown below is embedded from my author's YouTube channel, so you can watch this video either on this site or follow the link to the channel.
I think that after viewing this review, no questions will arise regarding the implementation of this procedure. But, in any case, you can ask questions in the comments of this article or under the video.
Standard steering wheel - size, article number and price
First, it’s worth making a reservation that not everyone likes to install new-style components in the pre-restyling Priora. It would be fair to mention the pre-restyling steering wheel. Its article number is 11190-3402012-00.
It is not sold in all stores, “showdowns” or secondhand, but you will have to hunt for a new option. Its cost without an airbag is about 2,000 rubles. With it, the price can increase from one thousand rubles.
the restyled version looks like this.
The restyled steering wheel on the Priora received article number 2170-3402018-00, its cost starts from 3,800 rubles. Please note that this is an option with a plug that is installed instead of an airbag, not from the “luxury” configuration - with a silver insert. A similar “luxury” steering wheel comes with article number 21700-3402018-20, it costs 400 - 1500 rubles more. The price for a steering wheel with an airbag starts from 7,500 rubles, from official dealers – 12,000 rubles.
Full size: The steering wheel diameter on the Lada Priora is 410 mm. Don't be surprised when you see that it fits Kalina too - the cars are equipped with the same steering wheels.
Step-by-step instruction
1. On the inside of the steering wheel, unscrew the two airbag mounting screws.
The screws are located on the right and left of the inside of the steering wheel.
2. Pry up the airbag and disconnect the power connector from it.
In order to disconnect the power connector, you need to use a flat-head screwdriver to pry it up and remove the latch. After releasing the latch, remove the connector upwards.
3. Disconnect the power connector from the horn buttons. We squeeze the ears and disconnect the connector.
4. Place the steering wheel so that the wheels point straight and make a mark on the steering wheel relative to the steering column casing. This must be done in order to set the steering wheel to its previous position.
The mark can be made with a washable marker.
5. Unscrew the nut securing the steering wheel to the shaft using a twenty-four socket. Do not unscrew the nut completely.
After unscrewing the nut a little, we knock the steering wheel off the splines. This can be done by striking movements of the palms of the hands on both sides of the steering wheel.
After the steering wheel has come off the splines, unscrew the nut completely and remove the steering wheel.
6. When removing the steering wheel, thread the airbag and horn power wires through the hole.
7. Now a few words about reverse installation.
We thread the power supply wires for the pillow and the signal.
We put the steering wheel on the splines and do not forget to align the marks that you made.
8. Screw in and tighten the steering wheel mounting nut.
Tightening torque from 30-50 Nm.
9. Connect the signal power connector.
10. Take the airbag and connect the power connector. After connecting, close the latch.
11. Place the pillow in place and secure it with two screws on the back side.
Tools for work
Let's try to figure this issue out together. Experts say that you can remove it on your own, without involving professionals from a car service center and making do with a small list of tools.
All these tools will help you easily cope with removing the steering wheel yourself. If you use them correctly, the whole process will seem easy.
Steering wheel removal steps
So, as a rule, any work consists of certain stages. It is worth noting that this does not require special knowledge, only manual dexterity and accuracy are important. Now you need to start the actual procedure:
- 1. Disconnecting the wire from the negative terminal of the battery;
- 2. Installation of the steering wheel, the position of which will fully correspond to the movement of the car strictly in the forward direction;
After you have completed all the steps of removing the steering wheel, you probably realized that everything is actually simple and even a little funny, and most importantly, fast. As a rule, there is no need to warn you that before removing the steering wheel you need to prepare a new one. If you are new to this business, then know that the Priore comes with steering wheels of certain models, which means you must pay attention to this when choosing it.
Video lesson
Replacing the steering wheel
Replacement is quite simple, but requires special attention, which is necessary to ensure that the steering wheel is installed level, as well as the presence of a set of tools with hexagons.
Before replacing the steering wheel, you need to check with the store salesperson whether a steering column cable is included with the steering wheel. In some stores it is sold separately; this part is required, otherwise the airbag will not work, which is no longer safe.
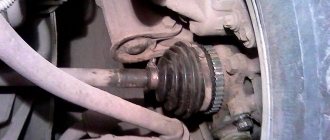
This is what the steering column cable looks like: the new (on the left) and the old (on the right) model.
Required tool:
- 8 and 24 mm heads;
- Ratchet;
- Phillips and flat head screwdriver;
- 5 mm hexagon;
- Desire to decorate your car;
When everything is prepared, you can start working.
Let's start replacing the steering wheel
- The first thing you need to do is place the car on a flat surface with the wheels straight ahead and protect yourself from the airbag deployment. To do this, you need to remove the negative terminal from the battery and wait for 15 minutes until the residual charge in the capacitor runs out. Then you can start disassembling.
- Next, you need to remove the protective cover of the steering column; to do this, you need to unscrew the screws securing the cover with a Phillips screwdriver (7 pieces).
- After the protective casing has been removed, the airbag must be removed. Using a 5 mm hexagon, unscrew the two bolts securing the pillow as shown in the picture.
- Once the screws are unscrewed, pull the pillow towards you, but not sharply, since the wires are connected to it. Using a flat-head screwdriver, bend the connector lock and remove the plug from the airbag.
- Next, you need to unscrew the steering wheel from the steering drive shaft. To do this, you will need a 24 mm socket and most likely an assistant, since the nut is tightened quite tightly. The nut must be unscrewed counterclockwise. After unscrewing the nut, remove the steering wheel by hitting it with both hands from the back of the steering wheel towards you.
- Using a marker, we make marks on the shaft where the cable is installed; this will be needed to install the new one and center it. Using an 8 mm socket, unscrew the cable and pull it towards you, having first disconnected the connector.
- This concludes the disassembly, now we need to start reassembling.
- We install the new cable, centering it along the old marks, tighten it with little force so as not to break the plastic clamp. We connect the connector.
- We install the steering wheel, centering it evenly so that there is no distortion, thread the cable wires into the holes on the steering wheel, and put it on the splines of the steering shaft. We check the alignment and tighten the head to 24 mm.
- We take out the safety latch from the steering cable, connect the connector from the cable to the cushion and snap it into the steering wheel.
- We install the steering shaft protective housing. Installation of the new steering wheel is complete.
As you can see, this steering wheel looks much nicer and more harmonious than the old one.
How to directly remove the Priora steering wheel
To remove this important part, you need to prepare some tools:
- Flat head screwdriver;
- Pliers;
- wrench head 24;
- hexagon number 5
- Wrench with extension for head.
Very important! Before you begin disassembling and removing the steering wheel, be sure to align the car’s wheels strictly in a “straight ahead” direction! And note how the steering wheel is located. This is necessary for proper reinstallation after removal.
Removal process
After installing the Priora in the desired position, it is better to fix the wheels, and you can begin to remove them. First of all, the airbag is removed. Removing it is a very delicate job and must be carried out with special precautions. To begin with, it is better to turn off the power to the car. That is, disconnect the battery terminal. And only after that, unscrew the 2 hex bolts from the back of the steering wheel. Then, very carefully move the device to the side.
Special attention! Under no circumstances should you make sudden movements or hit the device! Spontaneous operation may occur, resulting in serious injury!
The airbag wire connector is secured with a special clamp that wedges the center of the connector. You need to carefully pry it off with a thin screwdriver and then carefully remove it. Then remove the connector from the pillow. Without making sudden movements, put the device aside so that it does not come under impact or a sharp push. Do not under any circumstances try to disassemble the pillow!
Further work will be simpler. Using pliers, carefully disconnect the wires going to the sound signal and move them to the side.
Now the main nut is 24. It needs to be torn off, but not unscrewed or completely removed, but only unscrewed 2-3 turns. After this, gently tap your palms on the back of the Priora steering wheel to move it upward. That is, tear it along the slots. Then check the position of the wheels and steering wheel again. You can make marks with a marker on the steering wheel and column casing.
And only then completely unscrew the nut and finally remove the Priora steering wheel. When removing, be careful not to damage the wires of electronic devices. Pull them out through the special hole and move them to the side.
Installing devices in place
Carry out this operation strictly in the reverse order. Start by laying the wires and then follow the instructions. And again, be especially careful when handling the airbag!
Important! After fully assembling and connecting the battery, test turn on the ignition from the passenger seat! This will protect you from unexpected deployment of the airbag.
Useful video on removing the Priora steering wheel:
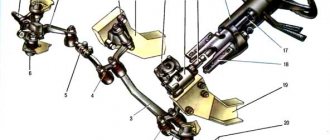
Let's sort it out
- Disassemble and remove the steering column. Remove the negative terminal from the battery;
- Using the eighth head, remove the contact group;
- Disconnect all wiring from the gray metal block. Each wire is under a lock, so handle them carefully, try not to damage the contacts;
- Disconnect the steering rack and cardan mounts by removing the bolt. Using a chisel and hammer, loosen the universal joint;
- Unscrew the four nuts that secure the amplifier to the body;
- Pull out the EUR.
To install the EUR, all steps are performed in reverse order. It is highly recommended that during dismantling you remember (better - take a photo!) the connections of all wires so that the installation goes smoothly the first time.
How to trim a steering wheel correctly?
It's time to move directly to covering our steering wheel with the purchased braid, or to putting on a cover. As mentioned above, this activity is not as simple as it might seem at first glance. To simplify the whole process, I have prepared special photo instructions.
How to put the cover on the steering wheel?
The cover is pulled over the steering wheel from top to bottom. It is better when two people participate in this process: one fixes the cover at one point, preventing it from slipping and warping, and the second carefully tightens it. Sometimes the cover is put on quite tightly, and it is impossible to do without male strength.
Dismantling algorithm
- To begin with, the steering wheel is locked by turning in any direction (there should be no key in the ignition switch).
- Next, you need to pry off the trim (also called the horn) located at the top of the steering wheel. At the same time, it is recommended to listen to how the sound signal is triggered.
- After detaching the upper part of the cover from the fastening, you should pry it from below and completely remove it. The power wires are located on the button, so you don’t need to pull the cover too hard to avoid damaging them.
- Now you have to disconnect the wires by pulling them a little, thus removing them from the contacts.
Note. Depending on what year Kalina was produced, the steering wheel mounts may differ. An airbag may or may not be present. If there is one, then you need to use a Phillips screwdriver to unscrew the bolts that secure it.
- It is worth noting that the bolts are fastened quite firmly, so you need to remove them with the utmost care so as not to damage the buttons and contacts.
- Afterwards the cover can be completely detached.
- The next step is to use a socket with a wrench to unscrew the nut that secures the steering wheel to the shaft. The steering wheel must be locked.
- In a situation where the nut is difficult to rotate, you can use a ratchet, with which this can be done faster and easier. There is no need to unscrew the nut completely; it is better to leave it in place, otherwise you might get hit in the forehead when removing the steering wheel.
- The position of the handlebar should be marked with a marker or pencil so that when mounting it back, it should be set straight. Marks can be made either on the steering wheel itself or on the casing.
- Now you need to take the steering wheel with both hands and pull it towards you, removing it from the shaft splines. If he doesn’t give in the first time, you can hit him with his hands from below, alternately left and right.
- After the steering wheel has been removed, you need to unscrew the nut completely and remove the wheel.
Difficulties in replacement
Removing the steering wheel on a Priora is quite simple, but putting everything back in place is not always possible.
Many users often have questions when replacing an old steering wheel with a new one. Here are the answers to the most common ones.
Question 1: Are mounts suitable for different models?
Answer: The mounts are identical, so the Priora 2 SE steering wheel is recommended for use on older models as well.
Question 2: I removed the steering wheel, but now I can’t put the new one back, it doesn’t work manually, what should I do?
Answer: If the part has been dismantled, then it can also be installed back. The steering wheel is installed by pressing your hands towards the shaft, without using tools like a hammer, but everything may not work out on the first try. There is no need to make sharp pushes of the steering wheel; a simple smooth press will be enough.
Question 3: Are additional components needed for the mechanism besides the steering wheel?
Answer: Yes, you still need to purchase a steering cable of the same model. Its installation is carried out similarly to the old version.
Question 4: The steering wheel is stuck after installation, what should I do?
Answer: Most likely, the steering cable is installed incorrectly. Disassemble the structure and reassemble it, adjusting the position of the cable in advance.
Safety system
The Lada Priora has a built-in safety system that is activated in the event of a collision. This system is represented by an inflatable soft pillow that expands at the time of an accident. The Priora has 4 airbags: one for each passenger, including the driver. They operate only in the event of a sharp collision at a speed of over 20 km/h, so they never open accidentally.
The driver's airbag is located directly in the Priora's steering wheel, which can cause some difficulties when trying to remove or replace the steering wheel or its elements. If you are going to install a new steering wheel, then it is worth finding out a little about the features of the location of the cushion.
Removal sequence
First you need to unscrew two screws on the back of the Priora steering wheel, which are located on both sides. To do this, you will need a 5 mm hexagon, while on both sides it is necessary to compress the spring clamps, preventing the pillow from falling out. It is important to remember that before starting work, you must remove the battery terminals to prevent the airbag from deploying.
After this, carefully remove the cushion from the front of the steering wheel. To do this, you need to carefully pry the clamp together with the wires and move it to the side, and also disconnect the power wires leading to the sound signal.
Please note that disassembling the airbag module is strictly prohibited.
Next, a pre-prepared 24-millimeter socket will come in handy, with the help of which the shaft nut is torn off; however, there is no need to unscrew it completely yet.
At this stage, you need to somehow mark the position of the steering wheel, which will be needed for subsequent assembly to its original position. For this purpose, you can make appropriate marks on the casing or, in fact, on the steering wheel. Once the nut has been loosened, you can begin to directly remove the steering wheel. To do this, you first need to gently tap it from the back with careful movements on both sides, but you should not use excessive force, because the steering wheel is still on the shaft. By progressively pushing the steering wheel, it is necessary to ensure that it is completely dislodged from the splines, and when this can be achieved, you can further unscrew the previously loosened nut.
After this, you can actually start removing the steering wheel. You need to act as before, carefully, threading the power wires for the horn and airbags through special holes. Upon completion of this procedure, you can finally remove the Lada Priora steering wheel.
After carrying out the planned actions, assembling the Lada Priora steering wheel with airbags is carried out in the reverse order. At the same time, do not forget about the marks made during disassembly, which will allow you to install the steering wheel in its original position. Remember that when carrying out the above manipulations, before removing the pillow, you should be outside the zone of its deployment.
Subsequently, after the integrity of the steering wheel and airbag has been restored, when you first remove the lock and turn on the engine, it is recommended to be outside the car and turn on the ignition by extending your hand over the steering column. This way you can protect yourself from unexpected operations and injury.
To summarize, it can be noted that in general, the process of removing the steering wheel of a Lada Priora car with an airbag, subject to all the above recommendations, does not pose any particular problems, especially for experienced car enthusiasts, and can be done independently, without contacting service centers of manufacturers or dealers, as well as at a service station. The main thing is to follow the procedure step by step and take precautions.
Basic malfunctions: in what cases should the steering wheel be changed?
The steering wheel itself on a Priora is rarely changed - unless something is wrong with the wiring (that is, it cannot be fixed by any repairs) or the horn does not work immediately after purchase. No matter how frivolous this misunderstanding may seem, it is impossible to operate a vehicle without a horn. Most often, repairs concern the pillow and train. If the airbag “shot”, then the steering wheel, of course, needs to be changed.
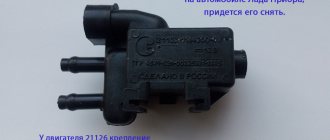
The cable is purchased separately for the steering wheel, and in any case it can be replaced. But the steering wheel of the restyled Priora with an airbag fits another cable with catalog number 2170-3709315-00: without it you won’t be able to connect the airbag. If the housing of the steering column switches becomes unusable, then the steering column, of course, will have to be disassembled, but changing it is far from necessary.
Removing the steering wheel. We eliminate the uneven position.
Good day! Status: Verified
History: (Can be skipped). The steering rack was repaired, with removal and partial disassembly (without removing the steering tips, or as they are called “steering rods”). So, after installing the rack back, in order to get the bolt into the slots of the steering wheel with the rack, I had to turn the latter by 30 degrees, which ultimately resulted in an uneven position of the steering wheel.
In fact: The steering wheel is not level relative to the level position of the wheels. Correction options: 1. Rearrange the steering rack by pulling out the steering wheel mounting with the steering rack from the splines. (I advise you to do this only if you need to re-assemble the rail). Time required: 2 days. 2. Perform wheel alignment and tell people to set the steering wheel straight. Cost: 1 hour. 1000 rubles 3. Turn the steering wheel 30 degrees. Costs: 1 hour, +1 neighbor.
I made decision No. 3 and after that go to the alignment. Does anyone think he did the right thing? I’ll add that the car was re-shoeed with summer wheels that were balanced.
Tools: 24mm socket wrench, flat blade screwdriver, 5mm hex key. Work: Using the instructions “Removing and installing the steering wheel of Lada Priora, VAZ 2170, VAZ 2171, VAZ 2172” we do this:
1. Take a screwdriver with a 5 mm hex head. We insert it into the hole in the airbag mounting in the steering wheel. Unscrew the 2 bolts (They cannot be removed from the passes).
PS/ These are the same bolts that secure the cushion to the steering wheel.
2. As soon as the bolts are unscrewed, the cushion will move slightly relative to the steering wheel.
3. Carefully turn the pillow sideways. Inspect the connector fastening.
4. We pry up the green clamp of the control wire block (which is in the center). 5. Now we pull out the entire connector from the mounting groove. 6. Remove the pillow and put it aside.
7. Pull out the audio signal wire connector from the pass. We disconnect it by prying the lock with a screwdriver.
9. Take a 24mm socket and a good wrench. With an elastic turn (counterclockwise), release and unscrew the nut (not completely). We do this so that when the steering wheel is knocked out of the steering shaft, the wires do not tear off and the shaft itself does not break.
10. We call a neighbor to help. Next, use sharp blows to knock the steering wheel off the shaft. When partially knocked out by about 50%, the steering wheel will move easily, now you can unscrew the nut completely. (I knocked it down a little and unscrewed the nut. Again I knocked it down a little, unscrewed the nut, and it worked 3 times.) 11. Now we easily and carefully remove the steering wheel. We turn them the way we want!) Having played enough, we turn them to the required degree. According to the instructions: Mark with a colored marker the location of the Lada Priora steering wheel relative to the steering shaft. My actions: I remembered by eye and decided to turn the steering wheel to the angle of the splines that allow it; it won’t fit any other way. (about 30 degrees).
12. We get on the splines (he will sit on them). ATTENTION! Use a screwdriver to pry up the internal non-separable connector so as not to bend the wires. The bolt is still unscrewed! Install the steering wheel and check it! We drive it into the shaft with a light blow. We knock it in a little and install a nut that will fix the steering wheel to the required height position on the shaft. We twist it.
13. Reassemble everything in reverse order. 14. Attention! Observe safety precautions when connecting battery terminals.
In the last 2 photographs I show why the displacement occurred. When they dismantled the rack, they turned the steering wheel shaft (in the rack, in the photo) and did not remember what position it was in. Those. The center of the tie rod fastening remained in place and the shaft itself turned. As a result, in the last photo you can see that the rack + steering wheel fastening bolt cannot be inserted any other way! Therefore, the only decision was made to turn the steering wheel until the fastening bolt came into place.
What to watch if the steering wheel shakes
If the car is driving over bumps, and the steering wheel “kicks” while driving, there is no need to rush to the service station - self-diagnosis in many cases helps to identify the cause of the knocking. The most common reason for this is a malfunction in the steering mechanism.
Steering rods
When they wear out, they receive small scratches due to contact with sand, misfires occur in the operation of the steering rods - this is immediately felt, because play appears when the steering wheel is turned.
Steering rack
When the grooves of the steering rack are practically erased, they do not engage fully with the gear, and each turn vibrates into the multifunction steering wheel.
Airbag and steering wheel replacement Priora
Not all drivers know how to properly install the Priora steering pad and how to install a new steering wheel. Of course, this work can always be entrusted to car service specialists, but sometimes there is no money for such services. When trying to replace a part on their own, many users encounter various difficulties. In fact, the installation and dismantling process is quite simple if you follow the step-by-step instructions.
Safety system
The Lada Priora has a built-in safety system that is activated in the event of a collision. This system is represented by an inflatable soft pillow that expands at the time of an accident. The Priora has 4 airbags: one for each passenger, including the driver. They operate only in the event of a sharp collision at a speed of over 20 km/h, so they never open accidentally.
The driver's airbag is located directly in the Priora's steering wheel, which can cause some difficulties when trying to remove or replace the steering wheel or its elements. If you are going to install a new steering wheel, then it is worth finding out a little about the features of the location of the cushion.
The design itself is quite simple and consists of the following elements:
- gas generator;
- pillows;
- control module.
In the event of a collision, a special sensor sends a signal to the module, which, in turn, turns on the gas generator. In about a second, the device fills an empty bag with nitrogen, which unfolds towards the driver.
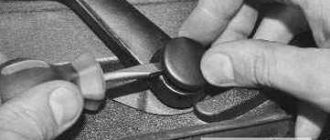
If you bought a used Priora, check for the airbag: press just below the center of the steering wheel. A soft-touch center means the cushion is in place.
Steering wheel assembly
After the old steering wheel has been removed, we install a new model. Of course, you can limit yourself to general provisions: carry out the assembly in the reverse order. But there are several nuances that should not be missed.
We arm ourselves with the same tools and begin assembly.
- We install the cable. Install it the same way as the old one, but do not push it all the way, otherwise the steering wheel will stick.
- We install a new steering wheel. There should be a wire sticking out from the middle of the steering wheel from the control module and a safety latch that needs to be pulled out. Just pull the latch towards you and it will come out of the slot.
- We connect the wire to the pillow, then to the cable.
- We snap the new cushion into the steering wheel.
- At the same time, we return all the fastenings to their places. The last thing to install is the casing.
If everything is installed correctly, the mechanism will not jam and will work fully properly for a very long time. The entire replacement process will take you about 40 minutes if you look at the instructions.
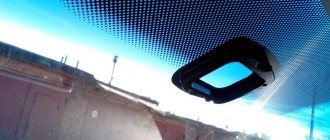
What does the Priora steering wheel hide?
The main distinguishing feature of the Priora steering wheel is the presence of an airbag. That is, it has two electrical devices in its filling:
- Horn switch.
- Airbag kit.
Because of these difficulties, it was necessary to install a special drum with contact tape in it to turn on these devices.
Attention! Not all Prioras are equipped with an airbag, but in any case there is a cavity in the steering wheel for it.
Because of this feature of the Priora steering wheel, removing it requires great care.
Why change or remove it?
The car steering wheel itself is very durable. Therefore, steering wheel replacement is rarely required. But I have to shoot much more often. Replacement is usually done when tuning a car for a “sports” version. Accordingly, such a replacement is only one of the episodes in a complex of alterations.
And the removal of the Priora steering wheel must be carried out for repair and maintenance of electrical components.
Steering wheel braid, its sizes and manufacturers
The braid on the steering wheel makes the touch even more pleasant, and you don’t mind spending money on it, because in your favorite car you want to surround yourself with only the best things. On the Priora you can put on the braid yourself, or pull the braid on like a “case”. The cover will not completely cover the steering wheel, but it is easier to install and remove. There are a lot of manufacturers, and their products differ only in design, and the price starts at 700 rubles.
The leather braid on the Priora steering wheel will be installed in an hour and a half. The kit includes instructions and a needle. This braid will look very organic, emphasizing the central insert behind which the airbag is hidden. The price starts from 500 rubles.
About the steering wheel
The new steering wheel turned out to be more attractive than the old one and began to blend better into the interior of the car. With the release of the restyling, many owners of pre-restyling cars began to be interested in replacing the old steering wheel with a new one.
New (left) and old (right) steering wheel
The steering wheel on the Priora wears out quite quickly, and replacing the old worn steering wheel will not be a waste of work, especially if you replace the steering wheel with a restyled one.
There are two types of steering wheels: with a silver insert and a glossy black one. The silver insert appeared in Priora 1 and is also no longer relevant, but the black glossy insert that appeared in the luxury version of Priora 2 looks quite harmonious and gives an excellent appearance in the cabin, which really catches the eye.
The new steering wheel is much more comfortable than the old one, in that the signal on the steering wheel can now be pressed as usual in the middle of the steering wheel. In the old version there were two buttons, pressing which in critical situations made it difficult to find this key.
Restyling
The smooth droplets of the steering column switches no longer stand out visually – the new style suits the car just right. Along with many little things that appeared in the cabin, the Priora 2 steering wheel with a chrome-plated Lada nameplate fits perfectly into the interior.
The diameter of the steering wheel has not changed at all, but the thickness has decreased. Steering has become easier because when a person tries to grasp a wide object with his palm, his wrist and forearm become very tense - it turns out that while driving, the hand is constantly under even more tension than it should be, and gets tired faster.
Life hack: Steering wheel on a Priora - size, price, malfunctions
Do you want to know how to remove the steering wheel on a Priora yourself, without resorting to the services of a car service, and at the same time, without spending a lot of time and effort?
Many car enthusiasts prefer not to contact a car service center for any occasion (it’s expensive, or there’s simply no such option), but to resolve issues at home and themselves using improvised means. But drivers do not always have the knowledge to solve a particular issue. In such cases, it makes sense to seek advice from knowledgeable people who can easily help you solve absolutely any problem or find and read the necessary information on the Internet. How to remove the steering wheel on a Priora? If you decide to replace your steering wheel, for example, with a sports steering wheel or want to install heating on it, you will need to remove it first. It is worth noting that all cars are different, which means that certain parts in each car can be disassembled differently, and besides, the disassembly process is different.
Priora 1
The four-spoke steering wheel on the Priora with an outdated design, which it inherited from the “tenth” family, still serves drivers faithfully - as practice shows, even after 10 years it will wear out externally (but not much), but scratches will not be noticeable. During restyling, they decided to replace the old-style steering wheel with a new one, which is now installed in all flagship Lada models. The horn buttons are located under the driver's thumbs, which is not always convenient - for example, when going through a turn, you have to literally look for them, because the driver does not always hold the steering wheel as taught in driving school.
How to remove the steering wheel on a Lada Priora with an airbag yourself
The above installation features with a built-in airbag force you to be especially careful when understanding the process of how to remove the steering wheel on a Priora. Experts advise that to carry out such work you must have the following tools:
- socket head for a 24 mm wrench;
- ratchet or crank;
- thin flat-blade screwdriver;
- extension;
- 5mm hexagon socket.