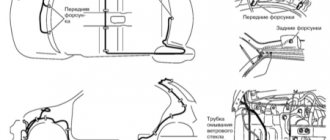
Maximum visibility in a car is very important for every car owner, so how glass is cleaned is very important for those who produce a Chevrolet Niva car; this process includes the operation of more than one system. Thanks to the injectors and wipers, you can clearly and clearly see what is happening on the road. If one of these systems fails, then the others will not work at the required level, so you should know how to choose universal fan-shaped windshield washer nozzles, also called jets.
Which washer nozzles are best to choose?
Instead of standard jets, a large number of fan injectors can be installed on Lada cars, here are some of them (the table is in the process of being filled out, leave feedback in the comments):
| Name | Catalog number | Note |
| Universal fan nozzles | You can buy it on the market at a price of 50 rubles per piece. | |
| Volvo injectors | 30655605 | You will have to cut the latches and grind the holes to the required diameter, cut the threads with an M8 nut. |
| Injectors from Ssang Yong | 7845009010 | Like from Volvo only with seal |
| Great Wall injectors | 5207300-K00 | It is possible to adjust up and down, left and right, the thread is cut with an M8 nut. |
| Injectors from Renault Logan | 7700846456 and 289321198R | Numbers of the old and new samples. |
| Injectors from Chevrolet Niva | 00001-7504676-00-0 |
In addition to new injectors, another modification recommended is the installation of a check valve.
It is worth noting that not only the quality of windshield washing, but also fluid consumption depends on the type of jets. Spraying too much will not allow you to spray the entire area of the glass at high speed (small splashes from the wind will only fall on the lower part of the windshield), and too much spray will quickly empty the washer reservoir. What washer nozzles do you recommend?
Let us remind you that other modifications of Lada cars can be found in the corresponding categories (Priora, Granta, Kalina, Largus, Niva 4x4, Vesta or XRAY).
Source
Volvo fan injectors and Toyota check valves for Lada Kalina hatchback
I decided to purchase and install fan washer nozzles from Volvo and check valves from Toyota.
On the drive, a lot has been written about this combination, but I still want to share, the impressions are only pleasant.
The original single-jet injectors were thrown out almost immediately, I replaced them with double-jet ones from the Chevrolet Niva. An excellent option, by the way, they worked well, but I wanted more, anyway, even 4 jets on the glass do not allow you to wash it completely, so the only option left is fan nozzles. Drive helped with the choice.
The following was ordered through the Exist online store:
Volvo 30655605 Washer nozzle 2 pcs. — 556.24 rub.
Toyota 85321-26020 Washer valve 2 pcs. — 100.92 rub.
You can easily find and order using the codes. The order itself was delivered 2 days after prepayment:
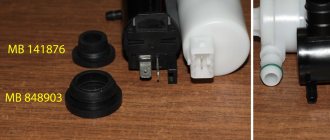
Volvo fan injectors and Toyota check valves
Volvo injectors are made with high quality, the price is of course high, but the result is worth it)
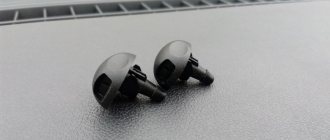
Volvo fan injectors
The check valve allows liquid to flow only in one direction, thereby water does not flow out of the tube and when you press the lever, the washer flows immediately and the wipers do not drive on dry glass, and if you are going to install fan nozzles, then I think it makes sense to buy check valves right away.
The arrow indicates the direction of fluid flow
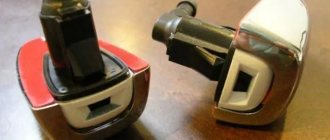
But if everything were so simple, then it would not be interesting) The fact is that the Volvo injectors are slightly larger than the standard ones and without modification they simply will not fit into the standard place (well, if the holes in the hood are not widened). Here's a comparison with the stock one:
injectors from Kalina and from Volvo
To solve this problem, you need an 8mm thread cutting die. and a stationery knife. We cut off the excess with a knife and cut the thread:
8mm thread cutting die.
It turns out something like this:
Tightened with regular nuts:
But this is not the only problem, because... The hood of the Volvo is apparently slightly different from the hood of the Viburnum, then with a normal installation the injectors will shoot a little higher, you need to raise the back of the injector. To do this, I cut out supports for the injectors from an old rubber mat:
When adjusting the jet height, the elastic band will need to be trimmed.
And then everything is simple, remove the hood noise, snapping off half of the piston, try on the injectors, leave the back part of the rubber to adjust the height, and cut off the front part so that it looks like in the photo:
The height of the jet can be adjusted with an elastic band
We install check valves in front of each nozzle, observing the direction of fluid flow:
arrow to injector
We check everything, install it, tighten the nuts, on the back it looks like this:
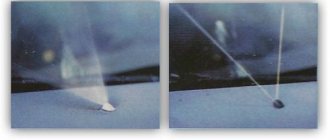
As a result, we get liquid sprayed over the entire area of the glass; the liquid hits the glass before the wipers begin to move due to the check valves.
Which universal windshield washer nozzles to choose?
Maximum visibility in a car is very important for every car owner, so how glass is cleaned is very important for those who produce a Chevrolet Niva car; this process includes the operation of more than one system. Thanks to the injectors and wipers, you can clearly and clearly see what is happening on the road. If one of these systems fails, then the others will not work at the required level, so you should know how to choose universal fan-shaped windshield washer nozzles, also called jets.
How to adjust the nozzles on the pulley?
To adjust the washer nozzle, it is enough to have a regular needle with which you can turn them in the desired direction. Also, there is no need to set them at the same level in height, which will reduce their effectiveness. It will be much more convenient if the outer nozzles are directed to the lowest points. The central jet must be directed precisely to the upper part of the glass.
Fan nozzles have three positions; after purchase, we recommend immediately setting them to the middle position using a screwdriver . Changes in position occur with a characteristic strong click.
We also recommend watching an interesting video about the adjustment device:
Hi all! Today I would like to tell you in more detail about fan-shaped windshield washer nozzles. Such devices are an alternative to classic inkjet devices.
Fans are considered more modern, relevant and effective. Although this point can be debated endlessly. I don't plan to do this yet.
It’s better to tell you about the features of fan nozzles, give recommendations for selection, and also make some clarifications regarding the very pressing issue of adjustment.
What types of injectors are there?
- There are inkjet ones, they are a hollow cylinder. To connect to the hose, the nozzle at the bottom of the structure has a fitting, and at the top there is a sprayer. The fluid supply force can be adjusted using a special screw.
- Fan type, their peculiarity is that they have many sprays, and due to the fact that the liquid passes through narrow channels, the pressure in them is greater.
The first option can usually be found on domestic cars, but on cars that have been produced in recent years, a fan version is installed, but even though they are produced using modern technologies, and are distinguished by their ease of installation and ease of operation, they also have their own flaws.
Disadvantages and advantages
The main advantage of a fan jet is that the jet that is sprayed is wide, due to which the entire windshield is covered, in addition to this the following advantages can be distinguished:
- Dirt dissolution occurs more efficiently due to excellent atomization, thereby saving liquid.
- The liquid, unlike jet wipers, begins to release simultaneously with the operation of the wipers, which reduces the risk of scratches on the glass.
- Despite all the advantages, they also have their disadvantages:
- At low temperatures, the washer quickly becomes covered with ice, so to avoid these troubles it is necessary to purchase additional heating systems.
- Due to the fact that a lot of liquid is sprayed onto the glass, visibility is reduced for a couple of seconds until the wipers remove it.
Despite these shortcomings, they can still be solved, the main thing is to choose the right jets.
Which injectors to choose
The surest option would be to choose factory jets, since when compared with similar parts of foreign cars, they can differ significantly. These differences are not critical and you can adjust them for your car, but you will have to deal with a more complex installation. Therefore, it is better to purchase a universal washer that is suitable for all types of cars. As a rule, they are produced with the following numbers: 30655605 and 7845009010. A Swedish part, for example, will cost more than its Korean counterpart. Also, an excellent option is offered by the manufacturer Toyota under number 85381-AA042, but it is worth knowing that they sell their products by the piece, so if you order a product, for example, in an online store, you should take this into account and add two products to the cart, not one.
How to make a replacement
This process is the same for all cars. Before starting work, you should prepare new hoses in advance. Then we perform the following steps:
We pull out the plastic pistons, carefully removing the upholstery.
- We remove the buffer foam pads. As a rule, they are attached with tape.
- Detach the pads
- We remove the hoses through which the fluid is supplied
- Old injectors must be removed
- We connect the pipes to the new jets
- We connect a check valve to the pipes and pipes
- Checking the operation of the system
If after replacement they begin to not work properly, for example, the fluid flows late, or moves to the side, it is necessary to adjust the parts.
Source
Malfunctions and ways to eliminate them
Below are instructions for eliminating defects in parts of the glass washer system on a Chevy Niva
Rear window tank Niva Chevrolet (article 2123-631401400)
If there is a problem with it, you need to check the tightness. And also disassemble the tank itself, which is quite simple in its design, and clean it. Replace if necessary.
Rear window pump (part number 2123-6314014)
The most difficult thing here is to carefully unfasten the door trim. After replacement, use a glue gun.
Rear window nozzle (art. 00001-7504676-00-0)
When replacing, the hose often falls inside the door.
In this case, you will need to remove the trunk door trim, then remove the washer reservoir. Hook the hose through the hole in the top with a curved wire and pull it into the inside of the door.
Next, push the hose from the washer so that the tail increases at the end, which, if long enough, bend and push back to the outside of the door. After this, it is enough to put a new nozzle on the hose, replace their parts with fan ones and install the tank and door trim in place.
We recommend watching the detailed video instructions:
Windshield washer reservoir and pump (art. 000017504617000)
Disconnect the power wires and hoses from the electric motor of the pump and drain the liquid from it. Remove the rubber belt securing the reservoir and remove the pump. There is a sealing sleeve at the junction of the pump and the tank.
It is necessary to check its condition and, if it has dried out, replace it.
Then carry out the installation in reverse order. Below are detailed instructions with photos:
1. Disconnect the wire from the “–” terminal of the battery. 2. Disconnect the two wire connectors from the pump motor terminals.
3. Disconnect the hose from the pump fitting and drain the liquid from the reservoir. 4. Remove the reservoir fastening belt and the unit itself. 5. Replace cracked or loose sealing sleeve. 6. Install the new pump in the reverse order.
Windshield jet (nozzle) (art. 21235208060)
First of all, you need to remove the buffer foam pads. Next, disconnect the pads. Remove the hoses through which the fluid is supplied. Remove the old injectors and connect the pipes to the new jets. Connect the check valve and immediately check the operation of the system
Fan nozzles
The advantage of this sprayer is primarily expressed in the larger spray angle and the pressure with which the liquid hits the glass.
At the same time, the risk of creating micro-scratches and the consumption of the liquid itself are reduced.
NIVA wipers and washer nozzles
Modification of wipers and washer nozzles in Niva
First of all, I bought fan nozzles.
Instead of the old inkjet ones, which were frankly annoying with their disgusting quality. One injector simply fell into pieces, and I drove half the road with the glass half covered in dirt. True, you can’t put these fan-shaped injectors in the standard places, but it doesn’t matter, I now have the “correct” nostril on the hood, into which it would now be a sin not to install the “correct” injectors, which is what I did.
the hose was hidden in the hood amplifier
To prevent water from flowing back into the tank, and then there was no pause while it was pumped back into the system, I installed a check valve from the Toyota washer system (I just pressed it and water immediately flowed).
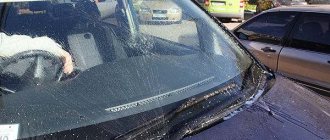
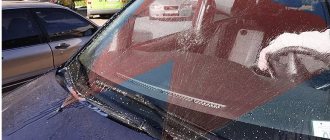
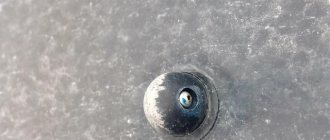
Nostril with nozzles on the hood.
Now the washer sprays onto the glass as it should.
All that remains is for the wipers, I installed Bosch wipers 41 cm long,
People use longer ones, but for me, after 33 cm, these were enough.
And most importantly, they don’t hurt anything.
Installation of fan nozzles
We got around to installing fan-type nozzles for the windshield instead of the classic jet nozzles standardly installed at the factory.
We can talk about the pros and cons of both types of nozzles for a long time. Well, I don’t like the supply of washer fluid to the windshield with a jet nozzle only to actually one place on the glass. Whether it’s spraying small drops over almost a large area of glass with a fan nozzle. Accordingly, the removal of various road dirt with brushes is done more efficiently and not on conditionally dry glass. True, washer fluid consumption increases. In short - as many drivers as there are, so many opinions on choosing the type of injectors. Wandering around the shops in the spring, I noticed these: At the top is a nozzle for the rear window, which I took along with the nozzles for the windshield, fortunately the price for everyone is 40 rubles apiece. I would like it to be more decent, but in our city the choice is small. There was no catalog number for the windshield for the injectors, only the name “Drop”. I suspect that they are VAZ ones. At the same time, I bought 20 buttons (hood insulation) 1118/1119-5007722, just in case, for 3 rubles.
I'm starting to install fan nozzles for the windshield. To make it easier to install them, I removed all the insulation buttons (removing the original factory ones is a pleasure - soft and elastic). But I still dropped 3 pieces for protection. I could only get one. And what the hell with the other two of them – they’ll fall under the car along the way. Well, so that the insulation does not interfere, I prop it up with a fishing rod stopper.
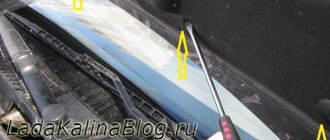
The original jets are attached to the hood using antennae.
After removal, I was convinced that no “saffron milk caps” had appeared under them in 4 years.
The purchased fan nozzles are secured with a nut. They fit into the standard technological hole without any problems, gaps or modifications, but I still treated the contact area of the injectors with the hood a little with transparent sealant.
On the left side the nozzle was screwed on with a nut quite tightly. On the right, either the plastic nut was loose, or he was overzealous. I solved the problem by replacing the nut from the injector to the rear window. They approached each other like family.
I put on the tubes from the washer and secured them to “everyone” with additional clamps. That's it - the injectors are in their new place.
I secured the hood insulation in place. 2 buttons purchased to replace the lost ones turned out to be of dubious quality, i.e. somewhat harsh. I think when removed again they will not survive the stress and will break.
All that remains is to properly adjust the position of the water supply by the nozzles - even though I didn’t expect them, they are also adjustable in different planes. I pre-adjusted the driver's side a little higher, so at speed it started to throw up to the very top of the glass and roof. I had to lower it a little. On the passenger side on the starboard side you will have to tinker a little with the adjustment - there was not enough time to get it right. The photo quality is poor - you can’t really see how the injectors work. And it was not convenient to take pictures with one.
In general, I am very pleased with the quality of the fan injectors, especially since they can be adjusted efficiently at any time.