Having a hatchback body, the VAZ 2114 is distinguished by an impressive trunk, which covers the entire rear part of the car. It is separated from the interior by a seat and a removable shelf.
The shelf has bending points provided by the design, along which it folds, increasing the volume of the luggage compartment. This design does not cause any complaints, especially if the presence of music is not important, but if music means a lot to the owner, a “surprise” awaits him - there are no places for mounting an audio system in the design of the VAZ 2114.
The standard shelf is thin and light, any speaker will make it heavier, which will lead to its incorrect fixation, the shelf will rattle a lot, the audio system will resonate with the pits and the rumble from behind will be simply unbearable, the presence of such “music” is very doubtful pleasure. Later, the sides will also become loose, and then it will become completely unbearable.
The problem is solved in three ways:
- The shelf is removed, there are no rear speakers, there is nothing to rattle, but there is no music either.
- Acoustic shelf VAZ 2114 is inexpensive to buy, but it will improve the situation significantly.
- Make an acoustic shelf yourself.
In addition to eliminating third-party noise, the acoustic shelf will solve the problem of trunk structural rigidity, provide the acoustic system with a reliable frame, and eliminate the negative impact of acoustic vibrations on the mechanical joints of the rear door and trunk as a whole.
We are finalizing the factory version
If the VAZ 2114 acoustic shelf is expensive for you, but you don’t want to make it yourself from scratch, then you can modify the factory shelf.
To do this you need the following tools and materials:
- Plywood.
- Putty.
- Upholstery.
- Self-tapping screws.
- Epoxy adhesive.
- Jigsaw.
- Knife.
- Emery (sandpaper).
- Stapler.
The shelf is easy to modify; for a good result, the steps are performed in the following order:
- We draw a template on cardboard, use it to draw places for the speakers on the shelf, and cut them out with a jigsaw.
- We use the shelf as a template, draw what we need on the plywood, and cut out what we need on the plywood.
- Using epoxy glue, we glue the shelf to a piece of plywood cut out for it.
- We cover (glue) the finished result with carpet (another fabric), not forgetting about the plywood ends.
Such a shelf, due to its rigidity, will significantly improve the sound, but in addition, you can soundproof the trunk and the shelf itself, this will make the music even better.
For soundproofing the following will be useful:
- Bitomast and Vibroplast (1 sheet each).
- Smoothing tool (usually a roller).
- Construction hairdryer.
Due to the fact that vibroplast perfectly dampens vibrations, it is enough to cover 2/3 of the trunk with it. Bitomast is applied to the shelf itself; it is a noise-absorbing material, it improves the sound and removes vibration echoes and unnecessary sounds. To apply, the materials are laid out on the desired surface, then heated with a hairdryer and rolled out over it.
Carefully monitor the quality of rolling; if there are bubbles under the material, the results of your work will very quickly fail.
Useful video
You can find tips on making an acoustic shelf with your own hands in the video below: Good sound is an important element of comfort, not only for a young driver, but for every driver. The acoustic shelf of the VAZ 2114 is a good option that allows you to “cheaply and cheerfully” improve the quality of driver comfort
Very easy installation, no additional modifications required. The acoustic shelf is designed to improve the sound quality of the acoustic system as a whole, as well as to eliminate unpleasant creaks, rattles and overtones when the car is moving. Instead of plastic sidewalls, wooden ones are installed, and speakers are attached to them. The main advantage of this design is that when the shelf is removed to transport large items, the speakers remain in the car. All necessary accessories are included.
- In the trunk, remove the inner plastic lining and plastic sides, after first removing the seat belts.
- Screw the seat belts back into place.
- We install in place: the plastic lining is transverse (the bar at the trunk lock) and the plastic upholstery of the rear door pillars.
- Install the wooden sidewall so that it goes under the seal near the glass, lifting it, and so that the inclined plane of the sidewall (with a triangle) lies between the transverse cladding and the seal.
- Try on and mark the contours of the bracket with a pencil so that the long side of the bracket is on the shelf (between the beveled plane and the place for the speakers), and the short side is pressed against the body. Screw the bracket to the shelf with 3.5X25 self-tapping screws along the marks.
- Try on and mark the contours of the corner with a pencil, placing the corner so that it is on a wooden rectangular spacer and pressed against the seat belt bracket, next to the standard place where the plastic side panel is attached. Screw the corner to the shelf with 3.5X25 self-tapping screws along the marks.
We make it from scratch
The acoustic shelf of the VAZ 2114 is easy to make with your own hands, you will have to spend a little on materials, and do not regret a little of your time.
The following “ingredients” will be useful:
- Centimeter chipboard or MDF.
- Carpet (other fabric).
- Glue.
- Self-tapping screws.
- Jigsaw.
- Drill.
- Grinding machine (emery, sandpaper).
- Stapler.
- Materials for the layout: cardboard, pencils, drawing supplies.
We will do it like this:
- We are preparing a template, then we will try it on the car, it should be a little larger.
- We cut out the shelf according to the template, remove the irregularities by grinding down the gap included in the template.
- We double-check its dimensions on the car, if everything matches the car and the size of the intended speakers, then the shelf is ready.
- We are preparing materials for covering (pasting), everything should be at hand.
- Apply glue to the plywood, apply fabric, and roll everything out to avoid bubbles.
- We fix the edges with a stapler.
- Let it dry for a day.
In order for the shelf to be foldable, you need to take care of the moving elements in advance and try on the hinges. It is better to do this before pasting with carpet, so the design will look much more aesthetically pleasing; the moving technical gap can be closed with a strip of “elastic” (elastic fabric), but not with carpet or other non-stretchy fabric.
Very often, people don’t want to fool themselves with jigsaws and glue, so they immediately buy ready-made ones. This solution has a significant advantage, because there are a great many modifications of shelves, both a regular “plastic shelf” and a solid “VAS 2114 acoustic shelf with sidewalls” are sold, all intermediate options are also present in the online assortment. Although the purchased version will be many times more expensive than the homemade one, laziness and the “pursuit of beauty” sometimes overpower common sense and the desire to save.
What to do?
There are three ways to solve this problem. The choice in favor of one option or another directly depends on your requirements, wishes and sometimes financial capabilities.
Solution option
Explanation
Completely dismantle the sides and shelf
Nothing will make noise in this situation, but you will deprive yourself of space to install an audio system. You can forget about high-quality sound inside the car
Purchase a ready-made podium for durable material with holes for speakers
A good option that requires certain financial costs. All you have to do is install it in place. Disadvantage - it is not always possible to find a shelf that is ideal for all parameters
Make a podium with your own hands
This option provides minimal financial costs and the opportunity to create a shelf that will meet your smallest requirements. The downside is that you have to do the work yourself, which not everyone can handle.
Having a stronger and thicker shelf not only eliminates noise, but also improves the sound quality of the audio system. The thick shelf acts as a highly efficient enclosure.
Today we will look at how you can create an acoustic podium with your own hands, which will be placed on factory sidewalls. You can also try to make an option with your own sidewalls, but it is much more complicated and extremely difficult for a beginner to cope with. Let's not make things difficult for you. The option with standard sidewalls is very good.
We create acoustic podiums
It doesn’t seem logical to change the shelf, investing effort, time and money into good sounding music, leaving the standard VAZ 2114 podiums, which are made of plastic and eliminates more than half of your work. Plastic does not dampen the vibration of the speakers at all; on the contrary, it enhances it, creating rattling and extraneous noise. Therefore, we will make new podiums, tougher, and making all the previous torment justified.
For the new holder you will need:
- Columns.
- Installation rings (included in the kit).
- Gloves and brush.
- Epoxy glue and hardener.
- Fiberglass and lycra.
If you start creating a podium from scratch, some skills in woodworking and other work with materials will come in handy, firstly, for an untrained person this is unrealistic, and secondly, people with such skills can imagine what exactly needs to be done without this article. Therefore, relying on the option that there are no such skills, as well as special equipment, on the basis of a standard podium we will carry out the procedure for strengthening it using the materials described above.
This procedure is done as follows:
- We cut off the mesh (part of it) from the podium and fix the installation ring; the structure should come out monolithic and rigid.
- We put lycra on the structure.
- Mix glue and hardener.
- We spread the resulting solution onto the lycra and, as in papier-mâché, glue the fiberglass (you need to stick 3-4 layers).
- Let the structure dry.
- We install.
The option of polyurethane foam is “not an option”: firstly, it causes corrosion of the body, and secondly, in addition to vibrations, foam also dampens sound.
Installation sequence
The sequence of actions when installing speakers on the rear parcel shelf of a car:
We recline the seats for easy mounting. We remove the rear brake light, which is located on the rear shelf: to do this, first unscrew two self-tapping screws. We use a marker (any kind) to outline the future holes for the speakers: you can choose any convenient method for yourself as “marks”. Removing the side struts
If you have a car with side curtains, then you first need to secure the plug, remove it and only then unscrew the screw under it. We remove the airbag with extreme caution. We remove three clips from the shelf and take out the structure itself. The work with the shelf is completed, now we start working with the wires:
The work with the shelf is completed, now let's start working with the wires:
We remove the side posts so that the wires can be connected. Take care in advance to make the necessary holes for the diameter of the speakers. We connect the wires to the speakers and wrap them with electrical tape. We run the wires under the plastic. Let's put the structure back together: pay attention to the safety of all wires.
If installed correctly, the speakers will not make noise even on a bad road. On the contrary, they will improve the sound quality of the music and immerse you in the atmosphere of your favorite tunes.
You can buy car speakers with delivery in Kyiv, Kharkov, Odessa and Dnepr, and also install them in the rear parcel shelf at 130.com.ua.
Which Speakers to Put on the Rear Shelf
Which speakers put on the back shelf
First of all, you can go there and put any size you want, not just 13 like the tailgate.
Secondly, the sound is better than the door.
Thirdly, everything is easy to do; it is impossible to do Shumka rear doors.
And by the way, the quality of the Kicker coaxial inexpensive speakers was quite satisfactory. It was quite possible to save money on front speakers. Also, the coaxial, especially mine, doesn't benefit from the components, they sound decent.
My car:
Peugeot 206 Sedan 4-Door 1.4 with manual transmission 2008 Equipment: HT Color: dark! Purchased in 2009!
Club card number: 00264
Expressed gratitude: 50 times
The pancakes are mounted on the back shelf through podiums. The podium to the shelf was reinforced from the inside with screws, and the speakers were screwed to the podium using fasteners that came with the speakers. The holes in the rear shelf are made of mosaic. Later I glued a shelf with STP inside and an iron partition where the shelf was attached. I took the wiring from the rear speakers (which I unplugged), although I had to increase the length. Now I'm thinking about how to fill the void between the shelf and the metal. What about the experts who give advice? What material?
My car:
No Peugeot 206 2008 color is as follows: I don't know! Purchased from 2014!
No club card: not yet
Thank you, said: 42 times
Nothing plays on my back shelf though. but inside the shelves are covered with super foam (the tray in the trunk is worth it).
The door trim is also glued with 88 adhesive foam.
My car:
Not Peugeot 206 2008 equipment further: double color: white! Purchased in 2012!
No club card: not yet
Thank you, they said: 76 times
By the way, the shelf was folded a little, after installing the speakers everything went well
If you want a good system, you still need to start changing your head
My car:
4-door car Peugeot 206 Sedan 1.4 Manual 2007 2007 equipment: XR color: dark blue metallic! Purchased in 2007!
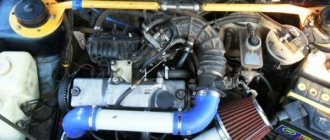
Tuning the VAZ 2114 engine and fine-tuning the power supply and intake system
At the same time, as the engine receives a new camshaft, lighter valves, an updated cylinder head and increased volume, sports pistons, the fuel system will also need to be improved - otherwise the car simply will not cope with such loads. In addition, the air supply system to the exhaust and combustion chambers will not be able to meet the increased needs.
Therefore, you immediately need to replace the standard one with a zero one. You also cannot do without a sports exhaust manifold (“spider”) with large diameter pipes. It more thoroughly cleans the working space from combustion products and facilitates the ventilation of the cylinders, creating good conditions for the free filling of the combustion chambers with the fuel-air mixture.
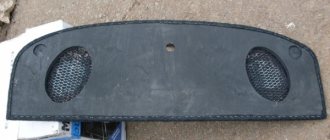
An acoustic shelf for a VAZ 2114, made of plywood and covered with carpet, will improve not only the interior of the car. On the VAZ 2114, the acoustic shelf is a component that solves several problems at once: sound output improves, squeaks in the trunk disappear, speakers can be installed in any size, even the largest ones.
Disadvantages of ovals or “pancakes”
What are the disadvantages of “pancakes”, which is why they are not used in good systems? The first drawback worth mentioning is the location, since these speakers are designed for shelf installation, they are always placed at the back. And the sound should come from the front. This is not an immutable rule, but music is always better perceived if it is heard from the front rather than from behind.
Because of this, by the way, it is impossible to listen to music normally if you have passengers sitting in the back. Because as soon as you turn up the volume control a little, they start complaining. This is not surprising, since the speakers are screaming right into their ears.
Also, “ovals” have all the disadvantages of coaxial acoustics. If a woofer, midrange, and tweeter are combined in one device, they will sound worse than component speakers due to design features, as well as the design and quality of the crossover.
How to choose acoustics for a car
In the design of such speakers there is actually... more than one! The playback range is divided into areas - each “subordinated” to its own dynamics. Special filters are used as signal “splitters” (they are also called crossovers), and then each speaker has its own. Serious models have a crossover in a separate housing, but simpler models make do with a capacitor (the simplest filter) on the speaker housing.
The advantage of coaxials is their large coverage of the reproduced frequency band. The main location is the standard seats of the car. Usually they are equipped with standard equipment. This type is suitable for car enthusiasts who are not picky about car sound and need an inexpensive solution. They are suitable as a replacement for old speakers in a car when maximum simplicity is needed. I took it off and installed new ones.
They come in different sizes: 13 and 16.5 cm. The larger the speaker area, the cleaner and louder the sound.
Troubleshooting solutions
An excellent way out of their current situation is to install the rear shelf of the VAZ 2114 yourself. Today, on numerous websites dedicated to cars, you can find a lot of options for making the necessary design on your own. If you don’t have the skills to work or free time, then an excellent solution is to buy an acoustic platform at an auto supply store. It is possible to select several modifications that differ from each other both in design and in the materials used in manufacturing. The price of the accessory depends on its design and the specific store, on average it ranges from 1,200 to 3,000 rubles.
Benefits of replacing the rear shelf
The main thing that car enthusiasts notice after installing a new, modified element is a more confident design that does not bend under the weight of even the most impressive-sized sound speakers installed on it. In addition, the acoustic characteristics of sound transmission are noticeably improved. This happens due to the fact that wood is the best conductor of sound impulses generated by speakers. In addition, the strength of the shelf and the reliability of its fastening prevent the appearance of unnecessary deformations, looseness, annoying squeaks and extraneous noise.
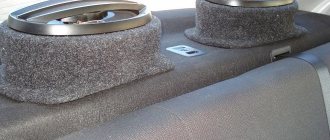
Made with my own hands
Bottom view of a raised shelf with installed speakers.
Installation is simple, there is nothing complicated - I ran the wires and cut holes in the shelf. Then I installed and secured the speakers and connected the wiring. The wires are very thin, so I bought and used others with a larger cross-section. He led them along the right side of the car, under the carpet underneath, then out into the trunk. In Kalina this is not difficult to do, and quickly.
The sound has become much better and more pleasant compared to how it was before with factory music. The kit includes wires, screws, and some mounting angles that I didn’t even need. Everything is neatly packed in a cardboard box.
VAZ 2114 interior tuning
Lada 2114 Samara (VAZ 2114)
It is also worth working thoroughly on it to remove standard minimalism and add handmade charm and surprise with softness and comfort. For this, several pieces of leather of the required size, glue and a construction stapler are suitable. Factory door inserts are made of fiberboard and covered with fabric. They can be carefully removed and the standard fabric replaced with vinyl artificial leather, then the doors will look fresh and presentable.
The main thing is not to make a mistake with the cut of the parts and use patterns. In interior tuning, mostly classic color combinations are used (black and red, white and blue, terracotta and green, orange and purple, yellow and blue). You should not use more than two colors at the same time when tuning the interior - the variegation will tire the eye and create inconvenience for both the driver and passengers.
When changing the steering wheel, you should not experiment with “horned”, semicircular or other exotic shapes - you need to remember that these changes will be subject to traffic rules, not to mention the fact that a non-standard steering wheel shape will not be a guarantee of safety.
Therefore, the best option would be to install a sports steering wheel from a renowned brand that has been tested for safety and has certain certifications.
Choosing the right speakers for your car based on different criteria
The first rule of high-quality sound is the number of speakers in the car. But this does not mean that you need to place three dozen sound sources in the car - everything should be in moderation
It is important to respect the presence of different frequencies. For example, you can use one or two subwoofers, two tweeters and seven or nine midrange elements
The number of sound sources in the car should not exceed reasonable limits. For example, an 11.2 sound system (eleven regular speakers and two subwoofers) is considered the most functional for an ordinary car. Often one subwoofer is enough, and high power is not necessary. You should also comply with the following criteria for purchasing speakers for your car:
- absence of incomprehensible discrepancies in frequencies, a large number of high-frequency devices;
- correctness of the kit - it is better to buy ready-made audio systems than to create them yourself;
- the presence of either two powerful speakers with low frequencies or a subwoofer;
- the ability to connect the entire system to a small car amplifier;
- reasonable power consumption so as not to drain the battery from one track;
- the presence of built-in fuses in each sound source or correct connection.
It often turns out that the speaker buyer is not very knowledgeable about electronics, but undertakes to install the purchased devices himself
In this case, you need to pay special attention to the type of connection. Each speaker or entire sound system must be fused
This will help avoid unpleasant overloads.
Therefore, it is better to immediately take advantage of the offer of ready-made audio systems with fuses in each sound source. Such a purchase will allow you to simply connect new sound sources and get high-quality sound. With the help of ready-made systems, you can change the sound quality in your car within a few minutes.
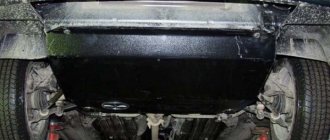
Front strut
Installing a front strut will help to correct the balancing in some way. It is a piece of pipe that can be easily installed with your own hands.
Again, you will first need to choose a spacer option. Today there is an abundance of front struts on the market, with front struts available in a wide range from various manufacturers.
Owners of used V8s are advised to choose an adjustable strut. The fact is that over time, on an old car, the strut cups get closer together. If the spacer is not adjustable, it will become difficult to install it (you will have to lift the car, use a mounting tool, etc.).
Here's how to install the front brace.
- A nut is unscrewed from each support (use a 13mm wrench);
- The distance between the support plates is adjustable (if an adjustable spacer is installed);
- The spacer is placed and the nuts are screwed into place.
As you know, the front strut for cars was invented by athletes. Even on cross-country V8s, it was widely used to strengthen the body when driving off-road. These amplifiers are also used in circuit racing. Here they offered a chance to increase steering sensitivity. In a word, the beginning of the use of spacers was associated with the beginning of the operation of the car in extreme conditions, when there were prohibitive loads on the body.
The body of the G8 is quite rigid and under normal operating conditions there is no particular reason to strengthen it. But today few people drive on good, ideal roads. Reinforcement in this case will not only help improve driving comfort, but will also significantly extend the life of the car body.
Lada 2114 Turtle › Logbook › DIY rear shelf.
To begin with, I walked around and looked around the shops. The shelves start at 1500 and go up. It won't work. The plywood turned up. There is a jigsaw. There is a warm garage. All conditions.
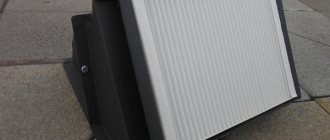
This is what you need to take off with.
To begin with, I started dismantling the original shelf and sides. But in the photo they are nothing. They look.
I unscrewed the screws, the sides are in no hurry to fall off. I thought. The sidewall will still go to waste. I solved the problem with a jigsaw.
Machine without shelf. Nothing too.
I left the sides alone for a while. Shelf for long-term storage.
I decided to make the shelf in two parts of different widths. To make it easier to open. Cut it out and screwed the hinges on.
What has happened so far.
Further refinement with a file. Things slowly came to a close.
To begin with, I “carpeted” the turtle.
The most difficult part is the sides. I tightened it and screwed the speaker on.
Upholstered and installed a shelf. What happened in the end?
I think it's good. All that remains is to carefully stick the register in the trunk and buy some adhesive tape to secure the shelf. She already fits well, but that’s for sure.
I threw in the wiring, soldered it, connected it, listened. The rear does not outplay the front, but only complements it. This makes me happy. But we need to change our heads.
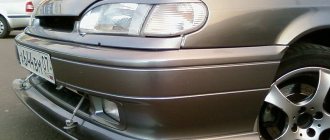
What surprised me: the rear license plate began to rattle. With the trunk closed, you can only hear it when standing behind you, but with it open... it almost shouts over the music. Or is the ShVI bad or are the speakers good? You'll need to put something under it.
Coaxial or component
Choosing the right speakers is not that easy. There are currently two types of car speakers in use: coaxial and component. Coaxial speakers include several speakers at once, the so-called strips. There are two-, three- and even four-way speakers. Component speakers are designed to reproduce only a certain segment of frequencies: low, high or medium.
Let’s make a reservation right away, the price tag between coaxial and component speakers differs very, very much; component speakers belong to HI-FI and HI-END equipment and are expensive, and also require a professional amplifier (possibly more than one) and competent installation
Moreover, the installation location of such speakers in the car is of no small importance for the overall sound quality
Tools and materials
First of all, you will need to stock up on materials and tools with which you can make a shelf. This list includes:
- Sheet of plywood - 2 pieces with a thickness of at least 5 millimeters;
- Cardboard sheet;
- Set of self-tapping screws;
- 2-3 furniture curtains;
- Electric jigsaw;
- Sandpaper;
- Marker;
- Shelf covering material;
- Roulette, ruler, etc.;
- Glue.
The design involves the creation of two main elements. They are combined into a single system - a podium for the speakers and a folding part with which you get access to the luggage compartment.
Manufacturing
The base will consist of two sheets of plywood. Their sizes and shapes are almost the same. But only the bottom sheet will have slightly smaller cutouts for the folding element. In the end, the task is to build a stepped ledge on the base. It will become a support for the folding element.
- Don't rush to remove the standard shelf. First, make a stencil using a piece of cardboard. The dimensions will be about 1.5 meters wide and at least 1 meter long.
- Some people find ready-made drawings on the Internet, but they may not always clearly correspond to your specific luggage compartment dimensions. This is due to the fact that even at the assembly stage of VAZ series cars, certain deviations are allowed.
Manufacturing process
Place a sheet of cardboard on the factory shelf and make the necessary cuts
Pay special attention to the corners near the rear pillars. According to the markings, mark the areas through which the seat belts will extend. Creating a stencil will allow you to clearly determine the dimensions, dimensions and shapes of the future shelf. Based on the results obtained on the stencil, cut out the elements from plywood. Immediately check to ensure that the cut out elements comply with the dimensions of the vehicle’s interior. This way you can find mismatches, trim and fit the workpieces. Now you can dismantle the standard shelf, but leave the sides in place. On blanks from a sheet of plywood, make a cutout of the folding part, and cut holes for your speakers
Here everything depends on what kind of speakers you plan to install on your VAZ 2114. Using an electric jigsaw, a folding element of the podium is cut out on one of the blanks. To do this, you need to make a C-shaped base. The cut plywood element will become your folding element.
Holes for speakers
- On the second piece, make the same cutout, only slightly smaller. So, when installing the first sheet of plywood on the second, a protrusion will be created at the cut site.
- In the upper part, a connection is made with the cut out elements left on the folding element. This is done using furniture curtains.
- Lay the top piece of plywood, where the folding part is already screwed, onto the bottom one. The two structural components are connected with self-tapping screws.
- The resulting podium is covered with fabric or any selected material. Carpet, carpet and other similar materials are excellent.
- The do-it-yourself podium is mounted on standard sidewalls. Check how firmly your shelf fits.
- Now you need to fix the podium on the sides using self-tapping screws.
- Don’t forget to first check how tightly the sidewall fasteners are tightened so that they don’t start creating unnecessary noise immediately after the work has been completed.
Even on standard sidewalls, a homemade thick shelf provides excellent sound quality for music, and also eliminates the noise that is familiar to VAZ 2114 owners, which comes from a standard podium.
Enjoying the result
A high-quality audio system is one of the main elements that owners want to see in their own car. This is especially true for the younger generation of drivers, some of whom are investing huge amounts of money in acoustics. Is it possible to trust the most powerful audio system on standard podiums? Of course no.
Loading …
VAZ 2114 chip tuning
This procedure can be considered one of the main stages of car transformation. will make it more powerful, improve dynamics, reveal all the hidden resources of the car without the risk of damage to the engine, which will require its repair and the purchase of expensive spare parts. In addition, installing new firmware for the electronic engine control unit will eliminate unstable operation and errors from older versions.
The beauty of chip tuning is that you can increase the power of a VAZ 2114 engine by 8-10%, and using a turbocharger - up to 30%. The most important condition for good chip tuning is that all operations are performed on an adjusted and fully operational engine by highly qualified specialists.