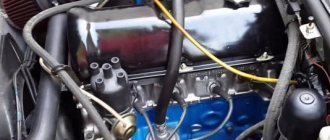
The ignition system of the VAZ “classic” ensures timely supply of a high-voltage impulse to the electrodes of the spark plugs. This impulse, for its part, contributes to the ignition of the fuel mixture, and the work cycle begins in the power unit. The correct operation of the motor as a whole depends on the correct operation of the system . Therefore, the question of how to set the ignition on a VAZ 2105 is relevant not only for owners of “fives”, but also for all other drivers. But today we will talk specifically about the fifth VAZ model.
Checking for correct installation
After the adjustment has been carried out, the installed device must be checked for functionality. First, start the power unit and try to press the gas sharply. At this moment, a slight detonation should be heard from under the hood - if this is the case, then the configured unit is working correctly.
There is another verification option. After everything is done, you need to drive out onto a flat road and accelerate to about 40 km/h, at this speed you need to activate fourth gear. If at the moment when you activated the transmission there is no detonation, this indicates that all actions were performed correctly. Detonation is allowed, but not severe. If the metallic sound is loud enough, then this indicates the need for further adjustment. If one of the methods described above causes difficulties for you, then try using the second.
Where is the timing belt located?
First, let's remember where the timing belt is located and what it looks like. Its location is in front of the engine, but do not forget that motors come in longitudinal and transverse locations. In most cases, gas distribution mechanisms use a toothed rubber belt, but in a considerable number of car models from different manufacturers, a steel chain is also used for this.
Engine cylinders can be equipped with two or four valves with one and two camshafts (CV), respectively. The kinematics of the gas distribution mechanisms of such engines differ. We will show them using the example of 8- and 16-valve power units for the VAZ 2110, 2111 and 2112.
The scheme with two shafts is more complicated, and in it, in addition to the pulley of the second RV, a support roller is added. This also complicates the belt replacement procedure. It is most difficult to perform this operation after a break or severe stretching of the belt, when the factory timing settings can be completely lost. Replacing in normal mode is not so difficult that you can’t try to do it yourself.
When adjustment is necessary
The very first thing you need to know is that there are no clear regulations for setting the ignition, since the advance angle is set or adjusted only when absolutely necessary, and the need can arise at any time.
Typically, tuning is done when the car has just been purchased secondhand, and the owner is trying to get it into working condition. It is usually necessary to set the ignition after engine repairs. If the distributor has been unscrewed and removed, you need to adjust the ignition timing.
On fuel-injected cars, the advance angle is controlled electronically, and the check may be caused by the “Check Engine” light.
In most cases, the need to adjust the OZ and the moment of spark formation arises after various engine repairs with the dismantling of various components. Separately, it is necessary to say about the transition to high-octane fuel. Here it is necessary to change the SOP to the previous one, which is why the adjustment is made.
Contactless system malfunctions
- complete failure - the engine stalls and will no longer start;
- uneven idling, shots in the carburetor when the gas pedal is sharply pressed;
- interruptions and skipped cycles while driving.
The most common symptom is the first one - engine failure, accompanied by a lack of spark. Common causes of the problem:
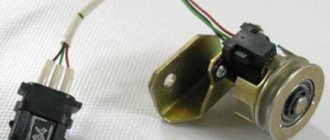
- The resistor built into the distributor slider has burned out.
- The Hall sensor has failed.
- Broken wires connecting the switch to the coil or sensor.
- The switch burned out, or rather, one of the parts of the electronic board burned out.
After turning on the ignition, a working controller supplies a reference voltage to the contacts of the Hall sensor.
The search for the “culprit” is carried out by sequential measurements at different points. Turn on the ignition and use a voltmeter to check the voltage at the Hall sensor, transformer contacts and switch terminals. Current must be supplied to the primary winding and the 2 outer contacts of the electromagnetic sensor.
To check the controller, a familiar auto electrician suggests using one of its functions. After turning on the ignition, the switch supplies current to the coil, but if the starter does not rotate, the voltage disappears. At this moment, you need to take measurements using a device or a control light.
A Hall sensor malfunction is diagnosed as follows:
- Disconnect the high-voltage cable from the central socket on the distributor cover and secure the contact in the immediate vicinity of the body, at a distance of 5-10 mm.
- Disconnect the connector from the distributor, insert the bare end of the wire into its middle contact.
- Touch the body with the other end of the conductor after turning on the ignition. If there was no spark before, but now there is, change the sensor.
When the engine operates intermittently, you need to check the integrity of the wiring, contamination of the switch terminals, or high-voltage wires for insulation breakdown. Sometimes the switch signal lags, causing dips and deterioration in overclocking dynamics. It is quite difficult for the average owner of a VAZ 2106 to detect such a problem; it is better to contact a master electrician.
The cause of unstable motor operation is often oxidized switch contacts
Modern controllers used for contactless ignition of the “six” burn out quite rarely. But if the Hall sensor test gives a negative result, then try to replace the switch using the process of elimination. Fortunately, the price of a new spare part does not exceed 400 rubles.
Installation of BSZ on VAZ 2106
When choosing a contactless ignition kit, pay attention to the engine size of your “six”. The distributor shaft for a 1.3 liter engine should be 7 mm shorter than for more powerful 1.5 and 1.6 liter power units
To install BSZ on a VAZ 2106 car, you should prepare the following set of tools:
- open-end or socket wrenches with dimensions of 7-13 mm;
- flathead and Phillips head screwdrivers;
- pliers;
- drill with a 4 mm drill (to mount the electronic unit in the side member you will have to make 2 holes for self-tapping screws).
To drill 2 holes for the switch, you can use a hand drill instead of an electric one
I highly recommend purchasing a 38 mm socket wrench with a long handle for unscrewing the ratchet. It is inexpensive, around 150 rubles, and is useful in many situations. Using this key, it is easy to turn the crankshaft and set pulley marks to adjust the ignition and timing.
With a 38 mm spanner it is very convenient to turn the crankshaft using the ratchet nut
The first step is to dismantle the old system - the main distributor and coil:
- Pull out the high-voltage wires from the sockets of the distributor cover and disconnect it from the body by unlocking the latches.
- When turning the crankshaft, set the slider at an angle of approximately 90° to the engine and place a mark on the valve cover opposite. Unscrew the 13 mm nut securing the distributor to the block.
- Unscrew the clamps of the old coil and disconnect the wires. It is advisable to remember the pinout or sketch it.
- Loosen and unscrew the nuts securing the clamp, remove the coil and distributor from the car.
When removing the ignition distributor, keep the washer-shaped gasket installed between the part platform and the cylinder block. It may be useful for a contactless distributor.
Before installing the BSZ, it is worth checking the condition of the high voltage cables and spark plugs. If you doubt the performance of these parts, it is better to change them immediately. Serviceable spark plugs must be cleaned and the gap set to 0.8-0.9 mm.
Install the contactless kit according to the instructions:
- Remove the BSZ distributor cap and, if necessary, replace the sealing washer from the old spare part. Turn the slider to the desired position and insert the distributor shaft into the socket, lightly pressing the pad with a nut.
- Replace the cover, securing the latches. Connect the spark plug cables according to the numbering (the numbers are indicated on the cover).
- Screw the coil of the contactless system to the body of the VAZ 2106. To ensure that terminals “B” and “K” are in their original position, first unfold the body of the product inside the mounting clamp.
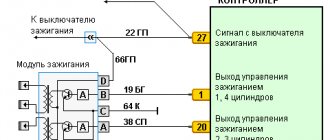
- Place the wires from the ignition switch and tachometer onto the contacts according to the diagram above.
- Install the controller next to the spar by drilling 2 holes. For convenience, remove the expansion tank.
- Connect the wiring harness to the distributor, switch and transformer. The blue wire is connected to terminal “B” of the coil, the brown wire is connected to terminal “K”. Place a high-voltage cable between the distributor cover and the central electrode of the transformer.
If there were no annoying mistakes during the installation process, the car will start immediately. The ignition can be adjusted “by ear” by loosening the distributor nut and slowly turning the housing at idle engine speed. Achieve the most stable operation of the motor and tighten the nut. Installation is complete.
Useful notes
If you have a “seven” with a carburetor, then after replacing the timing chain you need to adjust the ignition, because the drive sprocket of the ignition distributor-distributor (in common parlance, distributor) was also removed from its seat. Injection models do not require such adjustment.
Soviet and early Russian cars of the classic family were traditionally equipped with double-row timing chains. This provided increased reliability due to the fact that the break of one link did not provoke an instant collision of the piston with the valve in the open position. The disadvantage was the increased weight. In order to save money and simplify the design, the chain began to be made single-row. The resource of a double chain reaches 100 - 120 thousand kilometers, while a single chain is half as much. Some car owners are returning a double-row chain to their power units. True, for this you will also have to replace all the gears that mesh with the chain. Today, a set of such parts is quite difficult to find, so get ready for search work if you want to increase the reliability of the timing mechanism.
A double-row timing chain has a much longer life, but choosing a set of parts for its installation is much more difficult
The timing chain is a transmission mechanism, the condition of which the car owner must monitor especially carefully. It is not without reason that experienced drivers advise listening to their car. Extraneous noise with jingling notes is a sure sign that it’s time to open at least the cylinder head cover, crank the crankshaft and inspect the chain, at least externally. If there are alarming signs, the chain will need to be removed and replaced. Confidence, accuracy and these instructions will help you save a considerable amount of money, because replacing a chain or belt on a “classic” costs about 2,000 rubles in the country.
UOZ by ear
How to install the ignition on a VAZ-2106 with your own hands? Sometimes it may happen that the advance angle recommended by the factory is not enough for normal engine operation. Then the strobe light should be thrown in the trash - it will be of no use. The engine has a certain mileage, wear and tear and the factory parameters are no longer suitable for it. Then it’s worth tuning using your hearing. Let's see how to install the ignition on a VAZ-2106 using only your ears.
The engine idles, and by rotating the distributor, the speed increases. If you increase the angle, the speed will increase and engine performance will stabilize. From this position you need to turn the distributor slightly towards a decreasing angle - just a little. The distributor is then tightened.
Ignition system VAZ 2105
The VAZ 2105, like other classic Zhiguli models, is equipped with a contact ignition system that requires periodic adjustment. This is due to the design features of such a system. The performance of the power unit, power and fuel consumption, directly depend on the correct setting of the ignition timing. It is worth taking a closer look at the adjustments and malfunctions of this system.
What does it consist of?
The main elements of the ignition system of the VAZ “five”, which are responsible for the formation and ignition of a spark, are:
- generator;
- ignition switch;
- distributor;
- spark plug;
- ignition coil;
- high voltage wires;
- accumulator battery.
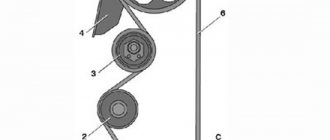
Diagram of the VAZ 2105 ignition system: 1 - generator; 2 — ignition switch; 3 — ignition distributor; 4 — breaker cam; 5 — spark plugs; 6 — ignition coil; 7 - battery; 8 - high-voltage wires
A malfunction of any of the listed devices leads to malfunctions in the operation of the power plant.
Why is adjustment needed?
Operating a vehicle with an incorrectly adjusted ignition is a problem, as evidenced by the following symptoms:
- floods the spark plugs, which causes the engine to trip;
- power decreases;
- dynamics are lost;
- fuel consumption increases;
- The engine gets very hot;
- At idle, the engine is unstable, etc.
The listed signs indicate that the ignition timing is set incorrectly and needs to be adjusted. However, these symptoms may also indicate problems with other elements of the ignition system. Therefore, in each individual case, a more detailed study of the problem that has arisen is required.
Photo gallery
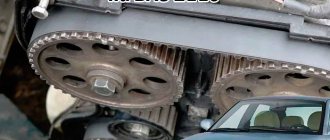
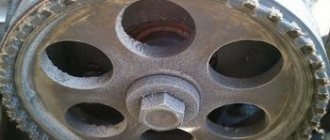
Photo 1. Aligning the camshaft and pulley marks
Photo 2. Strap placement diagram Photo 3. Checking the consumable tension
How can you set the ignition on a VAZ-2105
If your “five” receives fuel from the carburetor and it has a conventional contact system installed, and not an electronic one, you can carry out the regulation procedure yourself. Today we’ll talk about how to set the ignition on a VAZ-2105 and what you need to take into account to do everything right.
System components
Ignition is a rather complex system that includes several important components. In order to understand the principle of setup, you first need to familiarize yourself with the components of the system. It includes the following elements:
- Lock. This is where you need to insert the key to activate the system. When turning, the chain closes and starts the other devices.
- The ignition relay transmits a signal to the mounting block and the 30th terminal of the generator.
- Reel B-117A. It is the second element that receives the signal from the mounting block together with the 30th terminal.
- Ignition coil. Acts as a converter that increases the voltage of the incoming 12-volt current.
- Distributor, or distributor. The device is necessary to convert direct current into alternating current with subsequent distribution of pulses to the spark plugs.
The distributor is the most complex element in the entire system. It performs a number of diverse roles, including ignition distribution, control and interruption. It is with the help of this unit that the entire system is adjusted. Let us note for novice car enthusiasts that the distributor is a very fragile part and is susceptible to all sorts of malfunctions. If it does not work, serious problems will arise with the operation of the ignition. Experienced drivers always carry a backup distributor cap with them in case the main one cracks.
How to set up
Before you start setting the ignition, you first need to arm yourself with the necessary tools. To complete the procedure you will need:
- a wrench for working with the crankshaft (can be replaced with an open-end wrench 38);
- minus screwdriver;
- key to 13;
- probes necessary for measuring gaps;
- spark plug key;
- light bulb with two cables;
- covers for the spark plug holes.
Settings are carried out using tags. After the first stage of work is completed, you will need to align the mark on the crankshaft pulley with the middle mark on the timing belt. Experts recommend using this particular label if you use AI-92 gasoline. Next, you will need to loosen the distributor clamp. The first cable of the control light is attached to the ignition coil (low-voltage input), and the second is connected to ground. Now you need to turn on the ignition. The light will light up.
Next, you should start rotating the distributor body. As soon as you notice that the control device has gone out, stop the procedure. Now slowly turn the device until the light comes on again. As soon as you achieve this, the distributor needs to be secured. Remember, it is strictly forbidden to twist the device sharply. In this case, you will not get the desired effect. If the hand twitches and the light comes on, it means the work starts all over again.
The set ignition must be checked. Accelerate the car to 40 km/h, then quickly shift into 4th gear. If there are no extraneous sounds in the engine area, it means you did everything right. If some points remain unclear to you, you can watch the video on our website.
https://youtube.com/watch?v=W2vxBE_fxAo
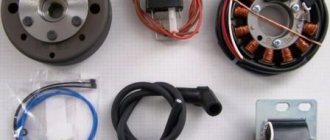
Electronic ignition
Everything is a little simpler here. Let's see how to set the electronic ignition on a VAZ. Instead of a mechanical breaker, the system uses a commutator and a Hall sensor.
The procedure is quite simple. For safety, remove the negative terminal from the battery. Next, rotate the crankshaft until it aligns with the long mark - in this position, the piston of the fourth cylinder will be at TDC (top dead center).
Next, you need to remove the ignition distributor cap. The slider should be looking at the fourth cylinder wire. You can use a spark from a candle or a lamp. There is no particular difference in how to set the ignition on a VAZ-2105. The distributor is slowly turned in one direction and the other. When a spark jumps or a lamp flashes, you need to stop. Next, the distributor is turned quite a bit towards the minus side and secured.
Installing and adjusting the ignition on the Five without errors
Why turn on the ignition?
The ignition circuit includes several main elements - a VAZ ignition switch, a distributor, spark plugs, and high-voltage wires. Before you set up the distributor and set the contactless ignition of the VAZ (BSZ), you need to understand the consequences of its incorrect setting. Before adjusting the device, you need to make sure that the problem does not lie in the distributor, spark plugs or wire connections, since their symptoms are similar.
Installation of a contactless device is carried out with the following symptoms:
- Detonation. When the engine is running, metallic sounds are heard from under the hood.
- Engine power and speed have decreased significantly.
- The power unit as a whole does not operate steadily at low speeds.
- Fuel consumption will increase.
- In addition, if the distributor is set to late ignition, this can lead to engine overheating.
With these symptoms, a large amount of deposits and soot will form on the engine walls, and wear on the components of the power unit will also increase.
Installation instructions
In some cases, the inability to start the engine lies in the ignition coil or lock. If these elements are to blame, then the VAZ 2105 ignition switch and ignition coil are replaced. If the problem is an incorrectly set angle, then below are instructions for setting the contactless ignition. There are several ways to do this (the author of the video about step-by-step adjustment of electronic ignition on the domestic “five” is the Sdelaj Sam channel! Pljus interesnoe!).
How to set the ignition on a VAZ 2105 using a light bulb:
- First, you need to dismantle the distributor cover, but you should not remove the high-voltage circuits.
- Then you need to turn the crankshaft using a ratchet wrench until the mark on its pulley coincides with the middle mark on the front cover of the engine, there are three in total. You also need to take into account that when the marks are aligned, either the first or fourth cylinder can be set. The cylinder itself is checked using a slider - it should be directed towards cylinder 1.
- Using a 13mm wrench, you need to loosen the distributor housing.
- Next, one wire from the lamp must be connected to the car body, and the second to contact K on the coil.
- Now you need to turn the key in the ignition, but you do not need to start the engine. Turn the distributor clockwise and counterclockwise, and the lamp itself will blink and then go out. You are required to find the position at which the test light starts to light. Once you find it, the distributor will need to be tightened.
There is another adjustment option that will help if you don't have a light bulb.
This method allows you to adjust the angle by ear:
- First, get into the car and start the engine.
- Next, using a 13mm wrench, you need to slightly loosen the nut that secures the distributor. But at the same time, the device must be held to prevent it from turning arbitrarily.
- After this, slowly try to rotate the distributor in both directions.
- You are required to find the moment at which the power unit can reach the highest speed. When you do this, the distributor body will need to be turned clockwise a little, but so as not to throw off the setting.
- Having done this, tighten the nut securing the distributor with a 13mm wrench and check the operation of the motor. If something does not suit you, then the adjustment is made again.
Checking for correct installation
After the adjustment has been carried out, the installed device must be checked for functionality. First, start the power unit and try to press the gas sharply. At this moment, a slight detonation should be heard from under the hood - if this is the case, then the configured unit is working correctly.
There is another verification option. After everything is done, you need to drive out onto a flat road and accelerate to about 40 km/h, at this speed you need to activate fourth gear. If at the moment when you activated the transmission there is no detonation, this indicates that all actions were performed correctly. Detonation is allowed, but not severe. If the metallic sound is loud enough, then this indicates the need for further adjustment. If one of the methods described above causes difficulties for you, then try using the second.
Video “Visual instructions for adjusting the unit with your own hands”
More clear instructions for setting the angle at home, indicating all the nuances, are shown in the video below (the author of the video is the Ato! Moto-Life channel).
Part modification history
In 1980, second-generation rear-wheel drive cars appeared - the VAZ 2105 sedan. This model is the result of the VAZ 2101 modernization. It also became the progenitor of the luxury class sedan VAZ 2107 and the VAZ 2104 station wagon, where the lock is located in the base unit.
Classic 80s design
From a design point of view, the VAZ-2105 met the fashion requirements of the 80s. This made it possible to introduce the VAZ ignition relay in models of the automotive industry in Europe and use it for many years. However, in France, similar rear-wheel drive sedans with an additional door already in the 70s began to give way to modifications with front-wheel drive. Since entering mass production, the model with contactless ignition has not become an elite model, and therefore the VAZ 21053 turned out to be not the most popular car of the AvtoVAZ concern.
The VAZ 21053 ignition switch circuit is required by owners of the Five quite often. VAZ 2105 cars with BSZ are still very popular in the domestic car market. If you need a wiring diagram for the VAZ ignition switch, you can easily find it. Ignition adjustment is of no small importance, thanks to which you can easily drive a car in harsh winter conditions.
How to set the ignition of a VAZ 2105 correctly
As we have already found out, the ignition timing should be within 3-5 degrees on the compression stroke. It remains to figure out how to determine the compression stroke in the first or any other cylinder. Since the marks on the pulley and on the front crankshaft cover correspond to TDC (top dead center) in the first cylinder, we will not argue with him and will find out how to determine the compression stroke in the first cylinder.
Ignition installation marks
To do this, look at the photo above and see three marks on the cover opposite mark 4 on the crankshaft pulley. Mark 3, the largest, corresponds to top dead center in the first cylinder. Marks 1 and 2 correspond to ignition timing angles of 10 and 5 degrees, respectively. At the same time, remember that the crankshaft rotates clockwise. Consequently, we have already found TDC and the angle itself; all that remains is to position the piston in the first cylinder precisely on the compression stroke.
To do this, unscrew the spark plug from the first cylinder, and instead put a paper plug in the hole or simply cover it with your thumb. Using a 38mm socket or a special wrench for the crankshaft nut, we rotate it clockwise until the plug pops out or our finger is pushed out by air pressure. Ready. All that remains is to accurately align the marks on the pulley with mark 2 on the cover.
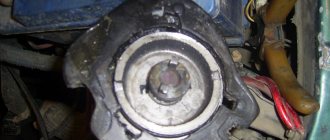
Checking the position of the slider under the distributor cover
Now open the distributor cover and check the position of the slider. It should be directed towards the contact connector on the distributor cover for the first cylinder. If this is not the case, rearrange the slider. After this, we set the exact ignition timing.
Distributor fastening nut
Using a 13mm wrench, unscrew the distributor mount and turn it a few degrees until the contacts in the contact group close. At this moment, a spark should jump on the first cylinder. To determine this moment more accurately, we connect the test lamp with a minus to ground, and a plus to the low-voltage terminal from the distributor. By rotating the distributor, we calculate the moment when the lamp lights up, naturally, with the ignition on. Close the distributor cover and start the engine.
If necessary, adjust the gap between the contacts with an adjusting screw and control it with a feeler gauge 0.35-0.45 mm
If we have a strobe light at hand, we don’t need to disassemble anything. To check the ignition timing on a VAZ 2105, it is enough to connect the strobe with one high-voltage wire to the terminal on the first cylinder from the distributor cover, and then connect the standard high-voltage wire to the tee of the device. We connect the low-voltage wire to the output from the distributor or to the coil, and the strobe power wires to the battery. Depending on the design of the strobe, the connection diagram to the battery may differ.
Stroboscope for adjusting ignition timing
When the strobe is connected, start the engine, warm it up at idle and direct the beam of the device to the crankshaft pulley. The moment the strobe lamp flashes coincides with the moment a spark appears on the first cylinder during the compression stroke. Therefore, we should see a coincidence of the marks on the pulley and on the front cover of the block. If necessary, adjust the position of the distributor by rotating and tighten the fixing nut with a 13mm wrench.
This way you can quickly and accurately set the ignition on the VAZ 2105 engine with your own hands. Good luck to everyone and smooth roads!
Step-by-step instruction
Turn the crankshaft with a wrench and align the mark on its pulley with the long mark on the block.
If the valve cover is removed, you need to follow the mark on the camshaft gear. Then remove the cover from the distributor and turn its shaft so that the slider is opposite the fourth cylinder. Next, the distributor is inserted into the engine, holding the slider, and the distributor is securely fixed with a nut.
Connect the wires and turn on the ignition. The nut is released and the distributor is slowly turned by its body. When the lamp flashes, the distributor is secured in this position. It is better to turn off the ignition to make sure that the contacts in the distributor are open. You can check the gap between them using a feeler gauge.
This way you can set the ignition on a VAZ-2105, but this is only the initial setting. For stable operation of the engine, the OZ will need to be adjusted.
Operating principle of BSZ
Electronically controlled spark generation operates according to a fairly simple algorithm, which determines the reliability of such a circuit. When the driver turns the key in the ignition switch, a constant voltage from the on-board network is applied to the primary winding of the coil, causing a magnetic field to form around it. Then the system works like this:
- The starter turns the crankshaft and drives the distributor shaft along with the slider.
- The Hall sensor, which reacts to the passage of a metal mass nearby, registers the rotation of the shaft along the protrusion on it and sends a signal to the switch.
- The electronic unit, based on a signal from the sensor, turns off the voltage supply to the primary winding of the coil.
- At the moment the circuit breaks, a high voltage pulse (up to 24 kV) is formed in the secondary winding of the coil. It is directed along a thick wire to the moving contact of the distributor.
- The slider redirects the impulse to one of the fixed contacts built into the cover. From there, the voltage goes to the spark plug of the cylinder where the piston is at top dead center.
- At this moment, the fuel is already in a compressed state in the combustion chamber. When a spark jumps across the electrodes of the spark plug, it ignites.
- The runner rotates and transmits a spark to all cylinders according to the 1-3-4-2 scheme, after which the car engine starts and starts working.
Outdated circuit with contact breaker
What do you need for repairs?
Before repairing, you must prepare the necessary tools. If your car has a modern VAZ-2105 engine, then to repair the gas distribution mechanism you will need to have sets of ring and open-end wrenches (with numbers 10, 13, 17, 30), a socket wrench for 17. Purchase new components in advance - a tension roller and a belt.
You don’t need to choose a cheap belt, then it will last a long time and fit perfectly. It is not necessary to change the tension roller along with the belt, but most car enthusiasts do complex repairs. This is necessary so as not to disassemble the mechanism several times.
Do-it-yourself VAZ 2121 carburetor repair
Repair of the carburetor unit on the Niva may be required in different cases. If a car enthusiast has practical skills in servicing his “four-wheeled friend,” then performing repair work independently will not be difficult for him. However, it should be noted that the design of carburetor mechanisms is highly complex, so high-quality work without preparation is unlikely.
Signs and causes of malfunctions of Ozone carburetors
External manifestations of the operation of the engine unit and the driver’s own sensations, as a rule, may indicate the occurrence of any malfunctions in the operation of the carburetor. The most common signs of malfunctions on Ozone are:
- unstable operation of the power unit at idle;
- the car loses its dynamics;
- after reaching a speed of 90 km/h, engine productivity drops sharply;
- difficulty starting;
- increase in fuel consumption.
Thus, if Ozone shows one or more of these signs of malfunction, this means that repair work is necessary.
The engine receives too much gasoline - the carburetor is flooded / the needle is stuck
If a car owner notices that the carburetor is constantly being filled with excess gasoline, we can conclude that the needle valve is faulty. Over time, it can lose its throughput, which is why at first there are difficulties in starting the engine, fuel drips appear on the carburetor, and then it will be impossible to start the engine at all.
The way out of the situation is to replace the needle valve yourself. To do this you will need:
- Remove the cap from the carburetor.
- Align the float along its original axis.
- Disconnect the needle valve.
- Screw a new valve into the vacant space.
- Screw the lid into place.
The car cannot maintain idle speed and immediately stalls
In this case, the economizer will need to be replaced. Most likely, the reason lies in this component, since it ensures the supply of fuel to the engine at idle. In rare cases, the idle speed control unit on Niva carburetors may fail.
To determine the cause of the malfunction, it is recommended to disassemble the carburetor and inspect the economizer and idle devices. Their condition will be visually noticeable (adhesion of a large amount of soot and dirt, deformation). If devices fail, the procedure for replacing them is as simple as possible: a new one is installed in place of the old component.
A classic among carburetors: DAAZ 1107010
Carburetors for VAZ cars have been produced by the Dimitrovgrad Automotive Unit Plant since the beginning of the production of these cars. The first model to appear was number 2101, which was intended for the well-known VAZ 2101. Later, DAAZ released a whole family for different car models.
Thus, in 1980, the DAAZ 1107010 model was released in this series, intended for cars of the 2105 and 2107 series. The 1107010 carburetor is capable of preparing the optimal fuel assembly composition for all engine operating modes without compromising the dynamics of the car and without harming the environment.
When choosing a model, it is important to consider the engine size. Carburetors are produced with different marking systems:
- 2105-1107010 is used for cars with a displacement of 1.2 and 1.3 liters;
- 2107-1107010 is installed on 1.5 and 1.6 liter engines.
Variations are possible. For example, for a VAZ 2105 car, a 21053 carburetor can be used, which is usually used for 1.2-liter engines, while a 2105 carburetor; for a 1.3 liter engine.
Adjusting the VAZ 2105 carburetor is not difficult if the car owner knows its structure and is familiar with the location of the main components. The device of the DAAZ 1107010 model is a symbiosis of several main systems, subordinate to each other and operating sequentially.
- Fuel level maintenance system. Performs the function of a constant fuel level in a special chamber.
- Warm-up starting system. Necessary for reliable starting of a cold engine. Here a mixture highly enriched with liquid fuel is prepared.
- Idle system. Necessary to ensure idle operation at minimum crankshaft speed. Provides a uniform and stable supply of liquid fuel at low speeds. The main DS does not work.
- Accelerator pump system. Designed for short-term enrichment of the fuel-air mixture with fuel at the moment of sudden opening of the throttle valve (for example, during sudden acceleration of the car). Thanks to it, the engine runs evenly, without interruptions during acceleration.
- Fuel dosing system (main). Regulates fuel supply while the vehicle is moving and at different engine loads.
- Econostat system. This is an additional system for enriching the fuel mixture in case of full engine load.
All these systems are consistently supplied with fuel through a special device - fuel nozzles. The jets determine the amount of fuel required for mixing the fuel assemblies. That is, the nozzle is a kind of calibration mechanism that regulates the size of the liquid fuel supply channel.
Contact distributor
The distributor is a device by which the moment of spark formation is determined. In addition, the mechanism distributes the spark among the engine cylinders. The main functions performed by the ignition distributor are:
- interruption of the low-voltage circuit of the ignition system;
- distribution of energy between candles.
The contact ignition system (CSI) or contact distributor received this name due to the fact that the primary circuit is broken through mechanical contacts mounted inside the device. This distributor was originally installed on the VAZ 2105 and other classic Zhiguli cars. It is driven by a shaft that rotates from the motor mechanisms. There is a cam on the shaft, which causes the contacts to close and open.
The VAZ 2105 distributor consists of the following elements: 1 - spring cover holder; 2 — vacuum ignition timing regulator; 3 - weight; 4 — vacuum supply fitting; 5 - spring; 6 — rotor (runner); 7 — distributor cover; 8 — central electrode with a terminal for the wire from the ignition coil; 9 — side electrode with a terminal for the wire to the spark plug; 10 — central contact of the rotor (runner); 11 - resistor; 12 — external contact of the rotor; 13 — support plate of the ignition timing regulator; 14 - wire connecting the ignition distributor to the output of the primary winding of the ignition coil; 15 — breaker contact group; 16 — distributor body; 17 - capacitor; 18 — distributor roller
Examination
Like any car part, the ignition distributor wears out over time, which affects engine performance. This is expressed in problematic starting, twitching, increased fuel consumption, and loss of dynamics. Since such signs generally indicate problems with the ignition system, before you start checking the distributor, you need to make sure that the remaining elements (plugs, wires) are in good working order. The main parts on which the formation and distribution of a spark depend are the cover and the contact group, so you need to focus on their diagnosis first.
First you should inspect the cover of the unit in question. If cracks are detected, the part is replaced with a serviceable one. Burnt contacts are cleaned with sandpaper.
The distributor cap should not have cracks or severely burnt contacts.
The contact group of mechanical distributors is a “sore spot” of classic Zhiguli cars, since the part constantly burns out and requires adjustment. Burnt contacts are inspected and cleaned. In case of severe damage, they are replaced.
If the breaker contacts are severely worn, they need to be replaced.
In addition, you should inspect the distributor slider and check the resistor with a multimeter: it should have a resistance of 4–6 kOhm.
The distributor slider should not be burnt, and the resistor should have a resistance of 4–6 kOhm
Adjusting the contact gap
The gap between the contacts is determined in the open state using probes. The adjustment is carried out as follows:
- Remove the distributor cover and turn the crankshaft to a position where the gap between the contacts will be maximum.
- Using a feeler gauge, we check the gap, which should be in the range of 0.35–0.45 mm.
Check the gap between the contacts with a feeler gauge - If the gap differs from the norm, use a flat screwdriver to unscrew the fastening of the contact group.
- Unscrew the adjusting screw.
- By moving the contact plate, we select the required gap, and then tighten the fastener.
Top view of the distributor: 1 - bearing of the movable plate of the breaker; 2 - oil can body; 3 — screws securing the rack with breaker contacts; 4 — terminal clamp screw; 5- bearing lock plate; b - groove for moving the stand with contacts - We make sure that the gap is set correctly, tighten the fastening screw of the contact group.
After adjusting and checking the gap, it is necessary to tighten the adjusting and fastening screws
Where to start setting the ignition
Spark plug. Make sure they are in good condition. If there is carbon deposits on their surface, remove it. Also, do not forget to adjust the spark plug gap.
Breaker contacts. Check the contacts; if they show signs of metal burnout or corrosion, replace them. It is not recommended to repair these segments; they do not cost much money and new ones will last much longer.
Capacitor. To check, you must use a special charge-discharge tester. The most optimal would be a pointer device; it will allow you to determine as accurately as possible the strength of the current flow, which should pass smoothly and slowly.
Ignition coil. Test the contacts with a tester, but first thoroughly clean the coil, distributor cap and distributor from dirt. If the lid has carbon deposits, it must be replaced with a new analogue.
Carburetor. Test the carburetor; if it is not in working order or minor malfunctions were discovered during the diagnostic process, it is recommended to repair it before proceeding with the ignition adjustment.
BB wires
High-voltage wires, or, as they are also called, spark plug wires, are different from all others installed in the car. The purpose of these wires is to transmit and carry voltage passing through them to the spark plugs and protect other elements of the vehicle from electrical charge.
Spark plug wires provide connection to the ignition coil, distributor and spark plugs
Malfunctions
The appearance of problems with explosive wires is accompanied by the following characteristic signs:
- problematic engine starting due to insufficient voltage on the spark plugs;
- shots at start-up and vibrations during further operation of the engine;
- unstable operation at idle speed;
- periodic engine tripping;
- the appearance of interference during the operation of the radio, which changes when the engine speed changes;
- smell of ozone in the engine compartment.
The main reasons that lead to problems with wires are wear and aging of the insulation. The location of the wires near the engine leads to temperature changes, especially in winter, as a result of which the insulation gradually cracks, moisture, oil, dust, etc. get inside. When cracks reach the conductor, the explosive wire can be pierced to ground, and a spark to the spark plug simply it won't arrive. In addition, wires often fail at the junction of the central conductor and the contact connectors on the spark plugs or ignition coil. To avoid mechanical damage, the wires must be correctly laid and secured with special clamps.
One of the malfunctions of high-voltage wires is a break
How to check
First, you should visually inspect the cables for damage to the insulating layer (cracks, chips, melting)
Attention should also be paid to the contact elements: there should be no traces of oxidation or soot on them. Checking the central core of explosive wires can be done using a conventional digital multimeter
During diagnostics, a broken conductor is identified and the resistance is measured. The procedure consists of the following steps:
- Remove the spark plug wires.
- We set the resistance measurement limit on the multimeter to 3–10 kOhm and connect the wires in series. If the current-carrying wire breaks, there will be no resistance. A working cable should show about 5 kOhm.
I check the wires for damage and spark breakdown as follows: in the dark, I start the engine and open the hood. If a spark strikes ground, it will be clearly visible, especially in wet weather - a spark will jump. After this, the damaged wire can be easily identified. In addition, one day I was faced with a situation where the engine began to misfire. I started checking with the spark plugs, since the wires had been replaced recently, but further diagnostics led to a malfunction in the cable - on one of them there was no contact with the terminal itself connecting the conductor to the spark plug. After contact was restored, the engine started running smoothly.
If the camshaft fails
The camshaft on the VAZ 2106 model is rarely dismantled. Typically during repair or disassembly. Sometimes to replace it.
Signs
First, let's talk a little about the signs that indicate that the camshaft is faulty, its journals or beds are worn out. It is difficult to determine whether the shaft or something else is knocking in the VAZ 2106 engine, but it is possible. The knock of the camshaft is dull and clearly audible. As engine speed increases, the knocking becomes more frequent.
Some drivers determine knocking in this unit using a stethoscope or a stick through the valve cover. But often it is difficult for an inexperienced driver to do this. Therefore, the best way to diagnose the camshaft is to remove it, wash it and inspect it.
If the camshaft is faulty, the following symptoms may occur:
- a dull knock, reminiscent of hammer blows;
- it is impossible to adjust the valve clearances; while the crankshaft is turning, the camshaft is constantly in different positions.
This video shows how you can eliminate longitudinal runout of a camshaft.
The most reliable method for diagnosing problems with the VAZ 2106 camshaft is to dismantle it from the car and wash it. You can wash it in gasoline or other cleaning liquid. Next, you need to hold the shaft and hit the bed, when you hear the slightest knock, we determine whether the mechanism is worn out. Be sure to make sure that the shaft does not move in bed, because when it hits the limiter it will make a dull knock.
Removed shaft
The camshaft has a great influence on the pressure in the lubrication system. If the gaps between the bed and the camshaft are large, then the pressure will be low, and as a result, unsatisfactory lubrication of other parts.
Causes
The main malfunctions that result in the need to replace the camshaft are its wear, the appearance of various scuffs and grooves on the bearing journals. Likewise, replacing the camshaft is necessary if it is found to be deformed or cracked. When such malfunctions occur, the power unit loses power and also begins to function intermittently. Problems with the camshaft are identified by a knocking sound in the cylinder head.
The camshaft on the “six” is rarely removed. In addition to the above reasons for replacing and reconfiguring the power unit. After this, you can notice a significant increase in power, like in sports cars.