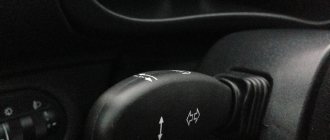
Come, driver! Let's discuss, what kind of thing is this button? What's a button? Nonsense! A little! Just try and drive if it breaks down. Without this thing, without that button - neither back nor forward. Get up and stay!
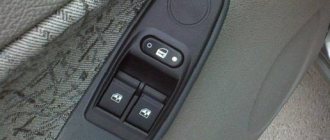
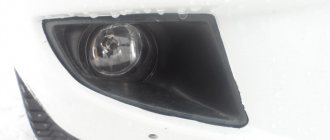
Since the moment of purchase, the right passenger window has not worked. The window went up and down from the driver's door control panel, but nothing from the passenger button. And since there is no air conditioner in the car, its role fell on me - open the window, close the window, and this is not very convenient, it’s annoying.)
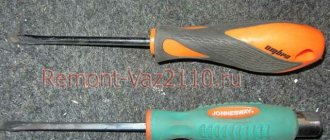
And so, I happened to stop by an auto store and buy a new button; I have them of the old type, oval, like the ones for eights and nines.
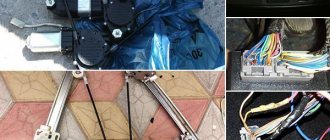
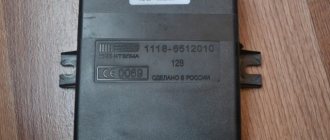
I gave it 180 rubles and went home with a calm soul, set it up, business as usual, remove the handle, pull the old button out of the block, put a new one in, but figs! The old button turned out to be without a connection block! This is how everything is soldered to the plug:
What do you mean why? Fuck it, the problem needs to be solved, but I really don’t want to go to the store, and it’s not a fact that I’ll find a wire with a block; I didn’t want to bother with a soldering iron. Since the button was removed, I decided to ring the contacts with a multimeter, and was very surprised when I found out that the contacts were working, there was a contact, but nothing was working...
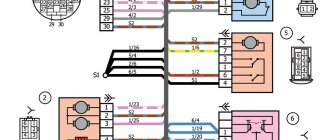
I dug up on the Internet a diagram for connecting additional buttons, good people, thank you, for a seven-pin two-position switch, and tried to smoke it... I had to smoke it with a good friend, using ICQ, but we figured it out, for which many thanks to him, respect and respect.
As it turned out, the buttons, despite their complete identity, have different connections of wires to the contacts, depending on its purpose (driver's or passenger's door), this was done to be able to control the window lift from two places.
The button itself consists of four contacts:
The upper ones are normally closed and are used to implement remote control from the driver’s seat. The lower ones are normally open and are used for direct control from a specific button. There is also an LED backlight with its own ground and power connections; it works when the headlights or side lights are turned on. All this stuff is output to the seven legs of the connector for connecting the block (in my case, soldering).
Now let's look at how the window regulator works? (vk) – driver’s button (pk) – passenger button
From the driver’s seat: When you press the “up” button, the current flows as follows: 2 (vk) – 1 (vk) – 6 (vk) -1 (vk) – engine – 7 (vk) – 3 (vk) -7 (vk ) -3 (vk)
When you press the “down” button, the current flows as follows: 2 (vk) – 7 (vk) – 3 (vk) – 7 (pk) – motor – 1 (pk) – 6 (pk) -1 (vk) -6 ( VC)
Those. in any case, all short-circuited contacts are used and if it works from here, then they don’t need to be checked at all. And if it doesn’t work from anywhere, then the problem may be in both the driver’s and passenger’s buttons.
Design and types of window lifters
Kalina front window lift
Window regulators are a device designed to raise or lower car windows.
At the moment, there are a huge number of options for these devices, but the design, despite the differences in component parts for different models, is similar, it includes:
- grooves that hold the glass by the side edges
- so-called “rails” that ensure the movement of glass
- Seal and damper, glass movement limiters in the up and down direction.
A window regulator of any design consists of two main elements:
- drive unit
- lifting mechanism - transmitting vibrations of the drive movement to the glass, and thereby ensuring its movement.
The drive is divided into two types:
- Mechanical, known to us from Soviet cars, where in order to lower or raise the window, you need to turn the window lifter handle.
- Electric, typical of modern cars, where to move the glass you just need to press the window button. The electric drive consists of a reversible electric motor with a worm-type gearbox.
In addition, window regulators differ depending on the mechanism of glass movement:
Each option has its pros and cons and technical features. All these device options have one thing in common: one day they fail; this problem especially often occurs in a model that is so popular today as the Lada Kalina.
There can be dozens of reasons why power windows malfunction, but the most common are the following:
- The commutator brushes of the electric motor, which is responsible for the glass movement process, freeze. This happens, as a rule, due to overheating of fragile graphite brushes, unstable to sudden temperature fluctuations, and this factor starts a chain reaction: overheating of the brushes begins to melt the nest, which is made of plastic in all Kalinas, and not of the best quality. For this reason, the brushes lose mobility, and the device can only be brought into working condition using a hammer. At the initial stage of the breakdown, it is enough to give a good knock or two on the door trim , but after a couple of weeks, this method stops working, and then you will have to disassemble the window regulator to repair it.
- Another cause of failure, typical of the Lada Kalina, as well as many other VAZ models, is the ill-conceived electrical circuit. The contacts cannot withstand the load placed on them, there is no unloading relay, which is why all the window regulators fail at once, and then it is necessary to repair not only the window regulators themselves, but also the remote control.
When it is impossible or too problematic to repair the device, it is more advisable to replace it with a new one. are suitable for the Lada Kalina :
- electric window lifter Garnet VAZ – 530 rub.
- electric window regulator Ningbo – RUB 1,699
- electric window lift AUTO-GEO – RUB 3,300.
Of course, the price is directly related to quality, but if the budget is limited, then the domestic option is not bad.
Now let's talk about how to install window regulators yourself.
Stories from our readers
“Fucking basin. "
Hi all! My name is Mikhail, now I’ll tell you a story about how I managed to exchange my two-wheeler for a 2010 Camry. It all started with the fact that I began to be wildly irritated by the breakdowns of the two-wheeler, it seemed like nothing serious was broken, but damn it, there were so many little things that really started to irritate me. This is where the idea arose that it was time to change the car to a foreign car. The choice fell on the melting Camry of the tenth years.
Yes, I had matured morally, but financially I just couldn’t handle it. I’ll say right away that I am against loans and taking a car, especially not a new one, on credit is unreasonable. My salary is 24k a month, so collecting 600-700 thousand is almost impossible for me. I started looking for different ways to make money on the Internet. You can’t imagine how many scams there are, what I haven’t tried: sports betting, network marketing, and even the volcano casino, where I successfully lost about 10 thousand ((The only direction in which it seemed to me that I could make money was currency trading on the stock exchange, they call it Forex. But when I started delving into it, I realized that it was very difficult for me. I continued to dig further and came across binary options. The essence is the same as in Forex, but it’s much easier to understand. I started reading forums, studying trading strategies. I tried it on a demo account, then opened a real account. To be honest, I didn’t manage to start earning money right away, until I understood all the mechanics of options, I lost about 3,000 rubles, but as it turned out, it was a precious experience. Now I earn 5-7 thousand rubles a day. I managed to get the car buy after half a year, but in my opinion this is a good result, and it’s not about the car, my life has changed, I naturally quit my job, I have more free time for myself and my family. You’ll laugh, but I work directly on the phone)) If If you want to change your life like me, then here’s what I advise you to do right now: 1. Register on the site 2. Practice on a Demo account (it’s free). 3. As soon as you get something on the Demo account, top up your REAL ACCOUNT and go to REAL MONEY! I also advise you to download the application to your phone, it’s much more convenient to work from your phone. Download here.
Installation
As you can already guess, installing the window regulator is carried out in exactly the reverse order of dismantling it; the only thing is that you first need to treat the guide of the device with lubricant.
The installation procedure for the front lifts is as follows:
- We fasten the new device with nuts (11 pieces);
- We connect the wires and the motor;
- We find the bolt securing the inner handle of the lock and tighten it, using a key, tighten the glass fasteners.
- We remove the now unnecessary tape and check the work.
You need to look at how the window opens and closes, whether there are any distortions, whether all the screws are tightened well. If a mistake was made, what to do, you will have to repeat the work again. If everything goes well, you can praise yourself for a job well done.
The rear window lifters are installed in the same way, in the reverse order.
- Through the niche at the bottom of the back door, we put the device in place of the old one.
- Using a 10mm wrench, tighten the bolts and nuts.
- Using a size 8 wrench, secure the mechanism with three nuts.
- We remove the tape.
Removal instructions
The device will be dismantled starting from the front windows. Before making repairs, you need to remove the defective unit, but first you need to dismantle the door trim.
Detailed instructions for dismantling the joint venture:
- First of all, you need to lift the glass all the way and fix it at the highest point with tape. It will be a right or left window regulator, it doesn’t matter.
- After this, using a 10mm wrench, you need to unscrew the two bolts that secure the glass itself. In addition, you will need to unscrew the screw on the inner handle of the lock.
- Then you need to disconnect the system motor and wiring from the power circuit.
- Unscrew the nuts on the mechanism, there are eleven in total, and dismantle the joint venture.
- Now let's move on to the rear joints. In this case, the dismantling procedure is almost identical - first, the glass must be lifted up all the way and fixed.
- Using a size 8 wrench, you need to unscrew the three nuts securing the assembly. Then, using a 10mm wrench, unscrew two screws and three more nuts. After completing these steps, you can dismantle the unit through the corresponding hole in the bottom of the door. Having removed the joint venture, you need to assess its condition. If the problem can be solved without replacing the mechanism, then repair the device; if the malfunction is “lethal”, for example, the window lift motor or gear has failed, then installation of a new mechanism will be required.
We check the quality of work
As you can see, this work is not at all difficult, it can be done independently, saving a lot of money on a car service, which will charge you a tidy sum for it.
In addition, since we had to remove the door trim, we can also carry out sound insulation, which in the Lada Kalina is also not at the highest level.
At the end, a small bonus on how to make the power windows work without the ignition.
Hello, happy owners of AvtoVAZ products. I recently discovered that the passenger window button does not work. I decided to take it apart.
I cleaned everything and put it back together. Now the power window button works well. Judging by the dirt, the car wash managed to fill the button. That's why she stopped working. There are resistors on the board. so if you call with a multimeter, it will not beep. You need to look in resistance measurement mode. Judging by the resistor it should show about 270 Ohms.
Price tag: 0 ₽ Mileage: 45600 km
Analysis of the current situation
Drivers with basic skills in working with tools will understand what needs to be done if the power window on a Kalina does not work. First you need to check the installed fuse and relay in the mounting block.
The diagram supplied with the official vehicle operating instructions designates the indicated elements as F2 (25 A) and K2, respectively. If the problem could not be detected, then the inspection is transferred to the terminals of the electric motor of the Lada Kalina.
Recommendations
Comments 17
Tell me please, can you send me a wiring diagram for such a button, I bought one too, I look at only three contacts, not how I can’t figure out how to connect on the Internet, all the connection instructions go to 7 contact buttons, I can’t find such instructions
Tell me please, can you send me a wiring diagram for such a button, I bought one too, I look at only three contacts, not how I can’t figure out how to connect on the Internet, all the connection instructions go to 7 contact buttons, I can’t find such instructions
If all else fails
If the buttons are working properly and the fuse is intact, then you should contact an electrician. Or you need to “ring” the wires yourself and look for where the break is.
The instructions below describe the process of installing a power window in the front doors of a Lada Kalina car. Their installation in the front doors of cars of the Lada Granta family is similar, with the exception of some features, which are also described in this article.
Please note that the installation of electric windows on a car must be carried out in specialized centers by qualified personnel.
Before starting work, you must read the operating instructions for the vehicle and additionally installed equipment and find out the possibility of disconnecting the battery, as this may affect the operation of the on-board computer, the settings of audio equipment and other devices.
If the battery cannot be disconnected, it is recommended to remove the fuses of the circuits to which the power windows and interior lighting of the car are connected during installation work.
We remove the door trim. Raise the glass to the top position and secure it from spontaneous lowering. We dismantle the standard window regulator.
The installation is shown on a stand with a cutout on the outside of the door to demonstrate some of the installation nuances.
We insert the electric window mechanism into the door through the service window with the glass raised up.
We drill a hole in the upper part of the door (the coordinates are indicated in the instructions), and use the standard holes at the bottom.
We insert the mechanism into the holes (shown by arrows) and screw on the M10 nuts, tighten with a wrench.
By turning on the gear motor, raise the carriage as high as possible, align the holes on the carriage and the glass holder, and fix it with screws.
Installing an electric window in Lada Granta
A special feature of installing an electric window lifter on a Lada Granta is that the glass is attached to the carriage using the brackets included in the delivery kit (shown in the photo).
The rubber gasket is used from a standard cable window lifter.
To install the bracket, you will need to trim the curtain glued to the glass.
We fix the bracket on the carriage.
By turning it on, we check that the glass does not warp during raising and lowering, and adjust it if necessary.
The glass should move without jerking or jamming. If this requirement is not met, it is necessary to loosen the fastening of the window regulator to the door wall, slightly turn the entire mechanism in one direction or another and pre-tighten it with fasteners. After rechecking and meeting these requirements, finally tighten the fasteners.
From the door cavity, through the hole in the pillar, we stretch a two-core wire through the cabin to the location of the switches. We insert the contacts into the housing, connect the contacts on the other end of the wire to the window lift motor.
We connect the housings with wiring to the switches. We make connections in accordance with the power window connection diagram:
We connect the battery. Turn on the side lights of the car, and the backlight of the power window switch should turn on.
We test the operation of the window regulator by testing it.
Reinstall the door trim. We place decorative plugs in the holes from the handles of standard power windows in the door trims and secure them with clamps.
You can buy electric windows “Granat” for LADA Kalina and LADA Granta in our online store.
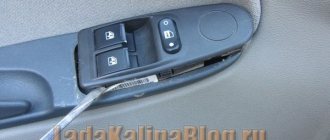
How to remove and connect the window lift button - using the example of LADA Kalina/Priora
Repairing the window lifter button on Kalina, Priora or Grant is not difficult. And no serious financial costs will be required, since the price of the “native” passenger door button is only 150 rubles. The cost of the control unit on the driver's door is about 600 rubles.
To remove the button on the passenger door or the control unit, you do not need to remove any decorative trim or door trim. There is no need to look for screws to unscrew them, since there are none.
- It is enough to carefully pick up the button or block with a flat screwdriver and simply pull it out of its seat. To avoid accidentally scratching the casing, it is recommended to wrap the screwdriver in a thin cloth.
- Then you need to disconnect the wire terminals to completely free the power window control module. Next, you need to tightly connect the terminals to the new button and return it to its place.
VIDEO INSTRUCTIONS » alt=»»>
Main causes of failure
The following two tabs change content below.
Most likely the power window fuse is at fault.
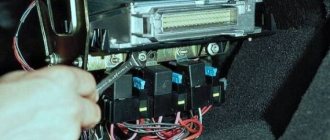
The angle is not good, but this is exactly what the mounting block looks like when you look at it from above
From the situation you described, it follows that the fuse is to blame. There are enough symptoms and prerequisites for its breakdown. First, you raised one glass, which is already good, since raising both windows at the same time is not recommended due to the increased load. Then they started to lift the second window, and the fuse burned out.
F2 (30A) - fuse number in the mounting block.
If one of the glasses works, then the fuse is good.
The button is broken
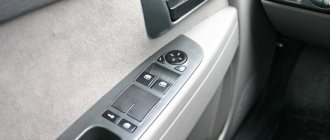
The power window buttons in the Norma configuration usually do not cause problems
If only one of the two or four power windows does not work, depending on the configuration and equipment of the car, then the problem is most likely in the button or in the wiring to it. It is necessary to remove the front door trim and ring the buttons, you can also look at the voltage on them.
Front passenger window button
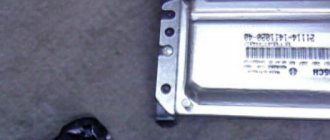
Motor failure
Appearance of the new motor (purchased to replace a broken one)
The window lift motor on the Lada Granta rarely causes problems. This part is reliable, but it can also fail. You can check the motor by applying voltage to it forcibly, that is, directly from the battery.
How to fix stuck power window buttons on a Priora
If the power window buttons work every once in a while or get stuck , but at the moment it is not possible to purchase a new control unit, you can fix the problem as follows:
- We remove the control unit. To do this, you need to carefully snap off the 6 plastic clips on the body of the decorative cover;
- Let's disassemble the block. To do this, you also need to unclip 6 clips on the body of the unit itself;
- We take out the control board and clean it of any contaminants;
- We remove the buttons themselves by carefully bending the side fastenings with a screwdriver;
- We remove all dirt and debris from the paths using alcohol and cotton wool;
- Lubricate the working part of the button with silicone grease (this is not necessary, but this will make the button move smoother);
- We assemble everything in reverse order.
Replacing the power window button Renault Logan and Megan
VIDEO REVIEW » alt=»»>
You can also replace the power window button block on Renault Logan and Megan cars yourself.
- All you need is a flathead screwdriver and a cloth or tissue.
- To remove the control unit, just carefully pick it up with a screwdriver and gradually pull it out of its seat. To avoid accidentally damaging the casing during dismantling, it is recommended to wrap the screwdriver in a thin cloth.
- Next, you need to disconnect the terminals with the wires, making sure that they do not fall inside the casing. Then you need to connect the new unit and install the buttons in place.
Do-it-yourself gearbox replacement
You will need to unscrew the self-tapping screws that secure the interior door handle. The wires are carefully unhooked, the speakers are dismantled. The next step involves unscrewing the glass from the guides and 4 bolts. To do this you will need a key set to “10”. The glass drops to the bottom of the door. First dismantle the protective curtain glued to the bottom of the glass. The window regulator is secured with 4 nuts on the left guide, 4 nuts on the right guide and 3 nuts that secure the gear motor.
The gear motor is disconnected so that the device does not jump out of the housing. In this case, the square axis should come out of the corresponding shaft with a cable. It is tightened by two springs, which are located at the cable entrance to the dismantled mechanism.
Vehicle Maintenance
It is recommended to replace any parts in the car only with original ones. Compliance with this requirement will eliminate subsequent unscheduled repairs. If Kalina's power window button requires servicing, then first you will need to find the necessary tools.
Using 2 small flathead screwdrivers, you need to remove the block from the grooves. Direct replacement is carried out without sudden movements, so as not to break fragile elements. As soon as it becomes possible to get to the wiring, you need to get rid of the plug with equal care. This can be done with little physical effort. A latch is used to disconnect the second plug.
After the glass power supply is removed, it must be inspected. The presence of any mechanical damage indicates the need for mandatory replacement. Even in-depth repairs will not help restore its functionality. Before installing a new unit, another check must be carried out. Its relevance increases when it comes to replacing a relay.
After removing the faulty part, you should manually check all connecting fasteners and wires. Traces of charring or damage are a sign that the Kalina power window button most likely needs to be replaced. If this is not done, then the need for repeated repairs will arise within 2-3 months. This is due to the increased load on the Lada window regulator.
Installation of a working unit occurs strictly in the reverse order. First, carefully connect the wires and 2 plugs. If the window lift button has been manipulated in any way, the reliability of its fixation must be checked manually. If a visual inspection does not reveal any problems, then the Kalina window lifter button is placed in its place.
Once all the wires are connected, the unit is secured using the provided latches. The repair is completed by checking the efficiency of the system.
You need to pay attention to the smoothness of the ride and the absence of the slightest delays. In the future, if the window regulator on Kalina does not work, you can fix the problem yourself
tweet
back Brake pads Lada Kalina
Forward Windshield wiper trapezoid Lada Kalina
Tags control unit, repair, window lifter, maintenance
Common faults
There are many reasons why the window regulator on Kalina does not work and why the device needs to be replaced, but we will look at the main ones:
- The electric motor brushes are stuck, usually as a result of overheating of the brush elements themselves, which, as a rule, are not resistant to sudden temperature changes. Accordingly, as a result of heating the brushes, the plastic socket may melt. This will also cause the brushes themselves to lose mobility. If the malfunction has just begun to appear, you can knock on the plastic door lining several times to restore the unit’s functionality. However, over time, this method will no longer be able to produce the required result, so intervention in the design of the joint venture will be inevitable.
- The cause of the malfunction, which may require replacement of the joint venture, can also be the ill-conceived electrical circuit installed at production. The contacts themselves are not able to withstand the necessary load that is placed on them. The SP system may fail due to the fact that the electrical circuit is not supplemented with a unloading relay. So in the event of a breakdown, it often happens that the car owner has to repair not only the power windows, but also the control panel itself.
As practice shows, in most cases, repairing a unit is either completely impossible, or can be done, but with great difficulty. Accordingly, the best option would be to install a new joint venture (video author - Emilien Ok).
Similar products
Do you like the store? Rate it on the Market!
Familyevich Evgen
Very good store, I recommend it!
Aminev Maxim
The best window lift store in Russia! :)
Latysheva Julia
Fast? placing and sending an order, complete and accurate information about the order.
Osipov Alexey
They called back right away and clarified the order. The order arrived ahead of schedule.
Safarov Oleg
Well done. You work quickly. And most importantly, the prices are reasonable. Keep it up!!
Nikolay Sotnichenko
Advantages:
Good order processing speed. Pleasant communication from employees.
Disadvantages:
none.
Ruslan Lukoyanov
I am very pleased with the work of the store, everything is without deception and fast delivery. Keep it up!
Dorofeev Timofey
I definitely recommend the store. Very quickly and clearly. Other online stores could do it.
Vitaly Sukhovlovsky
Advantages:
I liked everything
Disadvantages:
none
Comment:
The order arrived on time, everything is fine, thank you.