- Which low beam lamp is suitable for Largus (manufacturing years 2017–2021)?
- Which low beam lamp is suitable for Largus restyling (produced from 2021)?
- High beam lamps for Largus restyling
Comparison of the best lamps for replacing low and high beams for the Lada Largus.
Please note that after the 2021 restyling, different lamps began to be used. In the selection I included products from well-known brands - reliable and proven European manufacturers. Take care of yourself, install high-quality light bulbs with a transparent history, behind which there are experienced engineers and years of testing.
General information about this model
The first LADA Largus car rolled off the AvtoVAZ assembly line and went on sale in 2012. It was a Romanian Dacia Logan MCV, adapted for the Russian market. The car is produced to this day and has four modifications:
- Largus R90 – passenger station wagon for five and seven seats;
- Largus F90 – cargo van;
- Largus Cross is essentially the same five- and seven-seater station wagon, but with increased ground clearance and slightly different exterior and interior trim;
- Largus CNG – production started in 2022. Modification with gas cylinder equipment.
On a note. The first Largus rolled off the assembly line a year earlier - in 2011, but was intended for sea trials.
Conclusion
People who often operate their vehicle at night must adhere to the basic rules for adjusting headlights. This is done so that this seemingly insignificant detail does not become the cause of a serious accident.
Lada Largus is a popular family multi-purpose station wagon, mass production of which was launched by AvtoVAZ PJSC in 2012.
A car of this class is designed to meet the most diverse needs of potential buyers and can be used for both everyday and long-distance trips. At the same time, it feels great in urban conditions and on country roads.
The universal use of this car quite often contributes to damage to the elements of the front optics by stones flying from under the wheels of oncoming or passing vehicles, branches of low-growing bushes, etc.
Replacing damaged head optics and installing new elements is not difficult and can be carried out by almost any car owner, even those without experience in carrying out such work. The only difficulty with this is the need to dismantle the front bumper, where not only fog lights are integrated, but also headlights.
Replacing the headlight
Low beam on a Chevrolet Cruze
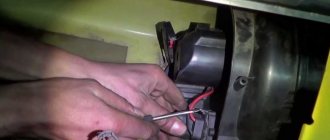
It may be necessary to replace the standard optics in rare cases. Usually the headlight is removed if you need to replace it with a new one, or during tuning. The process is quite simple, the only problem is that you need to remove the front bumper, since without this you cannot get to the lower mounting screws. The procedure for replacing a Largus headlight is as follows:
- The car is placed on a level surface and secured with a parking brake.
- The negative terminal is disconnected from the battery.
- The front bumper is removed.
- Bolts 1,3 and 4 (photo) are unscrewed, thereby releasing the headlight from the mount.
Headlight mounting screws
- The cover is removed and the wiring block is disconnected from the lamp.
- The headlight range control is removed.
- The marker lamp holder is removed.
- The headlight unit is released and can be removed.
New optics are installed in the reverse order, the gaps between all contacting parts should be minimal. After replacement, the headlights must be adjusted.
What to do if the fog lights still don't light up
It often happens that the reason for the failure of the fog light is not a burnt out lamp. What else could cause such a malfunction? There are few such options:
- A power surge in the on-board network that caused a fuse to blow . Typically this problem is caused by poor contact between the terminals of the battery, generator, or when turning on/off a powerful load. Eliminated by replacing the fog light fuse with a new one with the same rating.
- Oxidation of PTF power terminals and blocks . Identified by visual inspection. All power supplies are disconnected, the contacts are inspected and if there is any foreign deposits, they are cleaned.
- Short circuit . It may be caused by the insulation of the PTF supply wire rubbing against the body and shorting to it. In this case, as a rule, the fuse burns out, and replacing it with a new one leads to the same result. The malfunction can be eliminated by visual inspection of the wiring harness supplying the PTF, followed by isolating the damaged area.
- Broken power wire . Power wires can either break due to vibration or burn out when shorted to the body. In the latter case, the fuse usually blows. If the new fuse does not blow, but the fog light still does not light, you need to inspect the wiring harness, find and repair the break.
Replacing a low beam lamp on a Lada Largus
Choosing low beam bulbs in the Daewoo Nexia (+tips)
Once you have removed the lamp, you can begin replacing it:
- hold the new lamp by the base;
- To avoid touching the glass flask with bare hands, wear gloves. Why can't you touch the flask? Because traces of fat can lead to rapid burnout. If you need to wipe it down, don't use microfiber cloths;
- secure the base with a spring clip;
- Place the block on the contacts, and then install the plug in place.
That's all. You have changed the lamp, and, as you can see, the process is simple.
When you replace one lamp, replace the second one immediately. You will avoid unexpected burnout and ensure an even glow.
Troubleshooting Some Problems
How to properly adjust fog lights, adjust low and high beams with your own hands
If, after replacing the lamp, the low beam on the Lada Largus still does not light up, the cause of the malfunction may be a blown fuse. Replacing them is even easier than the paws, since they are located in the cabin, on the left side of the steering column.
Two fuses are responsible for the low beam:
- F9 – left headlight.
- F10 – right headlight.
Often the cause of the malfunction is poor contacts of the fuse terminals. In this case, you just need to clean them.
It should be noted that there is no low beam relay on the Lada Largus, therefore, if replacing the fuses did not produce results, all that remains is to check the contacts in the headlight itself, which could have burned out or oxidized.
Often the light goes out due to poor contact of the machine ground wire. In this case, the problem is also solved by thoroughly cleaning the contact. If it was not possible to restore the light, you need to contact a service center for help.
Here, perhaps, are all the instructions for correcting the most common VAZ wiring faults.
Where is the fog light fuse located?
The fuse through which the PTF on the Lada Largus is powered is located in the common fuse block. The unit itself is installed on the left side of the instrument panel and is closed with a protective cover.
We open the protective cover and get to the block, the numbering of the fuses in which is as follows:
Fuse F31 with a nominal value of 15 A is responsible for powering the fog lights and their relays.
So, we are convinced that it is quite possible to independently replace the light bulbs in the fog lights of the Lada Largus, and practically anyone can do this if they wish.
Source
Turn signals
After opening the hood, disconnect each wire from the turn signal. To do this, you need to release the spring tip by pressing its lock. After a characteristic click, pull out the part.
After installing new lighting elements, connection and assembly occur in the reverse order. Moreover, after installation, the wire blocks should be checked.
A special feature of this procedure is the preliminary dismantling of the headlight unit, under which the side light lamps are located. After this, it is necessary to disconnect the wires from the battery, which is done with extreme care.
Removing the front bumper will allow you to get to the cover that protects the dimensions. Since they come into contact with other light devices, it is advisable to carry out all procedures using sterile gloves. If any device has been touched, it must be wiped with a clean, lint-free cloth.
To replace the side light bulb in Largus, the socket of the old part is turned counterclockwise. The black and yellow wires connect it to the battery, so it turns off from them. A new part is installed in this place, and assembly is carried out in the reverse order.
You need to make it a rule to regularly change not only the lamps, but also monitor other lighting elements. After all, the process of reducing their brightness occurs slowly and the driver simply does not notice the deterioration in road lighting.
Block lights
Structurally, each block headlight of the LADA Largus station wagon consists of two sections. One contains:
- "marker" lamp (W5W).
- double-filament lamp for low and high beam (type H4);
Nearby is the section in which the PY21W turn signal lamp is located.
The headlight unit is dismantled when it is damaged or needs to be modified (tuning).
Replacing the headlight
Before you begin work related to replacing the headlight, you must:
- Secure the station wagon using the handbrake.
- Remove the key from the ignition.
- Remove the negative wire from the battery terminal.
The dismantling of the headlight block of the LADA Largus station wagon begins by first removing the front bumper. This operation is shown in detail on the video page:
After this, access to the fastening elements in the lower part of the case will open. Next, you need to disconnect the electrical wires:
- going to the H4 type lamp. To do this, remove the cover 3 and disconnect the pads;
- remove the sockets for the direction indicator lamps 5 and indicator lamps 7;
- remove the actuator of the headlight hydraulic corrector (if equipped) from the headlight housing, to do this, slide boot 4 along the cable and unclip the fastening latch.
This is interesting: Chevrolet Cruze sores
after this, you need to unscrew the fastening bolts (items 1, 3 and 4) located around the perimeter of the body part (2);
push the headlight housing forward a little and remove it.
The new headlight unit is installed in the reverse order, maintaining a uniform gap between housing 2 and body parts.
Adjusting the luminous flux
After carrying out any work related to the head optics of the LALA Largus car, it is mandatory to check and adjust (if necessary) the direction of the luminous flux of the switched on lamps. To do this, it is best to contact a specialized service station, equipped with special instruments and staffed by qualified specialists. However, in case of emergency, such an operation can be carried out independently and without the necessary equipment. In practice, there are several ways to check and adjust headlights. You can see one of them by watching the video:
Replacing lamps in a headlight
Among the sudden malfunctions that almost all car owners encounter, one of the first places is the failure of head optics light sources. These include lamps:
- low/high beam;
- direction indicator;
- Dimensions indicator.
All of them are located inside a separate headlight and changing them, if necessary, is not difficult.
Replacing the low/high beam lamp
Change the low/high beam lamp in the LADA Largus headlight in the following order:
remove the protective cover;
disconnect the block with wires;
- pull out the rubber seal;
- pressing on the spring holder, remove it from under the latch;
carefully releasing the holder, carefully remove the burnt out lamp
The new lamp is inserted into the reflector hole and secured using standard fasteners. Then all the removed parts are returned to their places.
Attention! Lada Largus uses halogen light sources, the glass surface of which is not recommended to be touched. To avoid darkening of the flask when heated, it is recommended to hold them by the base
Replacing the turn signal lamp
In order to change a faulty lamp installed in the turn signal compartment, you must:
gently press out the plastic connector retainer;
This is interesting: 7 steps for dismantling and installing silent blocks: detailed instructions using the example of a rear beam
disconnect the connector with the on-board power supply wires;
remove the lamp socket from the headlight socket by turning it clockwise (left lamp) or counterclockwise (right lamp);
By pressing and turning the lamp counterclockwise, we take it out.
The new lamp is installed in the reverse order.
Replacing the indicator lamp
A burnt-out baseless bulb installed in the size indicator is changed as follows:
- disconnect the block with electrical wires from the cartridge;
- turn the socket clockwise (left lamp) or counterclockwise (right lamp) and remove it from the headlight housing;
A new lamp is placed in place of the burnt one.
The cartridge is returned to the standard socket, performing all operations in the reverse order.
Main characteristics of standard Largus head optics
During the development and production of the Lada Largus, the engine and headlights were borrowed from Renault Logan. The standard headlights are equipped with standard AvtoVAZ halogen lamps (H4 base) with two filaments. They are chosen as light sources due to their durability, optimal light output and the fact that they do not darken over time. A standard Largus lamp with a power of 60/55 W (high and low beam, respectively) produces a luminous flux of at least 1500 lm.
The Lada Largus optics use a standard fixed diffuser, with the help of which the direction of the light flux is adjusted by the position of the reflector and the lamp. The adjustment screws are hidden in the engine compartment, thereby protecting them from dirt and moisture. The headlights can be adjusted from inside the cabin using a hydraulic adjuster, but if precise adjustment is needed, this is not enough.
Should I install halogen lights on Vesta?
Vesta owners, after several years of using the car and the expiration of the warranty period, decide to make changes. They use xenon or LED lamps in the headlights instead of standard halogens. In terms of durability rating, halogen headlights recommended by the manufacturer are the leaders in reviews, but this fact does not discourage car enthusiasts from experimenting. However, for installing LEDs and xenon lamps not specified by the manufacturer, the car owner may be held liable in the form of a fine.
Bi-xenon fog lights. Photo source: https://www.drive2.ru/l/490330510015332514/
AvtoVAZ cars are well known to domestic buyers. However, Vesta, released in 2022, differs from the younger models. One of the differences is the lighting elements used in the headlights. If you know how to change lamps on a Lada Vesta, the owner can do this work on his own.
What lamps are available and which ones can be installed?
Before we start replacing, let’s find out which lamps are installed in the low beam headlights on the Suzuki Grand Vitara and which ones can be installed instead of the standard ones.
The Vitara manufacturer installs halogen devices with an H7 socket with a power of 55 W from the OSRAM concern in its car.
Is it possible to replace them with some others with the same base, and if so, is it worth it? Of course you can! Moreover, it is not only possible, but sometimes necessary. Bulbs with such a base are produced by many manufacturers and differ greatly in characteristics.
There are devices with a long service life, increased brightness and different color temperatures. The latter is very important, since the effectiveness of the device in certain weather conditions depends on this parameter.
If we often drive in bad weather, then we should pay attention to devices with a relatively low (3,000-4,200 K) color temperature - “warm” light penetrates better through fog, rain and snow, and also does not glare on wet asphalt. This low beam lamp is perfect for driving in bad weather.
This low beam lamp is perfect for driving in bad weather.
Bulbs with a higher color temperature fail in such conditions, but in clear weather they illuminate the road better and do not tire the eyes. The light of such devices approaches daylight, but we are accustomed to it from birth.
This device illuminates the road well in clear weather and does not tire the eyes.
Lamp rating - which one is better to choose?
Now let’s look at the test results of sixteen “near” H7 light bulbs from different manufacturers and characteristics. The test was carried out using a lux meter placed in front of the headlight, and, naturally, took into account the quality of lighting.
A stationary lux meter will be used to carry out the test.
Rating of H7 low beam lamps based on the strength of the luminous flux they create
| Place | Appearance | Lamp | Luxometer readings, klk | Peculiarities |
| 1 | OSRAM Night Breaker Unlimited +110% | 32.1 | quite high cost, but the brightest from the list | |
| 2 | GE MegaLight Plus +50% | 30.6 | excellent price/quality ratio | |
| 3 | PHILIPS X-tremeVision +130% | 29.1 | high cost, white light | |
| 4 | GE Halogen | 28.6 | low cost | |
| 5 | PHILIPS VisionPlus +60% | 28.4 | unreasonably high cost | |
| 6 | NARVA Range power 50+ | 28.1 | – | |
| 7 | NARVA Contrast+ | 27.5 | yellowish (fog) light | |
| 8 | PHILIPS Vision +30% | 27.0 | good price/quality ratio | |
| 9 | NARVA LongLife | 26.8 | extended service life | |
| 10 | PHILIPS BlueVision ultra | 26.7 | partially blue bulb “for xenon” | |
| 11 | OSRAM Original | 25.3 | standard lamp | |
| 12 | OSRAM AllSeason | 24.5 | yellowish (fog) light | |
| OSRAM UltraLife | 24.5 | increased service life | ||
| PHILIPS LongLife Eco Vision | 24.6 | really last a long time | ||
| 13 | PHILIPS Crystal Vision | 22.7 | blue bulb “for xenon” | |
| 14 | MTF Platinum light | 20.8 | blue bulb “for xenon” |
As can be seen from the test, there are a huge number of lamps that shine much better than the original one, which took 11th place. So there is plenty to choose from.
Interior light bulb
Design of the W5W lamp for the interior lighting:
Lamp designation according to ECE - W5W
Technical characteristics of the W5W lamp for the interior lighting:
- Power - 5 W;
- Color: transparent;
- Base - glass;
- The base is flat.
Dimensions of the W5W lamp for the interior lighting of the Lada Largus
- The diameter of the flask is 10.3 mm;
- The size from the tip of the flask to the seat is 20.7 mm;
- Lamp height - 26.8 mm;
- Base width - 9.5 mm;
- Base thickness - 2.1 mm;
Installation location of the W5W lamp for the interior lighting of the Lada Largus:
About related faults
A lighting device for any purpose that refuses to perform its function can signal to the owner of the Lada Largus that the fuse is faulty. If it is discovered that the jumper in the fuse link has burned out, then such an element requires unconditional replacement, which also means replacing the marker light bulb. This is quite easy to do. The mounting block is located on the left edge of the interior panel in close proximity to the unit for switching the modes of lighting devices. Here are the inserts numbered F1 - F39. Fuses numbered 9 and 10 are responsible for ensuring the operation of the low and high beam, respectively for the left and right headlights of the Lada Largus car.
Insufficient contact at the terminals in the fuse block can also cause problems with the normal functioning of the head optic components.
There may be cases of premature burnout of the contact inside the lamp itself or banal oxidation of contacts with the ground. The last option can be easily eliminated. To do this, it is necessary to thoroughly clean the contacting surfaces of the cable lugs. A wire brush will do. If these methods do not give the desired result and the functionality of the Lada Largus lighting devices is not restored, then you will need to contact professionals for a more thorough diagnosis of the causes of the malfunctions and their subsequent elimination.
How to choose a lighting element
The range of lamps for installation in car headlights is very extensive. However, there are two factors that significantly limit your choice:
- the design of the headlamp block does not allow the use of any options you like;
- code requirements that expressly prohibit the installation of any elements other than those originally used by the manufacturer.
In the Lada Largus car, the functions of low and high beam are performed by one double-filament halogen lamp. This is convenient as it allows you to save space under the hood and reduce the size of the headlight unit. One tungsten filament produces a beam of light of greater brightness, directed primarily horizontally (high beam), and the second creates a beam with an opening angle of 30°, of which 10° are directed above the horizontal, and the remaining 20° below it.
The ability to reduce the size of the headlight unit results in the need to change the light bulb when any filament fails, even if the second one works quite reliably. In addition, you always have to change both lamps, left and right, since for high-quality lighting you need a set of two lamps selected according to their characteristics.
New Lada: Lada Kalina 2 Sport or Lada Granta Sport. Kalina 2 sport or Granta sport?
Lamp replacement process
How to replace a PTF light bulb? This process in Lada Largus is quite simple, although it requires some disassembly of the car. Therefore, in addition to light bulbs, you need to stock up on:
- Torx key 20.
- A 17-gauge spray gun (optional, but it makes the job easier).
- Cotton gloves or clean cotton cloth.
We drive the car into a pit or overpass, although if you want to replace the light bulbs in the Lada Largus PTF it is quite possible to use a jack and on bare ground. True, you will have to wallow in the mud, but you don’t have a choice of what to do on the road.
To get to the fog lights, you need to remove the fender liners. For greater convenience, I would recommend removing the wheel: it won’t take much time, but it will be much more convenient to work with.
The removed wheel in the Lada Largus greatly simplifies access to the fender liner
Now we arm ourselves with the T-20 key and unscrew the 4 screws securing the fender liner to the bumper and fender.
We bend the front part of the fender liner and get access to the Largus foglight.
We disconnect the power supply from the fog lamp, for which we press the latch and simply pull out the block itself.
Take the fog light bulb by the socket and turn it counterclockwise a quarter turn. Now it can be removed. All that remains is to figure out how to replace the burnt out bulbs in the PTF with new ones.
Important! Before installing a new lamp, you should wear clean cotton gloves. Otherwise, sweat and grease from your fingers remaining on the bulb will quickly damage the lighting fixture.
This rule must be strictly observed when working with any halogen light sources.
So, put on gloves, remove the new lamp from the box and install it in place of the burnt one, fixing it by turning it 45 degrees clockwise. We connect the power supply, making sure that the latch snaps into place. We install the fender liner, and then the wheel in place.
Bulbs installed in LADA Largus recommended by the manufacturer
Lada Largus appeared on the domestic market not so long ago. Its production began more than 15 years ago. It became the prototype of the Dacia Logan MCV. The exterior of the car differs little from its predecessor, only in the logo, which is installed on the radiator grille.
Its main advantage is its stable suspension. Thanks to this, LADA Largus has become a real find for Russian roads. It grips confidently on slippery surfaces, which is important in the winter season. The car is a little heavy to drive and not good enough to drive.
Failure of lighting fixtures is a common problem for this model. It is not classified as complex, but requires immediate elimination. Even a slight deterioration in the quality of the luminous flux is a reason to replace the lamp.
Which lamp to choose? The first question that arises among car owners. The choice on the car accessories market is huge, but not everyone knows what characteristics you should pay attention to. Our table will help in solving this problem. It contains detailed information regarding which lamp is suitable for which unit in the Lada Largus. If you do the work yourself, be sure to watch the video of replacing the low beam lamp. It clearly shows all the features and subtleties of the process.
Table of lamps used in Lada Largus
| Installation location | EEC designation | Power, W | Appearance |
| Headlight block: | |||
| high/low beam lamp | H4 | 60/55 | |
| front turn signal lamp | PY21W | 21 | |
| side light lamp | W5W | 5 | |
| Fog lamp | H11 | 55 | |
| Lamp | WY5W | 5 | |
| Back light | |||
| turn signal lamp | PY21W | 21 | |
| brake and side light lamp | P21/5W | 21/5 | |
| fog lamp | P21W | 21 | |
| reverse lamp | P21W | 21 | |
| Additional brake signal lamp | Р21W | 21 | |
| License plate lamp | W5W | 5 | |
| Trunk light bulb | W5W | 5 | |
| Interior lamp | W5W | 5 | |
| Individual lighting lamp | W5W | 5 | |
| Glove compartment lamp | W5W | 5 | |
| Illumination lamp for hazard warning switch and cigarette lighter | W1,2W | 1,2 | |
| Illumination lamp for the ventilation, heating and air conditioning control unit | W1,2W | 1,2 | |
Which low beam lamp is suitable for Largus?
60/55 H4 lamps are installed at the factory:
- 60/55 is the power of low beam (55) and high beam (60) in watts,
- H4 - base type.
Please note that the same bulb is used for low and high beam
Quick comparison
| Model | Peculiarities | Rating | Link |
| Philips X-treme Vision | the brightest, give white light | ★★★★★ | Buy |
| Philips LongLife EcoVision | inexpensive, extended service life | ★★★★✩ | Buy |
| Bosch Pure Light | extended service life | ★★★★✩ | Buy |
| Osram Original Line | good lighting area | ★★★★✩ | Buy |
Philips X-treme Vision - the brightest light bulbs
Features declared by the manufacturer:
- bright white light,
- increase the lighting area in front of the car by 45 m,
- high quality quartz glass.
The package contains two lamps.
Country of origin: Poland.
What we like most: White bright light, increased illumination area.
Test results
Good ADAC score, results:
- very good road lighting,
- short service life,
- relatively expensive (but each lamp is tested at the factory).
Auto Express test winner. According to the measurement results, the border of the bright light spot is 75 meters from the car.
Philips LongLife EcoVision - long-lasting lamps on Largus
- high strength quartz glass,
- resistant to temperature changes and vibration,
- high internal pressure - powerful light.
There are two pieces in the package.
Country of origin: Poland, Germany.
What we like most: they are close in color to standard lamps, they should last longer than regular lamps.
Bosch Pure Light
Features declared by the manufacturer:
- up to 90% more light,
- exclusive design with silver plating and blue sector.
There is one piece in the package.
Country of origin: Poland, Germany.
What we like most: Inexpensive, well-known manufacturer.
Osram Original Line
- quality of the original spare part (OEM),
- improved visibility up to 130%.
The package contains one lamp.
Country of origin: Germany.
What we like most: inexpensive, good service life, country of origin.
Many domestic cars are equipped with lamps from the manufacturer OSRAM from the factory. This is a German company that is one of the leaders in lighting technology for both domestic use and automotive lighting.
And the Lada Largus is no exception here, since many cars from the assembly line have light bulbs from the manufacturer Osram. But there are exceptions, as some owners said that they had installed lamps from other manufacturers, such as Narva or even Philips.
If you want to change the low beam headlight bulbs on your Largus yourself, then you should keep two things in mind:
Firstly, the lamp power should be no more and no less than 55 Watts. Secondly, pay attention to the base, it should be H4 format. Other lamps simply won't work
The photo above shows the Night Breaker series from Osram. This model promises a significant increase in light beam and range of up to 110% in contrast to conventional lamps. From personal experience I can say that you will most likely never get 110%, and you will not notice, but a noticeable difference after the factory bulbs is immediately visible.
The light is brighter, whiter and less blinding than standard lighting. As for the service life specifically on Largus, it all depends on the frequency of operation. Since nowadays you have to drive with low beam headlights all the time (in the absence of daytime running lights), a year of operation of increased power lamps with regular use is quite normal.
As for the cost, the cheapest light bulbs can cost from 150 rubles apiece. More expensive analogues, such as those above in the photo, cost about 1,300 rubles per set, respectively 750 rubles per piece.
Dimensions
To replace the side light bulb in Largus, the socket of the old part is turned counterclockwise. The black and yellow wires connect it to the battery, so it turns off from them. A new part is installed in this place, and assembly is carried out in the reverse order.
You need to make it a rule to regularly change not only the lamps, but also monitor other lighting elements. After all, the process of reducing their brightness occurs slowly and the driver simply does not notice the deterioration in road lighting.
Car headlights are designed to provide a full view of the road at night. The proper condition of all lighting sources on the car is a necessary condition for safety while driving. Traffic regulations set very strict requirements for the serviceability of headlights. A driver who does not comply with them is subject to a fine.
Headlights on Lada Largus may have the following types of problems:
- burnt out lamps;
- broken lamps;
- cracks on the surface of the optics;
- dimming of lights;
- incorrect formation of the light beam, etc.
The reasons for these problems may vary. Clouding of the optics is caused by the matting effect of dust particles in the oncoming air flow; cracks and broken lamps are usually the result of a collision with an obstacle while driving. Scratches on the surface of the optics can be the result of driving on roads with bushes and trees with spreading branches growing on the sides.
Driving with headlights that have any of the above factors is unacceptable. To carry out repairs, you can contact a service station, where qualified technicians will provide you with the required assistance. But car service costs money - not all vehicle owners are ready to incur financial expenses.
Step-by-step replacement instructions
After the burnt-out lamp is removed, you must perform the following steps:
- wear medical or clean fabric gloves;
- take the new H4 lamp by the base and insert it into the socket;
- Gently wipe the flask with a clean cloth soaked in alcohol;
- install the socket with the lamp into the socket and secure it with a lock;
- Replace the rubber boot and cover.
It is important to ensure that the protective elements are attached tightly, without distortions or cracks. During shaking and vibration, an incorrectly installed cover and boot will fall off and leave the cartridge without protection from external influences and moisture.
It is necessary to wipe the flask with alcohol, since halogen devices become very hot during operation. Traces of grease or sweat from the hands will form dark spots and will cause premature destruction of the lamp. This is an important point, so you need to prepare alcohol and clean rags in advance.
Replacing light bulbs on Lada Largus - photo, video of replacement
Constant use of the car will one day lead to the need to replace light bulbs on the Lada Largus. This is easy to do at a specialized service station, but you can do all the necessary work yourself. To achieve the desired result, you need to carefully study the instructions. This is due to some nuances that should be taken into account when replacing light bulbs on a Lada Largus. Let’s talk about all these subtleties of work in more detail.
What kind of lamps are in the headlights of Lada Largus?
All lamps that are used for outdoor lighting in Lada Largus can be divided into 3 categories:
You also need to understand what kind of light bulbs are needed to replace in a Lada Largus car:
For low beam, use an H-4 bulb with a power of 12V, 60/55W;
For dimensions, you need to take a W5W lamp with a power of 5W;
For the front turn signal, use a PY21W bulb;
The fog lights have H-11 lamps with a power of 12V, 55W.
Replacing low and high beam bulbs on a Lada Largus
Any replacement of light bulbs must begin with turning off the power. These actions are required for working with electrical equipment of a car. The power is disconnected by turning a special lever or removing the terminals from the battery. This way you will completely eliminate short circuits caused by improper connection of wires. You need to understand that one bulb is used for the low beam of Largus, and the second for the high beam. The average lamp operating life ranges from 2-4 thousand hours. You can gain access to the left light by removing the battery.
- Turn the lid counterclockwise;
Installing the working light bulb in the Largus lantern is carried out in the reverse order. Remember that you should only hold the lamp by the base, and it is advisable not to touch the bulb. As a last resort, you can wipe the light bulb with a lint-free microfiber cloth. You can watch the correct process of replacing a low beam light bulb in the video:
Replacing side light bulbs on Largus
If it is necessary to replace this lamp, the entire lamp must be removed. This is the only way to ensure access to the side lights of Largus
After dismantling, we disconnect all power wires with extreme care and attention. After disconnecting the power from the battery, you need to remove the front bumper, which serves as additional protection for the dimensions. Ideally, work is carried out wearing sterile gloves.
If the device was touched by negligence, it must be treated with a lint-free microfiber cloth.
Ideally, work is carried out wearing sterile gloves.
If the device was touched by negligence, it must be treated with a lint-free microfiber cloth.
- We remove the fender liner by removing the fasteners;
- We remove the socket with the light bulb by turning it in the direction of the clock, and for the right side you need to turn it in the opposite direction;
- Remove the burnt out lamp from the base.
To replace the backlight on Largus, turn the socket counterclockwise. Then carefully connect the 2 wires to the battery. And now all that remains is to install the working lamp and carry out the assembly. Installing all components in place is carried out in the reverse order and does not take much time.
Replacing turn signal bulbs on Lada Largus
It is impossible to get to this lamp from the engine side, so we will replace it from below the car.
We remove the fender liner by removing the fasteners; We unscrew the socket with the burnt out lamp counterclockwise; Remove the lamp by carefully pressing it and at the same time turning it counterclockwise.
Reinstalling all parts is carried out in reverse order.
Replacing bulbs in fog lights
As in the previous case, the replacement is carried out from below the car.
- We unscrew the fasteners and dismantle the fender liner;
- Unlock the latch and disconnect the block from the lamp;
- Carefully turn the light bulb counterclockwise and remove it from the socket.
Installing the work lamp is carried out in the reverse order.
Interesting to know! In reality, replacing light bulbs on a Lada Largus is much easier. We have described the ideal and correct option. Having trained your hand, you can do all the work with the least amount of effort and time.
Let's sum it up
It is imperative to monitor all lighting elements and change them on time. Reduced efficiency of light bulbs can easily lead to dangerous situations while driving!
How to change the brake light bulb on a Ford Focus 3
The Focus 3 attracts its customers with its unique design. Thanks to body aerodynamics, a low drag coefficient is achieved, which greatly affects fuel consumption.
And improved sound insulation of the engine compartment, wheel arches and underbody reduces noise in the cabin at high speeds.
Inside, the Focus 3 can be simple or have all sorts of useful electronic gizmos, depending on the configuration.
For example, replacing brake light bulbs.
Open the trunk. On the inside (right or left depending on which light bulb needs to be changed) opposite the lampshade, remove the protective cover.
Under the cover you will see two nuts in the form of plastic tubes.
Gently unscrew them with your fingers. If they do not give in, take the pliers without squeezing them (in the form of a fork), resting against the blades of this bolt along the axis and tear it off. Next, twist it by hand.
After unscrewing the bolts, pry the lampshade from the outside and pull it away from the wing (the direction is indicated by the mounting bolts). The narrow feather part of the lampshade closer to the door is held on a clamping clip. Be careful not to break this fastener.
When you remove the ceiling lamp, you will see the sockets with turn signal bulbs and a brake light with a parking light.
After changing the required light bulb, reassemble everything in the reverse order.
There is no need to tighten the bolts securing the rear lamp with pliers; there is a possibility of stripping the threads.
Have a nice trip!!!
Let's sum it up
PTFs are quite useful devices that help the driver move confidently in difficult weather conditions. As you can see, not all Lada Largus configurations initially have such lighting devices in their arsenal. For caring owners, this is not an obstacle, and they easily purchase and install PTF in their cars.
We examined two options for installing lighting equipment in LADA Largus and found that they are quite simple. If your station wagon does not yet have these useful products, then feel free to purchase them and install them, after which the bad weather will not be able to scare you.