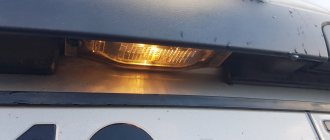
Front optics that generate low beam allow the Lada Granta to provide sufficient illumination of the road section in the dark. Unlike high beams, this mode is characterized by moderate brightness and a “gentle” beam direction without the risk of dazzling oncoming drivers.
If the low beam lamp on a Lada Granta car, which is responsible for the low beam, is a high-quality product, then the vibration of the light beam emanating from it (visible to the driver) is categorically excluded. Otherwise, the operation of such a component will be a difficult process in terms of high-quality illumination of the road surface. Many drivers are interested in how to change a low beam light bulb.
Air filter Grant
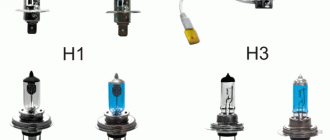
What kind of lamps are in the Lada Granta headlights (old and new family)
For normal operation of the lighting and light signaling system of the Lada Granta, use the lamps specified in the vehicle's operating manual. It is worth noting that the updated Lada Granta family uses new headlights with different lamps. The table shows the categories of lamps that are used on the new Grant and the pre-restyling version.
| Installation location | New Granta | Old Granta |
| headlight | ||
| – low/high beam lamp | H19 | H4 |
| – turn signal lamp | PY21W | |
| – lamp for daytime running light and side light | W21/5W | |
| Rear light (for sedan body) | ||
| – brake signal and side light lamp | P21/5W | |
| – reversing lamp | P21W | |
| – fog lamp | P21W | |
| – turn signal lamp | PY21W | |
| Rear light (for liftback, hatchback and station wagon bodies) | ||
| – brake signal lamp | P21W | |
| – side light lamp | R10W | P10W |
| – reversing lamp | W16W | |
| – turn signal lamp | PY21W | |
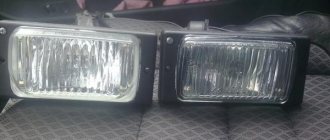
| Front fog lamp | H16 | H11 |
| Side turn signal lamp | WY5W | W5W |
| License plate lamp | W5W | C5W (sedan) W5W (hatchback) |
| Trunk light bulb | C5W | C5W |
The new H19 and H18 lamps are an evolution of the H4 and H7 lamps. New lamps have already been included in the design of future LADA projects (more details). Lada Granta FL is the first model to use H19 lamps in its headlights.
Instead of new H19 lamps, H4 lamps can be installed in Lada Granta FL headlights. Before installation on the H4 lamp, the antennae should be bent:
Lamps H19 and H4 shine equally, this is confirmed by tests:
Let us remind you that we previously posted instructions for replacing lamps in Granta headlights and flashlights (low and high beam, DRL).
Source
Which low beam lamp is suitable for the Granta (restyling)?
Suitable vehicle years: 2022, 2022, 2022.
Restyled cars produced since August 2018 are equipped with 60/55 H19 bulbs:
H19 is a development of H4 lamps. You can install an H4 bulb in the headlight, but before that you need to bend the “antennae” that sticks out at the bottom of the bulb.
Next we will look at lamps with the original base recommended by the manufacturer. While the choice is not very large, we hope that over time more options will appear.
Quick comparison
| Model | Peculiarities | Rating | Link |
| Philips LongLife EcoVision | inexpensive, extended service life | ★★★★✩ | Buy |
| Osram Original Line | good lighting area | ★★★★✩ | Buy |
Philips LongLife EcoVision H19
There is one piece in the package.
Country of origin: Poland, Germany.
What we like most: they are close in color to standard lamps, they should last longer than regular lamps.
Osram Original Line H19
The package contains one lamp.
Country of origin: Germany.
What we like most: inexpensive, good service life, country of origin.
Source
Checking external lighting devices on a Lada Granta VAZ 2190 car
Check the operation of the headlights, taillights, auxiliary brake lights, turn signals, and license plate lights. Replace faulty lamps.
1. The following lamps are used on the Lada Granta VAZ 2190:
1 — front turn signal lamp, lamp type PY21W;
2 — low/high beam lamp H4 55/60W;
3 — side/daytime running light lamp W21/5W;
4 — fog lamp, lamp type H11.
2. Rear lamps are of the following type:
1 — brake light and side light lamp, lamp type P21/5W;
2 — rear turn signal lamp, lamp type PY21W;
3 — reverse light lamp, lamp type P21W (a fog light lamp, lamp type P21W, is symmetrically installed in the left rear light).
4. Side direction indicators are of the following type:
1 — side turn signal lamp, lamp type W5W.
5. License plate light bulbs, bulb type C5W.
6. The design of the additional brake light uses LED light sources of increased brightness.
After driving in heavy rain or washing the car, the lenses of the headlights and taillights may appear white due to the difference in air temperature inside and outside the headlights. This phenomenon is similar to the fogging of car windows from the inside during rain and is not a sign of a malfunction.
Source
What can you supply?
Halogen lamps are standard on this vehicle. But it is quite possible to install other types of lighting elements. The following types of lamps can be supplied to Grant:
- GONE. They are becoming increasingly popular among car enthusiasts. Their advantages include significant light brightness, low energy consumption and long service life.
- XENON. The glow of such paws is ensured by the creation of an electric arc in an inert gas environment. They are distinguished by high luminosity, relatively small size and significant duration;
However, it is better not to experiment with light, but to use the lamps on Grant that are indicated in the documentation for the car, namely halogen ones.
With fairly good performance indicators, such lighting devices are the cheapest, and their choice is large, which allows you to choose the optimal use case.
Description and tips for lighting Lada Granta
Below is a description of the design of the Lada Granta lighting devices to understand the relative placement and functionality of the individual elements of the corresponding mechanisms.
The lighting and alarm system includes two block headlights; side direction indicators; rear lights; license plate lights; additional brake signal; interior and trunk lighting lamps; sound signal.
1 – block headlight;
2 – screw for adjusting the optical element in a flat and vertical surface;
3 – cover of the high and low beam lamp socket;
4 – screw for adjusting the optical element in the vertical surface;
5 – lamp socket for side and daytime running lights;
6 – hydraulic headlight level control;
7 – turn signal lamp socket.
The headlight unit combines three sections. A halogen double-filament lamp H4 (high and low beam) is installed in one section. The other section contains a PY21W (orange) turn signal lamp. The third section contains a two-filament lamp W21/5W (daytime running light and side light). When the ignition is turned on, the daytime running lights (21 W thread) are automatically turned on. When you turn on the headlights, the running lights go out and the side lights turn on (5 W thread). An actuator (working cylinder) for the headlight beam direction regulator (headlight hydraulic corrector) is also installed in the headlight housing. The car is equipped with a hydraulically driven headlight leveler, which allows you to adjust the height of the light beams depending on the vehicle load. The headlight range control consists of a regulator on the instrument panel, working cylinders installed in the headlights and connecting tubes.
What does the market offer?
Below are several options for halogen lamps of different price categories that can be installed on Grant:
- EVO VISTA. Halogen lamps from China, which have a completely transparent body, the color temperature of their light is 3200K. It will cost $25.
- OSRAM BLUE IPER. Halogen lighting elements made in Germany, with a declared color temperature of 5000K. The balloon is painted blue. The price is about 17 dollars.
- PHILIPS H4 COLORVISION. A set from a German manufacturer, characterized by bright light and the ability to choose the color of the glow (blue, green, yellow). The price is about 35 dollars.
- KOITO DENSO VWHITE. Products "Made in Japan", with transparent bottles and a color temperature of 3700K. They are characterized by high light intensity. Price - about $28;
- STANDARD LIGHT COULD. Korean light bulbs with a transparent bulb, the color temperature of which is 2900K, which allows them to be used in headlights with plastic housings. They will cost only $6.
- FARO ULTRA. Cheap version made in China. The base is transparent, the characteristics of the products are ideal for installation on the Grant. Cost - 4 dollars.
And these are just a few types of halogen lamps. In general, the range of such lighting devices is very large and allows any car owner to find a suitable option both in price and in terms of quality of work.
Lada Granta headlights: features and replacement
Lada Granta is a budget front-wheel drive car that was developed by the Volzhsky Automobile Plant in 2011. The optics of the vehicle have changed significantly compared to previous models of this brand. This applies to both the types of devices used and their design, as well as adjustment methods. It is important for the owners of this car to learn about all the nuances of the headlights so that the operation of the Lada Granta is long-lasting and correct.
Check list
- Turn off the engine, squeeze the parking brake lever;
- Open the liftback cover;
- Remove the plastic protection / sound insulation layer. The choice depends on the model year. More details are described at the beginning of the article;
- Unscrew the lamps, three nuts;
- Replacement of Grant liftback taillight lamps, carry out related preventive maintenance;
- Reassemble the structure in reverse order.
Conclusion based on the results of the replacement The design and fixation of optical devices is not at all complicated. Every car owner can do the replacement; there is no need to contact a service center. Only as a last resort, when a global breakdown is identified or surgical intervention by a specialist is required. After reading the instructions provided, the owner knows exactly how to change the Granta liftback taillight with minimal time.
Front and rear lights for Lada Granta
On the Lada Grant, AvtoVAZ has provided the following types of optics:
- front: Lada Granta fog lights (PTF) and head lights;
- rear lights: right and left.
The headlights consist of four sections, differing in the following structure and design:
- Low and high beam headlights. They use H4 lamps with a power of 55 W or 60 W.
- Turn signals. They use PY21W lamps with a power of 21 W, distinguished by an amber color.
- Daytime running lights and parking lights. The DRLs of the Lada Granta use P21/5W lamps. On the main thread their power is 21 W, on the additional thread - only 5 W.
- Fog. It contains an H7 lamp, the power of which reaches 12 W.
The rear headlight also consists of several sections:
- Brake lights and side lights. The lamps in them are installed on both the main and additional filaments. In the first case, P21/5W is used, in the second - P21/5W or P21/4W. On the main filament, the lamp power reaches 21 W, on the additional filament – 5 W.
- Turn signal indicators. They use the same lamps as in the front of the vehicle - PY21W with a power of 21 W, distinguished by an amber color.
- Reversing warning lights. The manufacturer provides for the use of PY21W lamps with a power of 21 W.
- Reflector headlights. They also install amber lamps of the W5W type. Their power reaches 5 W.
The service life of the lamps in the headlights of a Lada Granta car varies. Type H4 has a relatively short service life - about 650 hours. Other lamps have a longer lifespan. It may change depending on voltage surges in the vehicle's electrical system.
Which low beam lamp is suitable for the Granta (pre-styling)?
Suitable vehicle years: 2011, 2012, 2013, 2014, 2015, 2016, 2022, 2022.
60/55 H4 lamps are installed at the factory:
Please note that the same bulb is used for low and high beam.
Quick comparison
| Model | Peculiarities | Rating | Link |
| Philips X-treme Vision | the brightest, give white light | ★★★★★ | Buy |
| Philips LongLife EcoVision | inexpensive, extended service life | ★★★★✩ | Buy |
| Bosch Pure Light | extended service life | ★★★★✩ | Buy |
| Osram Original Line | good lighting area | ★★★★✩ | Buy |
Philips X-treme Vision H4
Features declared by the manufacturer:
One of the highest brightness levels and incredible comfort in the dark.
The package contains two lamps.
Country of origin: Poland.
What we like most: White bright light, increased illumination area.
Test results
Good ADAC score, results:
Auto Express test winner. According to the measurement results, the border of the bright light spot is 75 meters from the car.
Philips LongLife EcoVision H4
There are two pieces in the package.
Country of origin: Poland, Germany.
What we like most: they are close in color to standard lamps, they should last longer than regular lamps.
Bosch Pure Light H4
Features declared by the manufacturer:
There is one piece in the package.
Country of origin: Poland, Germany.
What we like most: Inexpensive, well-known manufacturer.
Osram Original Line H4
The package contains one lamp.
Country of origin: Germany.
What we like most: inexpensive, good service life, country of origin.
Signs and causes of headlight malfunction
During operation of the Lada Granta, various malfunctions with optical instruments occur. They have such signs
- lack of light from one or more lamps;
- inconsistency of light flux;
- blinding oncoming drivers.
If the following symptoms become noticeable, pay attention to the reasons for their occurrence:
- Burnt out light bulb. This can happen due to voltage surges in the system.
- Blown fuse. It is not possible to restore its operation, so the solution to this problem is to notice the part.
- The low or high beam has failed. This occurs due to a broken relay. During diagnostics, it becomes clear: the contact jumper, external contacts or electromagnet winding are burnt.
- Weakening of the luminous flux on one of the headlights. The connection of the negative wire in such a situation is often damaged due to moisture getting on it.
- The light flux spreads in the wrong direction (sideways, up, down). This occurs due to the fact that the mounting of optical instruments is damaged.
- The front side light does not light up. This happens either due to a burnt-out light bulb or due to a lack of contact in the socket. In some cases, a wire break is diagnosed.
- The rear parking light does not light up. The reasons for this malfunction are exactly the same as the previous one.
- The side lights shine in an unusual way. This happens due to the fact that one of the fuses blows due to power surges.
- The reversing light does not function. The cause of the problem is a faulty switch in the gearbox. It is also necessary to check the system for burnt out spirals.
Most problems with optical devices can be fixed with your own hands. This is due to the fact that diagnosing the causes of their occurrence is quite simple.
In some cases, it is necessary to contact a service station to conduct a comprehensive inspection of the entire electrical system of the machine. In order to eliminate the problem, you need to identify the cause of its occurrence and replace those parts and spare parts that have failed.
When replacement is required
Replacing low beam lamps on a Grant may be necessary if they burn out. But, if such a malfunction occurs very often, or along with the low beam, any other part directly related to the electrical system disappears or stops working, then in this case it is better to contact a specialist.
The process of replacing low beam lamps on a Lada Granta
In most cases, the problem lies in the car's wiring or insufficient voltage supplied by the battery. It will be extremely difficult to find the cause on your own without the proper skills.
Replacing standard lighting
In order to replace headlights or carry out repairs, you need to prepare accordingly. The vehicle owner will only need 8 mm and 10 mm socket wrenches. The process of removing the headlight is as follows:
- Initially, you should disconnect the negative terminal from the battery.
- In order to gain access to the lower mounting of optical instruments, you need to remove the lower bumper.
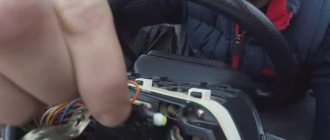
- It is necessary to disconnect the turn signal lamp clips. You also need to remove the running lights of the Lada Grant.
- The main light cover should be removed by turning it counterclockwise. After this, you can gain access to the inner surface of the headlight.
- Remove the wire retainer from both the low beam and high beam lamps.
- The headlight hydraulic corrector must be removed counterclockwise.
- Using a wrench, unscrew the 4 mounting bolts.
- After completing all of the above steps, you can remove the burnt out lamp by replacing it with a new one.
While disconnecting optical devices, they must be held. This should be done to prevent them from falling and being damaged.
The rear lamps can be removed and replaced much more easily than the front lamps. This is due to the fact that they are accessed through the trunk of the car. As a result, there is no need to remove the bumper. Removing and replacing lamps in the rear headlights is as follows:
- The luggage compartment trim needs to be removed. The bases of the instrument lamps will become visible under it.
- To unscrew you will need an 8 mm wrench.
- Another fastener needs to be pressed out without using tools. This can be done by hand.
- The taillight connector can also be removed without the use of keys.
- Having pryed the headlight, it should be bent. After this, you can completely remove the device.
- To replace the lamp you need to unscrew the base.
After all these steps, the work must be done in the reverse order to install the headlight unit in its original place.
The lamps we choose (H4).
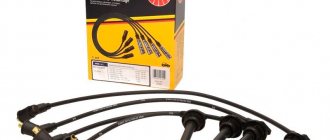
Dear colleagues, good evening! In our cars, one H4 lamp is responsible for low and high beam - a sign of a budget car. We can say with full responsibility that our optics for this solution turned out to be one of the best. Owners of Rio, Solaris and Polo usually remain silent on this issue. Some admit that the low beam in Grant will be better (there are not many of them). The standard lamps are over a year old and have covered about 30,000 km. They will probably need replacement soon. I decided to take care of new lamps in advance. My choice is Narva, a subsidiary of Phillips, production is located in Poland. I think that today it doesn’t matter where the plant is located - in China they will do no worse. I installed Narva lamps in my previous car - they worked honestly for about a year and a half (about 40,000 - 50,000 km). In terms of price - one of the most inexpensive among acceptable ones, in my opinion.
Looking ahead, to sum up all my research, I suggest using standard (basic) lamps from Narva, Phillips, Osram or Bosch as a replacement. Narva: 488813000 488814000 The first option is packaging in a cardboard box, the second - in a blister. The first one is 15 - 20 percent cheaper. Phillips: 12342PRC1 12342PRB1 The first option is a cardboard box, the second is a blister. The price is approximately the same. Osram: 64193 May be in a cardboard box or blister. Bosch: 1 987 302 041 1 987 301 001 The first option is a cardboard box, the second is a blister. The first one is 20 percent cheaper. Of all the manufacturers offered, only Phillips claims “30 percent better visibility than conventional lamps” in its base lamps. The service life of all standard (basic) lamps is about 500 hours. In principle, we can wrap this up. For those who have no peace, please follow me further... So, the decision was made to buy low beam lamps in advance. I decided to look into the Narva manufacturer’s catalog in order to assess the possibility of improving the low beam. For a reasonable fee. I would like to note that the catalog and the manufacturer’s website do not carry any useful meaning, unfortunately. A common product for marketers. H4 lamps are available in several versions (series): - standard (regular lamp) - longlife (regular lamp with a declared twice the service life) - range power 50+ (lamp with a declared improved visibility of up to 50%) - range power 110 (lamp with a declared improved visibility of up to 110%) - range power blue+ (a lamp with a declared improved visibility of up to 50% and a cool white light) - range power white (a lamp with a xenon light effect, neatly marked as “for off-road use”, prohibited sales in Europe, because they are kicking in all directions) - rallye (a lamp with extreme brightness “for off-road use”, prohibited in Europe, available in power versions of 60/55, 100/55, 100/90 and 130/100 watts) - range power LED (LED lamp, according to the description, is effective, environmentally friendly, safe and does not even blind oncoming traffic, but there is a footnote “before using, make sure that their use is permitted by law” and “disclaimer of obligations/liability on the part of the manufacturer for the incorrect use of this product ", in the attached photo of comparison with a conventional lamp, it shoots in all directions). Other manufacturers have a similar division into series, like two peas in a pod, with minor changes. Some series have exactly the same names. Phillips and Osram indicate the luminous flux for lamps, although the former called it a lumen (a unit of measurement of luminous flux); the site was probably adapted by a person without a technical background. Two options range power 50+ and range power blue+ fit into a reasonable board. The rest is significantly more expensive (from about 1,000 rubles per pair). range power blue+ are no longer needed, because you will inevitably have to pay for stylish white light with service life - this is a fundamental feature of halogen lamps (the higher the temperature of the filament, the whiter the light). We went to look at range power 50+, it promises to be 50% brighter and 20 meters further, compared to standard lamps, and also claims to have an increased service life. The English version of the site has the same description, only the service life is stated to be double. I didn’t believe anything, especially the double service life. But I decided to try. The asking price is about 350 rubles per pair (if you take it in a package in the form of a box for two lamps). While the order was traveling, in the evening of a working day, I observed a colleague (his Granta was purchased a week after mine, the mileage is also similar) near the open hood. I tried to replace the low beam (it burned out) while warming up. That means I’ll be climbing there soon too. Well, a couple of days later the lamps arrived.
The rest of the cable channel for the air conditioner was used as a seat for the lamp (I note that installing a split system with your own hands is something each of us can do). I drilled a hole in it “by eye” with a 22 mm drill bit and it turned out that our lamp fits into it clearly, “pull-in”.
We connect and take measurements, in fact we find that RP50+ lamps consume a little less compared to standard lamps. Visually, yes, they shine brighter, but only a little.
Source
Polishing headlights - why is it needed and how to do it
The lighting equipment of a vehicle must always be in perfect condition. Only in this case will operating the car be convenient, pleasant and safe. Polishing headlights is necessary because over time they become cloudy and worn out. This problem arises due to a whole range of different factors, among which experts identify:
- environmental impact on glass (rain, snow, hail, sunlight);
- the occurrence of scratches and chips due to the ingress of small particles from the road surface during movement.
Many small damages in some cases significantly affect the condition of optical instruments. The lighting intensity in such situations can deteriorate quite significantly. To polish Granta headlights, you can contact a service station. At the same time, it is possible to do the work yourself. The advantages of each of these methods are obvious. If you turn to a car service station for help, you will have to spend more money, but the quality of work will be at a high level. The polishing process is divided into three stages:
- Use of abrasive materials of large fractions. They allow you to remove scratches and even some minor chips from the surface, making them completely invisible.
- Use of fine abrasive materials. This is a preparatory stage for the polishing itself. It allows you to level the surface, giving it the proper appearance.
- Polishing using special compounds and wheels of varying hardness. It is after this stage that the surface of the headlights becomes perfectly smooth and sparkling.
At home, all prepared skins for polishing should be soaked in water for 10 minutes. First you need to choose a material with a grit of 2000. It allows you to remove deep scratches from the surface. After this, you can use sandpapers with grits of 1000, 800 and 600 for sanding. When the surface becomes uniform, you need to move on to using a soft, dry and clean cloth and the polish itself, which is used to restore the appearance of vehicle optical instruments.
Types of lamps for PTF
If PTFs are installed by the automaker, then they use standard halogen lamps. Many motorists are not satisfied with them, which forces them to look for replacement options. There are currently three types of lamps on the market that can be used for fog lights:
- halogen;
- LED;
- gas-discharge, or xenon.
Before choosing the final replacement option, you should determine which bulbs are in the foglights. The main difficulty for most drivers is to correctly decide which lamps are best to install in fog lights - each of them has certain advantages and disadvantages.
Halogen
The most common type for fog lights, which has an affordable cost as its main advantage. Such elements ensure acceptable PTF efficiency in foggy conditions, and when properly configured, do not cause blinding oncoming drivers. Among the disadvantages of halogen lighting is a short working life, and replacing a bulb in a fog lamp is not always an easy task. In addition, the headlight becomes very hot, which, if it cools suddenly, can cause the glass to crack. If the power of the standard lamps for the driver is insufficient, when replacing the lamps in the fog lights with more powerful ones, there is a high risk of the control unit overheating and the headlights automatically turning off.
Headlight adjustment
Adjustment of the lighting optics may be necessary if, while driving or significant shaking in the car, any malfunction occurs that causes a change in the direction of the light beam either in the vertical or horizontal plane. This can occur on both an old and a completely new car, since such a problem depends on external factors, in particular on the road situation in which the vehicle was located, as well as the characteristics of its operation. To adjust the headlights on a Grant, you need to be properly prepared:
- You need a Phillips screwdriver or a 6mm hexagon.
- The vehicle must be equipped and ready for use. To do this, fill the tank, increase the tire pressure, place the spare tire in the luggage compartment and sit in the driver's seat.
- The vehicle must be 3 meters from the wall before adjustment.
- You need to take several measurements on the wall. This applies to the distances between the headlights and their height above the road surface on which the car is parked. On an artificial wall, you need to mark the edges and centers of optical devices.
The entire process of adjusting the headlights occurs in accordance with the following rules:
- To remove body vibrations, you need to rock it a little from side to side.
- It is necessary to select the “one person” position on the headlight leveling control. After this, you should turn on the low beam. It is worth assessing the light output from each optical device, as well as its actual deviation from the center.
- Having raised the hood, you need to find the electrical correctors. With their help, you can align the output of light beams, making them identical. They must correspond to the points marked on the wall - both vertically and horizontally.
The end of the adjustment can be judged when the beams from the headlights go directly to their projections made on the wall. After this, it is recommended to do a test drive, after which you should check all the work again. If the optical instruments are correctly fixed, their angle of inclination should not change after the machine moves.
FakeHeader
Comments 18
I drove these myself for 2 years, installed fog breakers, and it got even better.
allseason supposedly installed yellow ones, I like the different lamps, there were some transitional models, my relatives had one, one Osram lamp, the other Philips, and I read something like this on the internet many times
I installed Allseason before the new year (available in the BZ) - I tested it on two excursions during the New Year holidays, both times with bad weather: the first - a snowstorm, the second - a half-damp track with ice and snow suspension. The result is good light.
I agree 100%. I installed these on Megan’s near-range H7, now I’ll install the same on the far-range H1))
Before this I installed Osram night breaker plus (64193NBP02B) on an old Passat, on the whole I was happy, then I drove on a grant with standard Philips, after a trip to the village along a dirt road one of the lamps burned out. I installed Osram yellow ones, I don’t remember the model, but they were very praised, they say they shine very well at night in the rain. I drove in the rain, fortunately we have such weather regularly. I will say that nothing is visible, neither in the rain nor in the wet asphalt. I drove off-road again, hit a larger spot, and the lamp burned out on the other side. Replaced it with Philips H4 3700K X-treme Vision +130%, the remaining Philips and Osram became a repair kit. I drove for three months, went off-road again and the left lamp burned out! Not available individually anywhere, set 1200 RUR. (however, I look at the ones that were installed on the Passat now in general are made of gold steel) I bought a kit and installed it, now the repair kit contains three lamps of different colors: Philips yellow-white, Osram bright yellow, and Philips Extreme bright white.
It’s a shame that the lamps on the grant die quickly after being burned out; this never happened on the trade wind. On the other hand, replacing a lamp on a trade wind was a whole quest. In the grant, I got used to changing them in a couple of minutes. In addition, in the trade wind, after potholes and primers, it was not necessary to change the lamps but to repair the suspension.