Lada Largus cars are available in several modifications, which differ in equipment. Basic versions do not have air conditioning and a standard head unit. Connecting a radio to a Lada Largus does not require the owner to have knowledge of electrical engineering or car design and can be done independently.
How to install
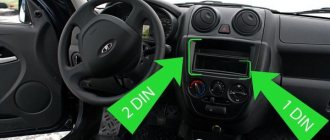
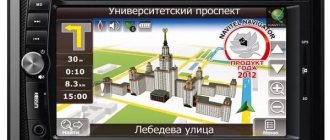
Some cars come from the factory with a 1 DIN car radio with CD player. Basic versions are equipped only with audio preparation; a plastic plug is mounted instead of the head unit.
To install the radio on Largus with your own hands, you need to:
- After removing the plug, place guide slides with locks in the instrument panel.
- Secure the mounting assembly using the tabs located around the perimeter of the part. Bending is done with a screwdriver; the installed shaft should not vibrate or make any extraneous sounds.
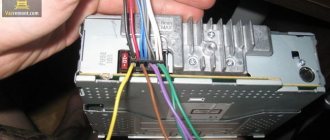
- Connect the ISO connectors located on the standard wiring to the head unit.
- Connect the antenna plug to the socket on the radio. If the sizes and shapes of connectors and plugs do not match, appropriate adapters are used.
- Insert the audio device into the shaft and push it until it clicks, indicating that the latches engage.
- Install a decorative frame around the radio panel.
Some owners install 2 DIN size radios on their Lada Largus. To place the head unit, it is necessary to replace the front plastic trim on the instrument panel, since it is impossible to accurately modify the original one.
The original panel is secured with latches, which can be removed manually or with a plastic screwdriver inserted into the gap between the parts.
The front panel with an extended window requires modification - it is necessary to install control buttons for additional equipment on it, borrowed from the Renault Logan sedan; original elements from Largus cannot be placed. This is due to the fact that the panel is designed for oval-shaped keys, which were never used on Largus.
At the same time, the mounting sockets for installing mounting clips are being finalized.
In the instrument panel, it is necessary to remove the horizontal jumpers located near the socket of the standard radio and climate control controls. Dismantling is carried out with a hacksaw and wire cutters, the remaining elements are cut off with a construction knife. All manipulations are carried out with caution, since there is a risk of damage to the standard electrical wiring. Then you need to reinstall the center console to assess the contact density of the elements.
Since the original wiring has cables with colored insulation that does not comply with the ISO standard, it will be necessary to compare the assignments of each element on the car and the radio. An adapter is used for connection; wire switching is allowed by twisting the necessary cables. It is recommended to reinforce the joints with tin-lead solder or a metal connecting sleeve. The connection point is covered from above with a heat-shrinkable tube, which provides protection from moisture and short circuits.
Useful tips
The dimensions of the double-din system are 178x100 mm. Installing a radio will require modifications to the interior space. If you purchase a device 178x120x100 mm, this can be avoided.
To install a simple car radio, the size should not exceed 178x50 mm. To install, use a plastic spatula or screwdriver. The kit includes adapters.
To install 2 DIN, you need to take another console trim and pliers. Additionally, you will need a frame for the head unit and a metal blade. The latter will be required to finalize the installation site.
The replacement of standard acoustics with analogue ones deserves special attention. Even if the device has identical dimensions, a new frame will be required. Otherwise there will be gaps in the panel.
Instructions
Usually a user manual is included with the radio. There are detailed characteristics of how it is used, what to press and when, and most importantly, why.
According to the diagram in the instructions, two versions of the radio are indicated:
There is nothing complicated about the first category, it’s just the name that is incomprehensible. These two versions differ only in different buttons and what is written on them. The most useful and practical feature is the ability to pair with some wireless devices via Bluetooth, such as connecting to a mobile phone. In this case, the standard radio on the Lada Largus will provide you with the opportunity to talk on the phone even without using your hands, thereby not violating traffic rules. If you think that you will have to talk very loudly or shout so that the interlocutor can hear clearly, then nothing like that. A normal tone of voice will be sufficient.
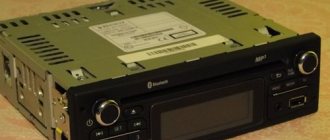
Device characteristics
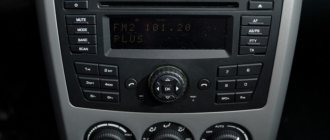
It can't be called complicated. In addition, the instructions and user manual supplied with the system will help you understand the structure, functionality and characteristics of the device. Structurally, a car can be equipped with either a conventional 1 Din or 2 Din radio. The differences between them are minimal and lie in the location of the buttons and inscriptions.
To reproduce high-quality sound, the audio system provides four speakers:
One of the main features and at the same time advantages of this device is the ability to connect to a smartphone via Bluetooth wireless channel. In addition to comfort and convenience, this function provides passive safety, since the Hands free system allows you to talk on the phone while driving without using your hands. The quality of communication is decent, communication with the interlocutor is not associated with difficulties, the driver does not need to raise his voice, and passengers hear him well.
The principle of operation of the radio
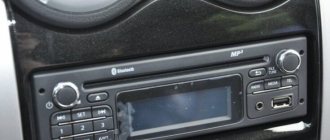
You can't please all people. Some people like the original standard audio system that comes with a new car, while others want a more advanced option. So what is it like - the original Lada Largus radio? The appearance harmonizes very well with the interior design. Convenient control buttons help you quickly figure out what to press or scroll where. The radio tape recorder fits into its proper place tightly and without unnecessary play. The sound is also good, music for every taste sounds excellent and clear. The radio picks up the signal well, even if the reception is so-so.
Sound via Bluetooth
A standard car radio in combination with dynamic speakers “reads” music programs equally well, “digesting” any genre without much difficulty. The manufacturer has addressed radio lovers with a powerful antenna device that allows them to pick up a signal of even minimal power. The radio allows you to memorize 6 stations in each frequency range.
Listening to music is available via CD drives or flash devices. Also for the same purposes, switching using Bluetooth is possible.
With a wireless connection, it is possible to rewind not only between music programs, but also directly within a track.
The display clearly displays the charge level indication (if “Bluetooth”), as well as the “RDS” line. There is a Russified font in “IDTag”.
Other methods of connecting to this device are the “Jack” and “USB” sockets.
Some owners are not satisfied with the lack of a removable decorative panel for the radio. We consider this point to be unimportant, since it is not able to protect against fraudsters.
Replacing car radio Lada Largus
Suddenly you decide to replace the device. Or maybe you just want to clean it, change the firmware, install a code, or repair a tired standard device. Another relevant question arises: how to remove the Lada Largus radio without any visible external latches, keys and locks? If you have seen the removal process on Renault cars, then you know that there are four holes along the perimeter of the front panel. This is where the tricky latch and the answer to the question of how to remove it are hidden.
You will need 4 short rods at once, something similar to metal knitting needles or wire 2-2.5 mm thick. You need to first insert our two pins into the left side, and then the remaining two into the right. By simultaneously pressing all four, you need to pry the plastic card from below, and the radio will come out of its grooves. Now you can do anything with it: change the firmware, program the code, repair, etc. You will especially need this procedure when you disconnected the battery terminals.
After this procedure, you need to enter the code again, and if you don’t know it or don’t remember where you put the documents, you will need information from the back panel. There we will find a barcode, the last four characters of which we will need in order to generate a new code for the Lada Largus radio. It is advisable not to forget it. Without the correct code, the radio will not even turn on.
How to remove the Lada Largus standard radio and enter the code
- Files
- Engine
When removing the battery or for other reasons, the Lada Largus head unit requires entering a 4-digit code.
The code is usually written in the service book, but anything can happen - they lost the book, changed the radio, etc.
The radio code can be restored using our Renault and Lada Largus standard radio code generator
To do this, we need to find out the so-called PRE-CODE , which is contained in the information on the radio itself; to find it out, we remove the radio.
How to remove the standard radio of Lada Largus
The standard radio on the Lada Largus is removed in the same way as removing the standard radio on many Renault models, for example: Megane
For removal there is an original tool from Renault, code - 7711381821
But there is no need to buy it; 4 or even 2 regular ballpoint pen refills are suitable for removal.
Insert 4 rods into the holes around the perimeter to release the fixation (see photo below), you can pry it from below with a plastic card or a flat-head screwdriver. The rods can be inserted alternately, first 2 on the left, then 2 on the right.
To understand what you are clicking, here is a photo:
Reverse part of the Largus standard radio
How to find the PRE-CODE on the Lada Largus head unit
After removing the radio, we look for the barcode, we need the last 4 characters - 1 letter and 3 numbers
In this example it is: K068
We enter the resulting PRE-CODE into the code generator and get our code for the radio.
How to enter the code for the Lada Largus radio?
The code for the Lada Largus standard radio contains 4 digits.
To enter it, you need to dial it using the standard joystick of the radio or using the radio keys, after entering, press and hold the “6” button.
1. Press button 1 on the panel successively until the required value for the first digit of the code appears.
2. Press button 2, the second digit will start flashing.
3. Press button 2 on the panel successively until the required value for the second digit of the code appears.
4. Press button 3, the third digit will start flashing.
5. Press button 3 on the panel successively until the required value for the third digit of the code appears.
6. Press button 4, the fourth digit will start flashing.
7. Press button 4 on the panel successively until the required value for the fourth digit of the code appears. When the secret code is completely displayed on the screen, to save it in the radio's memory, press and hold button 6 on the panel until a confirmation sound sounds.
If you have anything to add to the article, or would like to share your experience on this topic, please leave a comment
If you are the author of a report on repairs, modifications of a Renault car, or recommend material for the Renault-Drive Knowledge Base , please let us know
Don't forget to share with other Lada Largus owners
Firmware for Lada Largus radio
It was already mentioned a little higher that sometimes the radio needs new firmware. Why is it needed - you tell me. It's simple, at the factory setting our standard Lada Largus radio sometimes displays fonts clumsily, especially Cyrillic. Otherwise, she writes everything humanly, but in some options there are only hieroglyphs. This is where you will need to install updated firmware. How to make it? At one's own risk. If something goes wrong, all you have to do is remove and throw away the non-working device. It’s better to find out everything right away and find out before installing the firmware.
If the radio is still under warranty, flashing the firmware will void the warranty. In this case, why not remove it and take it to a service center and do everything wisely, without the risk of losing even those functions that already work well. Self-installation will also require certain skills. First you need to find out everything, find and download the firmware onto a flash drive. The installation will take place with the radio in place by pressing certain keys. The procedure itself will last several minutes. If everything works out and the installation finishes correctly, you will know about it right away.
The Lada Largus is one of the few domestic cars equipped with a standard radio. Lada Largus comes with audio preparation and a radio tape recorder already from the factory. It is about the scheme implemented on the Lada Largus car that we will talk in this article.
It is worth noting that in accordance with modern standards, the Lada Largus car has two plugs connected to the radio. Unfortunately, these plugs do not comply with the ISO standard.
That is, if you replace the standard radio, you will most likely have to buy an adapter for the radio. Plugs on Lada Largus are used as for Renault cars. It is worth saying that you can connect a joystick to the standard radio for control from the steering wheel; for this, there is a connector on the back of the radio. The question now remains where to get the joystick? You can learn more about the standards for connecting a radio in the article “Connecting a radio in a car with your own hands.” So, one of the plugs is used to connect power to the radio. Second, for connecting 4 speakers (2 front and 2 rear)
Let's sum it up
In our opinion, the standard car radio present in the practical Lada Largus station wagon is very worthy in terms of its functionality and sound. This can be confirmed by many owners of this practical car, because there are a lot of positive reviews on this topic on the Internet. In addition, a convenient manual is included, through which “making friends” with the radio will not be difficult and will not require much time.
| FM, Am ant OK | The radio module is working properly. |
| Microphone OK | The microphone is working. |
| VT-Module OK | Bluetooth works fine. |
| CD OK | The disc player operates normally. |
| Fascia Button OK | The keys work properly. |
| Power IC OK | The on/off button works. |
Let's start installation
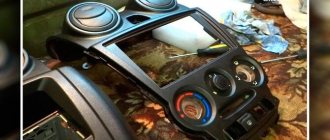
To install the radio, you need to remove the center console. It can be removed easily, just pry it from below and apply a little pressure. Then you should disconnect all wires connected to additional equipment. To ensure that the new audio device is recessed into the panel during installation, you need to remove the partition with a hacksaw. After all, the standard seat sizes in Granta are usually designed for 1 DIN size. Sometimes it is also necessary to slightly shorten the adapter flange leading to the central nozzles of the ventilation system. It won't harm her work in any way.
Center console disassembled
When installing, you should follow the recommendations from the instructions and use the wires and adapters supplied with the gadget. Sometimes it may be necessary to purchase additional items. This will be clear from the radio connection diagram. Usually the connection takes very little time.
After connecting and checking the functionality of the device, you should assemble the central console. To do this, install all the buttons and nozzles of the ventilation system, as well as the heater control unit from the old console. The nozzles and buttons must be secured with latches until they click, and the unit must be secured with two screws.
The console is secured to the dashboard with four clamping clips. They can be included in the kit or purchased separately. During installation, the frame is fixed from the inside with latches.
The console must be locked until it clicks. You should also secure it with screws. After this, the decorative frame snaps onto it. The radio is installed!
Installation completed