October 10, 2017 Lada.Online 56 113 9
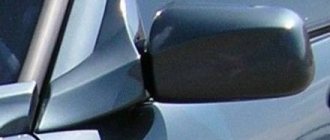
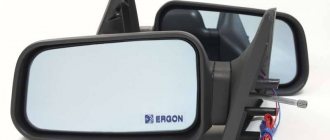
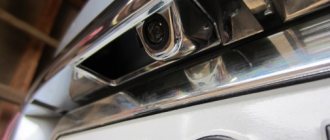
With the development of electronics, exterior mirrors are becoming multifunctional elements of the car. In a modern car, the side mirror may additionally contain: a camera, a vehicle recognition system in the “dead spot” and a lighting lamp that illuminates the space next to the car in the dark. Do you know that the last option can be installed on LADA cars with your own hands?
Required
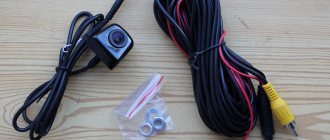
: LED, waterproof flashlights (in this example, 23 mm LED Eagle Eye, can be found in popular products from Aliexpress, price 50 rubles.)
The installation process is shown using the example of side mirrors of a Lada Priora. On other modern LADA cars (Vesta, XRAY, Largus, Granta, Kalina, Lada 4×4) all actions are performed similarly. You will find photo reports of these modifications on other LADA models in the comments to the article.
Do-it-yourself lighting in mirrors for alarms
Hi all!
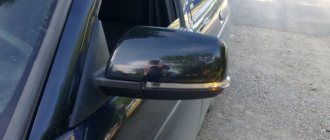
For a long time there was an idea to make the mirrors illuminated, namely to make it so that it would work from the alarm system, namely, it would light up when the car is disarmed). My alarm system is TOMAHAWK TZ-9020. I wanted to make it so that when you disarm the car, the backlight would light up for a certain time. The most important thing was to find the necessary wires in the main alarm unit for it all to work correctly. First of all, I removed the mirrors and took them home to the warmth, marked the holes, drilled holes, installed daytime running lights in the shape of an eagle eye in place of these holes, and ran the wires into the interior.
Then, when all the wires were found in the alarm units, I began to disassemble the front doors, removed the door cards and away I went, which I don’t really like, I had to thread the wires through the rubber corrugations, I also had to disassemble the front interior door sill trims in order to stretch the wiring from the door to the interior of the car) . When all the wires were connected to the alarm unit, the connection process began; we only needed two (2) wires, plus (+) and, accordingly, minus (-).
These two wires had to be connected to the connector and one which is minus (-) is responsible for the polite illumination of the car, and the other which is plus (+) is responsible for power). Next we check everything. And we put everything back together in reverse order.
So this is how it turned out for me! The backlight comes on when you disarm the car, when you turn off the car and take out the keys, the backlight also starts to light up for a few seconds.
I'm pleased with the result. The only annoying thing is that these eagle eyes stick out a little from the bottom of the mirrors. I made a video, or rather two, of how it all works.
Let's see if anyone has any questions, ask, I will try to answer everyone.
Thank you all for your attention! See you again!)))
Author; Alexander Shatalov, Samara
What things should you take to the exam?
In practice, driver candidates rarely think about this issue, so they get ready to take a practical exam in the same way as in any other place (to work, to a store, etc.).
You can often see girls coming to the exam with huge bags containing items for all occasions. However, at the race track, a large number of things not only do not help, but also hinder.
The fact is that during delivery, things will need to be placed somewhere. This could be the back seat of a training vehicle or a service area on the site. However, since the exam environment itself is quite stressful, it is quite common for examinees to forget to pick up their belongings or lose them.
Since your main task is to pass the race track the first time, it makes sense to solve the problem with personal belongings in advance, that is, not to take anything with you at all. A passport proving your identity will be sufficient for you.
Making a backlit mirror with your own hands
After renovating an apartment, the question arises of decorating it with various interesting design details that can fully show the capabilities and imagination of the owner.
In most cases, lighting for a bathroom mirror is done solely for decorative purposes.
One of these interesting solutions is an illuminated mirror, which can not only decorate and give a special charm to the bathroom, but is also a very convenient interior element to use.
Any bathroom these days is incomplete without a mirror.
The mirror should be selected based on the size of the room.
Spare parts for sale
Side mirror GAZ-3302 main spherical left 246x147mm BOR Article: 3302-8201417
Side mirror GAZ-3302 main spherical right 246x147mm BOR Article: 3302-8201416
Side mirror GAZ-3302 main spherical with heated left 12V BOR Article: 3302-8201417
Side mirror GAZ-3302 main spherical with heated right 12V BOR Article: 3302-8201416
Side mirror KAMAZ, MAZ main spherical without heating 430x200 BOR Article: SAKD 458.201.050
Side mirror KAMAZ, MAZ main spherical with heating 12V 430x200 BOR Article: SAKD 458.201.051-01
Side mirror MTZ, VMTZ, ChTZ main spherical 300x200mm BOR Article: 207.8201020
Side mirror MTZ, VMTZ, ChTZ main spherical with heating 12/24V 300x200mm BOR Article: 207.8201020
More products
Buy or make?
Of course, the shelves of shops and markets are overflowing with mirrors for every taste and pocket, but a thing made independently is in any case more reliable and cheaper. It is important to express your own taste and embody your vision in the product.
Mirrors can miraculously make a room appear larger if placed and sized correctly.
It is better to choose the shape of the mirror, taking into account the presence of geometric shapes and lines of the bathroom.
Making a backlit mirror with your own hands is not at all difficult. This process does not require any special professional skills or tools; it is enough to decide on the appearance and design of the mirror.
The color of the mirror should match the shade of the bathroom, namely the ceiling, floor and walls.
Or, on the contrary, you can focus attention on the mirror area by choosing a brighter shade.
Design selection and design features
First you need to choose the size, shape and type of mirror. These parameters should be chosen based on the size of the bathroom and your own imagination. Lighting can be provided with light bulbs, but the option with an LED strip looks more compact and modern.
A backlit mirror not only expands the space by reflecting objects, but also reflects the light emitted by it.
It is appropriate in both chic and modest interiors.
The backlight will be applied along the contour of the mirror either in a special box or simply on adhesive tape. If the mirror has a complex geometric shape with bends and curvatures, installing the box will be difficult, so it’s easier to limit yourself to tape, which is best glued to the back of the mirror, providing a pleasant hidden glow.
An illuminated mirror can also have additional heating, which helps prevent the glass from fogging up while someone is taking a shower.
If desired, the design can be equipped with a sensitive IR sensor, with which you can adjust the brightness and backlight modes (such work requires certain knowledge in electrical and electronics).
Illuminated mirrors create the best lighting for cosmetic procedures, since the light emanating from it is directed onto the reflected object, without creating distortions or shadows.
What's next
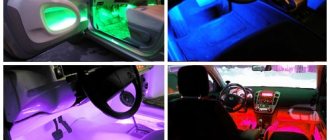
Having studied the main advantages and characteristics of LEDs, as well as strips using them, I began to think about what options to implement in my apartment. And there really are many examples. Here are just a few of them.
New feature! Photos are grouped into a gallery - to view the next/previous one, click on the arrow.
However, I was interested in complex projects that span the entire space. And I found this option, although YouTube rather helped me here. How? Yes, it’s very simple - after watching one of the videos, the service suggested that I familiarize myself with similar ones and this is what I saw:
The guys who filmed the video implemented a whole project in which practically only LEDs, lamps based on them, as well as LED strips are used to illuminate the apartment.
From the description it became clear that each room has 3 lighting modes: behind the cornice, lighting of ceiling niches, as well as main lighting of 400 lux.
Materials and tools
Materials you will need:
- Mirror;
- Material for the frame (can be made of metal, plastic or wood);
- Wall mounts;
- Adhesive and surface degreaser;
- LED strip with connecting elements and power supply.
The set of tools is quite simple and consists of a screwdriver or screwdriver, a ruler and level for marking, a hacksaw for preparing the frame, scissors for tape, and self-tapping screws for fastening.
No. 5. Controller for RGB strips
For multi-color tapes, the calculation of the power supply power is the same as described above, only for them you will also need to purchase a controller. Its power is equal to the power of the adapter, but may be slightly higher. A controller is needed to change colors, saturation and run various programs. It is mounted between the tape and the power supply.
There are different controllers:
- the simplest ones can only switch several colors;
- more expensive models allow you to create the effect of running lights, flickering or smooth changes in shades;
- controllers with an IR remote control allow you to control the backlight remotely, but the controller must be located close to the remote control. The radio remote control allows you to control the tape even from another room, configure thousands of shades and dozens of operating modes. You can even program the tape to run at certain times in a specific mode.
There are also controllers that can be controlled via Wi-Fi using a smartphone. Their functionality is almost the same as that of radio models.
Manufacturing process
- To begin with, the mirror glass is mounted on the frame. The simplest option is a plastic base, which is attached to the glass with glue. At this stage, it is necessary to provide hooks or loops with which the finished mirror will be hung on the wall.
A mirror on which the lighting will be installed.
The size of the back frame is determined based on the size of your mirror.
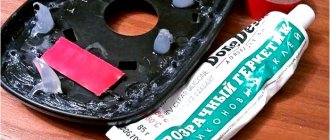
It is necessary to use a neutral glass sealant as glue so as not to damage the mirror amalgam.
Before gluing all elements, the bonded surfaces must be thoroughly degreased, otherwise the structure will very quickly lose reliability in conditions of high humidity in the bathroom. It is best to choose a glue that is waterproof and neutral in chemical composition; it will last a long time in humid conditions of the room and will not damage the structure of the glass. Sealants are best suited for these purposes.
The channels perform a double function: tape is glued to them, and plastic covers are also attached.
Covers are a must; they act as a reflector and prevent the mirror from showing through at the junction with the wall.
Perform the work carefully to avoid damage to the mirror surface.
If desired, you can use a special metal profile when gluing on the outside of the structure.
It is important that the power of the power supply is no more than 50% higher than that of the LEDs, otherwise the LEDs will very quickly fail due to overload in the network.
Given the high humidity of the bathroom, all work related to electricity must be carried out in full compliance with safety precautions.
This way you can create your own unique mirror that no one else will have.
As you can see, there are no particular problems installing the lighting on the mirror.
Reflector installation: which material is more convenient to use?
Initially, it was planned to use sheet aluminum as a reflector. But this plan was not destined to come true. The reason for this was the high cost of the material and the complexity of its processing. The solution came during the installation of the frames - to use a regular glossy PVC panel. This turned out to be correct. The material is easy to process and does not require large financial costs.
First, all parts of the reflector were cut out and tried on. To fix the plastic panel on the inner frame, holes were drilled in the aluminum profile.
Fitting the panels took a minimum of time - processing the material did not cause any problems
Decoration and decoration options
Depending on the flight of creative thought, a ready-made mirror can be decorated with a picture or a sticker, as well as placing lamps in some fancy shape.
If desired, you can assemble multi-colored lighting, but in this case you will need additional equipment.
Mirrors equipped with touch panels that respond to touch look like an interesting option, but this option is expensive and can be quite problematic to do at home without the help of a professional.
Illumination can be done in different ways, for example, along the edge of a mirror sheet in the form of a frame.
As you can see, there are no particular difficulties in this process, so making your own illuminated mirror can give you a wonderful interior element that will not only perform a decorative function, visually expanding the bathroom in a very beneficial way, but also illuminate the room with a pleasant light from diode lamps.
An illuminated mirror is an ideal choice for creating diffused lighting in the bathroom.
Advice from professionals
In addition to the manufacture of the frame itself, an equally important point is its mounting on the table. Most often, self-tapping screws supplemented with plastic washers are used for this purpose. It is the plastic that will prevent the mirror from cracking, but will provide the required fixation. The reflective plate itself is most often glued with transparent glue designed specifically for this purpose.
It is better to use 2 to 4 fasteners. In principle, such a mirror can even be hung on the wall.
A number of useful tips regarding the use of a makeup mirror can be obtained from specialists. For example, keep children away from it, since electricity is connected to the structure.
It is a good idea to place the display surface above the cosmetics cabinet to immediately provide yourself with a place to store it, as well as at a comfortable distance from the person sitting. By the way, LED bulbs should definitely be taken with fuses for maximum long-term operation.
Luminescent models should not be taken under any circumstances, as they distort perception and therefore can harm the main process - applying makeup. Next to the table it will seem ideal, but in daylight it will lose its quality. Warm shades of lamps will be more pleasing to the eye, but cool shades will highlight all skin imperfections, and they can be disguised.
In general, the number of light bulbs may vary depending on the dimensions of the frame, but two of them must be mounted at eye level for more comfortable operation. It should be added that similar lighting can be arranged on the wardrobe.
To learn how to make a make-up mirror with your own hands, watch the video.
Daewoo Nexia is just a car › Logbook › Polite lighting in the mirrors - part 1 - INSTALLATION
As usual, while browsing the drive, I found a Klopyra topic about lighting in the rear-view mirrors
, but I decided to implement it differently since we have different mirrors
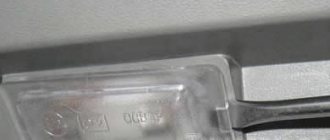
We buy diodes with nuts
We wrap the mirrors with tape, drill holes for the diodes and make “sunk holes” so that the diode sits deeper
Grinding diodes for countersunk
The diode had to be disassembled and removed from the housing (to shorten the bolt)
I replaced the nut with a washer, in which I cut the threads with a 10 mm saw
Fix the wires and washer with hot glue
As practice has shown, diodes with a power of 3W are a lot - they shine like a SPOTLIGHT
, connected to
the StarLine A91 signaling system
(polite backlight function)
Connected according to the diagram
That is, when you remove the signal from channel 4, a minus sign comes and the backlight lights up for 20 seconds, and when you turn off the ignition, the backlight also lights up for 20 seconds (to get out of the car with the backlight