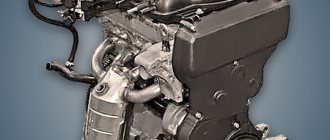
In order to replace the speedometer drive on a “classic”, you will need several wrenches (10, 13) and a lift or inspection ditch.
The sequence of operations for replacing the drive is given below. Each number in the image corresponds to a step in the list. The work is performed sequentially and takes about 20 minutes.
- Using a 13mm wrench, unscrew the bolt of the clamp securing the exhaust pipe of the muffler to the gearbox.
- Unscrew the nut securing the flexible shaft of the speedometer drive.
- Using a 10mm wrench, unscrew the drive fastening nut.
- Using a 13mm wrench, unscrew the two nuts securing the cross member to the body. Then we lower the rear of the transmission down so that the studs come out of the crossmember holes.
- We shift the gearbox to the right and remove the speedometer drive from the hole in the crankcase.
We install the new drive in the reverse order of removal.
To replace the flexible shaft (cable), disconnect the upper fastening of the drive cable from the speedometer and remove it from the hole in the front body panel.
What is the difference between the speedometer drive of the VAZ 2101, 2103, 2106?
Depending on the gear ratio of the rear axle gearbox, speedometer drives can be of three types. They differ in the number of driven gear teeth (12, 9, 13).
One of the rarest, almost “extinct” on the auto parts market is the 2101 drive without a mark with 12 teeth. It is suitable for Zhiguli gearboxes with a rear axle 2101, which has a gear ratio of 4.3. The VAZ 2102 station wagon (gearbox – 4.44) is also installed on older models, but has a larger reading error (“overestimates”).
Drive 2103 (9 teeth) is marked with red paint - for a gearbox with rear axle 2103 with a gear ratio of 4.1.
The most popular option nowadays is the VAZ 2106 drive with 13 teeth, which has a blue mark on the body. Suitable for classic VAZ car models with axle 2106 (main gear ratio - 3.9).
How much does a new drive cost?
In auto stores in Moscow and the region, the average price for a speedometer drive is about 300 rubles.
SPECIALISTS ANSWER
NIKOLAI OVCHINNIKOV – HEAD OF THE STEERING FINISHING BUREAU; ALEXEY KLIMENKO – ENGINEER, TRANSMISSION DEVELOPMENT DEPARTMENT; VYACHESLAV VLASOV – LEADING ENGINEER OF THE TRANSMISSION DEVELOPMENT DEPARTMENT; ANATOLY ABEZIN – CONSTRUCTION ENGINEER, SUSPENSION KB.
Is it necessary to check the oil level in the steering gear housing of the “classic” and, if so, how to do it?
Actually, you don't need to do this. But if a leak is detected or there are any other reasons for doubt, the amount of oil in the crankcase is easy to check. Its level should be under the lower cut of the filler plug.
Does it make sense to use bearings in swingarms?
Certainly! Bearings (in this case, sealed ones are used) instead of nylon bushings, albeit slightly, do reduce the effort required to turn the steering wheel. At the same time, the rigidity of the trapezoid increases slightly, which has a positive effect on the stability and controllability of the car. The plant used this design on the new Niva VAZ-2123.
On the VAZ-21074, first and reverse gears are difficult to engage from time to time. It is sometimes impossible to even turn them off when the engine is not running and the car is stationary - only when moving. Replacing the clutch didn't help.
Most likely the cause is the transmission input shaft front bearing, which is mounted at the rear end of the engine crankshaft. It is possible that the bearing jamming creates the effect of a partially disengaged clutch and makes it difficult to shift gears, including if the engine is not running and the car is stationary. This is especially noticeable when using the lowest gears - reverse and first, when the rotational resistance is maximum.
Are there rear suspension springs for the VAZ-2115 sedan? If you believe the catalog, then VAZ-2108-2912712 springs are installed on it. But could it be that the VAZ-21099 weighing 940 kg has original springs, but the “fifteenth” weighing 985 kg does not?
In stores and on the market they often offer supposedly “ninety-ninth” rear springs. This is either a deception or a delusion. According to the documentation, all Samaras (from 2108 to 2115) have only “eighth” springs in the rear suspension. There are two options: the first, “high” - for the domestic market and “low” - for export. Each option is divided into two classes - A (“hard”) and B (“soft”). All springs are painted white, and differ in the color of the applied marks. For Russia: class A - yellow mark, class B - green. For export, respectively, A is brown, B is blue.
The device does not work, how to disassemble it?
Speedometer device
The indicator is designed to inform the driver about the speed at which the car is moving, as well as the daily and total mileage. All information is reflected on the dial located on the dashboard.
On vehicles with a carburetor engine, a mechanical speed meter is installed, on engines with an injector - an electronic one.
The mechanical meter operates thanks to a worm gear and a metal cable through which the torque of the secondary shaft is transmitted. The electronic counter also uses a worm gear, only the rotations are transmitted to the speed sensor shaft. The information is displayed on the display.
Causes of device malfunction
Signs of a device malfunction include incorrect readings and noise during operation.
The reasons may be the following:
- the counter is faulty;
- the fastening nuts are loose;
- break of a flexible cable;
- the tip or the socket into which it is inserted is damaged;
- the drive is broken or the socket through which it connects to the gearbox is damaged;
- The cable sheath is damaged.
Checking the mechanism for functionality
To diagnose the cause of the meter malfunction, you need to lift the car using a jack and remove the meter cable. At the next stage you will need an assistant. One person rotates the raised wheel while a second person watches the flexible shaft. If the cable rotates, then the reason is in the counter; if rotation does not occur, the cable will have to be changed.
The electronic device is checked by testing the instrument panel. Press reset and turn off the ignition. When the ignition is turned on again, the arrows on the speedometer should move three times. If they remain motionless, this indicates a malfunction of the meter.
Speedometer Troubleshooting Instructions
To carry out repair work, the VAZ vehicle should be installed on a lift or inspection groove.
Drive repair and replacement
To repair or replace this device, you must follow these steps:
- Using a “13” key, you need to unscrew the bolt on the clamp, thanks to which the exhaust pipe is attached to the gearbox.
- Then unscrew the flexible shaft fastening nut, the drive fastening nut and the nuts that secure the cross member to the body.
- The next step is to lower the rear of the gearbox so that the studs can come out of the crossmember holes.
- By moving the gearbox to the right, you can remove the device drive from its seat on the crankcase.
- Next, install the new device and perform the reverse steps of removal.
Replacing the speedometer drive
But at first I just thought that the drive was faulty, I counted the teeth (luckily only the middle was ground down), there were 13 of them, as in principle on all cars of this model with a five-speed gearbox, I bought a new one and installed it.
Imagine the surprise when, after a couple of kilometers, the speedometer failed again. Having removed the drive again and contrived, he looked into the hole in the box, while turning the shaft. It turned out that there was a problem.
I’ll write about how to change the speedometer drive drive gear in another article, but for now about replacing the drive.
Types of drives
When purchasing a drive, you still need to be careful. It is advisable to first remove the drive and count the teeth, since their number varies. There are several types of them: 9, 12 and 13 teeth. The installation of one or another drive depends on the installed rear axle, since they have different gear ratios. The 13 teeth are color coded blue.
If you are one hundred percent sure that the drive is faulty, then buy it. But I still recommend that you first figure out the reason why the speedometer is not working and only then make a purchase.
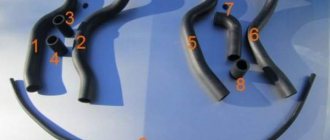
Replacing the seven speedometer drive
- in order to remove the part from the box, you need to lower it a little by unscrewing the nut 13 securing the box;
- use a 10mm wrench to unscrew the drive;
- Pull it out a little and turn it to disconnect the connector and unscrew the speed sensor.
- We pull out the part to the end.
Unscrew the box fastening
Unscrew the speedometer cable
Unscrew the speed sensor
Assembly is carried out in reverse order.
Reinstalling the speedometer drive
Note
Now there are still enough fakes on the market, and in order not to buy a low-quality part, check it at least a little. To do this, grab the gear on one side and the output on the other and try to turn it. If the engagement slips, it is better to refrain from such a purchase.
Checking and replacing the VAZ 2107 speed sensor
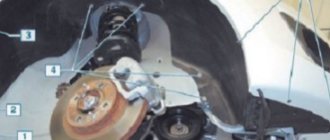
While the vehicle is moving, the VAZ 2107 speed sensor (injector) generates speed data sent to the electronic engine control unit. Its breakdown causes injection control errors and leads to a drop in engine power and an increase in fuel consumption. You can check and replace the sensor yourself. To do this, you will need a garage with an inspection hole, a slotted screwdriver, a 22 mm wrench and a multimeter or test lamp.
The principle of operation of the VAZ 2107 speed sensor
The operation of the speed sensor is based on the Hall effect, which describes the occurrence of electrical impulses when a conductor with direct current is placed in a magnetic field. The sensor generates pulses during the rotation of the output shaft of the VAZ 2107 gearbox. During the time the car travels a kilometer, the VAZ 2107 speed sensor generates about 6000 pulses, the frequency of which allows you to determine the current speed.
Where is the VAZ 2107 speed sensor located?
The sensor is mounted on the gearbox in the speedometer cable drive mechanism. To remove and check it, you will have to disconnect the gearbox speedometer cable.
Symptoms of a problem
The main sign of problems in the operation of the sensor is the issuance of the corresponding error code by the on-board computer. Malfunctions may manifest themselves in other signs:
- increased fuel consumption;
- poor engine thrust;
- speedometer not working or working with a large error;
- unstable idle.
Attention! These four symptoms can be caused by problems with other parts of the car.
Causes of sensor malfunction
The design of the sensor is quite reliable. The cause of the breakdown is usually oxidized contacts on the sensor or broken wires that go from the sensor to the engine ECU. The contacts should be inspected, if necessary, cleaned and lubricated with “Lithol”. It is better to start searching for broken wires from places close to the plug. There they bend more often and, accordingly, fray and break. At the same time, it is worth checking the grounding of the sensor. The resistance in its network should be about 1 Ohm. If no fault is identified, you need to check the speed sensor itself. To do this you will have to remove it from the car.
How to remove the speed sensor VAZ 2107
To remove the speed sensor, you must perform the following operations:
- install the car above the inspection hole;
- engage the parking brake;
- place wheel chocks under the wheels;
- from the inspection hole, using a slotted screwdriver, unscrew the nut of the speedometer drive cable;
- disconnect the cable from the gearbox;
- loosen the plastic clamp that tightens the wiring harness coming from the speed sensor;
- press the spring clips and disconnect the block from the speed sensor;
- Using a 22mm wrench, unscrew the sensor from the speedometer drive;
- remove the speed sensor.
The VAZ 2107 speed sensor can be checked using a multimeter or “control”. To install the sensor, you must do the above steps in reverse order.
Checking the speed sensor
The easiest way to check the speed sensor is to install a new one in its place. The price of the part is low, so this is the easiest and fastest way to make sure it is working or broken. If you don’t have a new VAZ 2107 speed sensor at hand, you should first check the old one, and then go to the store for a new one. To check the operation of the speed sensor, you will need a small plastic tube with a diameter corresponding to the thickness of the sensor axis, and a voltmeter (multimeter). The check is performed in the following sequence:
- connect a voltmeter to the sensor output that supplies electrical signals and to the vehicle ground;
- put the tube on the sensor axis;
- rotate the tube.
As the tube rotates, the voltage at the sensor output should increase in proportion to the rotation speed. If this does not happen, the VAZ 2107 speed sensor needs to be replaced.
Tip: In a similar way, you can check the speed sensor directly on the car. To do this, you need to hang up one of the drive wheels, connect a voltmeter to the sensor output and ground, and start rotating the wheels. If voltage and pulses appear, the sensor is working.
Instead of a voltmeter, you can use a test lamp. In this case, when checking the functionality, voltage must be applied to the “positive” output of the speed sensor. If the light flashes when you rotate the sensor, the problem is not with the sensor. You will have to check other components and parts of the “seven” that could affect the operation of the engine ECU.
Basic speedometer faults
Malfunctions can be divided into two types:
- the speedometer does not show the current speed;
- The speedometer drive is noisy.
The VAZ 2107 speedometer may not work for the following reasons:
- The speedometer is faulty. In this case, the device must be replaced.
- The nuts securing the ends of the flexible shaft have come loose. To fix the problem, they need to be screwed on.
- The flexible shaft is broken. It must be replaced to restore the speedometer's functionality.
- The tip of the flexible shaft or the mating socket on the speedometer is damaged. In this case, you should change the VAZ 2107 speedometer cable or the speedometer itself
- The flexible shaft drive is faulty or the speedometer drive socket in the gearbox is damaged. This is a rare breakdown, the elimination of which involves repairing the gearbox and is worthy of description in a separate article.
The VAZ 2107 speedometer drive can make noise for two reasons:
- The drive is laid with small bending radii. To fix the problem, you need to re-route the speedometer cable, having previously lubricated it.
- The braiding of the VAZ 2107 speedometer cable is damaged. In this case, the flexible speedometer drive assembly needs to be replaced.
As practice shows, most malfunctions are related specifically to the VAZ 2107 speedometer cable and can be eliminated by replacing it.
The drive can make noise for the following reasons:
- the cable has a small bending radius. Here it is necessary to re-route the drive;
- The cable sheath is damaged. In such a situation, it is necessary to replace the speedometer drive assembly.
As practice shows, the largest number of breakdowns of the VAZ-2107 speedometer are associated with its drive and can be eliminated by replacing the flexible cable. To do this you will need pliers and a screwdriver. To facilitate installation, you can use steel wire with a length of about 2 m and a cross-section of 0.5 mm. The drive is fixed in the lower part of the crankcase to the gearbox, so repairs require a lift or inspection hole.
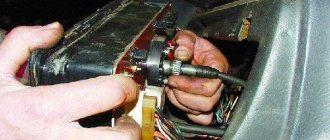
How to replace the speedometer drive?
In order to replace the speedometer drive on a “classic”, you will need several wrenches (10, 13) and a lift or inspection ditch.
The sequence of operations for replacing the drive is given below. Each number in the image corresponds to a step in the list. The work is performed sequentially and takes about 20 minutes.
- Using a 13mm wrench, unscrew the bolt of the clamp securing the exhaust pipe of the muffler to the gearbox.
- Using a 10mm wrench, unscrew the drive fastening nut.
- Using a 13mm wrench, unscrew the two nuts securing the cross member to the body. Then we lower the rear of the transmission down so that the studs come out of the crossmember holes.
- We shift the gearbox to the right and remove the speedometer drive from the hole in the crankcase.
Unscrew the nut securing the flexible shaft of the speedometer drive.
We install the new drive in the reverse order of removal.
To replace the flexible shaft (cable), disconnect the upper fastening of the drive cable from the speedometer and remove it from the hole in the front body panel.
Causes of breakdowns
The causes of breakdowns are usually associated with mechanical damage to one of the drive parts, but some malfunctions can occur due to contamination or lack of lubrication. The main manifestations and signs of a malfunction will help you diagnose the specific cause of the breakdown.
- If the arrow lies at zero and does not respond to acceleration, then, most likely, a broken drive cable is to blame for the breakdown. In this case, it will have to be replaced. However, such a malfunction can also be caused by other reasons, for example, a loosening of the nut securing the flexible shaft to the speedometer. In this case, a simple tightening of the nut will “cure” the speedometer needle from its vagaries.
- The speedometer making a knock may be due to dirt getting into the socket for attaching the flexible cable to the transmission secondary shaft, or to loosening of the fastening. In such a situation, it is necessary to inspect the seat of the drive gear to the drive shaft and eliminate the cause of the breakdown.
- The operation of the speedometer needle with an uncharacteristic sound is most often associated with a lack of lubrication of the flexible cable and, accordingly, its additional friction. Such a malfunction can be “treated” simply - the cable is coated with lubricant, after which the malfunction is eliminated.
- Cases when the speedometer needle goes off scale and lies motionless in this position are associated with a rupture of the opposing spring in the drive shaft. In this case, the drive changes completely.
- The high error in speedometer readings is associated with incorrect attachment of the flexible cable to the secondary shaft of the gearbox, which is why the speedometer receives incorrect impulses and, accordingly, rotation data. This problem can be corrected by adjusting the cable fastening.
Problems with the speedometer are not always associated with drive failure. For example, a malfunction of the electric motor of an electromechanical speedometer will also lead to malfunction of the device. To check the operation of the drive, you need to start the car, first hanging one wheel and supporting it so that when you engage the gear, the car does not move spontaneously. If in this case the drive rotates, then the problem is associated either with a malfunction of the speedometer itself or with a break in the drive cable. Otherwise, the drive is to blame and will have to be replaced.
What is the difference between the speedometer drive of the VAZ 2101, 2103, 2106?
Depending on the gear ratio of the rear axle gearbox, speedometer drives can be of three types. They differ in the number of driven gear teeth (12, 9, 13).
One of the rarest, almost “extinct” on the auto parts market is the 2101 drive without a mark with 12 teeth. It is suitable for Zhiguli gearboxes with a rear axle 2101, which has a gear ratio of 4.3. The VAZ 2102 station wagon (gearbox - 4.44) is also installed on older models, but has a larger reading error (“overestimates”).
Drive 2103 (9 teeth) is marked with red paint - for a gearbox with a rear axle 2103 with a gear ratio of 4.1.
The most popular option nowadays is the VAZ 2106 drive with 13 teeth, which has a blue mark on the body. Suitable for classic VAZ car models with axle 2106 (main gear ratio - 3.9).
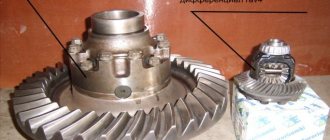
repair of gearbox differential on VAZ 2108, VAZ 2109, VAZ 21099 cars
1. Remove the differential (Fig. 5.12) from the gearbox (see “Disassembling the gearbox and troubleshooting its parts”).
2. Turning 90° around the pinion axis, remove the side gears from the differential housing.
3. Remove the retaining ring from the pinion shaft.
4. Remove the pinion axle and two pinions from the differential housing.
5. Remove the bolts securing the driven gear to the differential housing.
6. Press the driven gear off the differential housing. 7. Inspect the working surfaces of the satellites, the axes of the satellites, side gears and the spherical surfaces of the differential housing in contact with them. Remove small irregularities with fine-grained sandpaper. Replace parts with significant defects.
8. Check the condition of the transmission driven gear. If there are chips, chipping or significant tooth wear, replace the driven gear. On VAZ 2108, VAZ 2109, VAZ 21099 cars, final drive gears with different gear ratios are installed. The number of teeth of drive gear 1 and the number of teeth of driven gear 2 are stamped on the driven gear.
WARNING The final drive gears are selected in pairs at the factory based on noise and contact patch. Therefore, when replacing the driven gear, also replace the drive gear: the driven and drive gears are sold as a pair. To check, count the number of teeth on the drive gear.
9. Inspect the bearing seats on the differential housing. If these areas are significantly worn out, replace the differential housing. If there is pitting (sinks) on the raceways and rolling elements, traces of indentation of the rolling elements on the raceways, or damage to the cages, the bearings must be replaced.
10. To replace the differential bearings, use a puller to press the bearings off the differential. In this case, the bearings are destroyed. Then…
11.... press out the outer rings from the gearbox and clutch housings with a special puller. If there is no puller, press out the axle seals first. Please note that in this case the seals are damaged and the seals must be replaced (for more details, see “Replacing gearbox seals”). Press out the bearing rings from the outside of the crankcases with a punch.
12
Please note: there may be an adjusting ring under the ring installed in the gearbox housing, which must be re-selected before pressing in new rings (see “Selecting a differential bearing adjusting ring”)
13. If it is necessary to replace the speedometer drive gear, you can press the bearing (without destroying the bearing) using two screwdrivers, applying force to the inner ring of the bearing. The gear will be destroyed, but the gear still needs to be replaced.
14. Assemble the differential in the reverse order of removal, having first lubricated all parts with transmission oil. In this case, the driven gear is installed with the teeth marked outward.
Rice. 5.12. Gearbox differential of VAZ 2108, VAZ 2109, VAZ 21099: 1 - speedometer drive drive gear; 2 — satellite; 3 — semi-axial gear; 4 — driven gear of the main gear; 5 — satellite axis; 6 — differential housing; 7 — differential bearing