“Seven” is still popular, they are bought, then sold, then bought again. This is the most advanced model of the classic Lada.
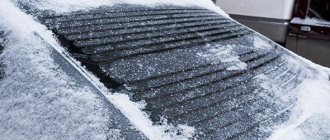
The rear window heating schemes for each car brand are different, but for models of the same family they are approximately the same. The VAZ 2107 heater circuit is simple. You should look for the reason for the intermittent or completely non-functioning glass heater in the electrical circuit diagram. Heated glass does an excellent job of preventing fogging, but it happens that the heater is working, the heating is working, but the glass in the car still sweats.
What does computer diagnostics of the heater control unit reveal?
Carrying out this diagnostic procedure allows you to find out the status of all sensors. Check the software installed in the heater ECU. Find out the performance of the micromotor reducer of the Priora heater. And adjust the units. This operation, adjustment, allows the computer to more accurately produce the temperature closest to that set by the driver. That is, by manipulating the damper, the ECU combines the sensor resistance data into a single system.
How and with what to carry out this operation
Computer diagnostics of the Priora heater control unit is done by pairing the vehicle equipment with a diagnostic device through a special diagnostic connector. It is located quite cleverly, behind the glove box, in common parlance the glove compartment. To access it, you need to pull out this drawer, located on the passenger side, all the way. On its back wall, at the bottom left side, there is a connector.
This type of diagnosis requires professional equipment. This is either a full-fledged motor tester, or a professional scanner such as “Auto-AS” and others. Only they have this function included.
How to do it
Connect the connectors and turn on the ignition. Wait for a connection signal from the equipment. Exit to the work menu. Find the option “SAUO heater” and turn it on. Then everything is the same as when diagnosing the engine ECU. First of all, check for errors. Then check the operation of the mechanisms using the “IM control” function.
Each diagnostic device has its own instructions. Before connecting the device, be sure to study them! Video on the topic of diagnostics "Priors". Checking the electrical package. The same algorithm for checking the heater:
Principle of operation
In addition, the Priora heater device includes important components, without which normal operation of the stove would be impossible. These include the following mechanisms:
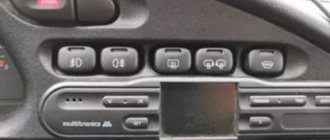
- The operation of the control unit is based on turning the knobs, each of which is responsible for one or another system parameter.
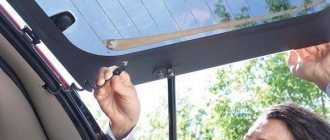
- The cabin temperature sensor allows you to maintain the required temperature at a constant level. This mechanism is located in the headliner trim.
- The additional resistor is located in the fan housing along with the fan, radiator, filter and damper.
- The radiator is connected through hoses to the system that cools the engine. During vehicle operation, coolant circulates from the engine to the radiator all the time. The heater is controlled by a damper, which changes the direction of outside air, directing it towards or past the radiator. The damper can be located in an intermediate position, which provides for the division of the external air flow: one part is directed to the radiator, and the other passes past it.
- The micromotor is responsible for controlling the movement of the damper. It is located on the left side of the body. The micromotor gearbox has an output shaft, which is connected to the axis on the damper.
This is exactly what the Priora stove (2020) is designed like. But we have not yet considered all working issues.
Delivery by transport company (cash on delivery, no prepayment)
Advantages:
- the cost of delivery of heavy and large-sized orders is much cheaper than that of Russian Post;
- There are practically no restrictions on the weight and dimensions of cargo;
- There is a wooden crate service - this is an additional guarantee of the integrity of the order.
Disadvantages: unfortunately, there are branches only in cities.
The estimated cost of delivery for an order up to 30 kg is 450 rubles.
List of transport companies with which we cooperate:
- TC "PEK" (cash on delivery service available);
- TC "Business Lines";
- TC "Energia";
- TC "KASHALOT" (KIT) (cash on delivery service available);
- TC "SDEK" (cash on delivery service available);
- TC "DPD";
- TC "ZhelDorExpedition";
- TC "VOZOVOZ";
- TC "Baikal-Service".
To send your order by transport company:
- Place an order in our online store by phone or on the website (registration is not necessary);
- After we receive it, our manager will contact you by phone to clarify the cost, delivery time and your wishes. Next, we will pack your order carefully and then send it to you;
- You will receive a shipment tracking number from us via SMS or email (if available). You can monitor the status of the order coming to you using our tracking service, as well as independently, on the transport company’s website using the track number. After the order reaches your locality and the manager of the transport company contacts you, you need to receive the order at their office or order home delivery;
- Upon receipt from the transport company, you pay the cost of delivery and order.
The cost of delivery is calculated based on the volume, weight of the selected product and the distance from the city of Tolyatti.
To send an order you must:
- indicate full name recipient;
- Your locality and region;
- series, number of passport or driver's license;
- Your phone number (contact).
TC "Business Lines" - Urgent delivery of goods from 1 kg throughout Russia. The exact cost can be found on the official website of the delivery service - https://www.dellin.ru TC "PEK" - Guaranteed safety of cargo for the entire duration of cargo transportation, clear information support, delivery of goods throughout almost the entire territory of Russia, Belarus and Kazakhstan in optimal time and accurately calculated cost of services. The exact cost can be found on the official website of the delivery service https://pecom.ru/ru/calc TC "SDEK" - Low tariffs compared to foreign courier companies, while the quality of the services provided meets modern international logistics requirements. Developed network of own representative offices. The exact cost can be found on the official website of the delivery service https://www.cdek.ru/calculator.html TC “ZhelDorExpedition” - Serves only large cities and towns. The exact cost can be found on the official website of the delivery service - https://www.jde.ru/branch TC "Energia" - Cargo transportation in Russia, the CIS and China. The exact cost can be found on the official website of the delivery service https://nrg-tk.ru TC "KASHALOT" (KIT) - Delivery of cargo from 1 kg to 20 tons throughout Russia and Kazakhstan. The exact cost can be found on the official website of the delivery service https://tk-kit.ru/calculate TC "Baikal-Service" - Transportation and delivery of groupage cargo by road in Russia. The exact cost can be found on the official website of the delivery service https://www.baikalsr.ru TC “DPD” - Transportation and delivery of groupage cargo by road in Russia. The exact cost can be found on the official website of the delivery service https://www.dpd.ru TC "VOZOVOZ" - Transportation of groupage cargo by regular delivery routes between Russian cities.
The exact cost can be found on the official website of the delivery service https://vozovoz.ru The filaments glued to the glass have some resistance, when an electric current is applied to them, they begin to heat up due to the resistance, thereby heating the glass and melting it ice. On one side, a plus “+” is supplied to the filament, and the other end of the filament is connected to a minus “-”.
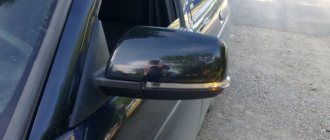
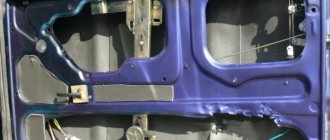
Lada Priora in any configuration is equipped with a heated rear window and heated mirrors. The heated mirrors turn on when the heated rear window is turned on. The design of heating mirrors is based on the same system as with heating glass; filaments are glued to the mirrors, which warm the mirror and help it to sweat.
One thought on “Electrical diagram of Lada Priora in detail”
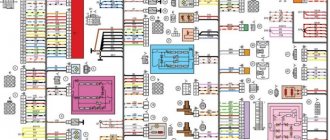
These materials present in an extremely simple and accessible form a description of the maintenance and repair of VAZ Lada Priora cars in a step-by-step manner using ready-made spare parts in a garage workshop. Possible malfunctions have been studied and methods for eliminating them have been considered.
The relay and fuse box is also called the mounting block or black box. In the event of a car breakdown related to electrical equipment, the fuses and relays are first checked. If a fuse is blown, you must first determine the cause of its blown before replacing it.
Installing fog lights on a Priora
Fog lights are necessary in poor visibility conditions: fog, heavy rain. Their main feature is the distribution of light flux over the road and along the edges, which significantly improves visibility in bad weather. The basic configuration of the Priora does not include fog lights. They should be installed to increase traffic safety on the road. Fog lights improve visibility not only for the driver on whose car they are installed, but also for all other road users.
Other methods and connection diagram
The largest category of cars that do not have heated mirrors, of course, are all our domestic car models, so the most pressing question for the VAZ 2112 is how to connect heated mirrors, now we will tell you the answer. So:
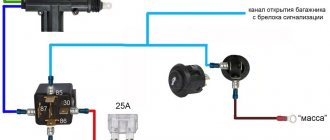
Installing heating is a very popular variety of tuning procedures, because it is not particularly difficult and is therefore available to every interested car owner, the connection diagram is shown in the photo below
Electrical diagram for connecting heating elements
Of course, when it is urgently necessary to do heating, then the purchase and installation of new mirror elements with a built-in heater is the most popular and most often used option
How to disarm the electrical package unit of LADA PRIORA
What to do if Priora is not removed from the standard alarm!
The hazard warning light blinks, the car does not respond to the ignition key buttons. As a rule, several units are involved here that are synchronized with each other.
- Ignition
- Radio channel module (Located in the driver's door)
- Electrical package block (Comfort block)
- Engine ECU
New blocks come with non-activated codes inside and can be installed on any car without problems, but once you register (train) the keys, a special code is written into all these blocks, which is synchronized with each other and serves as a standard alarm system. (Immobilizer) As soon as you turn the ignition key, within five seconds there is a poll between the key and the units, if the code matches everywhere, then the engine ECU gives permission to start, if the code of at least one device is not recognized, the engine ECU is blocked and the car does not start.
Stories from our readers
“Fucking basin. "
Hi all! My name is Mikhail, now I’ll tell you a story about how I managed to exchange my two-wheeler for a 2010 Camry. It all started with the fact that I began to be wildly irritated by the breakdowns of the two-wheeler, it seemed like nothing serious was broken, but damn it, there were so many little things that really started to irritate me. This is where the idea arose that it was time to change the car to a foreign car. The choice fell on the melting Camry of the tenth years.
Yes, I had matured morally, but financially I just couldn’t handle it. I’ll say right away that I am against loans and taking a car, especially not a new one, on credit is unreasonable. My salary is 24k a month, so collecting 600-700 thousand is almost impossible for me. I started looking for different ways to make money on the Internet. You can’t imagine how many scams there are, what I haven’t tried: sports betting, network marketing, and even the volcano casino, where I successfully lost about 10 thousand ((The only direction in which it seemed to me that I could make money was currency trading on the stock exchange, they call it Forex. But when I started delving into it, I realized that it was very difficult for me. I continued to dig further and came across binary options. The essence is the same as in Forex, but it’s much easier to understand. I started reading forums, studying trading strategies. I tried it on a demo account, then opened a real account. To be honest, I didn’t manage to start earning money right away, until I understood all the mechanics of options, I lost about 3,000 rubles, but as it turned out, it was a precious experience. Now I earn 5-7 thousand rubles a day. I managed to get the car buy after half a year, but in my opinion this is a good result, and it’s not about the car, my life has changed, I naturally quit my job, I have more free time for myself and my family. You’ll laugh, but I work directly on the phone)) If If you want to change your life like me, then here’s what I advise you to do right now: 1. Register on the site 2. Practice on a Demo account (it’s free). 3. As soon as you get something on the Demo account, top up your REAL ACCOUNT and go to REAL MONEY! I also advise you to download the application to your phone, it’s much more convenient to work from your phone. Download here.
- Use a standard gear motor from a VAZ 2110
- Use a stepper electric damper drive from a VAZ 2170 (Priora)
The difference between these two methods is that in the first case you will have to hold the button until the damper reaches the desired position and then release the button.
And the second method is the most correct - automatically setting the damper to the required position depending on the set position of the “twist” of the automatic control system.
Let's look at both methods in detail:
Remaking the heater damper using a VAZ 2110 gearmotor
The gearmotor itself is located inside the panel. Control the gear motor on a separate button. You can use an old watch to attach the button. And move the self-propelled gun from the center to the sides.
make it clear where the damper is located using LEDs. Set up a sector divided into 5 contact zones. A wire is soldered to each contact, and on the gear lever the upper contact slides along these five contacts.
Design of the rear window heating system
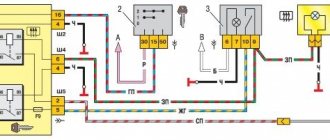
The system that helps clear the rear window of ice, snow or fog is not very complicated in design. The electrical circuit in general terms can be depicted as follows:
- C - generator.
- E230 - OZS system switch.
- J519 - on-board electrical network control unit.
- Z1 - heating element of the OZS system.
Although there may be some differences in different car models, nevertheless, if we consider it in detail, then in principle it includes the following main elements.
- Mounting block.
- Ignition switch.
- Heating switch ZS.
- Indicator lamp signaling the activation of the OZS.
- Heating element of the OZS system.
K6 - additional relay. K7 - OZS switching relay. A - connection to power systems.
In addition, the system has fuses, terminals and wires that connect all elements into a single whole.
When the ignition key is turned, the OZS is turned on by pressing a button, to which power is supplied through an additional relay K6. At the same time, the rear window heating relay K7 is activated, the heating element is connected and at the same time the control light comes on.
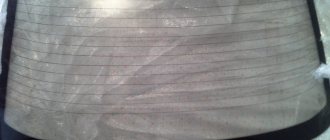
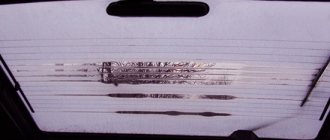
The design of the heating element on the rear window may also vary. In the standard version, it is a mesh of thin metal nickel threads, which are connected by two conductive busbars located on opposite sides. On one side, a 12V current is supplied to the bus, and on the other, the bus is shorted to ground. Such devices are attached to the glass using special glue.
On some car models, the heating element is applied to the glass using spraying, for example, aluminum. A thin film with good light transmission is attached on top of this coating using glue that conducts current.
Application
Quick warming up of the car, protection from harmful gases, pollen and burning, in the VAZ 2110 is carried out by the recirculation button. In a VAZ car, two different methods of air intake are used:
- from the street;
- from the salon.
Recirculation button VAZ 2110
In the article we will consider in detail the second item on the list. Recirculation was installed selectively on VAZ 2110 cars; cars of 2001 were equipped with it, but since 2002 only the button remained. In such cars, the recirculation system required additional installation and was installed independently, at the request of car enthusiasts.
Fuse box in the passenger compartment of VAZ-2170, -2171, -2172
The fuse box in Priora is located at the bottom of the dashboard, on the left side of the steering wheel. To get to it, you need to open the cover, which is held on by three latches. Rotate each locking knob 90 degrees and pull the lid down and it will snap open.
Fuses in the interior mounting block
F1 (25 A) - radiator cooling fan . If your fan does not work, check its motor by applying 12 V directly to it from the battery. If the engine is working properly, then most likely the problem is in the wiring or connectors. Check the serviceability of relay K1.
The fan in the Priora usually turns on at a temperature of 105-110 degrees. Do not allow the engine to overheat, watch the arrow of the temperature sensor.
If the fan runs constantly and does not turn off, check the coolant temperature sensor located on the thermostat. If you remove the connector from the working sensor, the fan should turn on. Check the wiring to this temperature sensor, as well as the contacts of relay K1, move this relay, clean the contacts. If this is the case, replace it with a new relay.
F2 (25 A) - heated rear window . Check together with fuse F11 and relay K2. If the rear window does not fog up, the heating element threads may have broken. Inspect all the threads and if you find a break, seal it with special glue or varnish, which can be bought at car dealerships for 200-300 rubles. Check the connection contacts at the terminals to the heating elements at the edges of the glass, as well as the switch on the dashboard and the wiring from it to the rear window.
F3 (10 A) - high beam, right headlight . F4 (10 A) - high beam, left headlight . If the headlights do not shine on high beam, check the K7 relay and the headlight bulbs. The steering column switch, wiring or connectors may also be faulty.
F5 (10 A) - sound signal.
If the signal does not work when you press the steering wheel button, check relay K8. The signal itself is located under the radiator grille; you can get to it by removing the plastic casing from above. Check it by connecting the voltage to 12 V. If it doesn’t work, try turning the adjusting screw, or replace it with a new one.
F6 (7.5 A) - low beam, left headlight . F7 (7.5 A) - low beam, right headlight . When replacing lamps, be careful; there are separate lamps for the low and high beams, so they can be easily confused. It is better not to install lamps in high-power headlights; the reflectors may melt and the desired effect will not be achieved. Most low beam headlight problems that cannot be corrected by conventional means can be related to the light control module (LCM). The low beam relay is only available in cars equipped with a light sensor, it is located in the place of relay K1; on most cars this relay is not in the mounting block; the low beam circuit goes through the MUS block. It happens that the tracks in the block burn out; if there are problems, it is better to replace it with a new one. If the windshield wipers turn on spontaneously when the low beam is not working correctly, the problem is most likely in the windshield wiper control unit, located in the center of the dashboard, the topmost block, next to the radio, is best reached from the glove compartment, or by hand through the removed console covers at the feet.
Assignment of contacts of the instrument cluster block
1 To the electric power steering 2 To the hazard warning lamp 3 To the emergency oil pressure sensor 4 To the parking brake switch 5 To the immobilizer control unit 6 To the airbag control unit 7 To the exterior lighting switch 8 To the turn signal switch (starboard side) 9 To the indicator switch turn (left side) 10 To the fuel injection system control unit 11 To the front passenger airbag deactivation sensor 12 To the seat belt sensor not fastened 13 To the control unit of the electronic brake force distributor 14 To the “RESET” button on the steering column switch (-) 15 To the level sensor brake fluid 16 To the anti-lock brake system control sensor 17 To the headlight high beam switch 18 To the instrument cluster lighting switch 19 Housing 20 To terminal “30” of the battery 21 To terminal “15” of the ignition switch 22 To the fuel consumption sensor 23 To the function switching mode key trip computer in a ring forward and changing the minutes (-) 24 To the mode key for switching the functions of the trip computer in a ring back and setting the clock (-) 25 To the outside temperature sensor (-) 26 To the outside temperature sensor (+) 27 To the fuel level sensor 28 To speed sensor 29 To coolant temperature sensor 30 Low-voltage tachometer input 31 Diagnostics during production of instrument cluster 32 To terminal “L” of generator relay regulator
Device
Almost all stern window heater systems are identical and do not differ much from each other.
The entire system consists of several elements that ensure normal and safe operation of the heater:
- heating threads (their number may vary depending on the device model);
- electrical wires supplying current to the work area;
- device safety relay;
- power button equipped with a signal LED;
- fuse.
The failure of one of the component elements of the heating device or a break in its electrical circuit may prompt the question of why the rear window heating does not work.
Malfunction of button and wiring
After checking and confirming the serviceability of the fuses, you need to move on to the button.
This element may also fail. The manifestation of a defect is accompanied by the absence of light from the LED. That is, the light bulb will not turn on and needs to be replaced. In this situation, the voltage at the output contacts of the button is checked. Sometimes the question arises where the mirror heating button is located. The required element can be located on the microclimate control unit. Often the button for turning on the heated mirrors is combined with the heated rear window, then when turned on, two systems will work simultaneously. Situations of separation of devices are not excluded, when the required button is located on the driver's door.
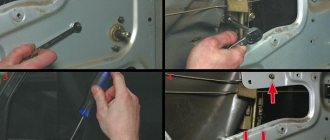
How to remove a mirror:
- The adjustment needs to be lowered down, which is accompanied by the appearance of a small gap, which allows you to pry up the structure and easily remove it.
- Next, disconnect the connector of the contacts connected to the heating. Just pull them, no special effort is required.
Examination:
- Using a multimeter, determine the voltage. When the button is turned on, the indicator should be 12–14V.
- Testing with a light bulb also involves connecting wires to the terminal. If you turn on the button, the light will light up.
Heating system problems, troubleshooting
If all possible malfunctions have been ruled out, you need to pay attention to the heating circuit itself - the filaments, because they are sometimes damaged. Here it is easy to determine when and why the heated mirrors do not work
Examination:
- When connecting the tester, the resistance value is determined. Optimal parameters range from 10–30 ohms. The presence of a defect is indicated by missing or inflated indicators.
- Checking with a light bulb involves disconnecting the circuit and connecting the wires in series. The complete absence of glow may indicate a malfunction - the heating system has burned out.
Another typical failure involves breaking off contacts and connections on copper pads that should secure the power wires. In this case, the filaments themselves must be in good condition.
Then, to eliminate the defect, it will be enough to solder the contact fastenings. If the problem is a broken thread, no values will be displayed as the track progresses. This means you need to find a break and solder it.
Heating element replacement process
Sometimes a complete malfunction of the heating element is detected and restoration is impossible. It is necessary to replace the unit and a new device made in the form of an adhesive tape on which tracks are applied - filaments.
How to install a new heater:
- work begins with removing the plastic protection, for which you need to heat the surface using a hairdryer or hot water;
- as the plastic frame gradually separates, the soft coating holding the filaments becomes noticeable;
- under the influence of high temperatures the coating is also removed;
- Taking a new heating element on the side mirror, cut it to the required size and glue it onto the mirror surface, removing air bubbles;
- for new contacts you need to make additional holes;
- then the protection is removed and a plastic frame with suitable holes is glued on.
The damper drive does not work
It is impossible to check whether the Priora recirculation valve is working (on cars with the Panasonic climate system) by viewing errors in the operation of the system - the corresponding codes are simply not provided. Therefore, it is necessary to perform the following actions in accordance with the algorithm described in the diagnostic card:
- use a multimeter to measure the voltage level between ground and contact No. 1 going to the mode switch,
- if the obtained value corresponds to the on-board network voltage, there is an open circuit in the recirculation switch section,
- otherwise, you need to measure the voltage between ground and contact No. 2 of the recirculation button when it is pressed,
- if the measured value is equal to the on-board network voltage, the switch itself is faulty, and then it must be replaced,
- otherwise, use a multimeter to measure the state of the recirculation key,
- if the value is equal to the on-board network voltage, there is an open circuit in the area between the mode activation key and the SAUKU heater controller,
- if not, proceed to measuring the voltage in the area between ground and contact No. 1 of the damper solenoid valve (the recirculation mode button must be pressed),
- if the obtained value corresponds to the on-board network voltage, there is a break in the electrical circuit in this area,
- otherwise, there will be an open circuit in the ground circuit of the damper drive valve.
The pinout of the Priora recirculation button is described in detail in the circuit diagram of the Panasonic climate control system. If the recirculation malfunction is caused not by an open circuit or a breakdown of the solenoid valve itself, but by a malfunction of the damper, replacing it can be quite difficult for an unprepared car owner.
If you go to a car service center, it will cost a pretty penny (about 10 thousand rubles), since the technicians will tell you that you need to remove the entire stove, drain the antifreeze, and also remove freon from the air conditioning system. You can do this yourself, and without draining the antifreeze and pumping out the refrigerant. Therefore, it makes sense to describe the procedure for replacing the vacuum drive if the Priora interior air recirculation damper does not work:
- To begin with, you will need an L-shaped screwdriver - it is not sold in stores, but it is not difficult to make by bending any existing one made of a fairly soft metal. We use it to unscrew the bottom screw, which is located very inconveniently - there is a hole there large enough to stick your hand through and perform the necessary manipulations,
- the top screw is hidden behind the plastic of the stove body - it needs to be drilled exactly opposite the screw,
- disconnect the damper rod, for which you need to pull it to the left with a little effort,
- now the drive is free, all that remains is to pull it out (pull it a little to the left and press in the direction of the engine compartment - it should fall down), you need to pull it out carefully, since it can cling to surrounding parts,
- the procedure for inserting a new vacuum drive is also quite tedious - first we try to insert the valve into its normal place,
- the second step is to get the drive tube into the hole located in the lower part of the heater,
- put the hose on the valve itself,
- we tighten the screws in the reverse order (you will have to tinker with the bottom one, so you don’t have to tighten it - the valve will be held quite securely even without the bottom screw).
Operating principle of the air conditioner
In a sealed air conditioning system, a refrigerant, freon, continuously circulates, which is mixed with a special lubricant that is resistant to freezing. A compressor is responsible for moving freon through the system, which builds up pressure in the heat pipes. After turning on the air conditioner, freon ends up in the heat exchanger located under the dashboard of the car. The internal structure of this device resembles a honeycomb. Once there, the refrigerant begins to take heat from the hot interior. At the same time, it quickly heats up and turns from a liquid into steam. Since the compressor continuously pumps up pressure in the system, the steam goes into the blown radiator, where it cools, again becoming a liquid, which again ends up in the heat exchanger.
Is it possible to install air conditioning on a Priora?
The Priora initially provides the design possibility of installing an air conditioner. A car owner who decides to install this device on his car will not have to make any modifications. All the necessary holes and buttons are already on the dashboard, and space for heat pipes and electrical wiring is also provided. Thus, installing an air conditioner on a Lada Priora is completely legal, and government officials will not have any questions for the driver.