May 20, 2016 Lada.Online 79 899 4
Installing a stretcher or spacer for the front supports (cups) is a popular modification among tuning enthusiasts. This accessory is designed to strengthen the front part of the car body, which allows you to change the behavior of the car on the road. Let's look at this amplifier in more detail.
Why are they needed?
When traveling on straight and level terrain, instability is difficult to notice. But if you drive onto a bumpy path or try to take a turn, you will instantly feel that something is wrong with the car. It may happen that you leave the road when turning at high speed.
If you install struts in your car, both front and rear, the rigidity of the body will increase, which will make the car more “assembled,” that is, it will be easier to drive. There are two types of spacers: adjustable and non-adjustable. The first type is considered universal, they are not tied to certain parameters of the car, but they are quite weighty and not as rigid as non-adjustable ones, which, in turn, are made for a specific car model.
Experts recommend installing spacers on cars that have been around for quite a long time, since their body is initially less rigid than that of modern cars.
Why install
Amplifier
If the stiffness is insufficient, the car's handling is characterized by sluggish response. In theory, the presence of a spacer or extension allows you to maneuver more confidently and take turns at speed. Also, the body will not be greatly deformed, and the effect of metal fatigue will be avoided. This is especially true for owners of the VAZ 2114, who regularly drive on roads that are not of the highest class.
To summarize, let's look at what exactly spacers will do.
- They will increase the car's controllability when cornering.
- They will reduce the likelihood of spontaneous transmission shutdown at the gearbox.
- They will protect the engine from active displacements during maneuvering.
- Maintains the integrity of the body and power unit.
Some note that it is not worth installing a spacer, since it significantly increases the noise level in the cabin. The statement is true, but partially. The noise level will indeed increase, but only slightly. In practice, it is impossible to feel the difference, since the increase will be no more than 0.5 decibels.
For reference, specially trained people are able to distinguish noise levels only starting from 1 decibel.
Preparatory procedures
Many car owners are interested in which racks are best to install, as well as how to do everything correctly. Before you repair the front struts, you will need:
- We stop the LADA Granta car using the handbrake and place wheel chocks under the stern wheels.
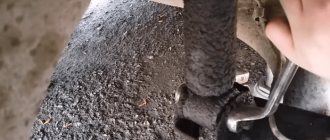
- Under the hood we find a shock-absorbing support rod, into the hexagonal recess of which, located at the end, we insert a key of the corresponding profile.
- Using the second wrench, we loosen the tightening torque of the nut securing the suspension element to the body. In the meantime, we use a hex wrench to keep the rod from trying to turn in conjunction with the nut.
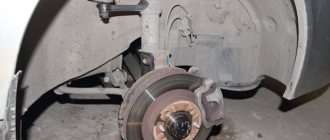
- We “dive” into the wheel arch of the LADA Granta and find a bracket that holds the brake hose on the strut body.
- We unscrew the specified fastening unit, removing the hose itself from the holding bracket. This will provide space for unscrewing the lower point of the shock absorber strut. You will have to work in tandem with a key “17” size.
You should dare to replace the struts in cases where a leak of working fluid from the shock absorber is detected, as well as if there is a knock, deformation of the rod or destruction of the silent block.
You should remember the rule that implies replacing the struts as a whole on one axis, even if the second shock-absorbing element is in good condition.
Compatibility of stretch marks with other elements
Perhaps in the future you will decide to install a gas or hydraulic hood stop. This unit is attached to the right suspension strut using a bracket. In principle, you can install the hood extension and stop so that these parts do not interfere with each other. The main thing is to make sure that the bracket that holds the stop fits on the brace bracket.
A good example: a brace and a gas stop are attached to the racks
Now let's talk about such an option as crankcase protection. This protection is standardly present in the crossover and in the charged Kalina NFR, which is not yet produced. The front strut brace, if you install it together with the crankcase protection, must be equipped with an engine bar. The motor is attached to the rod with 4 bolts, and in the event of a collision it will be directed downwards.
The results of crash tests of the “berry crossover” indicate the following: after a frontal impact, the engine will not be in the cabin. The crankcase protection for this car was developed taking into account special requirements, and as a result, in the event of a strong frontal collision, the engine goes down and not back. The same cannot always be said about tuning kits offered by third-party companies. Make a choice.
A metal strut brace that is not equipped with an engine rod cannot prevent it from moving into the cabin. Therefore, you can combine different tuning elements only at your own peril and risk.
Operations for removing the front strut from a Lada Granta car
The work is shown using the example of the left pillar of a car. The right pillar is removed in the same way.
1. Brake the vehicle with the parking brake and install wheel chocks (“chocks”) under the rear wheels. Open the hood. Raise the front of the car with a jack and place it on secure supports. Remove the corresponding front wheel. Loosen the bolts securing the wheel while it is standing on the ground.2. If you remove the shock absorber strut for repair, then, holding the strut rod from turning with one key, use a second key to loosen the tension of the rod securing nut. In this case, the spring will minimally “bite” the mounting bolts connecting the steering knuckle and the shock absorber.
As a result, it will be easier for you to remove them from the holes.3. Remove the brake hose holder from the bracket on the shock absorber strut.
On a Lada Granta car equipped with an anti-lock brake system (ABS), disconnect and remove the wheel speed sensor.
4. Disconnect the steering rod from the swing arm of the shock absorber strut “Replacing the outer tie rod end of a Lada Granta”
5. Place marks on the eccentric washer and shock absorber strut to indicate the position of the adjusting bolt relative to the strut. This will help approximately maintain wheel alignment when installing the strut.
6. Unscrew the nut of the adjusting (upper) bolt securing the shock absorber strut to the steering knuckle.
7. . and remove the bolt along with the eccentric washer from the hole.
8. Unscrew the nut of the lower bolt securing the shock absorber strut to the steering knuckle and remove the bolt.
9. Disconnect the steering knuckle from the strut.
10. In the engine compartment, unscrew the three nuts of the upper fastening of the shock absorber strut to the body.
eleven. . and remove the stand.
12. Install the shock absorber strut in the reverse order of removal
Pay attention to the position of the upper pillar support: the arrow marked on the surface of the support should be directed forward in the direction of vehicle travel. After installation, check and, if necessary, adjust wheel alignment and camber
Please note that after installing the rack back, you will need to make the “geometry” of the front wheels. If you are changing the strut spring and not repairing (replacing) the shock absorber, then the strut can be removed with the steering knuckle by disconnecting the assembly along the ball joint and CV joint splines. You will find more detailed information about this method of removing the strut in the article “Removing the strut from a VAZ 2110 car.”
Choice of stretch
Having opened the hood of the Lada Kalina of the first family, above the right shock absorber strut we could find a bracket to which a rough road sensor (RSD) is attached. This was true for all trim levels except “Standard”. The braces connecting the suspension struts and intended for the “first Kalina” could be equipped with a bracket to which the DND had to be attached.
DND under the hood of Kalina-1, right pillar
Let's say right away that the metal brace intended for tuning Kalina-1 is compatible with the design of Kalina-2. The rough road sensor bracket present on this part does not interfere with anything.
Typically, the compatibility list on the seller’s website contains the following models: VAZ-1117-1119, 2190, 2192-2194 (“Kalina-2”). The weight of the part itself rarely exceeds 4 kg, and its installation can be done by anyone who can handle a wrench.
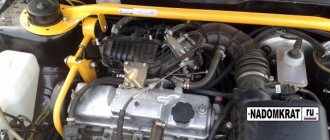
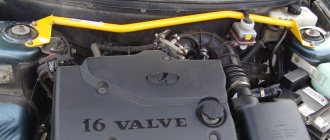
The part called the stretcher is in its rightful place
The strut extension for the Kalina-2 car can be equipped with an additional rod that needs to be secured to the engine. An experienced technician can perform this operation without making mistakes. The most difficult part will be to adjust the engine rod, and this process is not covered here. We only note the following: it is always indicated which engine (16 or 8 valve) the rod is compatible with.
During the tuning, we will have to unscrew and re-tighten the nuts that secure the suspension strut supports. We are talking about nuts screwed onto studs. When performing installation, it is better to use suitable washers, otherwise the metal will be pressed through over time. VAZ does not standardly install such a stretch, which is true even for a crossover of the berry family. However, performing the tuning in question does not void the warranty.
Rear suspension features
The rear suspension of the Grant is the same for the sedan and liftback. In fact, this is the same beam with springs and shock absorbers that is installed on Kalina, Samara and Samara 2. Instead of a stabilizer, a beam is used, which means the structure is dependent. Structurally, the rear part of the suspension system remains unchanged. Looking under the bottom, you can see the usual picture - a beam fixed in a semi-rigid position. It is attached to the body using hinges.
Support struts (springs with shock absorbers) are attached to the levers on the right and left. Despite the outdated design, a semi-rigid beam with racks has a number of undeniable advantages:
- even the maximum load actually has no effect on its behavior, which confirms the high level of energy intensity;
- maintenance, even according to regulations, should be carried out once every 100,000 km, but this period increases for the entire period of operation;
- Parts can be replaced in a garage even by beginners.
Step-by-step installation instructions
The kit for installing guy wires includes: the main part, a set of washers and fasteners. Actually, in order to secure the brace on the Kalina-2 struts, you first need to unscrew the nuts securing the strut to the body. A 13 key is suitable here, and it is better if it is an open-end one.
- Opening the hood, you will see nuts that are screwed onto studs. These studs are mounted into the suspension strut supports. Depending on the type of fastening of the brace, two or three nuts are unscrewed on each side;
- The extension brackets are placed on the studs, first on the right (where the hoses go), then on the left side;
- Lastly, tighten the nuts on all studs.
After completing these steps, all that remains is to close the hood and conduct a short test drive. The fastening should not loosen after several kilometers, which the owner must verify for himself.
Those who ignored the advice and tightened the nuts without washers can only hope for luck. As soon as the metal of the brackets on which the brace is attached begins to press through, the fastening of the entire suspension will immediately weaken.
Subtleties when installing a suspension element
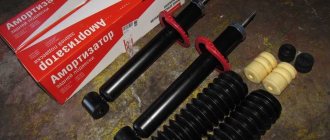
- We begin to assemble the suspension element using the reverse dismantling process algorithm.
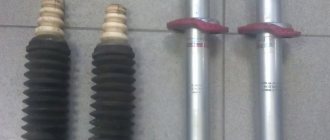
- Before direct installation, we recommend checking the shock absorber. To do this, you need to press the rod all the way and observe its behavior. If the pressing force is high, and the rod subsequently slowly (without delay) returns to the extended position. This indicates the serviceability of the element.
- A special mark, which the manufacturer kindly applied to the surface of the product, will help you install the front struts correctly. The direction of the mark should be oriented along the direction of the Lada Granta car.
- Having reached the correct location of the marks, feel free to assemble the shock-absorbing unit, following the well-known sequence of actions.
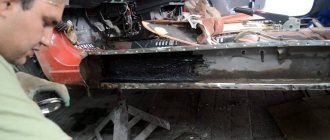
Making a spacer with your own hands
The first thing to do is to make flanges. To do this, unscrew the nuts securing the stands to the glasses and, placing cardboard on them, mark the future holes with a marker. Then cut them out in paper and put it on the pins. Now all that remains is to outline the outline of the flange according to the shape of the glass and trim off the excess cardboard. Inside the template, make a round opening corresponding to the protruding part of the support.
Ready cardboard template with holes
Important point. Make the outer edge of the template facing the engine not round, but straight, since a rib for attaching the pipe will be welded to it.
Perform further operations in this order:
Attach the cardboard template to the sheet of metal, outline it with a marker and cut out the steel flange using a grinder. Round all edges and sand to ensure there are no burrs. Mark the centers of the holes and drill them according to the diameter of the studs. Use a small drill first and then a large one. Bevel both sides of the holes and try the part in place. If a discrepancy is found, widen each hole slightly with a round file. Cut a 4cm wide strip of steel and weld it at a 90° angle to the straight edge of the flange. To prevent the strip from bending back under pressure from the pipe, make triangular stiffening ribs and weld them along the edges. Place the flanges on the studs and check for distortions. Press them with two nuts and carefully measure the distance between the strips to cut the pipe as accurately as possible. Disconnect the battery and cover the engine compartment with a damp cloth. Attach a pipe cut to size to the flange brackets and securely weld it at both ends. Check the gap between the hood cover and your structure. Unscrew the nuts and remove the brace from the car. Boil all the seams thoroughly, remove the slag and try to put it back. If the structure has been welded so badly that the flanges do not fit on the studs, file the holes again. Remove the finished spacer again, clean it with a brush to remove rust, degrease it and paint it in 2 layers, after applying a primer. Place the jumper in place and finally tighten it with nuts.
Advice. If you plan to bend the spacer, do it before cutting the pipe to size.
The coupling for regulation is placed in the pipe gap
If you are a specialist in welding, then you can easily make the stretch adjustable. To do this, buy a ready-made threaded coupling of the required diameter and weld it in the middle of the cross member, having previously cut it into 2 parts. After welding, twist them together, secure the coupling with a locknut, and only then cut the pipe exactly to size between the flanges.
Note. The described method is quite suitable for making a back stretcher, if you want to do it yourself. In this case, think carefully about the design so that the jumper takes up minimal space in the luggage compartment and does not block it in the middle.
Successful design of the stretcher - it stands right behind the seats
How to make a spread with your own hands - photo
Blank cut from metal
The workpiece must be rounded and cleaned
The part is tried on in place
Strips and stiffeners are welded to a homemade flange
The pipe must be carefully grabbed to the flange
Correct design - the pipe goes around the tank with liquid After painting, the spacer is finally attached. To distribute the load, a gusset must be welded to the pipe. Last fitting of the spacer before painting. First, you need to unscrew the fastening nuts
Video about making a front brace
Judging by the practical experience of many drivers, installing the front strut struts is not a necessary step, but in many cases it is useful. Installation of the finished product is easy, so there is no need to go to a car service center. Since the design of the element is not complicated, skilled motorists can save money and do the stretching themselves, provided that the garage has the necessary tools.
Preparing for self-production
To make a jumper for the front pillars yourself, you need to prepare the following materials:
- sheet steel with a thickness of at least 3 mm;
- pipe with a diameter of 32-40 mm with a wall thickness of 3 mm or more;
- thin cardboard and marker for making a template;
- primer for metal and paint in an aerosol can.
A thick-walled pipe is what you need to make a guy wire
Regardless of which cross member design you choose - rigid or with hinges, you will not be able to do without a welding inverter, as well as without the skills to work with it. The easiest way is to weld a rigid, non-adjustable spacer, clearly defining all the dimensions. In addition to welding, other tools will be required for the job:
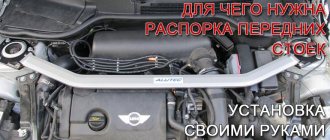
Why do you need front strut extensions?
It would seem, why else spend money on some piece of hardware when you can easily do without it. But for some reason, many people, in addition to tuning the car, install a stick connecting the front pillars to each other.
Some argue that these are all cheap show-offs, and there is not much difference in driving from their presence. In fact, this piece of iron is not there for beauty...
The fact is that a car (any car, it doesn’t matter whether it’s Russian or a foreign car) becomes harder to control when making a sharp turn or changing lanes due to deformation of the body during torsion. For precise and confident control, it is necessary to strengthen the strength of the entire structure and prevent the body from deforming
It is also necessary to take into account that braces enhance passive safety; in a frontal collision, the body will not fold quickly like an accordion.
Let's see clearly how stretch marks work.
Before installing the stretch...
Due to the impact, force is transferred to the chassis and because of this, the base of the wheels and the lower part of the arms are deformed
After installing the stretch...
With the front strut braces installed, both sides of the impact are neutralized
Before installing the stretcher when driving around a turn...
Weight and force are collected on one side, leaving the trajectory and the car rolls
After installing the stretch...
The force is transferred to the spacers, and the torsional force is evenly distributed. The car does not lose control
What problems does installation eliminate?
Domestic cars have a sad reputation as vehicles with low body rigidity, and many foreign cars also suffer from this. Installing rear strut struts is designed to reduce body torsion and increase resistance to vibrations. The effect will be most noticeable on cars that have been weakened by corrosion or have been in a serious accident. After installation, car enthusiasts note a decrease in roll when turning, a partial disappearance of squeaks of body elements, and noise from plastic interior panels.
It should be taken into account that in the event of even a small impact in the area of one of the glasses, the deformation will be more strongly transmitted to the mating part of the body.
“Calling” and the design of stretching racks
Lada Priora is a relatively new front-wheel drive sedan produced in Tolyatti. The design of the suspension (the link connecting the body and the drive wheels) of this car is the same as that of the “tens” and Grants. The principle of independence of racks from each other is used. This is a modern type of suspension, thanks to which the amplitude of wheel rotation increases, sharper turns are taken faster.
But when driving over Russian bumps and potholes, the independent wheels take different “angles.” As a result, deviations in camber and toe appear (the wheels deviate from their axis in different directions). Stretching the front struts of the Priora is designed to improve the stability of the car. The trend to purchase such spacers began not so long ago. But more and more often, Russian drivers are equipping their cars with such devices.
This device is a metal pipe that is attached to both Lada racks, thereby rigidly connecting them. It is installed between the shock absorber supports on the body, which are located under the hood. An additional stretcher can be secured under the bottom of the Lada, between the bottom and the crankcase protection.
It is believed that this part is made of two materials: steel and aluminum. The use of steel is determined to make the structure as strong as possible and prevent the racks from moving even a millimeter. But a more forward-thinking option is to install an aluminum spacer. It is inferior in strength to steel, but in the event of a strong side impact, such a stretch of the Priora will transfer less impulse from one wheel to the other. The displacement of the racks from their axes will be much smaller. Depending on the force of the impact, the aluminum part may even break, and then the damage to the second rack is completely minimized.
Installation
Increasing body rigidity
Installing front strut struts on your VAZ 2114 yourself will not be difficult. This procedure does not require any special skills, so you can safely go to your own garage and get to work.
- Remove the screws and washers from the shock absorber struts.
- If your car has a motion sensor on the struts, it will also need to be removed. But be sure to remember the position in which it was at the time of dismantling.
- Now secure the mounting bracket with the sensor directly under the plate. This must be done in such a way that the sensor is in its position before removal.
- The front strut extension is placed on the studs. The same work is done on both sides.
- The bolts are secured properly. Be sure to make sure the fasteners are properly tightened. In this matter, reliability plays a huge role. Therefore, it will not be superfluous to additionally verify the quality of the bolts used.
Types of stretch marks
The market for automobile spare parts and tuning parts is quite extensive, and therefore, when purchasing extensions for popular cars, you can choose among several options. Of course, the greatest variety in the domestic space is among the banners for VAZ cars. Let's look at the main advantages and disadvantages of the spacers available for purchase.
- A one-piece stretcher is the simplest option, taking up a minimum of usable space in the trunk.
- Model called TV. Between the rear glasses there is a round pipe with an adjusting screw. The lower part of the body is attached to the bottom of the passenger compartment (on VAZ models to the seat belt mounting bolts). The advantage of this stretch is that it remains possible to fold the rear seats and put large cargo in the trunk. But while maintaining functionality, we lose rigidity. A square-shaped structure acquires good rigidity only if the corresponding corners are rigidly connected to each other diagonally. So it turns out that the effect of having a lower part in the structure is not too superior to the result that can be obtained from regular stretching.
- The spacer is cross-shaped, in the shape of a butterfly. This type of stretching will have the greatest rigidity, as it has diagonal reinforcements. There is only one drawback, but a rather significant one - after installing the extension, access to the interior is blocked, and therefore folding the seats does not add useful space to the trunk.
Not all models on the market are described. In your search, you can even come across products of a similar format.
Agree, the product looks quite technologically advanced. But on a car with a living body, you definitely won’t be able to feel the difference between such a strut and the simplest one-component stretch.
Mounting options
In models from some manufacturers, the method of implementation of fastening leaves much to be desired.
The upper part of the spacer rests on the glass and is pressed from below by two crescents welded to the bolts. Judging by the reviews, the mount is quite flimsy and does not inspire confidence. But due to the fact that the bottom of the upper part is made of a cone, the spacer should fit tightly to the glass, thereby ensuring a more or less stable position. You can find reviews online from people who speak positively about the effect after installing this type of product.
Which stretcher is definitely not worth buying?
Despite its seemingly obvious uselessness, on the market you can find a rear strut brace attached to the shock absorber rod. Roughly speaking, it would be more correct to call such a strut an additional anti-roll bar. What adds to the absurdity is that in order to reduce vibrations, the shock absorber is attached to the body through a kind of silent block. In some cases, after some time, new extraneous noises appeared in the car from this type of strut. Therefore, we would not recommend purchasing this kind of tuning elements.
You can resort to installing such a spacer only if the rear pillar glasses do not have a clearly defined shape (for example, as on Renault Logan). In this case, it will be impossible to secure the cup spacer in any other way without welding.
How to install
Installing rear window extensions, as well as front strut struts, will not cause problems even for a novice car enthusiast. The adjusting screws are designed to accurately fit the product to the body of a specific car. This must be done before screwing it to the body. The car must be parked on a flat, horizontal surface. After tightening all the screws, you can slightly tighten the adjusting screw, creating a slight tension on the stretching of the glasses. But no more than that! Excessive spin will result in constant stress, which over time will weaken the body and cause geometry changes.
If you have the desire and straight hands, you can repeat the factory version of the rear struts with your own hands (an example is shown in the video).
- Do-it-yourself spacer: increasing body rigidity
- Why are they needed?
- Rear strut brace
- Front strut brace
Almost every motorist, while driving, compares his car with the “swallow” of the driver who is standing next to him in a traffic jam. It’s good if you have an expensive car made a couple of years ago.
It’s much worse if your neighbor in a traffic jam has one that’s also tuned. It is precisely this small competition, lasting 5–10 minutes, that forces motorists to “stuff” their cars with various bells and whistles. Some of these bells and whistles are not needed at all, and some are even useful. One useful tuning technique is installing spacers.
Types of spacers
A jumper made from a profile pipe looks more beautiful
Jumpers for racks are made of round and rectangular pipes. There is no particular difference in their operational parameters, except that the profile pipe looks a little prettier. There are 2 ways to attach the rod to the mounting flanges:
- rigid, made by welding;
- movable, made on a hinge.
Hinge type stretcher
The hinged design is more reliable than the rigid one, since welded seams can burst over time due to body deformations. According to the method of fastening, spacers are divided into 2 groups:
The third fulcrum is the engine
The last type of guy wires is equipped with a bracket attached to the bar through a rubber support. The upper part of the engine is screwed to it, which allows you to significantly reduce the vibration transmitted to the entire body of the car.
Here the third point of support is the body
According to functionality, jumpers are divided into regular and adjustable. In the latter, the rod consists of two parts, rigidly connected by means of a threaded coupling, whose rotation lengthens or shortens the pipe. The idea is that the strut should be suitable for cars of any age, including old ones, where the struts are already shifted towards the center.
Two-point stretch with adjustable length
On most factory cross members, manufacturers make special deep notches. In this way, they are trying to neutralize the main drawback of all stretch marks - the ability to transfer impacts from one side of the body to the other. According to the sellers, in the event of an accident with a side collision, the notched element will simply fold and will not transfer the impact energy to the opposite pillar.
Conventional cross member and with engine mount
Reference. In reality, much depends on the strength of the mechanical force and the angle at which it is applied. Practice shows that even spacers with notches sometimes do not save and the second rack still has to be straightened.
Adjustable rear cross member
As a rule, cross members are installed only on the front strut cups. But there are also rear struts, although they are not so popular for the following reasons:
- a jumper in the trunk often becomes an obstacle to the transportation of goods, since it blocks part of the compartment;
- the use of a rear strut does not provide such noticeable improvements in handling and stability as the front;
- Not every car has the opportunity to mount a bar, unless you make a homemade one.
Strengthening the rear of the car reduces trunk volume
Note. Along with stretching the struts, car tuning enthusiasts sometimes use lower struts installed under the bottom of the car between the tie rod mounting brackets. The operation gives results precisely when two jumpers work together - upper and lower.
The lower spacer is placed in the eyelets of the rods
Front strut brace
Stretch bars for the front pillars can be solid or composite, that is, those that can be adjusted in length. Solid guy wires can only be installed in the car model for which they are designed. The composite spacers have a powerful thread and a lock nut, thanks to which such a device can be installed in a car with almost any body width. The linings on the glasses of the racks can also be different.
There are those that are made by hot stamping, and there are also linings that are made by welding individual elements. The strength of the first type of lining is better, but the strength of the second type of lining is enough to make the body much stiffer.
Most A-pillar braces have only two mounting points, but there are models that have three mounting points. The third point is made in order to secure the brace to the body partition, for which you will have to drill several holes.
As for the material from which spacers are made, the most common is duralumin. There are also spacers made from carbon fiber and carbon fiber. Carbon parts are quite expensive. We should not forget that installing a new part into a machine significantly increases its weight, so the spacers must be light but strong. Duralumin stretchers from Japanese manufacturers have received very good reviews, as they are quite rigid and do not tear or deform.
To make a spacer yourself, you need to be able to work with an angle grinder and other tools for working with metal. First you need to measure the diameter of the glasses between the distant bolts on which the spacer will be attached. It is advisable to use an existing spacer as a basis. In order to make an element that will be attached to the glass, you need to take a metal plate (the thickness should be 5 - 7 mm)
, and you need to put a cardboard stencil on it, which needs to be cut to the diameter of the glass after measuring all the dimensions. Next, you can apply a drawing to the metal itself using a can of paint. Using a grinder, you need to cut out one of the parts of the future spacer according to the finished drawing.
To make an inner circle, you can try cutting a hole with a grinder, or take a drill and drill circles along the entire diameter using a drill, and only then remove the unnecessary metal circle. If you decide to cut a hole with a grinder, then you need to take a diameter slightly smaller than the true diameter of the glass, so that you can then bring the circle to the required size with a file or on a sharpening disk. Based on the finished product, like a pattern, you need to make an element for the second side of the spacer. The next step will be making the frame. To do this you need to take a pipe 20 mm long 2.5 m and bend it.
There is no point in immediately moving on to deforming the pipe. It is better to make a blank from wire, which will need to be changed according to the shape into which the pipe will then need to be bent.
Using a pipe bender, you need to change the shape of the pipe so that it fits well under the hood. The already curved work, which you must adjust to size, needs to be welded to the platforms, and on the sides of the work you need to weld 2 rectangular plates, which will make the structure more durable.
After the entire spacer is twisted, it needs to be sanded, degreased, primed and painted. Installation of the stretcher consists of screwing the platforms to the glasses. That's all. Financial costs may vary. Whether to do the spacer yourself or not is up to you. The main thing is to remember to park the car on a flat surface.
Some people consider spacers to be a cheap show-off, but some people simply need them. The choice is yours. Good luck on the roads.
Among the total number of motorists, there are always people who strive in various ways to improve their “iron horses”, increase their performance, reliability and durability. The vast majority of these drivers install metal struts (aka braces) on their cars for the front and rear struts. But such an improvement causes a lot of controversy, and the number of supporters and opponents of such tuning is approximately the same. Therefore, it is worth taking a closer look at the question of why stretch marks are needed and how to make them with your own hands.
The role of spacers in strengthening the car body: why is it needed?
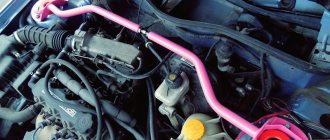
The stretcher is an additional rigidity installed between the upper supports of the struts (most often the front ones). It is made of a metal pipe, the ends of which are attached to two support flanges. The latter have holes that match in diameter and placement with the studs on the rack cups. The flanges are put on them, adjacent to the planes of the glasses, and screwed with standard nuts.
This is what stretching on a car looks like
Reference. Since the distance between the supports and mounting bolts differs for different car models, the spacers are made for a specific car brand.
The body of a modern car is made of thin sheet metal, interconnected in such a way as to ensure maximum structural rigidity. However, when rolling, turning and driving on bad roads, the body experiences high loads, causing it to deform elastically. This behavior has a detrimental effect on handling and reduces the life of the machine for the following reasons:
- the lower the rigidity of the body, the more it “twists” when turning or when hitting a bump;
- over time, the metal “gets tired”, causing cracks to form in the load-bearing elements;
- from constant impacts from the wheels, the side members bend inward, which is why, at a certain moment, adjusting the camber of the front wheels becomes impossible.
Extracting the side members on the stand, after which you need to install the cross member
Note. As a rule, the effect of “lost wheels” is observed on cars that have served for more than 10 years in difficult conditions. Their side members are so concave that there is not enough adjustment to align the wheels, so the tires wear out on the inside. The problem is solved by drawing out the side members on the stand and installing elements that strengthen the structure.
The spacer located between the pillar supports provides additional rigidity to the body and reduces the amplitude of deformation. That is, its installation gives a real positive result, no matter what opponents of such tuning say. The stretcher can be installed on any car, but there are certain cases when it brings particular benefits:
- with constant use of a passenger car in rural areas on bad roads;
- on machines that have undergone the procedure of stretching the side members due to metal fatigue and excessive deflection;
- on amateur cars taking part in sports racing.
Cars with such a frame do not require bracing
Reference. In professional motorsport, spacers are not used as a separate element. In specially prepared vehicles, a supporting frame is installed into which body elements are attached.
We make the front strut struts with our own hands. How to do this correctly, and what is required?
Such an improvement to the car as do-it-yourself front strut struts is quite simple and does not take much time. First, let's decide whether this is a necessary modification for the car or whether it will be another trifle offered by auto parts manufacturers. Car bodies of previous generations were made of rigid steel frames. Most of the loads fell on the car frame. Today's bodies are made from profiles that are stamped from sheet steel. Moreover, the assembly of individual parts and profiles is carried out through bolted connections and welding. And since the bodies are not framed, the joints of the parts become vulnerable during movement, undergoing vibrations and the influence of shock deformations, which over time leads to a loss of rigidity and deterioration in vehicle controllability.
This negative phenomenon can be especially acute when performing maneuvers and entering a turning zone. Thus, in order to increase stability and increase the rigidity of the car body, spacers were invented, which are installed in various components of the body.
DIY front strut brace
installed most often by car enthusiasts who want to stiffen the car body and avoid possible deformations and damage. They occur while the car is moving, and the springs on the front suspension are compressed, causing the body to undergo deformation in the area of the side walls. Therefore, installing spacers minimizes this phenomenon, increasing the level of rigidity of the car body, giving the driver confidence when driving at high speed.
At the same time, handling improves, and it is also possible to fully control the behavior of the car when turning, without slowing down.
Spacers are made for various components of the car body from a wide variety of materials. These can be steel products, duralumin parts, as well as more expensive spacers made of carbon fiber and carbon fiber. The price of the latter can exceed $1000 for various models of expensive foreign cars. It should be remembered that spacers, especially if they are installed in several body components at once, significantly increase the weight of the vehicle. Therefore, it is recommended to use parts made of light and durable material such as carbon.
Duralumin products from Japanese manufacturers have proven themselves well; they have increased rigidity and are resistant to deformation and tearing. You should also know that struts for the front pillars can be solid-body, as well as consisting of several elements that can be adjusted in length. As a rule, solid spacers are used for installation on racks for a specific car brand.
Composite ones are universal and suitable for many car models, since the installation dimensions are adjustable.
Before starting work
, the car must be placed on a flat horizontal surface. It is advisable that the purchased part is intended specifically for installation on your car; in this case, doing the front strut brace yourself will not cause any difficulties. To install, you need to unscrew the nuts from the studs of the posts and install the spacer.
If difficulties arise, the front of the car should be jacked up, which will make the installation process easier. In this case, most spacers settle into place when you press on them. The spacers are then secured with nuts. It should be remembered that straight spacers have much greater rigidity than products with special bends.
Purpose and principle of operation
Before you buy yourself a similar element and think about how to adjust the spacers, let's talk about the very essence of this design.
The car body includes a large number of elements that are connected to each other by welding, bolting and other fastening options. And when some forces appear on the body, the components interact. And the fewer movements are made, the higher the rigidity parameters are. This directly has a positive effect on controllability. Body rigidity is most noticeable when the car is moving at high speeds and cornering.
And so, a strut brace is a part that is designed to provide and create additional rigidity. The element looks like a tube with a round or rectangular cross-section. There are special platforms at both ends. They are welded and allow the levers to be fixed.
Installation is carried out across the engine compartment. And the mounting platforms are held on the rack glasses. The existing bolts help here.
After installing such a design, it is possible to eliminate body displacement and thereby improve the quality of handling. That is, the spacer takes on a certain part of the loads that affect the car body when driving. When the car turns into a corner at speed, the stretch prevents the cups from mixing, connecting them into a single whole.
Will racks fit from Kalina to Granta?
In short, yes, but there are nuances that not everyone knows about. Granta has a slightly different rebound characteristic; the compression stroke buffer is half a centimeter smaller. Hence the lack of knock on the rebound. In all other respects there is no difference, the softness is at the same level, even the holes of the support bearings are the same.
The situation with Priora is somewhat different. If they assure you that the racks are completely suitable, do not believe them and refuse to purchase. Externally they are identical, the only difference is the angle of inclination and centering. In Granta, the stock is offset, in Priora it is strictly in the center. After installing the racks from Priora to Grant, the angle of inclination shifts by 3°. After 500 – 700 km. The wheel bearing will fail due to excessive load on the axle.
Advantages and disadvantages
It’s not difficult to find a spacer option that suits you, using a specific article number or using the search by car model. The Autoproduct store alone offers the widest assortment.
But in order to make a final decision, it is worth dividing the characteristics of the spacer into pros and cons.
The positive points include:
- reduction of possible body deformation;
- confident cornering;
- improved off-road performance;
- increased steering sensitivity;
- improved vehicle stability.
But there are also disadvantages. Among them:
- a strong side impact deforms the entire rack;
- purchase and installation require large financial costs;
- access to some components in the engine compartment becomes more difficult.
And you can draw your own conclusions, since everyone sets their own priorities.
I'll say this. Spacers on the front struts increase body strength and vehicle stability when driving off-road and when driving straight along the highway.