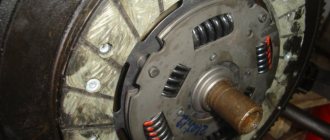
During the operation of the car, a situation may arise in which the owner of a VAZ 2110 will need to adjust the clutch. It must be said that this procedure is not difficult to perform and even a beginner can handle it. Such a need may arise in a situation when the clutch drive begins to malfunction. This can occur when the friction disc is severely worn. Before performing work, you need to have an idea of how the clutch operates on this particular car model. If you study this thoroughly, then it is quite possible to adjust the VAZ 2110 clutch with your own hands. In this case, there is no need to visit a car service center.
VAZ 2110 clutch problems and where they come from
The design has a number of disadvantages. The drive cable tends to stretch, and the friction linings wear out. Inevitable processes lead to breakdowns and failures, which provokes the need to adjust the device.
Clutch slipping
Disc slippage often occurs due to wear. Fine tuning of the drive prevents the parts from closing tightly, which causes slipping. A clear sign of this is difficulty shifting gears and a decrease in vehicle dynamics.
Jerks at start
The next obvious sign of a breakdown is jerking during sudden acceleration. Here, the root of the problem may be hidden in wear of the clutch, loose release, or stretching of the cable.
There is increased noise
Typically, driving a car is accompanied by increased noise for a number of reasons.
- Releaser wear. The device may make a lot of noise when changing gears.
- Crunching sound when trying to put the gearbox in position. Here the reason is incomplete opening of the disk with the basket. The mechanism is not disconnected and the load is partially transferred to the gearbox. If you try to drive the lever in this position, you can damage the gears.
Clutch not fully disengaging
A standard problem that makes it difficult to shift gears. The friction disc does not disengage, which causes difficulties during operation. In this case, the gearshift lever may refuse to enter the position.
What to do if cable adjustment does not help
If the cause of the problem is a worn cable, then it simply needs to be replaced.
If the cable is faulty, then the clutch may simply fail during a trip. Then the possibility of an accident increases sharply. You can change it by doing the following:
- the nut that secures the torso to the bracket must be loosened with an open-end wrench;
- After this, the cable can be removed. They do this very carefully;
- then it is disconnected from the clutch fork;
- then the cable is disconnected from the pedal. To do this, remove the protective cover and lock nut. After this, the pedal can be removed;
- Assembly should be done in reverse order. During this process, it is advisable to lubricate the parts with lithol.
The clutch in a car works under constant intense load when traveling. Therefore, it is not surprising that it wears out over time. Therefore, it may be necessary to compensate for its wear. For this purpose, adjustments are made. It is not difficult to perform such actions. Any beginner can handle this task. Therefore, there is no need to send the car to a technical service. The exception, perhaps, is cases of acute lack of time. A car enthusiast simply has no time to do this.
Sometimes adjustment can correct the deficiency by compensating for clutch wear. But in some cases it is so large that the cable has to be completely replaced. If any signs of wear are detected, it is better not to rely on the Russian “maybe”, but rather to immediately change the clutch elements. This will prevent the risk of emergency situations, because the clutch may simply fail while driving. Then trouble cannot be avoided.
Diagnosis of clutch faults
You can check that the clutch is working properly like this.
- Put the car on the handbrake.
- Move the gearshift lever to the neutral position.
- Start the engine.
- Engage the gear and slowly release the clutch.
As a result, the car should stall. If this does not happen, the clutch needs to be adjusted.
Pedal travel
This is where the whole process begins. The factory manual states that normal travel is about 13 centimeters.
Nut and locknut
But over time, the parameter increases as the driven disc lining wears out. This leads to the fact that the pedal rises slightly. Measuring the indicator is not difficult.
- Open the door leading to the driver's seat in the cabin.
- Squat down so you are close to the pedals.
- Place a regular ruler on the mat under the pedal, positioning it perpendicular to the clutch pedal.
- Measure the distance from the mat to the extreme point of the pedal, that is, the maximum distance.
- If the indicator is 16 centimeters or more, this indicates an urgent need for adjustment.
When is clutch adjustment necessary?
Adjusting the VAZ 2110 clutch is necessary if such symptoms are detected.
- Unpredictable behavior of the clutch pedal - when pressed, there is sagging and jerking.
- During acceleration or driving under load, vibrations of the body, engine and extraneous sounds appeared.
- The car accelerates jerkily or when the engine speeds up, the car lags in acceleration.
- When switching on the gear, great efforts must be made, which is accompanied by extraneous sounds, squeaking or crackling.
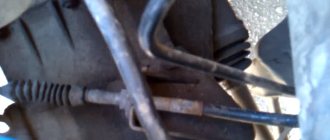
Where is the clutch cable located?
The location of the cable is the protective casing. Its ends are attached to the pedal and fork, which engages the clutch. If the discs wear out, the pedal travel increases. When the cable wears out, on the contrary, there is a decrease in the amplitude with which the pedal moves. This can lead to incomplete engagement or disengagement of the clutch.
How to finally adjust the clutch on a VAZ 2110
You can check that the settings are correct as follows.
- Warm up the engine to operating temperature.
- Engage the rear position of the gearbox. If the transmission “sticks” without difficulty, you can start moving.
- When accelerating the car, the acceleration proceeds smoothly, parallel to the increase in speed of the power plant.
- All gears work the same when reset to the bottom and top without any extraneous noise, squeaks or knocks.
If all conditions are met, the setup is complete.
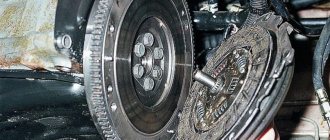
The design of the VAZ 2109 friction clutch and its purpose
Any self-respecting motorist will study the design of the unit before adjusting the clutch on a VAZ 2109. This will help you approach the issue wisely and avoid mistakes.
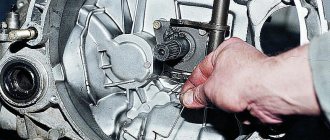
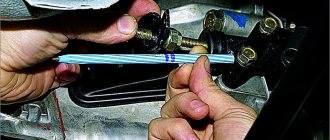
In the photo: The process of tightening the clutch cable on a VAZ 2109 car
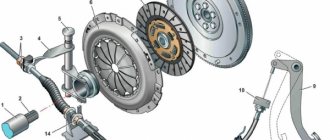
The mechanical drive design is simple and reliable. Compared to hydraulics, the cable requires minimal maintenance, and changing it is not labor-intensive. The mechanical drive consists of the following elements:
- Adjustable sheathed cable.
- Control pedal.
- Clutch release fork lever.
- Bracket for fastening the end of the cable sheath.
- Brake and clutch pedal bracket.
The mechanism serves to transmit force from the pedal to the release fork, which, in turn, removes the friction disc from the flywheel. Using a cable drive avoids major problems such as fluid leaks and periodic bleeding of air from the clutch control system. The weakest link in this chain is the cable, the quality of which at times leaves much to be desired. Therefore, replacing a cable on a Samara is a fairly common occurrence.
Meanwhile, the question of how to adjust the clutch on a VAZ 2109 car remains relevant for the cable mechanism. Setting standard values guarantees optimal tightness of the driven disk to the plane of the flywheel and basket when the clutch is engaged. The design also ensures complete separation (switching off) of the above parts from the passenger compartment through the pedal.
Replacing the clutch cable of a VAZ 2110
The simple procedure goes like this.
- Disconnect the release fork fastening.
- Using a 10mm wrench, unscrew the adjusting nut mounting bracket.
- Using “dancing with a tambourine”, unscrew the screw connecting the cable to the pedal inside the cabin. The second way is to dismantle the frill and wipers to gain access to the inspection hatch. From here the entire line can be easily removed.
- The next step is to remove the entire line through the interior.
- Installing a new cable is performed in the reverse order.
Adjustment steps
The work is carried out in two stages.
First, pay attention to how it all works. Study the instruction manual - the most important book for repairing all components, mechanisms and auto parts. Expand the chapter on the clutch and familiarize yourself with all the details and subtleties, understand the essence of the unit and design features, and learn the operating rules.
Only after this proceed to the adjustment itself.
The first stage is measuring the clutch pedal travel
- Place a ruler on the edge of the clutch pedal, resting it on the mat at an angle of 90 degrees.
- Measure the distance from the floor to the outside of the pedal. If the indicator is even a millimeter higher than the norm, clutch adjustment on the VAZ 2110 is mandatory.
The second stage is the setup process itself
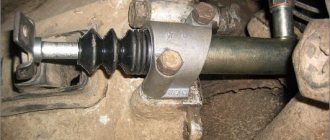
- Open the hood (with the engine off) and locate the locknut on the end of the clutch cable.
- Use the first key to reduce the lock nut fixation, and with the second, turn the adjusting nut and adjust the pedal free play within 120-130 mm. If you screw this nut onto the end of the VAZ 2110 cable, the full pedal stroke will increase, and if you unscrew it, it will decrease.
- Work with the adjusting nut and check the result until you get the required mark of 120-130 mm.
- Return to the car, sit in the driver's seat and sharply press the adjustable pedal 3-5 times, release and check the free play indicator again. Repeat the setup if necessary.
- Tighten the locknut. Pull the rubber limiting sleeve all the way into the fork.
If during the operation you notice that the cable or other parts of the drive are badly worn or have significant defects, then it would be better to replace them immediately, thereby protecting yourself from troubles in the future.
There are no particular difficulties in these actions; even an inexperienced motorist can perform them.
Still have questions? Watch the video instructions. Rate the page, your opinion is important to us! Did you like the page? Share on social networks!
Advice from professionals
- Carry out technical inspections of your vehicles regularly. This manipulation will allow us to identify future breakdowns and eliminate malfunctions at an early stage of development.
- Respond promptly to emerging signs. Do not operate a vehicle with worn parts.
- When making repairs, use only new and high-quality spare parts.
- Once again, spend a little and entrust the work to qualified mechanics if you don’t know how to remove the clutch cable of a VAZ 2110.
- To extend the life of the clutch cable, systematically lubricate it with a special substance using a syringe provided for this procedure. This feature will prevent chafing of the element.
Carefully monitor the condition of your car. Timely maintenance will extend the life of the vehicle.
https://mylada.net/remont/zamena-trosa-scepleniya-na-vaz-2110.htmlhttps://luxvaz.ru/vaz-2110/58-zamena-trosika-scepleniya.htmlhttps://carnovato.ru/ zamena-trosika-sceplenija-regulirovka/https://portalvaz.ru/zamena-trosa-scepleniya-vaz-2110-svoimi-rukami/https://vaz-2110.ru/podveska/zamena-trosa-stsepleniya-na- vaz-2110.html
Functionality check
After you have completed this work, you need to check the correctness of the work performed.
- First, measure the travel of the clutch pedal.
- With the engine turned off, depress the clutch pedal several times and return it to its place.
- Next, we take a new measurement and clarify the received readings.
- If they have not changed compared to the first measurements, then the work has been completed, correctly, and the first stage of verification can be considered completed.
- And if they differ from the first indicators, it means that the locking nut was not tightened tightly, and the adjustment process must be carried out again.
There is one rule among car enthusiasts! A properly adjusted clutch should begin to engage approximately halfway through the pedal stroke.
How the clutch works (briefly)
The clutch is controlled by a pedal located inside the car. Connection to the plug is made using a cable located in a protective casing. Let's imagine that the gearbox lever is set in the neutral position, and after the engine starts, the crankshaft begins to rotate. The basket presses the disc tightly against the flywheel. By pressing the pedal, we release the mechanism and torque is not transmitted from the engine to the gearbox; at this time, we engage first gear if we need to get underway, and smoothly release the clutch. The disk again begins to press against the flywheel, transferring torque from the engine to the gearbox and the car moves off.
If the force from the engine is suddenly transferred to the gearbox, the car will stall due to the load. The smooth operation of the mechanism allows you to extend the life of components.
Eventually
In conclusion, it should be noted that there are some “homemade” ones who specifically move the release bearing away from the basket, explaining their actions by the fact that in this way they will be able to extend its service life. However, they will have to be disappointed - the bearing is unlikely to become more durable, but the petals of the diaphragm spring will gradually be milled by the untwisted bearing race. And, please note, we are not discussing the discomfort from increased pedal travel, which can result in much greater expenses than purchasing clutch elements.
Source