01/12/2022 2,958 VAZ 2110
Author: Ivan Baranov
In any car, optics play an important role, since the driver’s safety depends on the quality of road surface lighting at night. Accordingly, because of this, many car enthusiasts change their headlights to provide better illumination. Find out more about what faults the factory headlights on a VAZ 2110 have and which headlights are best to choose from this material.
[Hide]
Tuning and repair of VAZ 2110
The information presented in this article will concern the disassembly of the VAZ 2110 headlight. Why do you need to disassemble the headlight?
In my case, I did this in order to insert the diode strip inside the headlight. This will also be useful for those whose headlights sweat. The reasons may be different. I will not describe how to remove a headlight from a VAZ 2110 in this article, since you can find detailed information about this HERE.
Well, let's get down to the process itself. In order to disassemble the VAZ 2110 headlight, you need to be patient. Since the parsing process is simple, but it can take a while.
First, let's look at how to disassemble the headlight of a VAZ 2110 (Kirzhach)
- So, the first thing you need to do is remove the glass from the headlight. I consider this stage to be the longest and most dangerous. Dangerous because if you are not careful you can break the glass.
A) Insert a screwdriver or knife into the edge of the headlight, between the glass and the plastic block.
B) This will create a small gap through which you can insert a utility knife and begin cutting the sealant.
C) be careful, do not rush, do not insert the screwdriver too deeply, otherwise the headlight glass will simply crack.
D) We go through the entire perimeter of the headlight with a knife. If the sealant does not yield, you can warm up the headlight with a hairdryer.
D) When the sealant has been slightly trimmed around the entire perimeter of the headlight, you can carefully push the screwdriver deeper into the headlight or insert a thicker screwdriver.
E) And again we go through the entire contour with a knife. (I played with the first headlight for 2 hours, with the second one less, either I gained experience, or there was less sealant. The second one succumbed to me in half an hour).
G) When the glass has completely come off, remove it from the headlight. Be careful, as the glass caught on the chrome plastic inside the headlight. And then it is fastened behind the headlight with three bolts. Therefore, if this happens to you, pry it with a stationery knife so that it comes unstuck from the glass.
We've sorted out the glass, let's move on.
2. Remove the chrome insert. To do this, unscrew 3 bolts from behind the headlight.
3. If you need to remove the headlight module and reflector, then remove the spring through the hole for the hydraulic corrector.
4. Now tighten the adjustment screws as much as possible, insert the screwdriver handle and unscrew the adjustment screws.
5. Now you can remove the board from the plastic headlight housing.
That's all, now let's look at the analysis of the VAZ 2110 (Bosh) headlight . Everything is much simpler with her.
- The glass on a Bosch headlight is very easy to remove, since it is not sealed with sealant. Unfasten the headlight latches.
3. To remove the reflector, you need to unscrew the adjustment screws and pull out the cap that covers the low beam bulb; to do this, pry it off with a screwdriver from the other side.
Replacing an element manually
What to do if the hazard lights don’t work, the low beams are off, the brake stop doesn’t work? If the brake lights do not light up and the headlights do not work, first of all you need to check the functionality of the relays responsible for their functionality. The performance of the lamps themselves is also checked - often they are the reason for the lack of lighting. If everything is in order with them, the problem will in any case lie in the electrical part.
Installing xenon on a VAZ 2110 will provide better lighting for the car. To make the car have an original appearance, you can connect the DRL and tune this element of optics. We have already written about how to change and connect daytime running lights in this article.
As for replacing the lights on the “ten”, it is carried out as follows:
- First you need to disconnect the wiring from the lights, and then dismantle the upper radiator grille, to do this, unscrew several bolts using a 10mm wrench.
- Next, you need to disconnect the wiring from the turn signal elements and dismantle the hydraulic corrector device. To do this, press the latch and rotate the device 90 degrees clockwise.
- Unscrew the three screws securing the optics using a wrench, the headlight can be moved back. Move the so-called eyelash of the optic a few cm, moving it beyond the edge from engagement with the wing.
- After these steps, you can loosen the two screws of the upper buffer clamp. Remove the so-called eyelash.
- Now all you have to do is unscrew the last fixing nut with a wrench, after which the lamp can be lifted and removed. If necessary, the headlight is repaired or tuned.
Sorry, there are no surveys available at this time.
DIY headlight repair for VAZ 2110
Many motorists, faced with malfunctions of the VAZ 2110 headlight, try to repair the headlight themselves, so to speak, with their own hands, or to improve the performance of the headlight, expanding its capabilities. However, finding high-quality optics is not so easy. Most often, cheap headlights from China or Taiwan come onto the market. Especially xenon headlights or lamps. They do not shine with quality workmanship, and durability leaves much to be desired; according to test results, they are inferior to standard classic copies.
The price of high-quality illuminators is considerable, however, they last several times longer. You can make repairs or modifications to the optics that you already have if you want to save money. You can easily do this yourself; the work does not require special knowledge or additional skills. Headlights for the VAZ 2110 differ in technology and manufacturer. Standard headlight brands:
- Bosch headlights (contain reflectors only, no focusing lens)
- Headlights from Kirzhach (including a focusing lens and reflector)
The most common headlight malfunctions:
- Broken hydraulic corrector, which is more practical to replace with an electric corrector;
- Trembling of the light beam;
- Lost adjustment of the light beam.
Repair of hydraulic corrector for VAZ 2110 headlights
Adjusting the light beam happens quite often, especially when the trunk of the car is heavily loaded; the light shines directly into the eyes of drivers of cars moving towards you. If the reflector has dropped and the adjustment does not work, our instructions will help you repair the headlight hydraulic corrector of the VAZ 2110; the repair will take very little time.
VAZ 2110 headlights Kirzhach - hydrocorrector repair
- Unscrew the headlight fasteners and remove them;
- We disassemble the headlights: carefully remove the glass, then the metal clips (6 pieces);
- Using a knife, clean the glass from the sealant;
- We cut off the convex profile (in the shape of the letter P) on the glass;
- Unscrew the screws (there are 3 of them) from the reverse side;
- Take out the paper reflector;
- Next to the hydraulic corrector hole inside the light housing there is a spring that must be removed;
- We perform the same actions with two plastic rosettes from two “turntables” securing the reflector.
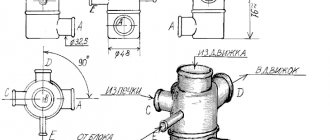
What does a hydraulic corrector look like and what does it consist of?
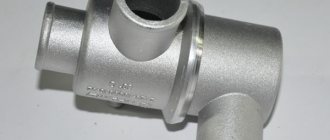
The device adjusts the angle of the light flux depending on the position of the car body. The shape of the regulator resembles a long tube, one end of which is located in the cabin, and the other is attached to the headlights. The design of the hydraulic corrector consists of:
- The master cylinder, which is installed on the instrument panel.
- Executive cylinders that regulate the position of the headlights.
- Connecting pipelines.
- Working fluid.
How the design details of the headlight hydrocorrector on the VAZ 2110 work
There are no complicated parts here; minor repairs can be done by yourself. This does not require a complex tool or special skills.
We repair the light fixture without disassembling it
You can snap the ball into place without removing the glass, through the holes of the light bulbs on the back side of the illuminator:
- We drill a hole exactly opposite the latch at the top of the headlight;
- Insert a screwdriver into the hole;
- Attach the collet to the corrector ball;
- We seal the hole we drilled;
- We attach a hinged loop from a furniture cabinet (hinges 5-6 centimeters long, with mounting holes and a cutout on top on which it is attached) to each broken corrector unit;
- We insert the canopy into the slot of the adjustment screw;
- We move the screw so that the slot is in a narrow place of the canopy;
- Holding the canopy, unscrew the screw until it stops with force. This is how the canopy is fixed, which needs to be placed in a horizontal position;
- Using an electric drill, using a 3 mm drill, we make a hole in the base of the light where there is a hole on the canopy;
- We screw a shortened screw into the hole so that it does not reach the high beam reflector. This slot secures the adjustment screw securely; it can be broken again.
Eliminating headlight shake
Many owners of the VAZ 2110 find that the light flickers when the car is moving. Such a breakdown most often occurs in Kirzhach headlights, but in Bosch parts such a breakdown rarely occurs. There is only one reason: reflector rattling. To eliminate light flicker, check:
- Is the reflector in place in the latch;
- The presence of an adjusting bolt rod;
- The emphasis is on the seating recess of the hydraulic corrector rod;
- We check the sagging of the thread (swap the high beam and low beam bulbs);
- Integrity of the tube in the hydraulic corrector (it may fray).
The most successful ways to eliminate jitter:
- We replace the hydraulic corrector with an electric corrector;
- We increase the length of the hydraulic corrector rod to tighten the spring.
This method allows you to get rid of light flicker by placing a cap on the hydraulic corrector rod.
Instead of a cap, use:
- Plastic dowel, eight millimeters long;
- The cap removed from the brake fitting;
- Different plastic cap.
- We remove the hydrocorrector itself from the illuminator;
- Place the cap tightly on the corrector rod. The main thing is that the cap does not jump inward;
- Install the corrector into the mounting socket
Replacing a VAZ 2110 headlight
Sometimes the entire headlight needs to be replaced. The work is done without any problems:
- Disconnect the negative terminal from the battery;
- We take out the radiator trim;
- Remove the block along with the wires;
- Press the latch of the hydraulic corrector cylinder and turn it clockwise 90 degrees until it stops;
- We take it out of the recess without disconnecting it from the hoses;
We take out the block with the wires, take out the hydraulic corrector
- We unscrew the bolts securing the headlight (shown in the photo with white arrows) and push the headlight itself back;
Unscrew the bolts securing the headlight
- We move the trim about four centimeters to the center of the car so that its hook comes out of the mount with the wing;
- To move the pad, loosen the tension of the bolts securing the buffer from above, push the buffer forward;
Loosen the screws securing the buffer
- We press on half of the lining so that the flange comes out of the mount, and take out the lining;
- Unscrew the nut securing the illuminator from the bottom;
Unscrew the nut from the bottom
- Disconnect the block from the turn signal lamp, pull the illuminator towards you and take it out;
- Unscrew the fastening screws to disassemble the illuminator;
- Separate the headlight from the turn signal;
Separate the headlight from the turn signal
- On the body of this pointer, unhook two hooks from the body of the optics part;
- We assemble in the reverse order to this and install the headlight assembly.
Congratulations! Do-it-yourself headlight replacement is complete, if anything remains unclear to you, I recommend watching the video on request VAZ 2110 headlight repair.
Replacement instructions
Since the cost of a new hydraulic corrector is 200-300 rubles, most car enthusiasts do not get tired of manual repairs. To replace the device we will need:
- Flat head screwdriver;
- Wrench with extended head.
The first step is to remove the old hydraulic corrector:
- Open the hood and remove the actuator cylinders from the inside of the headlights. To do this, simply turn the cylinder counterclockwise until it clicks.
To get to the actuator cylinders, you need to open the hood and go down to the headlight mounting area
Remove the adjusting knob by pulling it towards you
The fastening nut is removed with a socket wrench
Press the button to open the cover and gain access to the main cylinder of the hydraulic corrector
Pull the main cylinder through the hole
Tip: If snagging occurs when removing the pipes, you will need to loosen the fastening clamps under the hood or remove the water tank.
Installing a new kit is done in the same way, only in reverse order. The tubes must be supplied from the passenger compartment through a special hole, as shown in the photo.
We pull the tubes through a special hole in the cabin
Video: how to replace the headlight hydraulic corrector on a VAZ 2110 with your own hands
The hydrocorrector of the headlights allows you to smoothly adjust the direction of light and provides good visibility of the road surface. If this device breaks down, it can be easily replaced with a new one; the cost of the kit is very small. Before repairs, it is better to conduct a visual inspection and measure the stroke of the rod - this will help to understand the cause of the malfunction and eliminate it.
Adjusting the headlights on the VAZ-2110, as on any other car, is carried out in order to illuminate the space as efficiently as possible and at the same time not dazzle oncoming drivers. This applies to both low and high beams. The top ten can be equipped with two types of optics - German Bosch block headlights and domestic headlights from the Avtosvet plant from the city of Kirzhach. Both headlights need adjustment, which is what we will do now.
Changing the type of optics (tuning)
Car enthusiasts often tune their car headlights to improve their appearance. High-quality tuning gives the car a fashionable look and beauty. If you choose the right accessory, the appearance of dozens will change completely . The most popular among car enthusiasts is tuning headlights in the form of tinting. It is carried out in a variety of ways that have virtually no effect on the brightness and quality of road lighting. Types of headlight tinting:
- Painting of the headlight mask;
- Glass painting;
- Glass tinting film.
The process of such tinting is best shown in a video. For those who don't want to paint or tint their headlights themselves, there are ProSport headlights. They are already sold in black or chrome. You just need to install them instead of the standard headlights. Only they cannot boast of high quality or bright light.
What's better
One of the questions that 2110 owners ask is which headlights are best to choose for this vehicle. For the VAZ 2110, only Bosch and Kirzhach headlights are standard. If we consider the secondary market, what headlights are suitable for a foreign car?
This car configuration uses the following types of products:
- in the form of a monoblock;
- using lenses;
- modular;
- black;
- chrome plated;
- tinted.
In order not to be confused about which base is in the VAZ headlights, you can refer to the manufacturer’s documentation. Cars have a standard H1 base. When choosing new blocks, you need to focus on this feature.
Which ones to choose
Domestic headlights Kirzhach
produces headlights for the VAZ Kirzhach. Standard equipment of the headlamp unit:
- glass;
- reflector;
- hydrocorrector;
- hydraulic corrector springs;
- lenses included;
- curtains;
- standard lamps with H1 socket;
- fastening screws.
The main advantage of the Russian model is its affordable price. Additional benefits include:
- Available in any store in Russia.
- Provide good visibility at night.
- Improved brightness.
- Possibility of installing xenon.
Among the disadvantages, sometimes they note a not very clear glow and the need to additionally adjust the DRLs.
Headlights made by Bosch
Lighting devices from a well-known German company are included in the line of standard VAZ optics and are recommended as a replacement. Advantages:
- Expanded reflector surface (Bosch headlights shine well in bad weather).
- Optimal lighting brightness.
- The price is 10–20% lower than that of Kirzhach.
Otherwise, only disadvantages are noted, especially in comparison with domestic products:
- "Bosch" are deprived of the possibility of tuning (for example, it is problematic to install xenon optics on them).
- Low beam has worse illumination.
The service life is similar to the Russian model.
Installation and connection of headlights on a VAZ 2110
Installation of additional lighting provides good illumination of the road in snowstorms and rain. The standard optics of the VAZ 2110 do not provide an adequate light beam; it is always necessary to install additional light. How to install fog lights yourself: remove the plugs from the front bumper and secure the PTF using frames.
In the future, the connection diagram is quite simple:
- Connecting the PTF to the standard wiring, which extends from under the dashboard into the space under the hood.
- Find the connection pads in the front bumper (they are next to the socket plugs).
- Remove the plus from the car battery.
- At the bottom left of the steering column, find the mounting block for the relay and fuses. Open it.
- Use a screwdriver to remove the block.
- Find the terminals of fuses F4 and F14.
- Place copper connectors on the ends of the wires and insert them into the plugs.
Fog light
A very useful device, provides light in bad weather environments. The factory version is supplied for the VAZ 2110 “Lux” configuration. In other versions you need to install them yourself. At the same time, the place in which they will be placed is determined. Most often, this is the bottom of the bumper, there are holes for fastenings.
- transparent - they give light in spots, they are a little worse;
- corrugated - scatter light well on the road surface.
They purchase frames, relays, a power button, and wires for them. The latter are placed under the hood from the instrument panel, they are connected to the connectors on the instruments, they are isolated, the instruments are fixed in frames and secured to the bumper, and the wires are connected. The button is mounted in the break of the supply wire. Then the devices are adjusted.
Repair
The design of the headlight is simple; a car enthusiast can easily carry out some types of repairs on his own step by step. Disassembling VAZ lamps:
- Use a knife to remove the glass.
- Use a screwdriver to unscrew the reflector bolts.
- From the rear, remove all the wires and the hydraulic corrector spring.
- Pull it towards you to remove the module.
After 3–5 years, the rear lights, like the front lights, require major repairs or complete replacement. How to replace a VAZ 2110 headlight:
- Disconnect the minus from the battery.
- Unscrew the radiator grille from the car.
- Unscrew the block mounting bolts.
- On the reverse side, find the wire connectors and disconnect them.
- Remove the hydraulic corrector.
- Remove the trim from the outside of the headlight unit.
- Unscrew the block itself and remove it from the car.
You can also repair the hydraulic corrector yourself. The block is a vulnerable part of the head optics of the VAZ 2110. The algorithm is as follows:
- Remove the headlight.
- Take the light bulbs out of it.
- Pull out the glass (secured with sealant).
- Remove the spring from the reflector.
- Remove the reflector.
- Identify the worn part and replace it.
Most often, the breakdown consists of a cracked plastic part of the part or a burst spring. Assembly is carried out in reverse order.
How to repair a device
During the DIY repair process, you will need to make some parts and consumables yourself.
Tools
From the tool you need to prepare:
- Screwdrivers.
- Metalworking machine.
- Plastic dowels that will serve as a cap.
- Washers.
- Anaerobic sealant.
Description of the repair process with photos
Repairs vary depending on the type of fault. In most cases, factory headlight mounts are replaced with homemade ones, and the cylinder rod is also lengthened .
- We cut the metric thread into 3 on the adjustment screws.
The adjustment screws have metric threads.
Remove the plastic fasteners from the hydraulic corrector bolt
Using 2 washers and a spring, we make a reliable mount for the hydraulic corrector
How to extend the stem
If you want to expand the lighting of the road next to your car, it makes sense to lengthen the rod. This will allow you to change the position of the headlight. You will need to use a plastic tip 7-8 mm long. We recommend using a regular dowel of a suitable diameter. It is secured to the top of the stem with glue or sealant.
Modernization of headlights on VAZ 2110
Headlights of the "Kirzhach" type can be modified to improve lighting properties. How to improve the light:
- Remove the glass using a knife (it is secured with sealant).
- Remove the reflective pad.
- Move the lens 0.15 cm towards the reflector.
Upgrade option: slightly reduce the modular ring on a lathe. This tuning will allow the optics to shine brighter.
In addition, the following modifications to the headlights are possible:
- Changing the shape of the reflector. To increase the width of the light beam, it is necessary to compress the reflector vertically. In addition to the reflector, it is necessary to change the shape of the fastening, make it oval, for example, resting the part on the floor, and bend it to the required shape.
- Improving lighting by replacing and installing a new curtain. Make a curtain from tin and attach it to the module reflector. The border of the curtain should be located in the middle. After installing the curtain, the unit needs to be adjusted.
When making certain changes and modifications to the headlights, it is important to remember not only the quality and brightness of the light, but also safety. If you are not good at repairs, it is better to entrust it to professionals.
Tuning with a plastic tube
To complete the work, you need a set of tools, as well as materials for manufacturing: a jar suitable for the diameter of the headlight, LED strips, resistors, transparent plexiglass sticks.
Having prepared everything for work, we step by step:
- Heat the tube with a hairdryer, bend it around the can using pliers, this is the diameter of the headlight.
- Let cool and saw off excess.
- Assemble LEDs and resistors.
- Sand the edges of the tube and drill holes at the ends.
- Use a hacksaw to make notches on the inside of the tube.
- Fix the LEDs in the holes and remove the contacts.
- Apply sealant to the structure and secure it around the headlight lens.
Optics of the legendary “Ten”: which headlights should you prefer?
In any car, optics play an important role, since the driver’s safety depends on the quality of road surface lighting at night. Accordingly, because of this, many car enthusiasts change their headlights to provide better illumination. Find out more about what faults the factory headlights on a VAZ 2110 have and which headlights are best to choose from this material.
Choosing an optical system for Lada 2110
One of the most popular models of optical systems on the market today is the “Pro sport” system.
However, this model of headlights has a number of disadvantages that cannot be left unnoticed, since the safety of both the driver and passengers directly depends on the quality of the lighting emitted by the car. Based on reviews on the Internet, we can conclude that the “Pro sport” headlight emits low quality lighting and is unable to properly provide visibility of the track at night. Therefore, it is worth considering purchasing a Kirzhach headlight.
Example of headlight packaging
After unpacking the headlights and checking the package, the question arises: “Where to start?” In this case, You Tube will be your best assistant. On this site you can find many interesting videos on the topics of tuning headlights, fine-tuning lights, etc. Even if these videos differ from your vision of the work process, do not be upset, since each master uses a variety of approaches and materials in his work. Your task in this case is to emphasize for yourself the basic principles and approaches to installing headlights and get a high level of motivation, since without it it will be very difficult to achieve the desired result.
see also
The price for headlights of this model ranges from 2350 to 2550 rubles and largely depends on the dollar exchange rate. Also, to the initial costs it is worth adding the cost of a can of paint 200 rubles and masking tape 48 rubles. The approximate amount of initial costs is 5148 rubles.
Typical headlight malfunctions
Now let's briefly talk about the malfunctions. In accordance with the operating diagram, Bosch VAZ 2110 or Kirzhach headlights operate on the same principle. The same goes for other optical elements, be it turn signals on a VAZ 2110, Bosch fog lights, DRLs on a VAZ 2110, or brake lights.
So, what malfunctions are typical for optics:
- The rear lights of the VAZ 2110 stopped working. Since these lights turn on when reverse gear is activated, there can be several reasons for their failure. This is the wiring, the inoperability of the lamp itself, as well as the failure of the reverse sensor. If two light bulbs stop working at once, then you do not need to immediately disassemble the rear lights on the VAZ; you need to check the functionality of the sensor.
- The side lights or dimensions in the turn signals of the VAZ 2110 do not work. In this case, you need to check the relay and fuse located in the block. If the problem is not with them, then check the wiring and the lamps themselves.
- The running lights on the VAZ 2110 refuse to work. You should also check the functionality of the fuse and the wiring with the bulbs. But if, in addition to the DRL, all other lights work, it would not be a bad idea to diagnose the steering column switch.
- Feet don't work. Recently, owners of “ten” cars have installed so-called stick lights in their stop signals. The sticks are so called because the glass on them is made in the shape of a hockey stick. And it often happens that the stops do not turn on after replacing the optics. If you have changed the lights, then first of all you should check the quality of all connections and the functionality of the brake light bulbs. If everything is fine with them, look for a problem in the wiring.
- Only the high beam or only the low beam or both do not work. If all optics are working properly, but only the high or low beams are not functioning, check the bulbs first. Further according to the diagram, the wiring, quality of contacts, and fuses are checked. If all components work, it is necessary to diagnose the steering column switches. It is possible that when one or another light is turned on, a contact on the switch circuit comes off.
- If you have xenon installed on a VAZ 2110, then the cause of the malfunction may be a failure of the ignition unit.
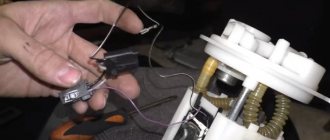
Principle of step-by-step action
Let's start removing the lamp from the headlight unit. To do this, we need a thin screwdriver and an awl, as well as a magnet on a long handle (if possible). We unscrew the lamp protection box on the headlight unit on both sides by hand.
Remove the cover. Below it you can see the three-pin headlight power connection block, as well as the spring mechanism of the lamp holder.
Replacing the low beam bulb on a VAZ 2114 Before disconnecting this unit, you need to disconnect the contact block. Then you need to compress the lamp fastening spring and release the lighting element itself. With a slight movement of the hand, we remove the lamp from its standard mounting location and replace it in the reverse order.
Before changing the low beam bulb on a VAZ 2114, it is advisable to make sure that there is no condensation in the reflector unit. If moisture is present, this may be the main reason for the failure of this device.
To eliminate it, it is important to clean the drainage channel, which is located in the area where the turning lamp is mounted (left or right)
When performing this work, you must adhere to basic safety rules. When the lights for the VAZ 2114 stop shining on the road, you don’t need to stand on the side of the road, creating an emergency situation, but try to get to the nearest gas station or service station.
Suggested options
As mentioned above, for car owners of the “dozen” the market offers only two options for headlights - domestically produced Kirzhach and original Bosch VAZ 2110 headlights. Of course, most consumers prefer German-made products, especially considering that their cost is lower than Russian optics ( author - channel Aleks B).
Which headlights are better?
Before removing and installing new optics, let's figure out which manufacturer to give preference to. Despite the fact that German-made products have always been famous for their quality, in reality, domestic experts recommend installing Kirzhach flashlights on the “tens”.
Let's see why this is so:
- It is clear that the purpose of the lights is to provide better visibility of the road surface when driving at night, while they should not blind oncoming drivers. These functions are performed normally by both Kirzhach and Bosch devices.
- Russian-made flashlights have a lens for near lighting and a reflector for distant lighting. As for German-made lanterns, they are equipped with two reflectors. The level of illumination of the road surface is generally identical in both cases, but the Bosch ones shine an order of magnitude brighter.
- In any case, lenses are better than reflectors because they provide a clearer line of light. In addition, their operation allows the use of xenon.
- Judging by the reviews of our compatriots, Bosch flashlights have poorer illumination, in particular in low beam conditions.
- German-made devices have an important feature - the road surface is illuminated much better in cloudy weather and rain, unlike Kirzhach. This is ensured by the fact that their design uses a larger reflector. However, due to this same feature, installing xenon in Bosch will be impossible.
Diagram and design of optics on the "Ten"
Before we tell you how to modernize and modify headlights, which headlights are best to choose for the VAZ 2110 so that the optics light illuminates the road well, let's talk about the device. According to the standard, headlights on the VAZ 2110 can be installed from manufacturers Bosch or Kirzhach. Headlights for the VAZ Kirzhach are equipped with a low beam lens and a reflector for high beam. As for the design of the VAZ 2110 Bosch headlight, in this case the original is equipped with reflectors in both cases.
1. Russian-made device Kirzhach
2. German Bosch headlight
Headlight adjustment
Briefly about the adjustment:
- To ensure the correct setting, you need to fill up a full tank of gas, wash the lights, inflate the tires to normal and put everything in the car that should be in it. We are talking about a spare tire, tools, fire extinguisher, etc. The car should be driven to a level fence or wall, and the surface on which the car is standing should also be level. The wall must be marked as shown in the photo.
- Place the car five meters from the wall.
- Turn on the lights.
- The headlamp control should be set to position 1.
- Set up the lighting as shown in the diagram.
How can you adjust headlights without disassembling them?
The headlights can be adjusted without dismantling them, but to do this, the following conditions must be met:
- The car's gas tank must be full.
- The glass of the lamps must be washed to keep them clean.
- The car must be equipped with everything necessary - a spare wheel, tools, a fire extinguisher, etc.
- It is also important to ensure that the tires are not flat.
- You will need a flat, vertical surface, such as a fence or wall. There should be enough free space in front of it - at least 8 meters.
Scheme for setting up lighting on the “ten”
The selected surface should be correctly marked on the wall, do it as shown in the figure.
So, how to adjust the headlights on a VAZ 2110:
- The car is driven away from the wall and installed so that its longitudinal part passes through the center of the surface.
- The lighting turns on.
- The hydraulic corrector regulator must be set to position 1 - driver.
- Adjust the lighting as shown in the figure.