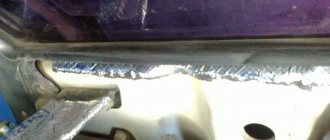
We are replacing stabilizer struts (eggs in common parlance) on a Lada Priora car. This is the third time the stabilizer struts have broken on this car; it was decided to replace them with reinforced SS20 ones (the factory gives a 2-year warranty on them; they usually last much longer). The replacement is not difficult, the tools you will ideally need are a garage equipped with a pit or an overpass, but you can do it as in our case, 2 17 keys, a hammer and a soap solution to put the stand on the stabilizer, this is not in the video, but it turns out much easier.
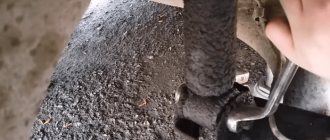
There was a slight hitch in removing the bolt; a stump or similar object can make the task easier; you can place it under the disk and lower the jack a little.
Video of replacing stabilizer struts (eggs) in Lada Priora:
As you can see, replacing the stabilizer struts on a Lada Priora car is not at all difficult, the total time spent does not exceed 15 minutes, even a beginner can cope with this task. In our stores, stabilizer bars are considered the most popular consumables in suspensions; road irregularities do their job and directly affect their service life.
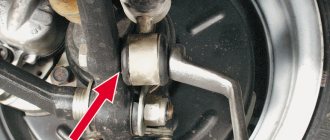
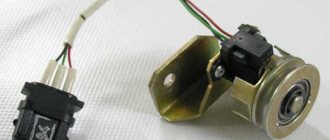
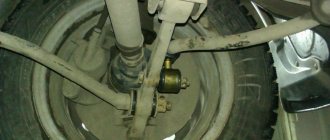
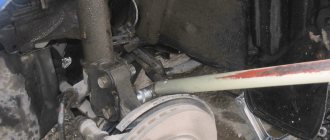
The stabilizer links connect the stabilizer to the right and left suspension arms. They are responsible for the condition of the car in corners, eliminating unnecessary rolls; their breakdown is fraught with dangerous consequences, so replace them as soon as possible.
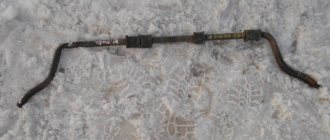
For comparison, on the left are the new SS-20 stabilizer struts, on the right are the original ones and, unfortunately, unreliable:
Text of the note* Good day everyone! I went to the dacha once again and along the way there was a knocking sound on the right side on the bumps. I arrived at the place, took off the wheel and saw that the stabilizer egg had been torn off
When I changed everything I went and experienced a knock MISSING =)
Thank you all for your attention! Good luck on the roads!
Reasons for replacing stabilizer struts
It’s not worth changing such a unit just like that, without objective reasons. Still, it costs some money and has its own resource of suitability. As long as the car behaves well, there is no point in spending extra money. But if characteristic signs of their malfunction appear, do not delay repairs.
There are several reasons for changing them:
- Characteristic knocking noises appeared in the suspension;
- There is a slight vibration feedback on the steering wheel, which worsens the process of driving and makes it more difficult;
- The front of the car wobbles a little;
- The wheels pull slightly to the side when driving straight.
How long the new elements will last depends on two factors:
- Quality of the purchased part;
- Conditions of the roads on which you primarily drive your vehicle.
We'll give you some parting advice. Many who go to a service station to replace stabilizer bars send the car, on the recommendation of a specialist, to check the wheel alignment. In fact, this procedure is completely unnecessary, since changing the struts does not in any way affect the angle of the wheels on your car. This is another attempt to lure more money out of an inexperienced client. Be carefull.
Sequence of actions when carrying out diagnostics
Diagnostics is essential before starting work on replacing parts. A visual inspection will help identify the source of the breakdown, assess the general condition of the vehicle, and correctly calculate spare parts and consumables.
- We drive the car into the inspection hole, ensure priority safety measures, squeeze the handbrake, install wheel chocks;
- Jack up the side, unscrew the bolts, remove the wheel;
- We use a metal pry bar to facilitate the diagnostic process. We press at the junctions of metal structures. If the rod is in good condition, there should be no squeaks or knocking. Otherwise, this will indicate defects and wear of elements.
We summarize the data obtained based on the diagnostic results and make a decision on the need to replace spare parts.
At the same time, we check the technical condition of silent blocks and the brake system. If there are signs of wear or deformation, we replace the elements with new ones.
The process of replacing stabilizer struts on a VAZ 2110
The stabilizer struts on a domestically produced VAZ 2110 car are replaced as follows:
- Place the car on a viewing hole or raise it on a platform. The front part must be fixed to supports.
- To avoid putting yourself in danger, put the car on the handbrake.
- If you are in a pit, then place shoes under the wheels, even if the handbrake is on.
- On both sides, alternately unscrew the nuts that secure the body to the arms of the anti-roll bar struts.
- Remove the spring washers.
- Unscrew the bolts on both sides.
- Unscrew the two nuts that hold the stabilizer bars to the body.
- Remove the spring washers from the studs.
- Remove the stabilizer brackets and rods along with the struts.
- If you need to replace the strut or bushing, unscrew the nuts securing the strut and arm, then knock the former off the bar with a hammer. The hammer must be wooden or plastic. Under no circumstances should it be a metal instrument. You will damage the element with it.
- Visually inspect the condition of the struts and bushings. If deformation, tears, wear, deterioration of elasticity, cracks, or loose fit are detected, be sure to replace the failed elements with new, high-quality ones.
- To remove bad bushings, you will need a press. Because of this, it is easier to replace the struts at the same time as the bushings.
- Inspect the assembly rod. There should be no signs of deformation on it. Make sure the ends are in the same plane.
- If the geometry deformation on the stabilizer bar is minor, it can be corrected. Otherwise, the part is replaced with a new one.
- If the stabilizer pads are worn out, torn, have lost their original elasticity or do not fit well on the bar, they must be replaced. New cushions are mounted on the stabilizer bar 350 millimeters from its center. The cuts should be located towards the front of the car.
- The struts need to be lubricated with a soapy solution, which will make it easier to put them on the stabilizer bar.
- The bar is mounted in its rightful place, the nuts that hold the brackets from the pillows are tightened. They should be tightened until the play in the cushion cuts is eliminated.
- First you need to tighten it from the side of the cut, that is, the front nuts. Only then are the rear nuts tightened.
- The nuts holding the front struts are mounted in place until there is no gap between the struts and the arms.
- Weight the suspension to finally tighten the stabilizer nuts. Place the car on a hard surface. The tightening torque for the rack components should be in the range from 4.3 to 5.3 kgf-m, and for the brackets - from 1.3 to 1.6 kgf-m.
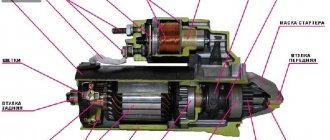
Purpose and principle of operation of the stabilizer
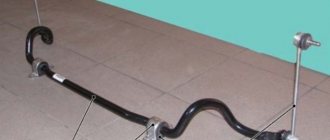
The stabilizer is a U-shaped rod made of spring steel. The stabilizer connects the left and right sides of the car in the transverse direction. It works like a torsion bar, that is, the centrifugal force is counteracted by the twisting force. The VAZ 2110 and almost all modern cars have a front stabilizer in their design.
Let's consider the principle of operation of the stabilizer. When the car rolls, the stabilizer unscrews. One end of the stabilizer goes up, the other goes down. As a result, one wheel is unloaded, and the second, on the contrary, receives additional load. When rolling, the stabilizer tries to level the car.
The effectiveness of the stabilizer directly depends on the rigidity. Hardness depends:
- on the material from which the stabilizer is made;
- on the shape of the stabilizer;
- on the method and geometry of attaching the stabilizer to the body.
The stabilizer bar is attached in the middle to the body of the VAZ 2110 car using two brackets. The stabilizer is isolated from the brackets by rubber gaskets - stabilizer bushings. On the left and right sides, the stabilizer is attached to the lower arm through the stabilizer links. The VAZ 2110 is not equipped with a rear stabilizer. But some car enthusiasts install it.
Why did I decide to replace the stabilizer?
When diagnosing the suspension of my car, it was discovered that the stabilizer struts had a lot of play on the stabilizer. Perhaps there is wear on the metal, we'll see after it's removed from the car.
In addition, cracks appeared on the rubber bushings, although they did not start to loosen, and there were no suspicious knocking noises. But since it got under the car, we’ll change them for prevention.
Features of SS20
The SS20 company produces quite a lot of different suspension elements that are suitable for the VAZ model range.
Their distinctive features forced car owners to pay increased attention.
- The product quality is high at a very attractive price.
- The products are provided with a long warranty. So, for struts - 2 years without mileage restrictions, and for springs - 4 years.
- The warranty applies to the product regardless of the installation location. You don’t have to go to a service station and pay money to the technicians to maintain your warranty. Many people change the struts on the “ten” on their own, in their garage. If you do this, the SS20 parts warranty will still apply. This is the only manufacturer that offers such warranty conditions.
The Asomi company can be called a definite competitor. Their parts are of quite high quality and reliable. Only the warranty is only 1 year. Moreover, the elements must be installed at specialized service stations. And this significantly affects the cost of repairs.
Ceiling covering
The material from which the ceiling covering in the VAZ 2112 is made gets dirty very quickly. Over time, a dark spot appears on the ceiling, directly above the driver's seat. Similar spots appear above the heads of passengers (but, as a rule, later). Re-upholstering the ceiling covering on your own is not an easy task. But finding a reupholstery specialist is not easy, plus his services are not cheap. So VAZ 2112 owners do it simpler and simply paint the ceilings of their cars using universal paint in spray cans (to paint the ceiling of a “two-wheeler” you need 6 of them).
Sequence of work
Painting the ceiling directly in the salon is not an option. First, the coating must be dismantled.
- The ceiling covering in the VAZ 2112 is held on by 10 screws and 13 plastic latches located around the perimeter. To remove the screws, use a Phillips screwdriver. The latches are opened manually.
The material of the ceiling covering on the VAZ 2112 gets dirty very quickly - The removed covering is removed from the passenger compartment through one of the rear doors (to do this, the covering will have to be slightly bent).
- The selected paint is sprayed from a can onto the ceiling covering (no preliminary primer is required - the universal paint is well absorbed into the material).
- After painting, the ceiling needs to be dried. It takes 6-8 days for the smell to completely disappear. Drying is carried out only in the open air.
The coating needs to be dried in the open air for 6–7 days. - The dried coating is installed back into the interior.
Improved dashboard lighting
The VAZ 2112 dashboards have always had one problem: dim lighting. This was especially noticeable at night. So the first thing tuning enthusiasts do is change the light bulbs in the instrument panel. Initially, there are simple and extremely weak incandescent lamps. They are being replaced by white LEDs, which have two advantages: some are durable and economical. Here's what you'll need to get started:
- 8 white LEDs;
- medium sized flathead screwdriver.
Sequence of operations
To remove incandescent lamps from the VAZ 2112 instrument unit, you will have to unscrew it and pull it out.
- The steering wheel moves down all the way.
- Above the dashboard there is a visor into which a pair of screws are screwed. They are removed using a screwdriver.
The location of the screws holding the panel is shown by arrows - The visor is pulled out from the panel. To do this, you need to slightly push it towards you, and then pull it forward and up.
- Under the visor there are 2 more screws, which are unscrewed with the same screwdriver.
- The block with instruments is removed from the niche. The wires located on the rear wall of the unit are disconnected. There are also light bulbs there. They are unscrewed and previously prepared LEDs are installed in their place.
Light bulbs are unscrewed from the printed circuit board by hand, their location is shown by arrows - The wires are connected to the block, it is installed in a niche and screwed together with a decorative visor.
Video: removing the instrument panel on a VAZ 2112
Replacing the steering wheel
Here's what's required to replace the steering wheel on a VAZ 2112:
- large flat screwdriver;
- socket head 22;
- new steering wheel.
Sequence of work
The first step is to get rid of the decorative trim on the steering wheel. It is most convenient to pry it off with a thin knife.
- The horn switch is attached to three self-tapping screws. They should be unscrewed using a large screwdriver.
- There is a 22 nut under the panel. It is most convenient to unscrew it with a socket head on a long wrench.
It is convenient to unscrew the nut 22 using a socket head on a long wrench - The steering wheel can now be removed and replaced with a new one.
After unscrewing the central nut, the steering wheel can be easily removed
About replacing seats
The seats on the VAZ 2112 cannot be called comfortable. This is especially noticeable on long trips. So, at the first opportunity, drivers put seats from other cars on the “two-wheeler.” As a rule, Skoda Octavia acts as a “seat donor”.
Skoda Octavia is the most popular “seat donor” for the VAZ 2112
It is impossible to install the seats from this car on a VAZ 2112 in the garage, since serious adjustment of the fasteners and welding are required. There is only one option: use the services of specialists with the appropriate equipment.