DRL lamps and dimensions
The 2180's daytime running and side lights use LED bulbs. Their undoubted advantages include high brightness and low electricity consumption. This allows you to significantly reduce the load on the car's generator. LED lights are resistant to impacts: shaking, vibration on the road.
To replace burnt out tail light bulbs:
- Disconnect the ground;
- We gain access to the headlight by unscrewing part of the inner trunk lining opposite the rear lights;
- We disconnect the wires from the cartridge we need, remove it by turning clockwise;
- We remove the burnt out light bulbs;
- The entire rear optics are removed after unscrewing the fastening nuts with a size 8 wrench.
- Reassemble in reverse order.
How does a rain sensor work?
Daytime running lights: operating features and regulatory requirements for 2022
The principle of operation of the rain sensor
The described device consists of an LED and several photosensitive elements (photodiodes). The light emanating from the LED is reflected from the glass surface and returned to the light-sensitive elements. If there is rain or snow on the surface, the degree of reflection changes and the sensor turns on the wipers.
The more wet the windshield is, the less refracted light will be reflected. Photocells react to the change and after that the wipers turn on. This is why false alarms may occur when insects get on the glass or if there are defects on the surface. To prevent untimely activation of the wipers, it is enough to turn off the sensor in dry weather and install the device only on undamaged glass.
Schematic location in the engine compartment
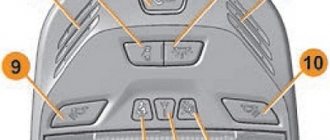
| Numbers/current | Functionality / where they are located |
| P(F-1) / 20 | Windshield washer |
| P(F-2) / 5 | Understeering's shifter |
| P(F-3) / 10 | High beam (left headlight) |
| P(F-4) / 10 | Steering column switch (left) |
| P(F-5) / 20 | Heated seats |
| P(F-6) / 30 | parking lights |
| P(F-7) / 30 | Rear dimensions |
| P(F-8) / 7.5 | Rear fog lights |
| P(F-9) / 10 | Right turn signal repeaters |
| P(F-10) / 10 | Automated gearbox selector |
| P(F-11) / 10 | Low beam (left side) |
| P(F-12) / 10 | Direction indicators |
| P(F-13) / 30 | Power circuit |
| P(F-14) / 30 | Stop signals |
| P(F-15) / 10 | Rain sensor, external lighting, hydraulic headlight range control |
| P(F-16) / 15 | Fuel pump, charging |
| P(F-17) / 15 | Illumination of the glove box, thresholds |
| P(F-18) / 10 | Turn signal repeaters (left) |
| P(F-19) / 10 | Low beam (right) |
| P(F-20) / 10 | Heated mirrors (external) |
| P(F-21) / 5 | Instrument panel (panel) |
| P(F-22) / 5 | central locking |
| P(F-23) / 5 | Canister, air flow sensor, timing valve |
| P(F-24) / 5 | ERA GLONASS |
| P(F-25) / 5 | Radio tape recorder |
| P(F-26) / 5 | Gasoline pump |
| P(F-27) / 20 | Parktronic |
| P(F-28) / 15 | Electric power steering |
| P(F-29) / 15 | Line output to tow hitch |
| P(F-30) / 20 | Reversing light |
| P(F-31) / 15 | Anti-theft alarm |
| P(F-32) / 15 | Illumination of the engine compartment, interior |
| P(F-33) / 5 | Window lifters |
| P(F-34) / 15 | Steering wheel rotation sensor |
| P(F-35) / 5 | Door program block |
| P(F-36) / 15 | Radio, diagnostic connector |
| P(F-37) / 15 | Generator |
| P(F-38) / 15 | Beep (optional) |
| P(F-39) / 15 | Daytime Running Lights |
| P(F-40) / 20 | High beam (right) |
| P(F-41) / 20 | Standard cigarette lighter |
| P(F-42) / 20 | Bus power |
| P(F-43) / 20 | Door locks, ABS, airbag |
| P(F-44) / 20 | Window lifters |
| P(F-45) / 20 | Heater fan (interior) |
| P(F-46) / 20 | Windshield wiper (windshield wipers) |
| P(F-47) / 15 | Air conditioner |
| P(F-48) / 15 | Windshield wiper (optional) |
| P(F-49) / 15 | Heated rear window |
| P(F-50) / 15 | Stability Program (ESP) |
| Name | Block pinout |
| RP 1 | Lighting, seat heating |
| RP 2 | Responsible for the cigarette lighter |
| RP 3 | Heated rear window |
| RP 4 | Front windows |
| RP 5 | Interior heater (stove) |
| RP 6 | Window lifter for rear doors |
| RP 7 | Gasoline pump |
| RP 8 | Car socket (powered by 12 Volts) |
| RP 9 | Heated windshield |
| RP10 | Heating relay |
| RP11 | Starter |
| RP12 | Cruise control |
Why do DRLs not work on Vesta?
The rear lights of the VAZ 2114 do not light up: reasons, do-it-yourself repairs
Daytime running lights on Lada Vesta may fail for the following reasons:
- The lamp has burned out - after checking, if necessary, you need to replace it with a new one.
- The fuse has blown - the daytime running lights will not work if the fuse is faulty. It is located in the Lada Vesta mounting block.
- There is a break in the wiring - the fault can be identified using a multimeter switched to voltmeter mode. It is also worth checking the reliability of the contacts.
- An additional body electronics unit has broken down - the fault can be eliminated by completely replacing the broken component (Lada Vesta is equipped with units with part numbers 231A08052R or 231A03142R as standard).
- Electronic short circuit protection has tripped - unsuccessful replacement of the DRL lamps on the Vesta with LED ones is the cause of this malfunction. The DRL lamps and headlights will not light up even after reinstalling the standard elements. To disable triggered protection, you must reboot the EMM unit. AvtoVAZ has issued a special instruction for such cases. In addition, you can use the Grade-X scanner (the device is sold by official Lada dealers).
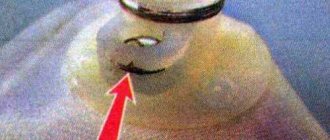
DRLs do not work on Vesta
To check the integrity of the fuse, you will need to open the car's mounting block. The element responsible for the Vesta DRL is marked F39.
Problems
There is one big problem - the risk of burning out the electronics unit, which, by the way, happened to many Vesta owners. For example, if you put LEDs in the DRL of a sedan, then after a short time they will simply stop shining. As a rule, in such cases, the fuses are replaced, which are marked in the instructions with the symbols F16 and F17.
Replacement must be done carefully
However, there are none under the cover that covers the fuse box. In the end, it all ends with a burnt-out electronics unit, which has to be replaced. It's all about the higher resistance of the diodes, which is why Vesta's electronics unit cannot withstand it.
The most unpleasant thing is that this is not a warranty case, so contacting the dealership for a warranty replacement will not help. You have to buy the unit yourself, and it is quite expensive - it is not always possible to find a part even for 8,000 rubles, and sometimes the price tag for an element reaches 19,000 rubles!
Moreover, such a problem can arise not only because of LEDs. If you thoughtlessly select and install components, it is more than possible to end up with a burnt-out unit.
What is necessary
The reverse lights do not light up on a VAZ-2110 car: how to fix the problem
To scan a car you must perform the following operations:
- Python 2.7 and PyQt4 are installed (32/64 depending on the version of Python, depending on the version of Windows);
- install DDT4ALL (the program is constantly improving), unpack it to drive “C” in Python27Scriptsddt4all;
- install the latest DDT database and unpack it into the program installation folder;
- run ddt4all.py on the command line;
- In the main window, click search; after scanning is completed, blocks will be displayed on the left.
To install the software database, copy the special “ecus” directory from your database and move it to the root of the source code tree. After this, ddt4all.py is launched.
Reverse sensor (3 contacts) for VAZ Vesta
Dear customers, in order to avoid errors when sending reverse sensor 8200177718 (switch, reversing light), indicate your car model and year of manufacture in the “Comment” line.
Modern vehicles are equipped with a set of mandatory visual indication devices. For example, a reverse gear sensor is designed for automated ignition of light elements that signal the reverse movement of the vehicle. But we must not forget that this equipment is an auxiliary element that only acts as an assistant in driving a vehicle, and does not reproduce its functions.
In accordance with operational and technical standards, the reversing lamps must be lit in the evening. If during operation of the car there is no additional illumination at the rear, immediate elimination of this problem will be required, which is usually caused by various technical breakdowns, exhaustion of service life or low quality of parts.
Reverse sensor 8200177718 Lada Vesta / LADA Vesta is located on the gearbox housing. It is designed to ensure that the rear lights turn off synchronously with the end of reverse gear.
If after replacing the reversing light sensor the problem is still not resolved, you should look for the reasons again. A complete list of possible problems includes the following factors:
— the light bulbs burned out. The situation is complicated by a longer search for a violation. The test is carried out by removing it from the lanterns and then checking it with a multimeter;
- the wiring is damaged. Solving the problem complicates the lengthy search for a breakdown. Diagnostics are carried out with the same continuity or resistance measuring device;
— there are bad contacts on the sensor elements;
— the insulation on the wires near the converter is broken, which leads to a subsequent short circuit;
— the fuse has failed (blown);
— the sensor itself is broken. The presence of a breakdown is indicated by the lights not being turned on when reverse gear is engaged, as well as their constant burning.
The cause of the breakdown may be one of the listed defects or a combination of several of them. Only consistent action to eliminate each cause will lead to the long-awaited desired result. To troubleshoot problems, sometimes you have to carry out all the steps listed above, but it is recommended to start with the reverse sensor, since the price of this element is relatively low.
To final check the functionality of the alarm system, you need to start the electric motor and switch to reverse mode. The last stage will allow you to check while moving backwards.
Characteristics of Reverse Sensor 8200177718 (switch), for cars of the Lada Vesta family:
Thread size: M14 x 1.5;
Wrench width: 24;
Number of poles: 2;
Casing color: green.
Other article numbers of the product and its analogues in catalogues: 8200177718.
Lada Vesta / LADA Vesta.
Any breakdown is not the end of the world, but a completely solvable problem!
How to replace the reverse sensor on a Lada Vesta yourself.
With the online store Discounter AvtoAzbuka, repair costs will be minimal.
Just COMPARE and BE SURE.
Don't forget to share the information you find with your friends and acquaintances, as they may also need it - just click one of the social networking buttons below.
Source
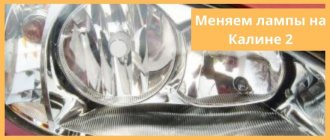
Changing the high beam lamp of Lada Vesta
Replacing a high beam bulb on a Lada Vesta is no different from replacing a low beam bulb. The only difference is the type of lamp itself and its location. And the high beam lamp is located closer to the edge of the car. If Vesta uses H7 lamps for low beam, then H1 for high beam. Otherwise, the replacement procedure is completely identical.
To put it very briefly, we unscrew the plastic casing, remove the wire plug, bend the latch and take out the lamp. We put a new one in its place. Here is the sequence of work for replacing the bulb in the high beam headlights on a Lada Vesta. I think comments here will be superfluous.
Dashboard firmware
After the not entirely successful first “tidy” of Vesta, an updated one was released, with the defects corrected. The question arises - what should the owners of the first generation Lada Vesta do? In order for the backlight to work in the daytime without turning on the headlights, you can reflash the “tidy”. If the car is equipped with cruise control not at the factory, but by the owner, the corresponding indication on the old panel without firmware will not light up.
Without the skills and knowledge, installing software yourself can do more harm than good. The tailoring must be used strictly for the specific dashboard. It is not allowed to install updated software from a new device to an old one and vice versa.
Step-by-step instruction
The right and left lamps change according to the same principle, but there is a slight difference. It is better to replace the low beam on the left by removing the battery. This will make it easier to get to the headlights in the engine compartment.
Running lights
On the Lada Vesta, these lamps are combined with side lighting and have two spirals. One of them has a power of 21, and the other - 5 watts.
Operating procedure:
- To remove the running light, turn the cartridge body counterclockwise. There is a flag on the chuck for rotation. See the direction of rotation when looking from behind the headlight.
- Pull the cartridge out along with the connected wires.
- Remove the burnt out bulb and insert the new one as far as it will go.
- Inspect the rubber seal on the cartridge. If it is damaged, replace it with a new one, otherwise dust and dirt will get inside the headlight.
- Install the chuck and turn until it stops.
Turn signal lamps
On Vesta, the turn signal bulbs have a single spiral with a power of 21 watts.
Reinstallation procedure:
- Similar to the running lights, rotate and remove the socket.
- Push the bulb in, then twist and pull it out of the socket.
- Insert a new one, making sure that the protrusions coincide with the grooves of the cartridge.
- Check the serviceability of the rubber gasket, replace if necessary.
- Install the cartridge.
The glass of the turn signal light is orange, so it needs to be replaced with a similar model.
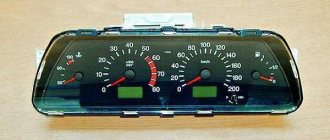
Description of the instrument panel
The instrument cluster includes the following control and measuring devices:
- speedometer
- tachometer;
- engine temperature indicator;
- fuel level indicator in the tank.
All this is located in three “wells” above the steering wheel.
The central instrument is the speedometer. Its scale is marked up to 200 km/h, although the Lada Vesta does not accelerate to this mark with any of the engines. There are also several indicators on the speedometer:
- unlocked trunk;
- open hood;
- alarm;
- unlocked doors;
- Cruise control;
- speed limiter
- direction indicators.
Below the speed scale there is a small on-board computer screen that displays the following information:
- mileage (including mileage per trip);
- current time and travel time;
- average speed;
- voltage in the on-board network;
- fuel consumption;
- checkpoint operation;
- ambient temperature;
- cruise control operation.
In the left “well” there is a tachometer with a scale from 1 to 7. “Red zone” means that the engine produces more than 5500 rpm. The indicators located here may indicate the following:
- pedal adjustment;
- safety belt;
- airbags;
- brake failure;
- accumulator battery;
- engine malfunction;
- emergency oil pressure;
- ABS;
- transmission malfunction;
- electric power steering.
On the right side there are two scales at once: engine temperature (top) and fuel level (bottom). Here you can see indicators such as:
- immobilizer;
- ESC;
- fuel level;
- lighting work.
The instrument panel is made in a modern style, everything is illuminated and there is no feeling of clutter. However, some car owners are dissatisfied with the ease of reading information, especially at speed, so they tried to adjust the brightness of the instrument lighting themselves.
Lamps used on the vest
All optics on the Lada vesta comply with established international standards and perfectly complement the appearance of the car. As mentioned earlier, halogen bulbs of standard H1 and H7 are used for high and low beam. The H7 model is 20% brighter than the H1, but their light output does not blind oncoming drivers.
Daytime running lights for Lada vesta use 5W, and side lights use W21. These are baseless two-pin incandescent lamps. The brake light also shows a two-pin light fixture, but with a metal socket. The model of this lighting fixture is P21. Reverse gear is indicated by the W16W lamp. The most commonly used lamps for 2180 are Osram, BOSCH, and Philips. You can purchase them yourself in spare parts stores, and then replace them without turning to service centers. This will significantly reduce the time and money spent on servicing the 2180 car.
Is it worth installing LEDs?
The standard running light bulbs on the Lada Vesta are also being replaced with LED ones. Diodes have a longer service life and are immune to shaking and vibrations that occur while the car is moving. LEDs have lower power consumption, which reduces the load on the generator.
You can buy LED DRLs on Aliexpress. Daytime running lights from Philips (price from 1500-2000 rubles), Vanssi (price from 500 rubles) are available for purchase.
Before replacing the standard DRLs on the Vesta, you need to visually compare the light coming from incandescent lamps and LEDs. To do this, you can leave a standard lighting element in one car headlight, and install an LED in another. Only after a visual comparison can you begin to replace the daytime running lights on the Lada Vesta.
After purchasing a Lada Vesta, many of its owners are seriously thinking about replacing the lamps in the head optics and license plate lights. Many people try to install diodes, because with them the sedan looks much more attractive. But all this usually turns into very unpleasant consequences.
Main light
In the Lada Vesta, the low and high beam bulbs are covered in the headlight with plastic covers. Low beam - closer to the center of the car.
Do not touch the glass with your hands, this will cause it to darken and quickly fail.
They have a lot of power, so they get very hot during operation. When replacing, be careful not to break the expensive light bulb, otherwise you will have to spend money on buying a new one.
Replacement instructions:
- Turn and remove the plastic cover.
- Remove the electrical block.
- Press the retaining spring and disconnect it from the reflector hook.
- Move the spring to the side.
- Pull the bulb out of the headlight without touching the glass.
- Install the new light bulb in reverse order.
Pay attention to the cleanliness and condition of the new lamp: the glass must be perfectly clean. High-quality packaging in a store should ensure the cleanliness of the product
In extreme cases, the glass can be wiped with a clean cloth moistened with alcohol.
High-quality packaging in the store should ensure the cleanliness of the product. In extreme cases, the glass can be wiped with a clean cloth moistened with alcohol.
Installation
Disassembly
The process of creating illumination for the rear seating area of the Lada Vesta and X-Ray begins with the dismantling of the rear door panels. In general, there is nothing complicated in this process. You just need to work carefully.
First you need to remove the window handle. To do this, you need a plastic spatula from a special kit for disassembling doors. However, if you don’t have one, you can use a thin screwdriver or a knife, but you must first wrap the tool with cloth so as not to damage the plastic.
Plastic tool for work
Use a spatula to pry the handle from the reverse side, which will allow you to disengage the latch and remove it. All that remains is to remove the handle itself. For Vesta and X Ray, the operating algorithm is the same.
The process of removing the handle is demonstrated in the video
Next, use the same spatula to remove the facing trim on the door handle, behind which 2 fastening bolts are hidden. They need to be unscrewed by 10.
All that remains is to unscrew the screw at the very bottom of the door, and then unclip the door card itself, which is held on by the pistons. According to the experience of owners, sometimes clips break, so you should be prepared to buy new ones.
The X-Ray door trim fastening is slightly different. After removing the handle, you need to unscrew the 3 screws that secure the cover to the metal. One bolt is located in the handle, the second in the central part, and the third at the end. When they are unscrewed, all that remains is to snap off the card with the pistons.
Location of bolts on X-Ray
At this point, the dismantling process during the creation of illumination of the rear seating area of the Lada Vesta and X-Ray is completed.
Seating
They need to be cut at the bottom end of each door card to the shape of the lampshade so that it can be securely fastened. If you purchased lampshades from Priora, the seat dimensions will be 25/61 mm.
Better to use a drill
For work, it is recommended to use a drill, but if you don’t have one, a stationery knife will also work, although working with it is not as convenient, and the process will take much more time.
Ceiling lamps
In the process of creating illumination for the rear passenger seating area of the Lada Vesta and X-Ray, car owners are faced with the lack of plugs on the lampshades. If the door card has to be removed in the future, which is very likely, it is necessary to be able to quickly turn off the backlight.
It is recommended to solder plugs to the lampshades
To do this, connectors are purchased separately and soldered to the lampshade, after which it is recommended to fill the soldering areas with hot-melt adhesive - this will increase strength and guarantee high-quality insulation.
How to remove protection?
To independently remove the protection (reboot) in the EMM block, AVTOVAZ has issued a special instruction. In short, it says that to remove the blocking, it is enough to apply +12 volts to the 3rd contact (free) of the white block of the block for 2-3 seconds with the ignition on, and then reset the errors of the comfort block controller. After this, performance should be restored.
Detailed instructions for removing protection:
- Remove the glove compartment lid to gain access to the comfort unit.
- Connect a connector with a wire at least 50 cm long to the free pin 3 of the white block.
- Apply +12V to the other end, for example from the green wire of the glove compartment lighting block.
- Turn on the ignition for 3 seconds.
- Turn off the ignition and remove the installed circuit, returning everything to its original state.
- Reset the EMM unit errors using a Grade-X scanner (or any other available method).
- Check the functionality of the circuits.
There is a more humane way - you can remove the protection using a special Grade-X scanner, which is now available at official Lada dealers. It is enough to find the corresponding parameters in the list that are responsible for unlocking the right and left sides of the car, respectively. After activation and complete reset of the unit, lighting functionality is usually restored.
Grade-X Scanner
If these instructions do not bring the desired result, this indicates that one or more driver channels are damaged. In this case, there are two options for eliminating the malfunction - repairing the unit or replacing it with a new one. If you are comfortable with a soldering iron, then you can easily figure out the circuit diagram of the unit and, using inexpensive attachments (installing additional relays), cheaply repair the electronics. If it is possible to purchase new driver chips, then repairing the unit will come down to replacing them.
For those interested, we provide sample diagrams for repairs using the installation of an additional relay.
As a conclusion, it is worth noting that interfering with normally functioning car components is always fraught with unexpected problems, and before replacing a simple working light bulb, think 10 times - whether all this will result in expensive repairs and a lot of wasted time.
Do-it-yourself firmware
You need to be aware that all actions are performed at your own peril and risk. No one can guarantee that after installing the firmware yourself, the device will work correctly. To prevent this outcome, it is recommended to update the panel either at an authorized dealer or at specialized service stations.
There is no need to confuse the panel firmware with the multimedia firmware - these are different devices.
The cost of such a service varies from 1,500 to 2,500 thousand rubles. This is much cheaper than buying a new shield to replace a damaged one yourself. For dismantling and reflashing, the warranty may be revoked if the procedure is not carried out by an authorized dealer. If you decide to update the software yourself, you will need to make a backup copy of the standard firmware, then prepare the necessary tools:
- A device for flashing Usbdm OSBDM V4.95 - can be ordered on AliExpress, the cost is approximately 600-700 rubles.
- Install drivers and software for Windows from the disk included with the programmer.
- Dismantle the instrument panel, peel off the factory seal, and remove the cover from the back.
- Open the programmer and move the checkbox to the 3.3V position - at this voltage you will not need an external power source.
- Connect to the dashboard and PC.
- On a computer or laptop, open the HCS12 Programmer program, select and click on the “Detected” item.
- Go to the “Target” item and select the folder with the location of the firmware, check the box next to the “Auto Reload” item, then click on “Detect Chip”. The programmer will determine the chip type automatically.
- Go to the “Security” tab and check the “Unsecure” box.
- In the “Advanced” tab, check the “Enable” box.
- In the “Device Operations” section on the “Target” tab, select the “Erase Selective” item - only the firmware will be replaced, the immobilizer data and mileage will be saved.
Now you can click on the “Program Flash” button - the firmware process will start. This will last a few seconds. After completion, when prompted by the program to connect the dashboard, click “No”. The flashing device can be turned off and the instrument panel replaced.
Lada vesta has quite a lot of functions that almost no one knows about
In addition to those described above, you can change the settings for power windows, daytime running lights, brush sweep, and belt buzzer. There is also a hidden menu for MMS, radio and testing. The connection occurs via Bluetooth.
You can customize the car for yourself, but remember that all work is performed at your own risk. If you are not confident in your strengths and capabilities, then contact specialists.
There are a lot of additional functions and settings - this is good and interesting. However, the manufacturer decided to remain silent about some of them, although they could make life easier for drivers and make AVTOVAZ products more attractive to potential buyers. Not all functions are necessary or required, but they can be useful in different cases. Therefore, it is worth learning about them in more detail and deciding for yourself whether to use them or not.
Features of the updated panel
In favor of AvtoVAZ, we can say that the manufacturer constantly modernizes all its cars, even new ones. Increasingly, engineers are listening to ordinary car enthusiasts (surveys on social networks, meetings with representatives, communication on forums). At the request of customers, the dashboard of the Lada Vesta has been modified. The changes include:
- the numbers have become noticeably larger, reading readings while moving has become much easier;
- the backlight is used regardless of whether the lighting is on or not, the backlight is on on all scales at any time;
- instead of white backlight, red is used;
- a voice alert now warns of an unfastened seat belt; the audio also includes a GPS connection and much more;
- the volume of sound notification and voice guidance has increased (information and warning signals);
- the time on the display is now synchronized automatically by satellites of the ERA-GLONASS navigation system;
- The warning indicators have been changed (low tire pressure and unfastened seat belts front and rear).
Export models supplied to Germany and Hungary were the first to be equipped with the updated dashboard. Since 2022, the “tidy” has become available for the domestic market. A function such as adjusting the backlight level has not yet been implemented.
Changing the parameters of the center
You can change the following parameters:
- The “BCM” block (on the left), the “Doorlock” function (below the block) and in the same place “Doorlock - Configuration”.
- Enabling “AntiHiJack” in the line “ANTI_HIJACK_CF (-)”, specify the required value, click “TRUE”, “Send”. Initially, AntiHiJack is deactivated on the machine. If you activate it, then with one click on the key fob the car will be disarmed, and with a second click it will be unlocked. When opening a door from the inside, only one door will open, the others will be closed, provided the central locking is activated. You can deactivate the functions by selecting the “FALSE” command and then “Send”.
- Speed threshold for activating a signal about an unlocked door - go to “DOOR_WARNING_SPEED_THRESH_TP (km/h)”, specify the required speed on the right and click “Send”.
- Changing the speed threshold for automatic central locking - go to “LWS_SPEED_THRESH__CF (km/h)”, specify the required speed, click “Send”.
- Auto-arming timeout (triggered when the system is turned off by the key fob or if the door is not closed) for this period of time in “AUTO_RELOCK_TIMEOUT_CF (min)” specify the required number of minutes, then click “Send”.
A little background
One sunny day you got bored and decided to do some easy tuning of your Lada Vesta, which, as you know, starts with the light bulbs.
It's no secret that standard DRL lamps look somewhat depressing, with a yellowish tint. It’s especially sad that they decided to make LED running lights on the X-ray’s sibling.
So, you bought Chinese white LED bulbs with huge declared lumens to embellish the appearance of your pet. You start dismantling the old ones, install new lamps and, in anticipation of white rays of light, start the car and get... no light.
After slight bewilderment, you try to return everything to its original state - install the incandescent lamps back in place and again check the operation of the running lights. But a miracle does not happen, the light is still missing and you begin to sort through ideas, look for the reason for what happened. Usually the first thought that comes to a car owner’s mind is “The fuse has blown!” You open the fuse table, find the required F39 and are perplexed - it is intact.