Procedure for starting a car engine in cold weather
To ensure trouble-free starting of the engine, the car must be prepared for winter use before the onset of cold weather. It is necessary to fill the engine and gearbox with oil designed to operate at low temperatures. It is imperative to replace spark plugs and filters, oil, air and gasoline. And of course the most important thing is the technical condition of the battery. Even if the battery is new, it must be charged from an external charger. If all these requirements are met in advance, then there will be no problems starting the engine in the cold season.
It is recommended to start the car engine in the following order:
- You need to insert the key into the ignition, turn it clockwise one sector and make sure that all electrical appliances are turned off. Although they should turn off automatically when the starter is running, it is nevertheless better to turn them off so as not to create additional load on the engine at the first moment after starting it.
- To bring a cold battery into working condition, you need to warm it up by turning on the headlights or side lights for 20-30 seconds.
- If the transmission is not automatic, then be sure to depress the clutch pedal all the way. In this case, the gearbox will be disconnected from the engine, which will significantly reduce the load on the starter. 4. Turn on the ignition for half a second so that the engine shaft moves from a dead center and the oil lubricates the rubbing surfaces of the engine.
- Turn on the ignition again for no more than 3 seconds. If the engine does not start, you must wait at least 15 seconds before restarting. During this time, the battery, warmed up due to an unsuccessful engine start, will gain strength. If after 5-6 attempts with pauses it was not possible to start the engine and the battery did not die, it means that either the water that got into the mechanisms froze and it is necessary to warm up the car by placing it in a warm garage. Or a malfunction has occurred and you need to contact service.
- If the car engine starts, you need to smoothly release the clutch pedal. After warming up, the car is ready to go.
Conclusion
The causes and methods of eliminating the malfunction of tripping valves on Lada Priora 16 valves are considered. If the problem still cannot be resolved, then it is recommended to contact a car service so that professionals can sort it out. Maybe it's time to replace the valves or rebuild the engine.
It is useful for any fan of the domestic automobile industry to know the reasons why the Priora engine has 16 valves. After all, this problem is quite common. Ask any driver what the reason is, he will immediately give several options for the malfunction. And also ways to solve them. Of course, by interviewing many people you can find out all the reasons. But they still need to be checked. In addition, very often the cause of engine tripping can be several conditions at once.
To ensure that the problem is resolved, you need to check all possible options. Only in this case will you get rid of this problem.
Lada Priora Sedan city aspirated › Logbook › Refinement of IKZ power supply
Hello guests and subscribers of my logbook. Today we’ll talk about how you can improve the power supply system for the ignition coils used on my car and not only. The history of how they appeared on the car is somewhat unusual
In general, one person approached and asked for something interesting, he wanted to install coils from VAG turbo engines on his evil Opel, the calibrator and I twirled them in our hands and noticed them, they almost miraculously fit into the spark plug wells of a 16-valve engine! The matching board was, of course, invented and tested, the very first tests carried out on my car and on Pasha’s car, which constantly tunes me, lasted for a month, as a result, improvements were made and the board acquired its final form. There is a small video with these coils, it’s interesting to take a look. https://www.youtube.com/embed/nTDc5JOXZys
If you are interested in installing these coils, let me know and I will describe it in more detail.
In the process of developing the matching board, a good drawdown in the power supply to the IKZ was discovered at the moment of its operation, it was useful to look on the Internet what people were doing with this, the first thought was to install capacitors. Almost immediately I came across a good post www.drive2.ru/c/2171255/ which confirmed my thoughts. I don’t see the point in reprinting his post, check it out, everything is described very well! Taking into account the fact that I still made scarves for the matching board, I also made it for the capacitors.
The board was made even without the use of LUT, so it is not very beautiful, but there is space for a capacitor to power the injectors. Places for IKZ condensers and injectors signed
Capacitors were selected according to the principle: - what was available at that time - minimum voltage 25 volts, capacity not lower than 2200 uF
Among my stashes I found three pieces with a capacity of 3300 microfarads and a voltage of 25 volts, they were installed, all this was installed in the case and tucked under the hood of the car.
It is lined with a heat insulator at all ends; it is also used as a filler and prevents the board from moving around the case.
The collective farm under the hood looks like this
Obeying the trend that arose in me, described in this entry www.drive2.ru/l/456526025019360491/, you need to connect it humanly before the onset of cold weather.
Operating experience, especially taking into account the fact that the car has undergone significant modifications—idling has improved, it has become a little smoother—low-end traction has improved—work has improved slightly at rpm above 6000, I don’t know what’s causing it
There were no changes in terms of fuel consumption, but overall I recommend the improvement; indeed, the drawdowns in my case decreased by 15 percent, at the moment when I was climbing I didn’t think to take a screenshot. By the way, the DSO Nano DSO201 mobile oscilloscope, which was borrowed from my boss, is amazingly helpful in such things.
By the way, as you can see from the photo, the conductor that was intended to power the injectors was disconnected, this of course did not surprise me, but when it was connected, the composition of the mixture changed in a richer direction, I had no desire to roll back the mixture, I later forgot, although the car was rolled back online after of this “device”. Of course, the mixture became richer only at low engine speeds, where there are no problems with power supply and the mixture in its normal composition. A slight enrichment in itself will give us an even better start from where we are, by the way...
My recommendations: - it’s not necessary to install it - it’s up to you to connect the injectors or not, although I’ll definitely connect it before the next online setup. In fact, this modification has no downsides, but there aren’t many advantages either. Good luck to everyone on the roads and making competent and necessary modifications.
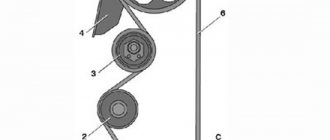
Step 1: Belt removal
First, unscrew the screws holding the shield that protects the entire mechanism from dirt. After removing the shield, it is necessary to remove the cover protecting the timing drive, located at the bottom front. To do this, you need to unscrew two screws. Then remove the belt from the generator drive. Here comes a very important moment.
It is necessary to install all shafts in the correct position. On the camshaft pulleys and the rear drive cover in the 16-valve version of the Priora car, the timing marks must match. This is done using the crankshaft. It must be turned to the desired position.
In a Priora car, the timing marks should not only be in relation to the camshafts, but also in relation to the crankshaft. To do this, remove the rubber plug in the upper part of the clutch housing and see if the marks match.
If on the flywheel it is located opposite the recess of the upper cover of the clutch housing, then everything is adjusted correctly. Often, when unscrewing a bolt, the valve timing is disrupted. To prevent this, the flywheel should be locked.
To do this, you will need a regular screwdriver of a suitable size. It must be inserted into the clutch housing between the teeth. It will be more convenient to use the help of a partner for this task. Next we proceed to the final stage.
1. Unscrew and remove the bolt for securing the pulley
2. Remove the support nut
3. Loosen the bolt securing the belt tension roller with a 15mm head
4. Remove the belt.
What have manufacturers done to help car owners?
Initially, microprocessor ignition options went on sale, where a modified distributor was installed, configured to work together with a hall sensor and control a classic brand car.
And everything seemed to be going well, except that for the classics the work of the distributor still remained problematic. Among other things, at the very beginning it was clear that for the electronic system, the characteristics of the UOS for a heated or unheated motor are clearly different. Because when setting the UOS to cold and then warming up the engine, inevitable detonations occur.
Due to all the inconvenient moments, system manufacturers decided to make the following modification. They had to make the microprocessor ignition for classic cars almost identical to the injection version, leaving only the injection system control unchanged.
Movable timing marks "Priors"
These are recesses on the shaft gears and on the flywheel. The protruding part of the flywheel has strips cut into it. With their help, it is good to determine the ignition timing with a strobe. But you shouldn’t trust these notches when installing the belt. It's better to rely entirely on gear markers.
Protrusions on camshaft gears
On the outer part of the gear drive, there is a protrusion in a certain place. On each of the gears, it is installed in its place.
What can be put on the classics from the existing MPSZ
Among the most well-known microprocessor systems, Maya, Secu 3 or Mikas MPSZ are most often used. Assembling any of them is not difficult, if you have the skills to correctly see and read the instructions with the diagram, and follow the sequence of installation actions. When choosing a microprocessor system, you should not be intimidated by the fancy circuitry that product sellers like to show off, offering the services of a familiar electrician for “guaranteed high-quality installation for pennies.” All components can be installed on the classic with your own hands.
When choosing, pay attention to the quality of the block itself. It is considered good form if there is no warping of the plastic parts of the burrs or microcracks. The second indicator is the presence of a large scattering surface in the form of an aluminum base
The microprocessor remains the most capricious part and the choice of place under the hood or in the cabin must be taken very seriously
The second indicator is the presence of a large scattering surface in the form of an aluminum base. The microprocessor remains the most capricious part and the choice of place under the hood or in the cabin must be taken very seriously.
The ignition coils can be separated into a separate unit; alternatively, they can be mounted directly next to the spark plugs on the head cover.
Benefits you shouldn't ignore
Lada 2105 Bright White 15 R Logbook Installation of steering column switches for Chevrolet Niva ignition switch for VAZ 2110
Along with optimizing his car, the owner, with a new ignition, additionally receives a number of special advantages.
Among them:
1. A real opportunity to customize your own engine for any attractive fuel for the car.
2. If you have a car with HBO, an increase in traction and overall power of the car.
3. Complete absence of detonations and knocking noises when picking up speed, even when less than ideal fuel is available.
4. In gasoline-powered cars, fuel burns out much faster, which reduces fuel consumption by an order of magnitude.
5. In cold weather, the car starts much faster and easier.
6. The electronic system does not require total control on the part of the owner, since control is assigned to the built-in display.
7. The machine can be converted and an additional toggle switch can be added to easily switch to one type of fuel or another.
8. With a new type of ignition, the owner receives new options; important parameters are kept at a specifically set level.
9. The starter turns off on its own after the engine starts.
10. You can control the ventilation of the cooling system.
McSystem › Blog › To the blog: Will a spark ignite a flame? Not always!
This modification will be useful in almost the entire line of VAZ injection engines, regardless of the type and composition of the ECM equipment and the ignition system in particular.
Immediately a warning - based on the results of comments and questions.! ! ! Intervening and making changes to the electrical circuit of a car requires at least basic skills in electrical engineering and awareness of the actions being performed! ! !If you feel that the electrical circuits and electrics of the car are not your profile, contact a more qualified person or an experienced auto electrician. This is in your best interests. And it will save you from unpredictable consequences.
Updates and additions are at the end of the article. A detailed detailed analysis of changes in the ignition system after modifications are described here:
Part two.
Expanded results In order. Engine VAZ 21124. 1.6 liters, 16 valves. Individual ignition coils (or dual module with high-voltage wires). Everything is beautiful. And at first glance, it seems that everything is thought out, so it should work clearly and reliably. It turns out that this is far from true. This is a VAZ!
Quite a lot has been written about ignition problems on this engine - about the choice of spark plugs, replacement and selection of individual ignition coils (hereinafter - IKZ).
So I came face to face with this problem. The main manifestations are the engine rotates unevenly at idle (speeds dance in the range of approximately 720-840 rpm), sluggish acceleration with twitching, increased consumption. In principle, most people understand - misfires, rare , but there is.
The ECU doesn't see them directly. Last year, one coil clearly started to fail - the ECU saw it. I replaced it and it started to loosen up a bit. But still the engine was missing something. What a good spark! Here's about this in detail. From the versions: - replacing the spark plugs (the current NGKs lasted only 7 tons km) with something more expensive from the "platinum, iridium" series, etc. - a costly option. - changing the IKZ, but for them a little more than 7 years (the original BOSH ones are there, the mileage is 75 tkm) - it’s a little expensive (the cost of one IKZ is around 540 UAH ($22), and there are four of them) and there is no confidence that the problem will go away. - Mass air flow sensor, which is also not fun... - look into ECU for serviceability of keys, current-limiting resistors, etc. Acting at random or based on assumptions is not my method or my approach.
Reading the ECU showed: 1.
Speed jumps2. Injection time jumps, slightly3. OZ jumps at XX (9-15 degrees) - a bit much4. Power supply, mass air flow sensor, air sensing sensor - everything is stable and beautiful.5. The ECU masses are all ideal (previous modifications and correct wiring were made) Verdict - unstable sparking.
The ICP parameters were measured - the resistance of the primary winding, inductance, the resistance of the secondary winding (taking into account the diode in the high-voltage circuit), checking for the absence of short-circuited turns - the norm.
The coils have a minimal (± 2%) spread and nothing alarming in the parameters. More on this later. On the hastily assembled “stand” there is a normal spark, a little weaker in appearance than on a classic with a contactless ignition system, but still clear throughout the entire range of rotational speeds (2 - 45 Hz), with an accumulation time of 2.0 ms. The coils are alive. The rubber caps in the explosive part of the coil have been replaced. To complete the picture, I decided to look at the diagrams on the coils with an oscilloscope on the engine, pulled out my C1-65A - a reliable, proven workhorse to the car and off we go. The ignition is on. The engine is running. On board the network (to the battery) 14.35V, which at XX, one hundred at 2000 rpm is stable. Amazing! Let's see. As usual, I start with power to the coils (+12V from the ignition switch) and I am HORROR! On the coils, as well as on the IKZ harness connector, the ripple is exactly 2.5V. I was not mistaken, I measured it in 2 modes (and the oscilloscope has been an everyday tool for many years and not the only working tool - there is no room for doubt). I apologize for the bad photos - the scan is slow and the shutter speed in the camera is short.
source
Replacing spark plugs - step-by-step instructions.
Good day to all. Almost every car enthusiast has at least once replaced spark plugs or glow plugs on their own. We described replacing glow plugs here. Spark plugs are the most important element in the operation of any car. Their purpose is to ignite the fuel-air mixture in the combustion chamber.
The spark plug is the final element on which the entire car ignition system operates. Spark plugs are consumables and require periodic replacement during operation. This article will provide information on how to do this yourself and avoid mistakes.
When to change spark plugs
To understand the specific timing of replacing spark plugs, you need to refer to the technical regulations of the car on which this operation must be performed. This is done due to the fact that depending on the make and year of manufacture of the car, the requirements vary.
What's wrong with the weather and how does it affect spark plugs? You ask. Very simple. Partial dust, sand, dirt, water from the road gets onto the engine. In the process of replacing spark plugs, we observe sand in the wells, oil that flows from under the gasket (Ford), and even water (from above from under the plastic where the wipers are). It's different on different cars. Since the engines are located differently.
How to change spark plugs
Everyone knows this very well, but still many neglect the requirements for replacing spark plugs. Perhaps the rush prevents everything from being done efficiently. Or they do not represent the full responsibility of the matter.
Spark plugs are changed when the engine is cool. It must be taken into account that spark plugs operate at high temperatures, so if you do not cool the car after driving, there is a risk of burns.
In addition, since the cylinder head is aluminum and the spark plugs are steel, they have different expansion coefficients when heated, and a plug that is unscrewed from a hot engine can bite.
The spark plugs really bite and they break off or come out of the cylinder head together with the threads. When unscrewing long spark plugs, they turn 1.2 turns and get snagged. Short candles most often envelop the candle thread.
Preparing to replace spark plugs
Before removing the coils (or wires) and the spark plug itself, it is necessary to thoroughly blow off the working surface so that the dust and sand that accumulate on it do not get inside the cylinder and damage the cylinder mirror and elements of the piston group. This must be done with a professional, powerful compressor.
If there is no compressor, but you need to unscrew the spark plugs, then find one (for example, a tire shop, there is always compressed air there). I do not consider the case when replacement is required in an open field.
If you unscrew the spark plugs without cleaning and blowing out the spark plug well, sand will fall into the cylinder. In engines that are tilted, when starting, the piston will rub sand against the cylinder wall as an abrasive. It will be a bully.
Some will say that this is nonsense. But such cases do occur. The human factor is present everywhere.
How to tighten spark plugs correctly
Go ahead. Let's imagine that you have completed all the preparatory operations and the spark plugs have come out. Great. You are well done. Now you need to screw in the new spark plugs.
First of all, you need to carefully inspect all the new spark plugs one by one. There should be no chips on the ceramic insulator, the threads should be clean, good, and there should be no other externally visible damage.
- Carefully place the spark plug (without throwing it towards the spark plug well, so as not to damage the insulator) into the well.
- Fit the spark plug by hand. In case of biting, go through the thread in the head with a tap (if possible). Be careful not to drop the tap into the cylinder.
- Tighten the spark plug to the required torque using a torque wrench.
If you put a load on the spark plug that exceeds the recommended norm, the sealing ring will be overtightened, overheating will occur and there will be a possibility of destruction of the spark plug, which may simply break.
It is also possible to strip the threads of the cylinder head, which will require an expensive and complex repair. Thus, tightening the candles is an extremely important point and doing it “by eye” is highly not recommended, even though this rule may be neglected even in some services.
Thank you all for your attention. I hope that this information will be useful to all those who are interested in it.
subscribe to the channel
. Stay up to date with all developments in auto repair.
Source
Crankshaft marks
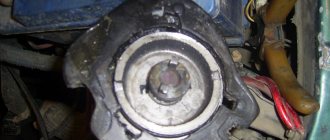
Installing the camshafts correctly in the desired position does not mean that this is enough to start the engine. Lada Priora has 16 valves, so if you do not synchronize the operation of all engine mechanisms, several of them will be damaged. To prevent this from happening, they must open or close at strictly defined times. The timing mechanism parts are driven from the crankshaft. The crankshaft has a gear at the output, the rotation of which is transmitted through a toothed belt to the remaining parts of the timing mechanism.
This gear is fixed on the crankshaft with a key; it will be impossible to install it in any other position. To correctly match the position of the pistons and valves relative to each other, there is an installation mark on it. It is located on the outside of the pulley in the upper part of the crown. Usually it is found opposite the tooth in the form of a slot, notch, or conical hole. Sometimes this requires wiping the working area of the pulley with a rag. The generator set drive pulley, which is removed from the crankshaft, may interfere with visibility.
Ignition coil reliability parameters
Before purchasing a new reel, try to find out its reliability, according to reviews from its owners. Ask about the mileage that the device has withstood, whether the engine response and fuel consumption, maximum speed and CO emissions have changed.
The coil design must ensure:
- reliable insulation between windings and turns;
- high electrical resistance between the body and ground;
- strength of the case, especially plastic parts;
- absence of microcracks;
- reliability of electrical contacts and connections.
A high-quality reel can withstand temperatures up to 180°C.
Ignition system
Such a system is a collection of parts that are involved in the process of spark formation in the engine. A spark in an internal combustion engine is necessary to ignite the fuel mixture in the combustion chamber. If the engine loses spark, its operation stops completely.
The Priora ignition system includes the following elements:
- Ignition coil;
- Spark plug;
- Crankshaft position sensor;
These three parts are responsible for the formation of a spark in the Priora engine; failure of one of them entails the loss of spark in a particular cylinder.
Let's look at each part of the car's ignition system in more detail to understand their purpose in more detail.
Spark plug
Spark plugs are used in all gasoline-powered vehicles. It screws into the cylinder head and creates a spark in the combustion chamber, which is necessary to ignite the fuel mixture.
The spark plug is a part with a threaded part that is screwed into the cylinder head; an electrode is placed inside the threaded part that generates a spark. Since the spark plug operates under high voltage, a special insulator is used in the spark plug to prevent breakdown and leakage of voltage.
Ignition coil
As described above, the Priora already uses an individual ignition coil. Such a coil is installed on each cylinder and is responsible for supplying a spark to a specific cylinder. The transition to IKZ made it possible to increase engine power while saving fuel.
The ignition coil is a part in which there are two windings, primary and secondary. A voltage of 12V is supplied to the primary winding, and a voltage of almost 40,000 Volts is generated on the secondary winding. This voltage is necessary for reliable spark formation in the combustion chamber.
Crankshaft position sensor
This sensor is necessary to determine the top dead center of the internal combustion engine, that is, when the compression stroke occurs in the engine, it is necessary to supply a spark in the combustion chamber. This sensor understands when the piston is at the top and sends a signal to the ECU, which in turn sends a signal to the IKZ to form a spark in this cylinder. This is how the fuel-air mixture ignites in a specific cylinder.
This sensor is installed next to the crankshaft pulley and reads readings from it. There are marks on the crankshaft pulley that the DPKV reads and thereby determines TDC.
It should be noted that a breakdown of this sensor or a break in its power supply leads to a loss of spark in the internal combustion engine and the inability to start it.
Story
The ignition system in Lada cars has changed over generations. Earlier cars with carburetor fuel injection used a distributor ignition system, which is quite unreliable and required manual adjustment and frequent maintenance.
The distributor was replaced with the advent of injection engines by a modular ignition system; a spark in such a system was produced by a module consisting of two coils. This system began to use a crankshaft position sensor, which helped the engine control unit determine the top dead center and compression stroke of the fuel-air mixture.
Lada 2110 Blue Bird › Logbook › Capacitors in the ignition module
After reading Will a spark ignite a flame? Not always! I decided to try to do something similar in my car. In addition, several participants in the drive noted the improvement as useful. I purchased capacitors from a TV technician for 20 rubles. per piece because There is no radio parts store, and there was no particular desire to tinker with devices:
I wanted one like McSystem, but these were the only ones I could find. I thought these would work too, the main thing is to connect it correctly and assemble it according to this diagram:
Wrap it well with insulating tape and install it in the car. I’ll take a photo of how it looks in the car later. I haven’t figured out yet whether it was good for my car. I'll take a ride and report back.
I took it for a ride, but the traction is better, the dynamics have increased!
Installing an interference suppression capacitor on Lada Granta, Kalina and Priora
On Lada Priora cars with standard music, to reduce the level of radio interference, AvtoVAZ has provided the possibility of installing an interference-suppressing capacitor. A similar modification is possible for other Lada models, for example, Grants and Kalinas.
The noise suppression capacitor is designed to work as part of the ignition system of a car engine. When the engine starts, a short-term voltage pulse occurs in the vehicle’s on-board network, which can negatively affect electrical appliances connected to the network. The capacitor is able to accumulate the necessary charge of energy and, if necessary, smooth out this impulse. It is installed in parallel with the power supply circuit of the ignition coil of the ignition module to reduce the level of radio interference in the frequency range 0.1-150 MHz. Application: Kalina and Priora cars, in the future all AvtoVAZ cars with an on-board 12 V network.
Required:
- Make sure there is a free 2-pin connector under the plastic engine cover, which is located coming out of the common wiring harness near the 4th cylinder coil. In the VAZ 21126 engine diagram, this connector is called an “interference suppression capacitor”. At the connector, the blue wire is + 12V (total power supply to the coils), and the black wire is ground (total mass of the coils).
- Buy an interference suppression capacitor (catalog number 1117-3745010 or TU37.466.169-2009), approximate price 250 rubles.
Procedure:
- Connect the noise suppression capacitor to the standard connector;
- Secure the condenser using a 10mm bolt into the standard hole on the cylinder head, above the thermostat.
According to reviews from owners, after installing this accessory, no noticeable effect was noticed. But, as they say, “Filtration (capacitors) cannot spoil the power supply.” Let us remind you that if there is no connector, you can install capacitors in the ignition system yourself.
Maintenance frequency of car generator bearings
When servicing the unit, you need to know which bearings are on the generator, and which race of each of them is pressed into place. To extend the time between overhauls, bearings are lubricated at the time of installation at the factory or when replaced by the user. It is believed that this amount is sufficient for the entire life of the rolling elements.
The frequency of bearing replacement is determined by ear:
- if the generator is noisy, it means the clip has worn out;
- Before jamming, the generator bearing hums for quite a long time, so the owner usually has enough time not to let this happen.
Design features of the generator are:
- one bearing is called the front bearing, since it is pressed into the corresponding (front) generator cover by the outer race;
- the second one is put on the shaft with tension on the reverse side, called the rear one, and is located near the commutator group;
- Before changing standard rolling consumables, you need to prepare a special tool;
- To get to the rolling parts, you will first have to remove the generator and then completely disassemble it.
For example, the front bearing can be knocked out, then a new rolling element can be installed in the mounting hole without a puller
It is important that the external dimensions match. It will not be possible to pull the rear bearing off the shaft in this way; a puller will be required.
But you can put on a new standard product by tapping a hammer on a sleeve of a suitable size or an old bearing.
Types of ignition coils
The structure of the coils of different car models may differ. Let's look at a few different types.
According to the principle of operation, ignition coils can be divided into two main types: single-spark and double-spark.
- Single-spark technology - each spark plug has its own coil.
- Double-spark technology - one ignition coil controls the ignition of the mixture in two cylinders.
Depending on the structure and operating features, there are four types of ignition coils.
Ignition coil with distributor. In modern cars, such ignition coils are no longer used. However, they can still be found in older cars, where they were used until the 1990s. Such coils create a high voltage pulse that passes through the ignition wire to the mechanical ignition distributor (distributor). This in turn transmits a high voltage pulse to the corresponding ignition wire, through which voltage is supplied to the desired cylinder.
Ignition module. The ignition module consists of several ignition coils that create high voltage pulses for the spark plugs. These impulses are supplied to the spark plugs through the corresponding high-voltage terminals and ignition wires. There are single-spark and double-spark ignition modules.
Individual ignition coil. Individual (plug-in) ignition coils do not require the use of high-voltage wires. They are installed directly on the spark plugs, creating a high voltage pulse directly at the spark plug. The advantage of this solution is that there is no voltage loss in the wires
In addition, this compact design saves space, which is especially important for modern cars.
System (“rack”) of ignition coils. This type consists of several coils combined in a single compact housing.
The principle of operation, what it consists of and the main malfunctions
The generator converts the mechanical energy coming from the engine into electrical energy. The principle of operation and its design are the same for all cars. The difference lies only in the quality, dimensions and location of the connecting nodes.
What it consists of:
- Pulley - transmits mechanical energy through the belt from the engine to the generator.
- The body is presented in the form of two covers. The starter is attached to them and the rotor supports are placed. The back cover contains external terminals for connecting to electrical equipment, a voltage regulator, a rectifier and a brush assembly.
- Stator - produces power. It is made of steel sheets and has the shape of a pipe. A three-phase winding is installed in the stator slots.
- The rotor is the moving part of the unit. When the engine starts, the rotor begins to rotate, and voltage is supplied to its exciting winding from the battery. The steel core becomes electromagnetic, creating an alternating magnetic field when rotated.
- Voltage regulator - maintains voltage stability in the on-board network when the ambient temperature and rotor speed changes.
- Assembly with rectifier diodes
- Diode module cover
- The brush assembly is a removable structure where brushes are installed that interact with the rotor rings.
The device of a classic ignition coil
All cars produced before the 1980s had a single ignition coil, which was a step-up transformer.
The main elements of the device: 1. central (high-voltage terminal), protected by a cover; 2. plastic cover; 3. secondary winding; 4. primary winding; 5. magnetic circuit; 6. iron core; 7. body.
A 12 V pulse is applied to the primary winding, which is converted into a high-voltage discharge with a voltage of 20-30 kilovolts at the electrodes of the spark plugs. High-voltage voltage pulses are supplied to the spark plugs one by one using a contact or electronic distributor.
How to check the ignition coil of a VAZ
If the ignition coil is faulty, the engine will not start. A characteristic sign of a faulty coil is its increased temperature when the ignition is turned off. This is easy to determine by touch.
Signs of a faulty ignition module may include the following:
- hesitant engine starting or failure to start;
- failures during sudden changes in speed;
- high fuel consumption;
- two cylinders do not work, the engine is feverish;
- lack of dynamics;
- a sharp drop in power;
- drop in power and thrust after warming up.
These symptoms may not only be caused by the ignition module. To determine the malfunction, it is enough to spend a few minutes diagnosing spark plugs, high-voltage wires and caps. This will eliminate the remaining elements of the ignition system and make sure that it is the ignition module that is faulty.
Checking the ignition coil is performed in one of 2 ways. The simplest one is to remove the central wire from the breaker-distributor, bring it to the motor housing and turn it with the starter, and a running spark should appear. After this, we check the energy supply to a separate spark plug, for which we unscrew the working spark plug, bring its contact to ground and attempt to start the engine. In this case, the spark should come from the wire to ground. If it is absent, the reason will be a malfunction of a system element such as the ignition coil.
To check the module in the second way, we only need a multimeter, then follow the step-by-step instructions:
- We check the power supply and the presence of pulses supplied from the ECU. We check the power between the central terminal (15) of the wire block connected to the module and the engine ground. When the ignition is on, the voltage should not be less than 12 V. Otherwise, either the battery is dead or the ECU does not work.
- We check the pulses from the ECU on the wiring block. We install one tester probe on connector 15, the second on the far right, then on the far left. The assistant cranks the engine with the starter, and at this time we record short-term voltage surges with a tester. If there are no impulses from the ECU, it is he who is to blame.
- We check the resistance on the secondary windings of the coils. We put the tester in resistance measurement mode and measure it at the high-voltage terminals of the module cover. Between pins 1 and 4 and pins 2-3, the resistance should be 5.4 kOhm. Otherwise, the module must be replaced.
- We check the resistance of the primary windings between contacts 15 and the rightmost, then the leftmost terminals. Nominal - 0.5 Ohm. Deviation is not allowed.
- Check the module for a short circuit. In ohmmeter mode, install one multimeter probe on the central terminal, the second on the metal body. There shouldn't be any resistance. If the device detects at least some resistance (other than unity or infinity), the module must be replaced.
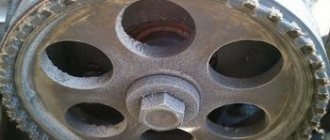
Which rollers are better for the drive mechanism?
Gates rollers were installed on the Priora from the factory. Reviews say that this is not the best option, since the quality of the material in them leaves much to be desired, and the service life is barely long enough to replace the belt. Plastic, after all, is plastic. Therefore, when replacing a belt, you should still play it safe and install better quality belts and rollers. The Marel KIT Magnum is a pretty good kit, it includes two metal casters and a quality Contitech belt. They are even visually different, although they cost about 4 thousand. In a word, there are no special questions regarding the VAZ belt, but it is better to install the rollers from a third-party manufacturer and certainly metal ones.
Source
Types and differences of VAZ ignition coils
A car's gasoline engine operates by burning fuel. To ensure ignition, an electric spark is required, which is formed between the electrodes of the glow plug. They have a small gap that the spark must overcome. This is feasible when high voltage (tens of thousands of volts) is applied to the spark plug.
The vehicle's on-board system is not designed for such loads, and the equipment that supplies electricity is not capable of producing such values.
To solve this problem, a coil is introduced into the car's ignition system, creating a high voltage. A component of the vehicle's ignition system converts low voltage to high voltage (depending on the characteristics of the part from 6-12 V to 35,000 V). The tasks performed by the coil are determined by the structural features of the element. It consists of primary and secondary windings, which are housed in an insulated housing.
Attention! If malfunctions occur, it is recommended to check all engine components: from the valves and cylinder block to the ignition coil or module
Air supply
Normal air supply is the key to the formation of an air-fuel mixture and a normal combustion process. Thus, a malfunction of one or more air supply elements can lead to the engine starting to choke. These include the air filter and throttle valve.
Contamination of air elements is the reason why a car stalls..
The air filter element must be changed every 20,000 km, since after this it becomes clogged and becomes unusable.
But it is necessary to monitor the condition of the throttle valve, since it is unknown when it will become clogged and begin to cause problems. Typically, motorists clean this unit themselves, using special products or a carburetor cleaner.
How to check a coil
The device can be tested in three different ways:
- visually inspecting;
- measuring the resistance at the winding contacts;
- by disconnecting the terminals one by one while the engine is running.
The first method is the simplest
. We disconnect the part and visually inspect it. The body must be intact, free of carbon deposits and melting. It wouldn’t hurt to smell the device – it shouldn’t smell like burning. It’s a good idea to compare a serviceable part with one that is suspected of being broken.
Second way
involves measuring the resistance of both windings with a multimeter. It is the most reliable because it provides the driver with precise coil winding parameters. To check the first probe of the device is placed on the input terminals. How much should the measurement result be? Readings should be between 0.4 and 2 ohms. To measure the resistance of the secondary, one probe is connected to the contact, the second to the spring, which goes directly to the winding. The result will differ for different part models. Typically it is in the range from 6 to 20 kOhm. If the measurements show less, this is a cause for concern.
Third way
suitable only for individual or four-lead coils will require the following steps:
- start the engine;
- disconnect the wires from the coils one by one;
- observe changes in the operation of the cylinder.
If no changes occur during the next disconnection, the part from which the wire was disconnected is faulty. The operation of the cylinder is checked primarily by ear. With minor deviations in the voltage supplied to the spark plugs, it is often quite difficult to feel the difference. Therefore, this method cannot be called accurate.