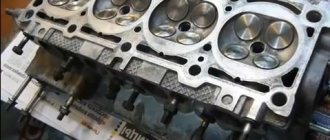
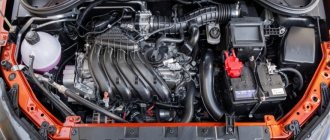
Tuning cylinder head VAZ 2114 8 valves
Subjectively, the cams of the 26th are even sharper than those of the serial camshaft.
The roller was used 2111, with a pin for the phase sensor. The base diameter of the cams is slightly reduced - 37 mm, this makes it more convenient to work with the cylinder head. By the way, the engine is not “plug-in”; the valves do not reach the pistons, even despite the head being milled. Although there is no goal to create a “plug-in” motor - when using high-quality belts, if you do not overtighten the belt, which many people do, there are no problems in operating “plug-in” engines with high camshafts.
After starting the engine, we measured the graph (there was a measurement before installation, of course). Here a problem arose - the motor did not react at all to the installation of the head and shaft. They added a little here and there, a little at a time. But it was thought that the previous chip would swallow this camshaft, the lambda probe would smell the lean mixture and the ECU would tighten the adjustments. But that did not happen. There were doubts about the camshaft, but the head should have pulled out anything. What's the matter? We started digging. We noticed that the “Check Engine” light does not light up under any conditions. We tried to turn off the mass air flow sensor - zero emotions. What did previous chip tuners do? I had to send the car to a professional colleague for chipping. It was then that it turned out that the left “Khryunov” firmware was loaded, in which EVERYTHING was disabled - the lambda probe, mass air flow sensor, knock sensor, phase sensor . How can the ECU correct anything about the mixture if its eyes have been ripped out and its nose plugged? That's why there were no changes and the car didn't drive any better. This is how chip tuning happens. After working with the firmware (all sensors were turned on, of course) and running and editing the program directly on the road, the car finally drove. Konstantin stopped by again to measure the VSKh.
Let's look at the graphs. Next is the schedule of the machine before all work is carried out. There is no catalyst, the chip was previously done at some “service” (all sensors were turned off!). The engine shows 85 hp. at 5300 rpm, maximum torque 13.6 kg at 3300 rpm . The red line is power, the blue line is torque.
We omit the measurement graphs without normal chipping and immediately move on to the final graph after running the program. Engine power - 96 hp. at 5300 rpm , torque - 14.3 kg at 4300 rpm . It is noteworthy that the maximum power speed has not changed and has not crawled up the revolutions - previously the peak power was at 5300 rpm, and now it’s the same.
Let's superimpose both graphs on top of each other and compare the changes (the dotted line is the final graph). At 6000 rpm 18.8 hp were added. and 2.2 kg of torque. The increase comes from the very bottom - from 2000 rpm. At 2000 rpm, 0.7 kg of torque was added. The character of the motor is smooth.
In conclusion, it is worth noting the following. It is advisable to modify the head for any camshaft; even with a 26 shaft the engine opens better in the upper speed range. The serial head gives unsatisfactory filling at the top. You should be more careful when chipping, you need to find out reliable information on the firmware being uploaded, and not use firmware where all sensors are completely disabled.
Is 26th shaft downstream? I wouldn't say that. Yes, from 2000 rpm there is an increase, but the bottom is given by the cubic capacity, the engine displacement. Head and camshafts - improves the middle and top speeds (unless of course the engine is strangled by the shaft and head, as on the Chevy Niva). In general, this is a good alternative to a standard camshaft, a good option for moderate tuning when you want to keep the bottom, but add something in the middle and at the top, i.e. revive the 8-valve engine without radically changing its character.
Update dated October 22, 2009:
At the request of the car owner, we are publishing a comparison of the VSH of a 96-horsepower engine with a 26-shaft (intake cam lift 9.6 mm) with a serial VAZ 2110 engine. Graphs of a serial engine: blue line - torque, red - power. The graphs of the modified engine are shown with a dotted line. For reference: the production engine of the VAZ 2110 (1.5i) showed 74 hp in measurements. at 5400 rpm, torque 10.9 kg at 4600 rpm.
Konstantin, the owner of the car, also sent feedback on fuel consumption:
Here is the fuel consumption report:
During these 2 weeks we managed to collect some statistics on fuel consumption. With very quiet driving around the city, consumption was 6.3 l/100 km . With a mixed driving style (sometimes sharp accelerations up to 5-6 thousand), consumption rises to 7.8 l/100 km . If I change my driving style to aggressive (I’m always the first to leave a traffic light), the consumption is 9-10 l/100 km . When driving evenly at a speed of 100 km/h, the consumption is 5 l./100 km . I'm pleased with the result, but I don't want to stop there. Thank you, Artem, for the quality work!
Article written: October 4, 2009 Author of the article, photo-video materials: © Quasar Prohibited without the written permission of the author: reprinting the article in whole or in part, reprinting and use of photo-video materials, as well as their modification and editing for the purpose of further publication on third parties sites.
Source
Checking and repairing the cylinder head of VAZ 2114, VAZ 2115, VAZ 2113, Lada Samara 2
The cylinder head should be thoroughly cleaned of carbon deposits from the surfaces of the combustion chambers and exhaust valves. Also remove any remaining oil from the oil channels.
There are no chips or damage on the camshaft journals and supports and in the holes where the Lada Samara 2 valve lifters are located.
To be sure, check whether antifreeze is getting into the oil channels; to do this, you need to plug all the coolant circulation holes. Using sediment, under a pressure of 0.5 MPa, pump water into the coolant circulation jacket, and within 3 minutes there should be no hint of water leakage from the cooling jacket.
When checking the tightness of the cylinder head using compressed air, it is also necessary to plug all coolant circulation jackets with special plugs. Select a reservoir, heat the water in it from 60 to 80 degrees and immerse the head in the reservoir of water. After 5 minutes, pump air into the head using a pump. The air pressure should be in the range from 0.15 to 0.2 MPa. No bubbles should form on the surface of the water for 2 minutes.
Valve seats: I — new seat; II - saddle after repair; a — intake valve seat; b — exhaust valve seat
Grinding of seats is possible if small scratches or damage have formed on the chamfers.
The procedure for grinding seat chamfers.
– before starting milling, you need to insert the rod into the valve sleeve of the VAZ 2113, VAZ 2114, VAZ 2115. Different cutters are used for the exhaust and intake valve seats. First mill a 15° chamfer
– then mill a chamfer 20
– grind the chamfer 45°, observing the diameters of 34 and 30.5 millimeters. Grinding of chamfers is carried out using canonical circles.
Only after the grinding circuit is installed on the chamfer can the machine be turned on. After finishing grinding, rinse and blow off the chamfers with compressed air.
How to increase the power of an 8 valve VAZ 2114 engine with your own hands
Many young car enthusiasts are thinking about how to increase the power of an 8-valve VAZ 2114 engine with their own hands. They do this because most often they buy a car with a weak engine due to lack of money. They are counting on increasing capacity. Tuning cannot be done on some old domestic engines. But the VAZ 2114 8-valve is suitable for tuning.
Therefore, next we will consider what can be done with the engine to increase its power.
Cracks
If overheated, the housing may also rupture in the form of cracks. They are not always visible to the eye, but their presence greatly affects the proper operation of the engine. If cracks have formed in the areas where the head and block meet, or in the valve seats, you will have no choice but to replace the block head with a new one. All other areas can be restored using argon welding. It is impossible to do such a cylinder head repair yourself due to the lack of specialized equipment - not all service stations have such welding.
As you can see, not everything can be repaired on your own. By correctly assessing the scope of work, you will nevertheless be able to save money on your budget.
How to increase engine power
To make the correct engine tuning, you need to choose one of several ways to modify the power unit. There are four types of engine modifications that will not cause harm to the latter and will not reduce the life of the engine.
- cylinder boring;
- installation of a new air filter device;
- turbine installation;
- chip tuning or electronic modification of the engine's brains.
You also need to take into account that as the engine power increases, fuel consumption will also increase. Therefore, before you decide to tune your engine, think about whether you need increased fuel consumption.
Increasing the volume of engine chambers
Let's consider the first method of engine tuning - increasing power by increasing the volume of the combustion chamber. To do this, the diameter of the cylinders is bored, and the surface is carefully ground to a mirror finish. The procedure is carried out on a special machine.
They replace regular pistons with forged ones, and the rings with lighter ones. Replace the connecting rods that connect them to the crankshaft.
Experienced mechanics recommend replacing oil injectors if forged pistons are installed. This is necessary for good oil cooling to occur. Since old injectors become unsuitable for further operation.
Installing a new air filter
To properly tune the engine, install an intake filter with reduced aerodynamic resistance. This ensures that air enters the mixer with the least effort. As a result, power increases by four horses.
Attention! In this case, fuel consumption is reduced, which has a beneficial effect on the car owner’s wallet.
Tuning by installing a new air filter is done as follows:
- Grind the internal intake channels.
- They install receivers.
- Change the throttle valve to a new one with a larger diameter.
A direct-flow muffler is installed at the exhaust. All work is carried out in service centers. Under no circumstances should boring channels be carried out in a garage.
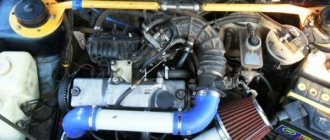
Turbocharging installation
Engine power is increased by installing turbocharging. Despite its great efficiency, many car enthusiasts do not dare to take this step due to the high financial costs. Installing a turbocharger requires contacting specialized workshops.
First of all, you need to choose a turbine suitable for the VAZ 2114 engine. There are two types of this device:
- low pressure turbocharger. By installing such a compressor, there is a chance to increase power by 15 percent. However, you will have to tinker with installing such a device;
- high pressure turbocharger. Increases power by 30 percent.
Another point why car enthusiasts do not dare to install turbochargers: the life of the engine is reduced. Since the motor is operated at full power at all times. Wear on parts increases and the engine heats up.
Therefore, you need to install a good engine cooling system. Under no circumstances should you pour water into it, as many car owners like to do. Always use antifreeze to cool power units.
Tuning the gas distribution mechanism
By tuning the gas distribution mechanism, you will not harm the VAZ 2114 engine. In addition, the 8-valve engine will reduce fuel consumption. And the power will be increased.
To tune the engine timing, do the following:
- Bore the valve seats.
- The intake and exhaust valves are changed to lightweight ones.
- The bushings are also changed to light ones.
- Install the split gear. But it must be configured correctly so as not to subject the engine to major repairs.
Next, let's look at what needs to be done with the split gear to increase the power of the motor.
Split gear method
To make the correct adjustment of the split gear, you need to set the piston to a point called TDC. To lower the speed or bring the speed to an average speed, make the gas-dynamic boost angle smaller and increase the angle of the opening exhaust valve.
To increase speed, the shaft is turned in the opposite direction of rotation of the crankshaft. In this case, the angle of gas-dynamic pressurization becomes larger.
There is another type of increasing the power of a domestically produced power unit. This is chip tuning. Specialists are involved. To improve engine tuning, the electronic engine control unit is reprogrammed. This is done using equipment called a programmer.
Experienced mechanics advise carrying out chip tuning in specialized workshops.
How not to increase the power of the VAZ 2114!
✔ Do not attempt to bore channels. This operation can be performed in the absence of ball cutters, but in garage conditions nothing will work even with cutters. The bottom line is that the accuracy of the cutter installation is important - the error should not exceed 1-2 microns. ✔ As you can see, on the stock VAZ-2114 hatchback the increase in power was 24%, and this is without installing a “chandelier”, “improved exhaust” and other expensive elements. ✔ There is no point in buying a “racing camshaft” without having the appropriate tuning firmware.
How to increase the power of an 8 valve VAZ 2114 engine with your own hands
A very common procedure for improving the performance of a car is to increase the engine displacement in order to boost it. There are several options for this:
- you can replace the crankshaft by installing another one with a larger stroke;
- bore the cylinder block, thereby increasing their diameter;
- doing both at the same time.
It is more advisable to increase engine volume when block wear requires switching to a repair diameter. In this way, you can kill two birds with one stone - improve the characteristics and carry out repairs.
What engines were installed on the VAZ-2114
The very first engine used on the VAZ-2114 was an injector with 8 valves and a volume of 1.5 liters. It is one of the most common on this car model, as it was installed on the VAZ-2114 for 6 years. Their series was designated: VAZ-2111, units with it had a rather modest power of 77 “horses”.
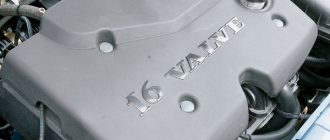
In 2007, the production of the “fourteenth” models was modernized, which gave motorists an updated engine. It had 16 valves and a larger volume of 1.6 liters. The series of this engine is VAZ-11183-1000260.
In addition to more modern characteristics, this power unit has received the Euro-3 environmental standard. However, engine power increased only in 2009. The first versions of this engine were with 77 hp. With. , and then their strength increased to 89.
In 2010, the VAZ-2114 again received a new engine. It had 8 valves and a volume of 1.6 liters, exactly the same one was installed on the Priora. Significant modifications to this engine helped it reach 98 horsepower.
Many car enthusiasts were interested in why modifications with 16 valves stopped coming off assembly lines. The need to change the power plant was associated not only with an increase in power, but also with the fact that when the timing belt broke in the previous model, the valves were bent.
What all powerplants have in common is that they use the same fuel injection system. Before entering the cylinders, the fuel passes through the nozzles in all modifications, and the installation is cooled using liquid. Well, the last similarity is that all units are four-stroke.
Crankshaft replacement
The top and bottom dead centers of the piston determine the working volume of the cylinder. If you replace the standard crankshaft with another one, with a larger piston stroke, you will get an increase in volume. The crankshaft for VAZ engines of the 21083 family comes with the piston stroke:
The standard piston stroke on the VAZ 21083 engine is 71 mm. The most common way to increase the displacement to 1600 cm3 is to install a crankshaft with a stroke of 74.8 or 75.6. By increasing the piston stroke, it is also necessary to replace or significantly modify the existing ones. Here, too, there are several ways to solve the problem.
You can install pistons with an offset pin hole, or use shorter connecting rods. The most common options include installing special forged pistons under the selected crankshaft, or removing excess metal from existing cylinders. One of the disadvantages is the rapid wear of the connecting rod and piston group. This happens due to the fact that due to an increase in the piston stroke, the operating angles of the connecting rod change, which means that the lateral pressure on the cylinder walls increases.
It is also worth adding that at high speeds, the standard intake and exhaust systems will not be able to cope fully. Filling the cylinders will become difficult, which will inevitably lead to a loss of power. This drawback can easily be attributed to the next method of increasing engine displacement.
Tuning an 8 valve engine “with split gear”
The split, that is, adjustable gear was not used in the last project. It is better to install it on “non-plug-in motors”. Setting method: 1.
The moving and fixed parts are marked with a mark, the same as on a standard pulley;
2.
Installation is carried out in the usual manner, aligning the crankshaft and timing mechanism according to the marks (as when replacing a belt), you should also remember about the correct tightening torque of the belt;
3.
If in the 4th cylinder the intake and exhaust valves are not open “to the maximum”, we carry out the adjustment: loosen the outer screws, and, holding the outer part of the gear, set the camshaft correctly. Tighten the fixing screws.
Split gear for VAZ 2114
Turbocharged engines
Tuning engines of this type, although much easier than those described above, still has its own characteristics. In this case, we do not have to disassemble the engine and increase the cylinder volume or change the crankshaft.
Here it will be enough for us to simply increase the amount of boost. The basis of this method lies in the ability to control the operation of the compressor, no matter what type it is.
We all know that the operation of any type of compressor directly depends on the engine speed. The amount of air pressure that the compressor produces is directly proportional to the engine speed. But the pressure cannot be infinite and must be regulated.
To regulate it, there is a special control unit that releases excess pressure. By adjusting this control unit, we can achieve that the maximum pressure at which air bleeding occurs will be higher.
It follows that the fuel-air mixture will enter the cylinder under greater pressure and fill a larger volume than with the standard settings of the compressor control unit.
However, all this must be done within reasonable limits, since the engine is technologically built into a certain margin of safety, but it is not unlimited. But if you decide to go beyond a reasonable strength limit, you will need to make more serious changes to the engine design so that it does not fail.
Such changes include changing the cooling system, increasing the combustion chambers in the cylinders, working on increasing the degree of engine cooling, installing additional air intakes, etc.
It may even be necessary to replace the cast-iron crankshaft with a steel one, and install pistons that are stronger than the ones that were installed. In general, the pockets will have to be turned out completely.
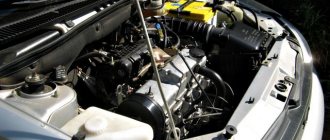
Work process
- Disconnect the negative terminals from the battery.
- The piston of the first cylinder is set to the top dead center position.
- All coolant is drained.
- Fuel pressure decreases.
- The intake pipe of the exhaust system is disconnected from the manifold.
- The cylinder head cover is being dismantled.
- All pipes, electrical wires and hoses are removed. But before you do this, you need to remember or note what was originally connected and where. This is done in order to avoid possible confusion during re-installation.
- There are three bolts on the camshaft belt cover that need to be unscrewed and the cover itself removed.
- The timing belt is removed and completely removed.
- The shafts must be secured against possible rotation.
- The pulley is attached to the camshaft using bolts that must be unscrewed and then the pulley removed.
- The nut securing the rear camshaft cover is unscrewed.
- Unscrew the remaining bolts and remove the cover completely.
- Slightly loosen the tension of the dozen bolts holding the head.
- Then each individual bolt is unscrewed one by one and removed along with the washers.
- The head is released and removed.
- If the head is attached directly to the gasket, a screwdriver or any other long tool should be inserted under the manifold. Next, you need to use this tool as a lever in order to slightly lift the head, and then remove it completely.
- Very carefully, so as not to scratch the surface of the head, it is necessary to remove the remnants of the old gasket. It is best to use a special liquid for this matter.
- We put the new gasket in place.
- We make sure that the shafts are in the top dead center position and all valves on the first cylinder are completely closed.
- We put the bolts back.
- Using a torque wrench, we begin to tighten the bolts one by one.
- We reinstall all removed equipment.
- We adjust the clearances in the valve drive and tension the camshaft belt.
As you can see, repairing the cylinder head on a VAZ-2114, which has 8 valves, is a fairly simple, albeit slightly labor-intensive task, which means that every person who has at least a slight understanding of this unit can handle it.
Cylinder block boring
This option involves expanding the diameter of the cylinders and installing pistons of larger diameter, which in turn also increases the working volume. Any major overhaul, a kind of small tuning, in the direction of increasing volume. With the right approach, and hands growing from the right place, they can be bored up to 84 mm. Further boring is dangerous, casting defects may appear, and then you can go for a new block. But there are also limitations and disadvantages here.
A significant reduction in the thickness of the cylinder walls will, in any case, lead to a small but reduced service life of the cylinder block. The thermal load also increases; in other words, thin walls will heat up much faster.
How to increase engine power and why is it necessary?!
Engine power is one of the main characteristics of a car, which determines the amount of work it produces. It determines how much weight (including its own weight), at what speed and how far a car can move in a certain period of time. Therefore, large and high-speed machines must have engines with higher power. This can be achieved in various ways, which will be discussed below. What does power affect and why increase it.
When talking about the power of an internal combustion engine (ICE), one cannot ignore such a dynamic parameter as torque. It should also be remembered that power is actually torque multiplied by crankshaft speed. Knowing the theory, it becomes obvious that you can change it either by increasing torque or engine speed.
Engine power determines the maximum acceleration speed of the car.
In the second case, inertial forces inevitably arise, which leads to the destruction of moving engine parts, and this method is of little use in practice. In turn, to change the torque, you can increase the distance from the center of the crankshaft to the center of the connecting rod journal (lever arm) or increase the force of exhaust gas pressure on the piston.
When the geometric parameters of the lever change, the dimensions of the motor also become larger, which is also not always acceptable. The only option left is to change the strength. This problem can be solved in two ways: by increasing fuel consumption or using it more efficiently.
Basic methods of increasing engine power.
Increase in cylinder volume and compression ratio.
Changing engine size is a fairly common and simple method. It can be implemented by several solutions at once:
- Boring of cylinders followed by installation of larger diameter pistons. It is very important that all cylinders are bored equally.
- Replacing the cylinder head gasket with a thinner one.
- Grinding the cylinder head.
What to do with engine 11183?
It is clear that a mandatory step in tuning the 11183 engine will be replacing the ECU. It’s simple: the standard M74 block cannot be flashed, but “January 7.2” is a good and time-tested solution. You will also have to abandon the “E-Gas” option, which means replacing the throttle assembly and receiver.
Everything I had to throw away
The intake tract parts were borrowed from the 2111 engine. A cable pedal was installed, and the engine began to look human.
Everything works well with the “January” controller, but standard firmware is not an option if the camshaft has been replaced. And it, in turn, has the following parameters:
- Release phase width – 104 ;
- Intake phase width – 109 ;
- Opening angle at outlet – 272 ;
- Inlet opening angle – 268 ;
- Valve travel (exhaust/intake) – 9.5/10.1 mm.
After installing the new shaft, the motor became plug-in. However, on the 2114 hatchback, increasing power almost always comes with a compromise. In this case, we had to sacrifice reliability. What's improved:
- Maximum torque increased by 14 N*m ;
- The power also increased – the limit of “90 horsepower” was passed.
By the way, any tuning leads to a decrease in durability. Make a choice.
Boring the block and replacing the crankshaft
This option includes both of the above, and allows for a maximum increase in engine displacement. For example, boring to a diameter of 84 mm, with the installation of a crankshaft with a stroke of 80 mm, will increase the engine capacity to 1798 cm3. In this case, you will also need to install forged pistons.
Whatever option you choose for yourself, it is important to remember that engine modification is a very serious and painstaking matter. It is best to entrust the matter to professionals who have done their best in this matter. After all, without the necessary skills and special equipment, tuning risks turning into flour and a waste of money, time and effort. Only after carefully weighing all the pros and cons is it worth going to the store for spare parts. As a rule, the costs of boosting an engine, including the cost of spare parts and labor, do not bring any tangible benefit to the owner. You are unlikely to feel an increase in power, as they say in the seat, your nine will not press you anyway.
What else is worth reading
Engine overhaul Rear gearbox, design and principle of operation Troubles the engine when cold Is it possible to install xenon TCS traction control system
Head milling
There are several cylinder head malfunctions that you cannot fix on your own. When the engine overheats systematically, the aluminum cylinder head becomes deformed. The perfectly flat surface of contact between the head and the engine block ceases to be so.
This leads to the gasket between the block and the head starting to leak. Replacing it with a new one does not solve the problem. In this case, grinding the adjacent surface may be the solution. Milling is performed on a special machine, which allows the work to be completed with perfect precision.
In the conditions of your garage, it is unlikely to carry out such a procedure yourself. Using a hand sander (as some garage “kulibins” advise) for this purpose means completely ruining the adjacent surface. In this case, repairing the cylinder head will lead to a complete replacement of the head - it is impossible to grind it indefinitely.
Chip tuning
You can boost a modern engine using software methods. Chip tuning is a modification of the program parameters of the electronic engine control unit in order to obtain the required results. It is used both as an independent method of boosting the engine, and as part of complex tuning measures.
Engine chip tuning procedure:
A car in the engine ECU has a certain set of parameters and directives, often differing even on the same car model depending on the sales region. So, most often, adjustments are made to the ignition timing in order to reduce the load on the transmission and achieve other goals. As a result, fuel combustion can become inefficient, the engine “thinks” during acceleration, power failures and high consumption of expensive fuel are observed.
Another important nuance is that some automakers may deliberately programmatically degrade the engine to reduce prices and achieve other technical or marketing goals, although technically the engine retains the ability to produce more “horses.”
Proper chip tuning allows you to eliminate these shortcomings (including engine depowering), making the car faster, more dynamic, more powerful and more economical. The advantage of such an “electronic” modernization is good results in the absence of intervention in the engine hardware, which can help maintain the warranty on the engine (although many dealer service centers refuse warranty service if they detect the fact of chip tuning).
It will also be necessary to change the ECU firmware when changing the technical configuration of the engine, so that the control program works correctly with new parts and the engine produces the desired results. “Separate” chip tuning shows very good results on sports cars and vehicles boosted “from the factory”, which initially have reinforced parts. On an ordinary low-power engine, chip tuning without large-scale interventions in the technical part will not show good results.
Important: flashing the “brain” of a machine is a responsible procedure, and it should be carried out by an experienced and knowledgeable person. Otherwise, there is a possibility of causing irreparable damage to the car.
Large R/S effect:
PROS: Allows the piston to remain at TDC longer, which ensures better combustion of the fuel mixture, i.e. more complete combustion of the fuel mixture, higher pressure on the piston after passing TDC, higher temperature in the combustion chamber. The result is good torque at medium and high speeds. A long connecting rod reduces friction of the piston-cylinder pair, and this is especially important during the working stroke of the piston.
CONS: A motor assembled with a sufficiently large R/S value does not provide good filling of the cylinders at low and medium engine speeds due to a decrease in air flow speed (due to a decrease in the piston speed after TDC, at the moment the intake valve opens). There is a high probability of detonation due to the high temperature in the combustion chamber and the long time the piston remains at TDC.
Source
Modification of the VAZ cylinder head
Car enthusiasts, regardless of how long they have owned a car, are constantly looking for ways to increase engine power. There are several options for improving your car, one of which is modifying the cylinder head (cylinder head).
We know that torque, and therefore power, are directly dependent on such an indicator as the coefficient of filling the cylinders with the working mixture.
The higher the filling, the greater the engine power, which increases as the maximum torque value shifts to higher speeds. To achieve this, camshafts with extended intake/exhaust phases and increased valve lifts are installed, but in practice this is not enough. If we take a critical look at the cylinder head, we will see many shortcomings - seemingly small, but they are the ones that prevent the full potential of the engine from being realized. This is due to the manufacturing technology used in mass production of the cylinder head, and therefore everything will have to be corrected yourself or in a tuning studio. How exactly? Let's talk about this. Docking of cylinder head channels and manifolds
The most noticeable “blunder” of our manufacturers can be called the inaccurate joining of the holes of the cylinder head channels and manifolds. We remember from physics lessons that any bump in the path of the air flow causes the appearance of turbulence, and, consequently, a decrease in its speed. Here we have whole “steps” that we absolutely must get rid of. At the same time, it is necessary to check the gaskets under the manifolds so that they also do not create obstacles. It is advisable to place the collectors on pins before starting work. This is necessary for the reason that the fastening of the manifolds on VAZ cars allows for a slight displacement of the planes of the cylinder head and manifolds relative to each other, which can lead to a zero result. We find places on the cylinder head and manifolds (2 pins for each at the edges) for convenient drilling. We place the metal pins tightly in the cylinder head, but the manifolds should fit onto them easily, but without play. Make the necessary holes in the gasket. Now accurate positioning of the manifolds and cylinder head is ensured.
It should be taken into account that if the diameter of the cylinder head channel is slightly larger (1-1.5 mm) than the diameter of the intake manifold channel, but their coaxiality is the same, then this can be neglected, since this will not create any significant resistance. At the exhaust, a similar situation is created, only the cylinder head channel can now be slightly smaller than the exhaust manifold channel.
Cylinder head inlet/exhaust ports
If you carefully examine the intake/exhaust channels of the factory cylinder head, you will immediately notice the casting tides in the area of the valve guides, the bushings protruding into the channel and, in places, the broken shape of the narrow channels. Using ball cutters of different shapes and sizes, it is necessary to increase the flow area of the channels and remove all irregularities and protruding parts. The shape of the channel must be changed so that its bend is as smooth as possible, but maintains certain radii of curvature. The inner surface of the intake channels is left slightly rough for better evaporation of gasoline from their walls. The exhaust channels can be polished, although this will not give a noticeable effect. The cross-section of the channel should not be a regular circle. The intake port is elliptical in shape with a slight barrel-shaped extension in front of the valve seat. The rest of the cylinder head channel and intake manifold gradually tapers in the direction of flow.
When increasing the diameter of channels, it is necessary to take into account nearby internal communications. If you work carelessly, you can damage the oil channel or the cooling jacket channel. When working with the cylinder head of eight-valve engines, which are used in front-wheel drive VAZs, you must be extremely careful. Although this will not save you when boring one intake channel, in which the oil channel runs so close that its opening is inevitable. Unfortunately, even if the channel remains unopened, it may simply be covered with a thin layer of aluminum and later break through under the oil pressure of a running engine. Before starting boring, it is advisable to drive a steel bushing into the oil channel, but, unfortunately, this is not the most convenient option. It is better to install steel or aluminum bushings after opening the channel, or weld the channel with argon. First, decide whether to start boring from the manifold or cylinder head. If you plan to significantly increase the diameter of the channels, then it is better to start refining from the part whose channels have thinner walls, and then the channels of the mating part are bored according to their shape and position. In classic VAZ engines, it is customary to start boring from the manifold, because the cylinder head channels have sufficient thickness for subsequent alignment. Note the parts of the valve guides that protrude into the channels. They create noticeable obstacles to the flow, so they try to shorten or sharpen them. Sometimes the bushings are ground flush with the wall of the channel and, although this better optimizes its throughput, such modification reduces the service life of the guides, which are already short on forced engines.
Valves
Here the improvements are aimed at increasing the throughput and reducing the weight of the valves. The throughput can be increased by changing the profile of the plate, as well as the working and additional chamfers of the valve. When regrinding valves, excess metal is removed from both sides of the valve plate. A small notch is made on the front side, and on the back side the radius of the transition of the rod into the plate is reduced. The valve plate and stem are also thinned. If you do not plan to change the bushings, then remove the excess metal from the valve stem from the poppet to the guide bushing. Reducing the diameter of the entire leg will require replacing guide bushings with a smaller hole diameter. On 8-valve VAZ engines, by reducing the diameter of the valve stem from 8 to 7 mm, you can achieve a reduction in the weight of the rod by 23.5%. For 16-valve engines, the stem diameter is initially 7 mm. You can supply titanium-aluminum valves, which are 40% lighter than steel, but they are very fragile and expensive. In this case, the seats have to be replaced with bronze ones, which are softer compared to cast iron, which leads to a decrease in valve rebound when closing and additionally dampens shock loads. On 8-valve VAZ engines, the working chamfers are made narrower, the exhaust angle is changed to 45º, and the intake angle is changed to 30º. In the places where the valve plate transitions into the working chamfer, additional chamfers are cut, which gives an increase of about 5-6%.
Further refinement involves replacing the valves with larger models. Sometimes they can be installed without replacing the seats, since the standard ones allow you to slightly increase their internal diameter and the diameter of the working chamfer. This is practiced on 16-valve cylinder heads 2112, on which enlarged 32/27 mm valves are installed. It is also possible to install larger valves, which involves replacing the seats. In this case, the original saddles are cut out and larger cast iron, bronze or metal-ceramic ones are installed. The necessary chamfers are cut into them and valves of an even larger diameter are installed than those previously discussed. This method is more expensive than the first, but the most effective, and for 8-valve cylinder heads of VAZ cars it is the only solution. The increase in power with this modification reaches 8-10%. In this case, you can install lightweight, enlarged valves 39/34 mm. So that you can better navigate, we will provide data on valves that can be installed on VAZ engines:
- — VAZ 2101, 21011, 2103, 2106, 21213, 21214, 2123 – valves from 39/34 to 42/35;
- — VAZ 21083, 2111, 21114, 21116, 11183, 11186 – valves from 39/34 to 40/34;
- - VAZ 2112, 21124, 21126, 21127, 21128, 21129 - valves from 31/27 to 33/29,
where the numerator indicates the diameter of the intake valve plates, and the denominator indicates the diameter of the exhaust valves.
Of course, this is not the only solution, and you can select the sizes of the valve plates yourself, but you must take into account that for naturally aspirated engines, the optimal ratio of the exhaust valve area to the intake valve is ¾ or approximately 75%. This is clearly seen from the following data: 31/27 - 75.9%
33/29 - 77.2% 39/34 - 76.0% 40/34 - 72.3% 41/35 - 72.9%
If your car is equipped with supercharging or nitrous oxide injection, it Exhaust valves need to be enlarged as the engine produces more exhaust gases. For such engines, the valve ratio can be 90% or more.
Valve springs
Standard springs are calculated for a specific engine using a serial camshaft.
A sufficient safety margin is taken into account, designed for relatively low speeds. In classic engines, valves hang at speeds of more than 7000, on the VAZ 21083 higher speeds are allowed, and on the VAZ 2112, inadequate valve operation is possible at speeds of 7500-8000 rpm. Replacing the camshaft with a higher camshaft can lead to stuck valves.
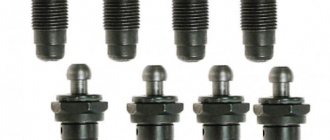
The simplest way is to increase the preload of the standard spring, which is done by placing a washer under it. The force on the spring increases, but the free play decreases noticeably. When installing sports camshafts, more stringent requirements are imposed on the forces on the springs. In this case, a large cam lift and a corresponding spring stroke are required, so they are replaced with stiffer ones that have a larger compression stroke. Stiffer springs significantly increase the load on the valves, camshaft and discs, so it is advisable to carry out such modification as the last of all methods of increasing the valve sticking threshold. Another way is to lighten the valve spring retainers. Their lighter weight reduces the load on the camshaft and timing parts, which is especially important at high speeds. You can resharpen the standard plates, but it is better to install new ones made of titanium-aluminum alloy. Aluminum (D16T) plates are cheaper, but are subject to deformation in critical operating conditions. Titanium products are more durable, although some car enthusiasts are deterred by their price. Plates made of Al-Ti alloy from the manufacturer PRO.CAR have proven themselves well. Valve tappets
In VAZ 21083 and VAZ 2112 engines, the kinetic connection of the cylinder head valves with the camshaft is carried out using pushers. On cylinder head 21083 they are mechanical with adjusting washers, and on cylinder head 2112 they are hydraulic compensators. Standard pushrods have some limitations and are therefore unacceptable when working with sports camshafts. In this case, solid mechanical pushers are used, which have an increased diameter and do not require adjusting washers. To install them, it is necessary to bore the wells to the required size. The valves are regulated by selecting thrust bearings of the required size (or “sausages” - cut valve legs of different lengths), which is quite labor-intensive. The work of a specialist in adjusting valves with installed “solid valves” will not be cheap!
Valve Levers
On classic-type VAZ engines, the valves are driven from the camshaft by levers (so-called rockers). They are convenient and easy to adjust the thermal clearances of valves, but they are excessively massive and allow some deviation in the kinematics of valve movement. Also, in the “classic” cylinder head, the rocker can fly off its seat at extremely high speeds. To combat these shortcomings, the levers are lightened, light-alloy models are installed and stiffer valve springs are used.
Valve guides
Depending on the type of engine and expected operating modes, the design and material of the valve guides are selected. Reasons that may require modification or replacement of standard bushings:
- — When using valves with a smaller stem diameter;
- — When the part of the guide bushing protrudes strongly into the cylinder head channel;
- — If the shape or size of the opposite part of the guide does not meet the requirements;
- — If the thermal conductivity of the guide bushing is insufficient (replacement with bronze ones is possible).
Bronze is a good heat conductor, it removes heat well from the valve and effectively dissipates it into the cylinder head, therefore, on highly accelerated engines, the use of bronze guide bushings is extremely necessary. A good example of such products are bronze bushings produced by PRO.CAR. They have a slightly shorter service life compared to metal-ceramic products, but it all depends on the operating modes of the engine and the quality of the bushings themselves.
Combustion chamber shape
With this modification, you can significantly reduce the risk of detonation, improve cylinder filling and create conditions under which the fuel mixture will be better distributed, mixed and ignited. Detonation occurs in places farthest from the spark plug. This is explained by the fact that when the mixture ignites, the pressure in the combustion chamber (CC) increases sharply and leads to extreme compression of the mixture that has not yet ignited. This provokes its self-ignition, which is explosive in nature and leads to a sharp increase in temperature and pressure in the cylinder. Detonation occurs, characterized by metallic sounds and propagating through the engine in a series of shock waves of detonation explosions. Frequent occurrences of detonation lead to devastating consequences, so it is imperative to take measures to eliminate them. To do this, the sharp edges and corners of the combustion chambers are smoothed out as much as possible, casting errors are removed and the surface of the combustion chambers is polished, which additionally adds 5% of power by reducing heat losses. To improve cylinder filling and create optimal conditions for the fuel mixture, it is necessary, first of all, to pay attention to the shape of the combustion chamber around the valves. On VAZ 8-valve cylinder heads, the combustion chamber is wedge-shaped and the valve gap is “screened” by its steep walls. This leads to the fact that the flow of the working mixture is forced to overcome additional obstacles, which is clearly noticeable when installing larger valves. Therefore, the volume of the CV must be expanded around the valve. It is also necessary to modify the segment of the valve gap near the spark plug and make the interface of the bottom and vertical walls of the combustion chamber smoother. There should not be any steps or wells around the valve seats, and the conical recess of the valve seat should be no more than 30º relative to the bottom of the valve seat. The VAZ 2112 cylinder head initially has a hemispherical cylinder head, which minimizes all necessary modifications and eliminates the flaws of mass production.
Compression ratio
The compression ratio (CR) is the ratio of the total volume of the cylinder to the entire volume of the CV. The more compressed the fuel mixture is before ignition, the more work it will do subsequently. By increasing the coolant, we increase engine power, but there are also limiting factors, such as an increase in the load on the piston and the risk of detonation. Standard cast pistons of VAZ engines allow a coolant ratio of up to 11:1. The most noticeable positive effect from the increase in coolant is in engines with wide valve opening phases. This is due to the fact that the filling coefficient of naturally aspirated VAZ engines does not exceed 100%, that is, the dynamic coolant does not exceed the static coolant. Dynamic coolant is the volume of the fuel-air mixture entering the cylinder relative to the volume of the combustion chamber. When using wide-phase camshafts at low and medium speeds, the dynamic coolant is lower than the static one. An increase in coolant leads to a proportional increase in dynamic fluid, which has a positive effect on the power and economic performance of the engine. In this case, it is necessary to eliminate the prerequisites for the occurrence of detonation at the maximum cylinder filling ratio, which is achieved by increasing the octane number of the fuel and changing the composition of the fuel-air mixture. As engine speed increases, the duration of the combustion cycle decreases, which can lead to incomplete combustion of fuel and, consequently, loss of power. Therefore, by increasing the coolant, we speed up the combustion process, which allows us to get maximum power from the engine. As a result, most high-speed forced gasoline engines require an increase in coolant. After completing the cylinder head modifications that we discussed in this article, you will be able to fully unlock the potential of your car’s engine!