The long evolution of the internal combustion engine could not change the main thing: it remained a heat engine, and therefore a lot depends on the serviceability of its cooling system. Touching upon the topic of the main causes of antifreeze leaks, we recalled the expansion tank cap as one of the likely options. Sometimes this small detail spoils the lives of many motorists and their cars much more than one can imagine. Today we will understand in detail what role it plays in the cooling system, and what can happen if it does not work properly, as well as how to buy a high-quality expansion tank cap and even repair it.
Why is an expansion tank cap needed?
The expansion tank acts as a compensation tank: when heated, the coolant noticeably expands in volume. In very old cars there was no separate expansion tank, and its role was played by the radiator itself.
The GAZ-21 cooling system did not have a separate expansion tank!
VAZ-2108: expansion tank with a cap, and the radiator without a cap
The radiator cap performed the same task as on modern cars: thanks to the presence of a steam outlet (exhaust) valve in the design, it maintained, albeit small, but excess pressure (0.45-0.55 kgf/cm2) in the system, which made it possible water boils only at 109-112 degrees.
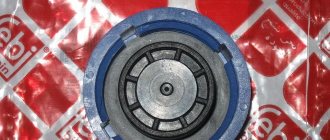
Radiator plug device for GAZ-21
An air valve was also provided in the radiator cap, adjusted to a vacuum (0.01-0.10 kgf/cm2). His task was the opposite - to prevent the creation of too low pressure inside the system.
In the photo: radiator cap GAZ-21. The “Open with Care” sign warns that it must be handled with care.
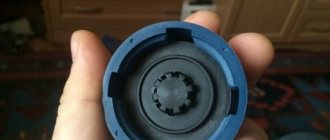
The modern expansion tank cap, although it looks different from the “vintage” radiator cap, is designed similarly. As a rule, there are two valves inside the plastic case - outlet and inlet.
Device of the VAZ-2108 expansion tank plug: 1 — exhaust valve spring; 2 — inlet valve; 3- intake valve spring; 4 — outlet (steam valve); 5 — brass valve block; 6 - filler neck of the expansion tank.
The cover of the VAZ-2108 in disassembled form...
...and on the expansion tank
The task of the first is to “bleed off” the pressure if it has reached the limit provided by the manufacturer. Since modern engines have higher operating temperatures than engines of previous generations, the exhaust valves of the tank lid can open at a pressure of up to 1.5 kgf/cm2, and this parameter is strictly regulated for each specific engine.
The standard parameter for a VAZ plug is 1.1-1.2 atm
The inlet valve opens at 0.03-0.13 kgf/cm2, which avoids excessive vacuum in the system. Some manufacturers structurally combine two valves into one, but this does not change their essence.
Why is it necessary to control the pressure in the cooling system so precisely?
Maintaining the required system pressure is important for two reasons. First, it should not be too low so that the antifreeze can boil at a higher temperature than it does at atmospheric pressure. After all, many modern engines can heat up to 120 degrees or more during operation, while most coolants under normal conditions boil already at 110 degrees. Increased pressure avoids overheating and boiling of antifreeze even at high temperatures.
Well, secondly, the pressure in the cooling system should not be too high in order to avoid antifreeze leaks and ruptures of rubber pipes and the plastic expansion tank - that is, to keep the system sealed. By the way, the preservation of tightness is often hampered not only by poor-quality operation of the tank lid valves, but also by the seating surfaces of the filler neck or the threads on the lid itself: if they are poorly processed, expect leaks.
Nowadays, it is rare to see such quality of processing of the mating surfaces on Lada tanks sold in stores - and therefore you should not expect perfect tightness of the connections
The coolant level sensor (left) is another way to lose the tightness of the system with all the ensuing (in every sense) consequences
What types of lids are there?
Let's look at several different expansion tank caps using the front-wheel drive Lada as an example. You can find almost a dozen covers for it on sale from a variety of different manufacturers. They may differ noticeably in body color, inscriptions, threads and “filling,” but the essence does not change: the exhaust valve must operate at 1.1 atmospheres (as the pressure parameter kilogram-force per square centimeter is usually called in common parlance).
Both of these covers are brand new, but one is working and the other is not. But you can find out about this only after checking or installing it on the car
Unfortunately, the lids available on sale are good and bad, that is, high-quality and not so good. This means that they can allow excess pressure in the system to be noticeably higher than normal - 1.3-1.5 kgf/cm2 and even higher!
It will be too much... Such a cover can ruin many parts of the cooling system
Some caps can release pressure to the required level, but they take too long and are reluctant to do so. Well, the lid may not hold even half of the required excess pressure, opening the exhaust valve already at 0.5-0.6 atmospheres.
An exhaust valve that capitulates early is also bad
Both the one and the other, and the third are almost equally bad. In the first two cases, the excess pressure in the system will be maintained at a higher level; in the third, it will not reach the required parameter. That is, in the first two cases, the driver can find out about the malfunction of the cap only after a rupture of the pipe or expansion tank, and in the second, the car can “boil”, releasing steam through the tank cap, even if it is not hot outside.
Expansion tank cap for VAZ 2114 - a small part with important functions
As a rule, the cooling system creates normal conditions for engine operation. The system coolant is stored in the expansion tank. The operation of the engine and other components of the car often depends on the condition of such a part as the cap of the expansion tank of the VAZ 2114.
A bad cap can cause overheating and radiator failure, cooling fan and water pump failure, blown fan belts, thermostat malfunctions, coolant leaks, and serious engine damage due to overheating.
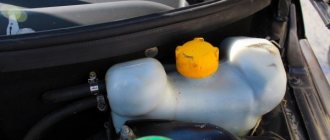
Location of expansion tank
Communities Lada Priora Lada Priora Club Blog Ignition switch wires
A plastic reservoir for excess coolant is installed by the manufacturer in different places depending on the model of the “tenth” family:
- in cars of the VAZ 2110-12 series, the reservoir is located on the left side (in the direction of travel) between the pillar glass and the wall of the interior partition;
- in VAZ 2114-15 cars, the container is also located on the driver’s side, but is placed in front of the pillar glass.
The expansion tank is attached to the body elements with a clamp in the form of a flat rubber belt with a metal hook that hooks onto a protrusion on the side member. There are 3 hoses connected to the tank:
- A large diameter pipe leading from the thermostat is connected to the bottom.
- The upper tube of small diameter goes through the partition to the radiator of the cabin heater.
- The middle small tube connects the tank to the upper fitting of the main cooling radiator.
Each hose performs a separate function. The thick pipe serves to expand the coolant and fill the system while pouring antifreeze through the neck of the tank. Two thin tubes are designed to drain the steam-water mixture from the stove and the main radiator into the tank when heated to the maximum permissible antifreeze temperature of 95 ° C.
The expansion tank (item 1) is located at the highest point of the cooling system at the same level as the throttle valve
Design and principle of operation
Structurally, the lid is a locking element, which is equipped with two valves. The first valve serves to reduce pressure, the second - to supply atmospheric air and increase pressure in the tank. The principle of operation of the cover is associated with changes in the density of the coolant as it heats up and cools down.
When the engine starts running, the antifreeze heats up and its bulk density increases to 20-25%. Hot antifreeze warms up the air layer. The exhaust valve sensor is triggered, it opens, some of the air leaves the tank and the pressure returns to normal. The bleeding process is repeated periodically when the internal pressure of the system exceeds 1.1-1.5 atmospheres.
After turning off the engine, the antifreeze cools down and the pressure in the cooling system drops. When it drops below a critical level, the intake valve opens and atmospheric air is supplied to the system. The pressure in the system equalizes and the inlet valve closes.
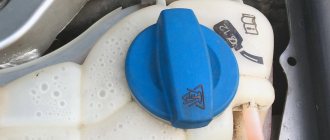
What does he look like?
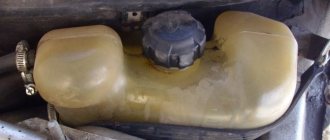
Externally, the expansion tank is a plastic container. Liquid is poured inside this container, which is directly involved in cooling the engine.
The design of the element includes hoses closed in a circuit, a float sensor built into the lid or plug of the tank. Whichever is more convenient for you. It is this sensor that transmits information about the current coolant temperature. When the permissible values increase, the corresponding warning light lights up on the dashboard.
Complete structure
Where is he located?
To replace a damaged container, you first need to determine where it is located.
The location of the expansion tank is the engine compartment on the driver's side, right behind the pillar glass.
Such an arrangement in the VAZ 2110 certainly cannot be called successful, since there are metal elements on all sides of the plastic tank. Because of this, problems arise with the expansion of the plastic, sometimes the tank simply bursts.
Depressurization of the tank occurs especially often in the summer, when there is intense heat outside. The manufacturer, represented by AvtoVAZ, took this problem into account when developing new models. And the owners of the “ten” have to put up with this arrangement of the tank.
Container location
Signs of trouble
The most critical signs of a faulty cap are steam coming from under the hood (if the engine temperature is not in the red sector, there is a 90% chance that the problem is in the cap) and/or swelling of the expansion tank.
You can also make an assumption that the cover is faulty if there is:
- coolant leaks from the tank;
- antifreeze leaks at joints;
- ruptures and swelling of hoses;
- air jams;
- engine overheating.
Steam, boiling liquid and leaks are associated with improper operation of the exhaust valve. Air locks are usually caused by a malfunctioning intake, or vacuum, valve. Bursts (swelling) of hoses can be caused by failures of both the exhaust and intake valves.
Air entrapment causes air pockets inside the heater core, thermostat, and radiator hoses. As a result, the engine will begin to overheat because the cooling system is unable to maintain a constant temperature.
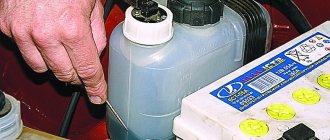
If air pockets appear, you need to completely drain the old fluid and add new antifreeze. New liquid is poured in gradually, in small portions of 100 ml.
Tank defects leading to system malfunction
Malfunctions of the container often cause antifreeze or antifreeze to squeeze out through the lid. Failures of the tank that require its replacement include the following defects:
- The presence of burrs and burrs on the threads and inlet of the cover.
- Failure of the pressure regulating valve.
- Damage to the sensor indicating the coolant level.
- Rupture of the walls of the container, leading to intense leakage of coolant.
- Wear and aging of container elements leading to malfunctions.
- Mechanical damage to the body due to impacts received during an accident.
Irregularities on the thread create difficulties when tightening the plug and do not allow the connection to be sealed.
Plastic walls often crack due to prolonged exposure to boiling liquid, high pressure, or due to insufficient thickness of the plastic. When purchasing a new tank, you need to make sure that the materials from which this unit is made are of good quality.
Checking the cover
If there is reason that the cap may be faulty, how to check the cap of the expansion tank of a VAZ 2114?
In service centers, the test is performed on special stands with a pump and pressure gauge. The cover is screwed to the stand and the pump begins to supply air. When the pressure gauge reaches 1.5-1.7 atmospheres, the exhaust valve should operate. The operation of the intake valve is checked in the same way, only the air is pumped out from under the cover. If the valves do not operate, the expansion tank plug of the VAZ 2114 is faulty.
How can you test the cover in the field?
First you need to conduct a visual inspection. Chips, cracks, gaps and other surface damage are reasons to replace the part. Look at the pressure rating listed for the vehicle and compare it to the pressure rating printed on the part. If they do not match, replace the cover.
List of tools used when replacing containers
To remove the old tank and install a new one efficiently, you need to acquire the following standard tools:
- wrenches (set);
- pliers;
- Screwdriver Set;
- new clamps (the use of old clamps is undesirable);
- sandpaper.
Sandpaper is used to process the inlet holes in the new plastic tank in order to eliminate existing roughness. Smooth surfaces of the holes will ensure tightness, strength and reliability when screwing the plug.
The cooling system in the car is completely sealed, and as the engine heats up, its coolant also heats up. Due to tightness, when the liquid is heated, increased pressure is created in the system, and the liquid begins to expand. Up to a certain point, the air displaced by the liquid accumulates in the expansion tank. When the pressure reaches a critical point, the release valve in the expansion tank cap is activated, and all excess air leaves the cooling system. As the liquid cools down, it begins to shrink, threatening to create decompensation (increased vacuum). To prevent this from happening, an inlet valve is also provided in the tank lid. The inlet valve begins to operate when the pressure in the tank drops below atmospheric pressure. By letting in air, the system equalizes the pressure.
Be sure to watch the video:
Finalization of the new cover
Unfortunately, the quality of spare parts for domestic cars leaves much to be desired, and it is better to check the new cover on a stand. If the pressure does not hold or excess pressure is not released, you can trim the springs. To do this, the part is disassembled, the sealing rubber is pryed off and removed with a screwdriver. Then use a screwdriver to carefully remove the inner cover and remove the springs.
The large spring is trimmed by one turn, and the small spring by two turns. As a result, the exhaust valve will begin to open at a pressure of 1 atmosphere, and not 1.7 atmospheres. When checking, the inlet valve should bleed freely.
The first option for improving the tank
Which lid is better? We purchase a cover of the “FEBI” brand (code – “02269”). Its cost does not exceed 160 rubles. We disassemble the standard product and remove the valve assembly. We carry out the same procedure with the purchased part.
We cut the original mechanism and then remove it together with the side, which allows for the centering of the spring. We grind the mechanism down to 1 mm on the “FEBI” valve element. This manipulation ensures that the valve and rubber seal are seated correctly.
Now we assemble the part and screw it onto the tank of the Lada Kalina. The result is a lid that is not subject to freezing. The refinement process will not take more than an hour of time, but the effectiveness of the product will increase many times over.
What is the main role of the tank cap?
As is known, a running engine creates a pressure in the cooling system that differs from normal atmospheric pressure. This occurs due to the fact that the coolant heats up along with the engine, as a result of which it expands and increases in volume. As a result, the pressure inside the engine cooling system (ECS) increases, but it is not in contact with the external environment, and there is nowhere for it to relieve excess pressure.
Developers of modern cars do not fight the increased pressure in the ODS “radically” - they do not try to completely get rid of it. It is adjusted using the tank cap. Increased pressure in the SOD is used to shift the coolant boiling point. After all, it’s no secret that at normal atmospheric pressure for water it occurs at a temperature of 100 °C, for antifreeze – 105–110 °C, and for antifreeze – 120 °C. The operating temperature of modern car engines is very close to these critical values.
So, for example, for carburetor VAZs it should be in the range of 90–95 °C, and for injection ones – 97–105 °C.
However, under certain engine operating conditions, a short-term increase in its temperature occurs to higher values, which, however, does not lead to failure of a serviceable engine, but causes the same heating of the coolant. For example, on injection VAZ 2109 the liquid at such moments can be 120–125 °C. Obviously, even antifreeze cannot withstand such heat. At the same time, an increase in the pressure of any liquid leads to an increase in its boiling point.
Injection VAZ 2109
Engineers designing engines have long found out that to prevent the coolant from boiling even during short-term critical heating of the engine, it is enough to maintain the pressure in the coolant at the level of 1.1–1.5 kgf/cm 2 (1.1–1.5 bar). A higher temperature is not needed, because the engine is not designed for it, and it will lead to its failure. And it makes no sense to allow a greater spontaneous increase in pressure, which can nevertheless occur, because it will complicate the process of manufacturing and servicing the motor, as well as increase its cost, since it will require a more durable and sealed SOD (more durable pipes and expansion tank, strong clamps).
Therefore, the tank lid must be sealed, but only up to the required pressure limits indicated above, after reaching which it maintains them, connecting the system with the external environment as necessary to release the air compressed inside the expansion tank.
Replacement or repair?
Is it even possible to repair the tank? If he was torn to pieces, then no.
This element is subject to repair only in the event of failure of components - a float or a cover.
If the seal is lost, regardless of the reasons, repair is impossible. Theoretically, you can glue the plastic together and make patches, but such savings will not lead to anything good.
To replace the cover, use a spare part from the VAZ 2199 model. Although this model is older than the “ten”, the elements are interchangeable. Plus, the quality of the cover from the nine turned out to be better, and the thread matches perfectly.
Simply unscrew the broken cap and screw a new one in its place. That's the whole point of the replacement.
Replacement
So, the old expansion tank has lost its tightness, and therefore it should be dismantled and a new one should be installed in place of the old tank.
To properly replace the coolant container, you will need a certain set of tools and materials:
- Set of wrenches;
- Screwdrivers;
- Pliers;
- Clamps (we strongly do not recommend using old ones);
- Sandpaper.
Sandpaper is required to process the inlet holes of a new tank made of plastic. This is due to their roughness. If you make the holes smooth, the pipes will be stronger and fit more securely.
Installation process
Replacement instructions are included with each new tank. So there shouldn't be any problems with this. Let's describe the main points.
- If the car has just been driven into the garage, be sure to wait a while for the engine to cool down. When removing the container while the engine is hot, the coolant will be very hot. The consequences are not difficult to predict.
- Open the cap on the car's radiator. This will relieve excess pressure from the cooling system.
- Another cap is removed from the bottom of the radiator, which will allow you to drain the coolant. This doesn't always need to be done. For example, if the coolant was changed very recently, simply pinch the reservoir pipes so that you don’t have to drain and refill the coolant.
- Disconnect the coolant level sensor connector.
- Loosen the clamps to remove the steam pipe.
- Loosen the clamp on the filling hose and disconnect it.
- Disconnect the rubber tank securing strap to allow the tank to be removed.
- Reassemble the unit in the reverse order, but now with a new tank.
- If, after replacing the tank, the cap begins to release excess pressure normally, but the low coolant level lamp still lights up on the dashboard, try replacing the coolant level sensor. It is located in the tank itself and can be purchased separately.
- The sensor is installed by disconnecting the chip on the cover and screwing a new one in its place. That's all.
If you chose a tank from Priora, then you will have to remove the hood sound insulation and cut out a small section of it at the level of the top of the tank. This is due to the shape of the tank being slightly different from the standard one.
As you can see, the work is not difficult, no problems should arise. The main thing here is to correctly select a new expansion tank and, according to the instructions, install it in place of the failed component.
Car : VAZ-2110. Asked by : Oleg Paramonov. The essence of the question : why does the expansion tank on the VAZ-2110 crack?
Hi all! I have encountered a problem; the second coolant reservoir on a VAZ-2110 is cracking. I'm going to be so broke. Why does it crack and what to do? Are the spare parts still defective?
The design and principle of operation of the expansion tank cap
In order for the necessary pressure to be created in the SOD when the engine is running, the lid device ensures a tight, hermetically sealed closure of the tank. A safety valve is provided to relieve excess pressure. It operates (opens) only when the pressure inside the SOD becomes 1.1–1.5 kgf/cm2 (depending on the design of the lid and its manufacturer).
While it is lower, the valve is closed, and immediately after releasing the excess pressure to a value that is less than that indicated above - partial release of the air compressed in the tank - it closes. There is one more valve in the lid - the inlet valve, it is also called a vacuum valve. Its purpose is exactly the opposite of protective. The inlet valve serves to intake (suction) air into the SOD. The fact is that after stopping the engine, as you know, it begins to cool down. The coolant temperature also drops.
Inlet valve cover
At the same time, it decreases in volume, which is accompanied by a decrease in pressure inside the SOD. The coolant that enters the tank, upon its own heating, begins to flow back into the system, freeing up space for the air remaining in the expansion tank and ceasing to put pressure on it. Then there comes a moment when the pressure in the SOD is compared with the external atmospheric pressure. If at the same time the temperature of the coolant turns out to be higher than in the external environment, then it, continuing to cool, will further decrease in volume.
Possible problems
In fact, ruptures of plastic containers do not occur so often, so you should not be alarmed in advance when purchasing a used VAZ 2110.
Much more often, owners of this domestic car are faced with a breakdown of the valve cover of the tank. It is responsible for relieving excess pressure when the power unit overheats.
It is this lid that can jam, causing pressure to build up inside the container, which can ultimately lead to rupture of the plastic.
Preventive measures
As you understand, the expansion tank is directly connected to the radiator and fan, therefore maintaining the tank in working condition is the direct responsibility of every car owner.
Prevention includes the following activities:
- Periodically inspect the condition of the plastic container and its individual elements;
- If you find that the coolant level in the tank is too low, add the missing amount;
- If it soon becomes noticeably smaller again, check the tank for leaks. Most likely, liquid is leaking somewhere;
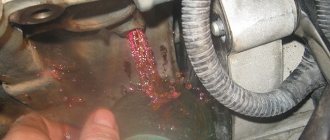
- Observe the condition of the tank neck. If there are traces of drips on it, that's good. This phenomenon indicates that the valve cover is triggered and relieves excess pressure. Hence the traces of coolant.
Signs and possible consequences of a part malfunction
Most often, the consequence of a malfunction of the cap is boiling of the coolant, sometimes accompanied by the ejection of the coolant from the expansion tank - a common occurrence for VAZ cars. If this happens at engine operating temperatures, then most likely the plug does not hold the required pressure.
Car coolant boiling
Another reason for the same phenomenon is that due to a malfunction of the vacuum valve, air entered the ODS and formed a plug, which disrupts normal circulation, and therefore the cooling of the coolant. In winter, due to an air lock, the stove may not work well. Unpleasant consequences: loss of coolant, which has to be topped up regularly. This happens when, due to increased pressure in the SOD, liquid is “expelled” through the joints between the fittings and pipes put on them, through clamps.
- rupture of low-quality pipes or those that have not been changed for a long time (a picture familiar not only to VAZ owners);
- the appearance of a leak in the main or heating radiator;
- tears the thermostat housing (for Nexia it’s a common thing - into 2 parts);
- burst expansion tank.
A leak appears in the main radiator
All these signs and consequences of a malfunctioning lid are the result of increased pressure in the SOD. The latter is not uncommon for VAZ 2108, 2109 and especially 2110 cars with new-style tanks. Of course, it is obvious that the plastic of these expansion tanks leaves much to be desired, but, nevertheless, this is also due to a malfunction of the plug. So the lid, by regulating the pressure in the SOD, also protects its elements from mechanical damage.
Algorithm of actions when replacing an expansion tank
Many car owners are interested in how to replace the expansion tank. The accompanying documents for the plastic container contain complete information on how to remove the old one and install a new one.
After diagnosing the cooling system and making a decision to replace it, the following measures must be taken:
- Prepare the necessary equipment, tools and auxiliary materials.
- Before removing the cover, you need to make sure that the car engine has completely cooled down after turning it off.
- Disconnect the antifreeze level sensor.
- Loosen the clamps and disconnect the steam outlet pipe and the filling hose.
- Disconnect the rubber belt and remove the expansion tank.
- Mounting a new container is done in the reverse order.
- Filling a new container with coolant.
- Identification and removal of air pockets in the cooling system lines.
The work of replacing the coolant container is not difficult, does not require special education and can be done with your own hands.
The normal operation of the cooling system depends on the quality of the new unit and the correctness of the actions taken during its installation.
When purchasing a new copy, you must ensure that it is original. The use of analogues affects the service life of the tank towards its reduction.
How to check the cover and identify problems?
Before checking the expansion tank cap, it must first be inspected to make sure that it is intact and has no mechanical damage in the form of scratches, cracks and severe wear, and is also free of rust, dirt, scale and other defects. Then you should check the functionality of its valves. Several simple diagnostic methods that allow you to only approximately determine their serviceability are given below.
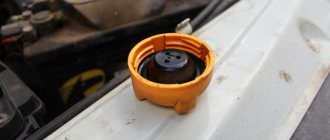
For safety valve. With the engine running and warm, loosen the cap. There should be a hissing sound of compressed air coming out of the tank. This means the valve holds pressure. But not every professional can determine which one exactly.
Unscrewing the tank cap
- If the SOD pipes look deformed (compressed, flat) before starting the engine for the first time in the morning, the valve is definitely faulty.
- Unscrew and remove the cover. Then we strongly squeeze one of the SOD pipes and, holding it like that, install and screw the plug back. Let go of the pipe. If it begins to take its original shape, the valve is most likely working.
A more reliable way to check the operation of the valves is to use a pump with a pressure gauge. You will also need any empty expansion tank. We connect to one of its fittings, and then fix with a clamp the pump hose, from which the tip for the nipple was previously removed. We plug the remaining outputs from the tank with some kind of plugs. Then close the tank with the lid being tested.
Pump with pressure gauge
You can also check it on the tank installed on your car without draining the coolant. To do this, for example, on a VAZ 2109, we disconnect from the expansion tank the pipe that comes from above and removes steam from the SOD. We install a pump hose instead. In order to plug it, we insert something of a round cross-section and suitable diameter, for example, a drill, into the disconnected pipe. Then we put a clamp on this hose and tighten it.
We turn on the pump and, watching the needle on its pressure gauge, record the moment a click appears, followed by a hissing sound coming out of the tank through the air plug. If this happened at around 1.1–1.5 kgf/cm2, and further pumping only leads to increased hissing, but the pressure does not increase, it means that the vacuum valve is not leaking, and the safety valve is working as expected.
Some useful tips
To prevent a malfunction of the expansion tank from taking you by surprise, follow these recommendations:
- Constantly pay attention to the readings of the coolant temperature sensor. If you find that the permissible values are exceeded, immediately go for diagnostics or check the functionality of the tank yourself.
- At least once a month, inspect the expansion tank when the engine is hot to identify damage.
- Monitor the refrigerant level. Having detected its fall, find and eliminate the cause of the leak.
- If the refrigerant boils in the tank, do not continue driving under any circumstances - this will damage the engine.
- When planning to replace the tank, buy products from trusted manufacturers in specialized stores.
Many VAZ car enthusiasts of the 10th family have encountered the problem of gas contamination in the cooling system, when when opening the cap of the expansion tank, air comes out, as when opening gas from water or beer. When the tank is closed tightly, excess air along with antifreeze escapes through the valve in the lid, and if it is not closed tightly, then the antifreeze also comes out from under the lid. I decided to get rid of this problem by installing a column for tubeless tires in the expansion tank so that excess gases would escape through it and the tank would not swell. I measured the seat on the post (diameter 15 mm), made a hole with improvised means in the tank (diameter 13 mm), threw the post into the tank and stuck it out with pliers. I think after this innovation everything will be fine and my post will be useful to someone.
The guys forgot to mention that there is no nipple in the column, otherwise they suggested that I turn the column over, there is a hole through it.
Refinement of a new part - what to do if it does not function?
When it turns out that the lid stubbornly refuses to relieve excess pressure and/or is not able to restore air losses in the SOD, it can be modified. For some reason, the most complaints come from owners of VAZ, model 2109, including those who buy new plugs. It is clear that the reason for the incorrect operation of the cover valves lies in the too much rigidity of their springs.
To modify the cover, for example, for a VAZ 2109, it must first be disassembled. This must be done carefully, using pliers and a thin flat-blade screwdriver. We must try to remember where everything stood so that the springs do not fly away to God knows where. After the lid for the VAZ 2109 tank has been disassembled, it’s time for the wire cutters. They need to shorten the springs: the large one, for the safety valve, usually by 1 turn, and the small one by 2.
Shortening the plug spring
For the second, the length of the removed segment is not critical - as long as it generally supports the vacuum valve when it is closed and does not resist the external air pressure of 0.03–0.1 kgf/cm 2 . With a large spring it is more difficult - as if not to overdo it. You need to look at its rigidity and the pressure at which the safety valve opened when checking the tank cap of the VAZ 2109. After shortening the springs, we assemble the cap in the reverse order. Before use, it is advisable to check again how it works.
Why did it happen
Communities Lada Priora Lada Priora Club Blog what is affected by the clutch release switch
Perhaps the automatic requests do not belong to you, but to another user accessing the network from the same IP address. You need to enter the characters into the form once, after which we will remember you and be able to distinguish you from other users exiting from this IP. In this case, the page with the captcha will not bother you for quite a long time.
You may have add-ons installed in your browser that can make automatic search requests. In this case, we recommend that you disable them.
It is also possible that your computer is infected with a virus program that is using it to collect information. Maybe you should check your system for viruses.
If you have any problems or would like our support team, please use the feedback form.
Refinement of the cooling system of the Lada Kalina car
Considering the fact that this problem is not uncommon for Kalina owners, we can assume that this is a miscalculation of Tolyatti engineers. The owner will have to correct this development inaccuracy.
- Drain the coolant.
- We dismantle and install the plug on the wide pipe, which is connected to the bottom of the expansion tank.
- We install a tee in the lower hose of the stove.
- We install a hose of suitable size, which is connected at one end to the tee, and at the other to the bottom of the expansion tank.
- We install a plug in the return line of the throttle valve heating, and in its place we install an additional hose.
- In the upper part of the expansion tank, you need to install an additional fitting, to which you need to attach a pipe for heating the throttle valve. There is also an option that does not require cutting in an additional fitting. To do this, you need to connect the new line to the upper pipe of the expansion tank using a tee.
- Fill the coolant a little above the maximum mark, start the engine and warm it up until the fan turns on.
- We expel air from the system, pushing through all the lines, and, if necessary, add coolant to the level.
This modification option will prevent the formation of an air lock, and if air gets in during scheduled repairs, removing it will not be difficult. After such a modernization, a slight negative effect is possible in the form of a long warm-up of the engine. But the undoubted advantages will be a well-heating stove and the absence of air locks.