The long evolution of the internal combustion engine could not change the main thing: it remained a heat engine, and therefore a lot depends on the serviceability of its cooling system. Touching upon the topic of the main causes of antifreeze leaks, we recalled the expansion tank cap as one of the likely options. Sometimes this small detail spoils the lives of many motorists and their cars much more than one can imagine. Today we will understand in detail what role it plays in the cooling system, and what can happen if it does not work properly, as well as how to buy a high-quality expansion tank cap and even repair it.
Why is an expansion tank cap needed?
The expansion tank acts as a compensation tank: when heated, the coolant noticeably expands in volume. In very old cars there was no separate expansion tank, and its role was played by the radiator itself.
The GAZ-21 cooling system did not have a separate expansion tank!
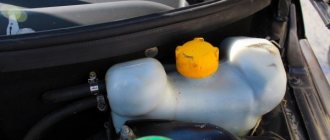
VAZ-2108: expansion tank with a cap, and the radiator without a cap
The radiator cap performed the same task as on modern cars: thanks to the presence of a steam outlet (exhaust) valve in the design, it maintained, albeit small, but excess pressure (0.45-0.55 kgf/cm2) in the system, which made it possible water boils only at 109-112 degrees.
Radiator plug device for GAZ-21
An air valve was also provided in the radiator cap, adjusted to a vacuum (0.01-0.10 kgf/cm2). His task was the opposite - to prevent the creation of too low pressure inside the system.
In the photo: radiator cap GAZ-21. The “Open with Care” sign warns that it must be handled with care.
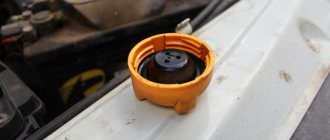
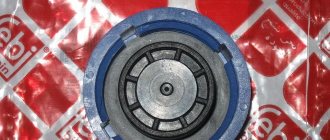
The modern expansion tank cap, although it looks different from the “vintage” radiator cap, is designed similarly. As a rule, there are two valves inside the plastic case - outlet and inlet.
Device of the VAZ-2108 expansion tank plug: 1 — exhaust valve spring; 2 — inlet valve; 3- intake valve spring; 4 — outlet (steam valve); 5 — brass valve block; 6 - filler neck of the expansion tank.
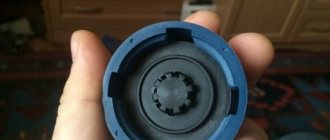
The cover of the VAZ-2108 in disassembled form...
...and on the expansion tank
The task of the first is to “bleed off” the pressure if it has reached the limit provided by the manufacturer. Since modern engines have higher operating temperatures than engines of previous generations, the exhaust valves of the tank lid can open at a pressure of up to 1.5 kgf/cm2, and this parameter is strictly regulated for each specific engine.
The standard parameter for a VAZ plug is 1.1-1.2 atm
The inlet valve opens at 0.03-0.13 kgf/cm2, which avoids excessive vacuum in the system. Some manufacturers structurally combine two valves into one, but this does not change their essence.
Why is it necessary to control the pressure in the cooling system so precisely?
Maintaining the required system pressure is important for two reasons. First, it should not be too low so that the antifreeze can boil at a higher temperature than it does at atmospheric pressure. After all, many modern engines can heat up to 120 degrees or more during operation, while most coolants under normal conditions boil already at 110 degrees. Increased pressure avoids overheating and boiling of antifreeze even at high temperatures.
Well, secondly, the pressure in the cooling system should not be too high in order to avoid antifreeze leaks and ruptures of rubber pipes and the plastic expansion tank - that is, to keep the system sealed. By the way, the preservation of tightness is often hampered not only by poor-quality operation of the tank lid valves, but also by the seating surfaces of the filler neck or the threads on the lid itself: if they are poorly processed, expect leaks.
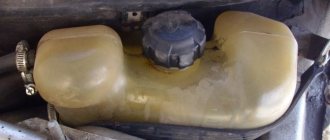
Nowadays, it is rare to see such quality of processing of the mating surfaces on Lada tanks sold in stores - and therefore you should not expect perfect tightness of the connections
The coolant level sensor (left) is another way to lose the tightness of the system with all the ensuing (in every sense) consequences
What types of lids are there?
Let's look at several different expansion tank caps using the front-wheel drive Lada as an example. You can find almost a dozen covers for it on sale from a variety of different manufacturers. They may differ noticeably in body color, inscriptions, threads and “filling,” but the essence does not change: the exhaust valve must operate at 1.1 atmospheres (as the pressure parameter kilogram-force per square centimeter is usually called in common parlance).
Both of these covers are brand new, but one is working and the other is not. But you can find out about this only after checking or installing it on the car
Unfortunately, the lids available on sale are good and bad, that is, high-quality and not so good. This means that they can allow excess pressure in the system to be noticeably higher than normal - 1.3-1.5 kgf/cm2 and even higher!
It will be too much... Such a cover can ruin many parts of the cooling system
Some caps can release pressure to the required level, but they take too long and are reluctant to do so. Well, the lid may not hold even half of the required excess pressure, opening the exhaust valve already at 0.5-0.6 atmospheres.
An exhaust valve that capitulates early is also bad
Both the one and the other, and the third are almost equally bad. In the first two cases, the excess pressure in the system will be maintained at a higher level; in the third, it will not reach the required parameter. That is, in the first two cases, the driver can find out about the malfunction of the cap only after a rupture of the pipe or expansion tank, and in the second, the car can “boil”, releasing steam through the tank cap, even if it is not hot outside.
What functions does the expansion tank cap perform?
If you understand the operation of the cooling system, you can see that during its operation, a certain pressure is created inside. The fact is that when heated, any liquid expands, which creates pressure inside the system.
No car manufacturer is struggling with this problem. The fact is that pressure allows you to increase the boiling point of the coolant, and therefore reduce the risk of leakage due to boiling.
The difference in pressure inside the system and in the normal atmospheric environment lies in the tightness of the system, where the expanding liquid simply has nowhere to go. However, there is another side to the coin. Increased pressure can rupture the reservoir or cooling system pipes. Which will lead to instant overheating of the engine and failure. To prevent this from happening, the excess pressure of the cooling system must be periodically relieved. It is for these purposes that the expansion tank cap was developed.
What is the main role of the tank cap?
As is known, a running engine creates a pressure in the cooling system that differs from normal atmospheric pressure. This occurs due to the fact that the coolant heats up along with the engine, as a result of which it expands and increases in volume. As a result, the pressure inside the engine cooling system (ECS) increases, but it is not in contact with the external environment, and there is nowhere for it to relieve excess pressure.
Developers of modern cars do not fight the increased pressure in the ODS “radically” - they do not try to completely get rid of it. It is adjusted using the tank cap. Increased pressure in the SOD is used to shift the coolant boiling point. After all, it’s no secret that at normal atmospheric pressure for water it occurs at a temperature of 100 °C, for antifreeze – 105–110 °C, and for antifreeze – 120 °C. The operating temperature of modern car engines is very close to these critical values.
So, for example, for carburetor VAZs it should be in the range of 90–95 °C, and for injection ones – 97–105 °C.
However, under certain engine operating conditions, a short-term increase in its temperature occurs to higher values, which, however, does not lead to failure of a serviceable engine, but causes the same heating of the coolant. For example, on injection VAZ 2109 the liquid at such moments can be 120–125 °C. Obviously, even antifreeze cannot withstand such heat. At the same time, an increase in the pressure of any liquid leads to an increase in its boiling point.
Injection VAZ 2109
Engineers designing engines have long found out that to prevent the coolant from boiling even during short-term critical heating of the engine, it is enough to maintain the pressure in the coolant at the level of 1.1–1.5 kgf/cm 2 (1.1–1.5 bar). A higher temperature is not needed, because the engine is not designed for it, and it will lead to its failure. And it makes no sense to allow a greater spontaneous increase in pressure, which can nevertheless occur, because it will complicate the process of manufacturing and servicing the motor, as well as increase its cost, since it will require a more durable and sealed SOD (more durable pipes and expansion tank, strong clamps).
Therefore, the tank lid must be sealed, but only up to the required pressure limits indicated above, after reaching which it maintains them, connecting the system with the external environment as necessary to release the air compressed inside the expansion tank.
The design and principle of operation of the lid
To ensure the required pressure, any expansion tank cap must create a hermetically sealed system. To relieve excess pressure, it has a special valve that opens when the pressure rises above the nominal value. Once the pressure is released, the valve closes and the cycle repeats until the engine stops.
When the engine stops, the dump valve closes and the intake valve opens. The fact is that during the cooling process, the liquid begins to narrow again, which means the pressure inside the system should return to normal. To do this, the intake valve draws in air and fills the space that was vacated by water or antifreeze. Thus, the pressure inside the cooling system is normalized and becomes corresponding to atmospheric pressure.
Cover device
It is important to understand that there is a locking element for expansion tanks on any car that has an internal combustion engine under the hood. And it doesn’t matter whether it’s diesel, gasoline or gas-powered.
Therefore, the problem with the failure of this unit can occur on any car, including such models as:
Malfunctions of tank caps and their consequences
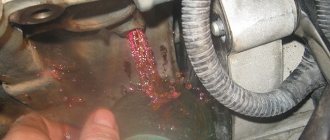
A leaky expansion tank cap can cause additional and “unnecessary” air leaks into the system. The fact is that if the pressure inside the system corresponds to atmospheric pressure, then the liquid will begin to boil at the temperatures at which this should occur. Thus, there will be a leak of coolant and subsequent overheating of the engine. The latter can easily fail.
The other side of the problem is the formation of an air lock. The air lock moves along with the coolant and prevents it from performing its functions. The liquid heats up and boils, which leads to its leakage, and in winter, due to an air lock, poor operation of the interior heater radiator is possible.
The worst thing is when the lid is hermetically closed, but has stopped releasing pressure into the atmosphere. As pressure increases, coolant begins to push out through pipe connections and other “holes in the system.” In the best case, everything will work out and you will only have to change the cover. At worst, the expansion tank can easily rupture and then repairs will cost much more.
Signs and possible consequences of a part malfunction
Most often, the consequence of a malfunction of the cap is boiling of the coolant, sometimes accompanied by the ejection of the coolant from the expansion tank - a common occurrence for VAZ cars. If this happens at engine operating temperatures, then most likely the plug does not hold the required pressure.
Car coolant boiling
Another reason for the same phenomenon is that due to a malfunction of the vacuum valve, air entered the ODS and formed a plug, which disrupts normal circulation, and therefore the cooling of the coolant. In winter, due to an air lock, the stove may not work well. Unpleasant consequences: loss of coolant, which has to be topped up regularly. This happens when, due to increased pressure in the SOD, liquid is “expelled” through the joints between the fittings and pipes put on them, through clamps.
- rupture of low-quality pipes or those that have not been changed for a long time (a picture familiar not only to VAZ owners);
- the appearance of a leak in the main or heating radiator;
- tears the thermostat housing (for Nexia it’s a common thing - into 2 parts);
- burst expansion tank.
A leak appears in the main radiator
All these signs and consequences of a malfunctioning lid are the result of increased pressure in the SOD. The latter is not uncommon for VAZ 2108, 2109 and especially 2110 cars with new-style tanks. Of course, it is obvious that the plastic of these expansion tanks leaves much to be desired, but, nevertheless, this is also due to a malfunction of the plug. So the lid, by regulating the pressure in the SOD, also protects its elements from mechanical damage.
How to check the expansion tank cap
Before diagnosing malfunctions of the expansion tank cap, you must first make sure that there are no visible mechanical damages on it. These may include cracks, scratches or severe wear. In addition, all kinds of dirt, dust and other foreign particles are not allowed on its surface or on the inside. Only after this can valve faults be diagnosed.
While the engine is running, unscrew the cap. If a hissing sound is heard, it means the valve is holding pressure in the system.
However, it is impossible to measure this pressure, and it has certain standards.
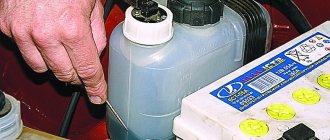
For a more detailed check, you can use a pressure gauge. To do this, use an empty expansion tank and screw the cap on it. Attach a pressure gauge hose to one of the fittings and secure it. All other openings are securely and hermetically sealed. Using a compressor, we create pressure inside the system and wait until the pressure is released. The resulting phenomenon is recorded in the form of pressure gauge readings and compared with standardized values.
Bought a new cover and it doesn't work?
If checking the new expansion tank cap shows that one or both valves are faulty, you can try to modify the part. Owners of VAZ 2110 and 2114 cars often encounter this problem. Usually the valves do not work correctly due to the manufacturer using too stiff springs.
First you need to disassemble the cover using a flathead screwdriver and pliers. During disassembly, remember exactly how all the components were installed, since the springs may fly apart in different directions. After disassembly, it is necessary to reduce the length of the springs. The large spring for the pressure relief valve is shortened by one turn, and the smaller one by two.
The safety valve spring (large) must be shortened taking into account exactly when the valve was triggered during the check of the cover. The main thing in this matter is not to overdo it. But with the second spring everything is much simpler - it should create at least minimal pressure on the intake valve at the moment of its closing. After finishing the cover, all components must be assembled in reverse order. The plug check must be repeated to ensure that the valves operate in a timely manner.
Let's consider malfunctions in the operation of the cooling system (CO) of carburetor and injection engines of VAZ 2108, 2109, 21099 cars that arise due to the failure of the expansion tank cap.
Before troubleshooting, you should know that in the cap of the expansion tank of the engine cooling system of VAZ 2108, 2109, 21099 cars there are two valves (inlet and outlet).
Main malfunctions of the cooling system due to failure of the expansion tank cap
If the outlet valve of the plug is stuck in the closed position, then:
Engine overheats
The pressure in the cooling system increases as it warms up (exceeding the boiling point of antifreeze - 110 g or antifreeze - 120 g), the coolant boils, and the engine overheats. Prolonged overheating of the engine leads to sticking of the piston rings, disruption of the geometry of the cylinder head, etc.
Coolant leak
The coolant is forced out by excess pressure through the hose-fitting connections, the main radiator tank connections, the heater radiator, and under the tank cap itself. Most often, the coolant simply “snots out”; drips are visible on the radiator, hose mounting points, and expansion tank. Under the hood there is a sweetish smell of antifreeze.
Failure or rupture of hoses and tubes of the engine cooling system
Occurs when the pressure in the cooling system increases critically.
Expansion tank burst or swollen
Likewise due to excess pressure in the system.
If the cover inlet valve is stuck in the closed position
Air in the cooling system
Air begins to “suck” into the cooling system through leaky connections to equalize the pressure in the system and atmospheric pressure (vacuum effect). The system becomes airy, which reduces the efficiency of the stove and the system itself. Air locks interfere with the normal circulation of coolant, which again can lead to engine overheating.
How to troubleshoot the expansion tank cap
There are only two options.
Rinse and blow with compressed air.
Notes and additions
— For the cooling system of injection engines of VAZ 2113, 2114, 2115, 2110 cars and their modifications, malfunctions due to failure of the expansion tank cap are similar to those described above.
More articles on the engine cooling system of VAZ 2108, 2109, 21099 cars
Design and principle of operation
Structurally, the lid is a locking element, which is equipped with two valves. The first valve serves to reduce pressure, the second - to supply atmospheric air and increase pressure in the tank. The principle of operation of the cover is associated with changes in the density of the coolant as it heats up and cools down.
When the engine starts running, the antifreeze heats up and its bulk density increases to 20-25%. Hot antifreeze warms up the air layer. The exhaust valve sensor is triggered, it opens, some of the air leaves the tank and the pressure returns to normal. The bleeding process is repeated periodically when the internal pressure of the system exceeds 1.1-1.5 atmospheres.
After turning off the engine, the antifreeze cools down and the pressure in the cooling system drops. When it drops below a critical level, the intake valve opens and atmospheric air is supplied to the system. The pressure in the system equalizes and the inlet valve closes.
Replacing the expansion tank VAZ 2114
Considering the relatively low price of the part, a full replacement is the optimal solution. All repairs are carried out on a cold machine. Before work, the Lada needs to be de-energized by disconnecting the terminals from the battery. To work you need:
- pliers;
- a piece of sandpaper;
- container for used antifreeze
- a set of new clamps;
- Screwdriver Set.
- Sand the inlet holes of the tank so that the edges are perfectly smooth;
- Open the radiator cap to reduce the current pressure;
- We squeeze the clamps of the old tank, remove the two upper tubes;
- Disconnect the lower wide hose and move it to the side;
- Remove the rubber clamp of the old container, take out the tank;
- We secure the new tank with a clamp, attach a wide hose;
- Further manipulations are in reverse order.
When installing a new part, a complete fluid change is recommended. For Lada you need no more than 8 liters of antifreeze. After performing the manipulations: start the engine; carry out the diagnostic measures described above.
The cap of the expansion tank of a car's engine cooling system, as a rule, does not raise suspicions about its serviceability. This, as many people think, very “modest” in importance part is entrusted with a very important task - to regulate the pressure in the cooling system. When the lid stops coping with this, in the best case, liquid will boil or leak out, and in the worst case, this will lead to the breakdown of some components.
Signs of trouble
The most critical signs of a faulty cap are steam coming from under the hood (if the engine temperature is not in the red sector, there is a 90% chance that the problem is in the cap) and/or swelling of the expansion tank.
You can also make an assumption that the cover is faulty if there is:
- coolant leaks from the tank;
- antifreeze leaks at joints;
- ruptures and swelling of hoses;
- air jams;
- engine overheating.
Steam, boiling liquid and leaks are associated with improper operation of the exhaust valve. Air locks are usually caused by a malfunctioning intake, or vacuum, valve. Bursts (swelling) of hoses can be caused by failures of both the exhaust and intake valves.
Air entrapment causes air pockets inside the heater core, thermostat, and radiator hoses. As a result, the engine will begin to overheat because the cooling system is unable to maintain a constant temperature.
If air pockets appear, you need to completely drain the old fluid and add new antifreeze. New liquid is poured in gradually, in small portions of 100 ml.
Validity check
Since such procedures must be regular, it is better to bother once and build yourself a testing apparatus. For it, the simplest pump with a pressure gauge and an expansion tank are combined into a single whole (you can spend money once so as not to reinvent the wheel from scrap materials). It is necessary to check both valves - both exhaust and intake. For the first, with the lid screwed on, air is pumped into the tank until a characteristic hissing sound appears.
If it was heard at a pressure of no higher than 1.2 atmospheres, the valve is already half alive. To make sure of its second half, wait until the end of the hissing and measure the remaining pressure. Should keep 0.8. At the first pressure above the specified value, the spring is gradually trimmed - and each time checked. When bleeding less than 0.8, the spring is stretched or washers are slipped under it.
Checking the cover
If there is reason that the cap may be faulty, how to check the cap of the expansion tank of a VAZ 2114?
In service centers, the test is performed on special stands with a pump and pressure gauge. The cover is screwed to the stand and the pump begins to supply air. When the pressure gauge reaches 1.5-1.7 atmospheres, the exhaust valve should operate. The operation of the intake valve is checked in the same way, only the air is pumped out from under the cover. If the valves do not operate, the expansion tank plug of the VAZ 2114 is faulty.
How can you test the cover in the field?
First you need to conduct a visual inspection. Chips, cracks, gaps and other surface damage are reasons to replace the part. Look at the pressure rating listed for the vehicle and compare it to the pressure rating printed on the part. If they do not match, replace the cover.
Visually inspect the condition of the main seal, pressure seal, and return seal. Replace the part if the seals are cracked, hardened, or damaged.
Both the release valve and the vacuum relief valve should spring back easily when released. If there is any binding, replace the part.
The operation of the exhaust valve is checked with the engine running. You need to wait a few minutes after starting the engine until it warms up.
The cooling system will start working and the pressure in the expansion tank should change. Unscrew the expansion tank cap. If you hear a slight pop, like when you open a bottle of sparkling water, this is a sign of high pressure in the cooling system and a working bleeder valve. If there is no pop, the release valve is faulty.
Cover diagnostics
Self-diagnosis of the cover is, of course, not one hundred percent reliable. But obvious malfunctions of the cover can be detected with a minimum of effort.
Diagnosing the cover comes down to diagnosing the valves.
Checking the safety valve
To check it, you need to start the engine and wait until it warms up to operating temperature. As soon as this happens, without turning off the engine, slowly unscrew the cap (don’t forget about safety precautions!) and if you hear the hissing sound of escaping air, then everything is in order with the valve.
Intake Valve Check
There are two ways to check the intake valve:
1. In the morning, before starting the engine for the first time, open the hood and look at the pipes. If they are dented or deformed in any way, the valve does not work.
2. It is necessary to unscrew the cap and squeeze the pipe tightly. Without releasing it, screw on the cap and release the pipe. If it begins to return to its original state, then the valve is working properly. If it remains compressed, then the cover needs to be replaced.
Finalization of the new cover
Unfortunately, the quality of spare parts for domestic cars leaves much to be desired, and it is better to check the new cover on a stand. If the pressure does not hold or excess pressure is not released, you can trim the springs. To do this, the part is disassembled, the sealing rubber is pryed off and removed with a screwdriver. Then use a screwdriver to carefully remove the inner cover and remove the springs.
The large spring is trimmed by one turn, and the small spring by two turns. As a result, the exhaust valve will begin to open at a pressure of 1 atmosphere, and not 1.7 atmospheres. When checking, the inlet valve should bleed freely.
Refinement of a new part - what to do if it does not function?
When it turns out that the lid stubbornly refuses to relieve excess pressure and/or is not able to restore air losses in the SOD, it can be modified. For some reason, the most complaints come from owners of VAZ, model 2109, including those who buy new plugs. It is clear that the reason for the incorrect operation of the cover valves lies in the too much rigidity of their springs.
To modify the cover, for example, for a VAZ 2109, it must first be disassembled. This must be done carefully, using pliers and a thin flat-blade screwdriver. We must try to remember where everything stood so that the springs do not fly away to God knows where. After the lid for the VAZ 2109 tank has been disassembled, it’s time for the wire cutters. They need to shorten the springs: the large one, for the safety valve, usually by 1 turn, and the small one by 2.
Shortening the plug spring
For the second, the length of the removed segment is not critical - as long as it generally supports the vacuum valve when it is closed and does not resist the external air pressure of 0.03–0.1 kgf/cm 2 . With a large spring it is more difficult - as if not to overdo it. You need to look at its rigidity and the pressure at which the safety valve opened when checking the tank cap of the VAZ 2109. After shortening the springs, we assemble the cap in the reverse order. Before use, it is advisable to check again how it works.
Useful video
You can glean additional useful information from the video below:
The modern automobile industry dictates its own rules in the technical component, if previously some component was practically “invisible” (insignificant). Now, almost the performance of the entire power unit as a whole may depend on it. Ask - “what is this, an insignificant part?” YES at least the expansion tank cap. Moreover, on hot engines, it can be the cause of its “wedge”. And most importantly, it needs to be checked correctly! However, everything is in order (from simple to complex), and of course, the video version is at the end...
Now I won’t tell you in detail how the expansion tank plug works ; I already have a whole detailed article about it. In this material I will try to tell you how to check it correctly.
What is wrong with the lid?
The spring that regulates the intake-exhaust operation corrodes quite quickly. After all, the air released is hot, but the air brought in is not dry. As a result, condensation forms, settling inside the plug and eating up the springs. The situation is even worse in winter. The same condensation quickly becomes ice, and the valves stop working until the lid thaws.
Since it does not have time to warm up, it will soon have to repair the radiator, the tank itself, the stove, etc. So it’s never a bad idea to check the tank cap in winter.
Old motors and cork
I would like to say a few words about old engines, and why NOT the expansion tank cap. It’s just that before it was on the radiator (not on the tank) - it was nominal in nature (that is, little depended on it). Often, engines operated at atmospheric pressure, that is, the engine cooling system (ECS) did not need any pressure or sealing (no, maybe there was pressure, but not so much), and in the past they often poured water into the system, not antifreeze or antifreeze .
This happened because power units used to have thick walls (often cast iron), operated at relatively low speeds, and if during some climb (say in the mountains) your radiator began to steam, then you could just stop and wait until the car cool down and move on. The margin of safety was enormous.
Disassembling the cover
The process itself does not even require accompanying photographs, since, as has already been said, in a structural sense this detail is not anything complicated.
If the plug is not new, but already installed on the tank, to check it, the first step is to unscrew it. It is better to do this when the engine and cooling system have completely cooled down.
- Use a small flat screwdriver to pry it up, after which the rubber seal in the form of a ring is removed;
- The casing located inside is pryed off and removed in the same way. This should be done carefully, holding it so that when the spring is working, the casing does not shoot into your eye;
- The insides are being examined. If the spring itself is alive, both it and the small valve are removed, after which all the dirt accumulated in the cover is cleaned out. Craftsmen advise using simple soapy water and cotton swabs for the ears for these purposes;
- Both a cleaned and a completely new plug need to be checked for functionality, since even just from the factory, the caps may need some work.
New engines and cover
Now everything is completely different, as I already wrote (link above), the plug is now a high-pressure valve. Which runs from about 1.1 to 1.4 ATM (it all depends on the manufacturer).
How it works? It's simple. The expansion tank plug closes the cooling system, making it airtight. When the coolant heats up, according to the laws of physics it expands, and the pressure increases accordingly, and since the system is closed, here you have 1.1 - 1.4 ATM. But if the pumping continues, the lid should open! IT IS IMPORTANT.
Why is this being done, in the sense of building up pressure? Again, everything is simple - so that the coolant boils at as high temperatures as possible.
Now modern antifreezes can boil at 105 - 110 degrees Celsius, and if they are locked at 1.4 ATM, they will boil at 120 - 130 degrees!
BUT WHY SO MUCH? And here is a simple explanation - often modern engines, for example CHEVROLET, OPEL, BMW, MERCEDES, VOLKSWAGEN, etc., operate at high temperatures. Often at 110 degrees Celsius (CHEVROLET doesn't even have a temperature scale on the dashboard so as not to shock you)!
They are called “hot engines” , this is facilitated by both the design (for example, an increase in the compression ratio, an increase in revolutions, now not uncommon even at ATMO - 6 - 7000), and the installation of TURBINES. And in order not to overheat them, they need to be effectively cooled (this is not an ancient SOD), otherwise they will quickly become unusable.
Now the power units are thin-walled (they cut off metal wherever possible), TURBORATED, with an increased compression ratio. And if they overheat, the block head can move, either the block itself (perhaps even the pistons will jam), or it will “blow out” the head gasket
Well, what happens in the end. YES, the expansion tank plug is now part of this complex system. It should control both low and high pressure (so that it does not increase unnecessarily), a little more
Cover tasks
The serviceability of the valve cover from the expansion tank directly affects the performance of the entire cooling system of the power unit.
During operation, the engine heats up, which is quite natural and understandable to everyone. When the engine heats up, antifreeze takes away some of this heat so that the internal combustion engine does not overheat. When the coolant itself heats up, it increases in volume, that is, it expands, and at the same time the internal pressure in the system increases. The hotter the engine, the higher the pressure in the cooling system. In order to avoid ruptures of the pipes and the tank itself, the radiator and other components through which antifreeze or antifreeze passes, a valve cover is used.
It is very important not only to tighten the plug correctly, but also to periodically check its functionality. If repairs or replacements are required, they are carried out at the first sign of problems.
The lid serves not only as protection against overpressure. The design provides two valves, or one, but combining both functions. One valve serves to relieve excess pressure, and the other to inject it.
For the motor to work correctly, it must be maintained at operating temperature. Typically it is in the range from 95 to 120 degrees. Depends on the design features of the engine itself. At these temperatures, the expansion of the coolant occurs by approximately 20-30%. This leads to excess pressure. And normal pressure is considered to be 1.1-1.5 atmospheres. The valve cap of the expansion tank, if necessary, removes excess pressure from the system, or pumps it in so that a vacuum does not form inside, the pipes do not compress and the hoses do not stop circulating antifreeze.
If the plug is working correctly, the engine will operate at optimal temperature and normal operating pressure. If not, the consequences of a malfunction can be disastrous for the internal combustion engine. And the culprit is the usual lid.
Cork as a regulator
There are only two types of expansion tank plug failure:
- No pressure . In a modern (hot engine), the cap JUST MUST contribute to the injection of atmospheres (from 1.1 to 1.4). Otherwise we'll boil! Think for yourself - the engine runs at 110 degrees, but the plug does not hold, and creates atmospheric pressure in the system, the antifreeze will boil very quickly, and it can, at a minimum, be thrown out of the tank. At the most, you will overheat the engine, with all the consequences.
- Excessive pressure . When the plug holds more than 1.4 ATM, for example 2.0 or even higher! This is also dangerous, you can throw off hoses and pipes from the cooling system, rupture the radiators (and they are now made with plastic walls). This again can lead to depressurization of the system and its overheating.
Therefore, it is very important, especially on modern engines, to check the expansion tank plug.
Typical problems and their diagnosis
- Violation of the tightness of the tank: the tank begins to leak due to mechanical damage;
- Rupture of the container due to impact or technological defect.
- Problems with the reservoir cap.
Tank cap malfunctions need to be disassembled separately, as this is the most diverse and common group of breakdowns. A clogged cover valve most often causes inconvenience to owners of “fourteeners”. The valve “clogs” due to dirt and stops releasing hot air. This leads to multiple excesses of operating pressure and overheating of the motor.
Also, coolant may leak through the cap, causing the working fluid level to gradually decrease. A leak can be identified by the presence of smudges in the expansion tank.
Common signs of a broken expansion tank:
- traces of leaks on the tank body;
- The engine overheating indicator light is on;
- smoke from under the hood, other signs of significant overheating;
- warm air does not come out of the heating deflectors, despite the fact that there are “symptoms” of a significant increase in the operating temperature of the engine.
Verification methods
Now I won’t go into the weeds and tell you how you can check it at a service station. We will use only traditional methods:
- Checking the status . Due to high mileage, due to water poured into the SOD, the plug may fail (and it simply rots - the valve rusts). First of all, you need to unscrew the plug and check its condition visually. IMPORTANT! This is done on a cold engine, because in a hot one there is pressure in the system, and you simply risk being doused with hot antifreeze. If the plug does not work, it “sticks” due to rust, then it is better to replace it.
- Do not mix antifreezes . Especially those that don't mix. For example, G13 is mixed only with its own kind (even if from different companies). But with G11 and G12 it does not change at all, they have different additives and bases (some have propylene glycol, others have ethylene glycol ). When mixing, even if not immediately, a precipitate may form. You will clog not only the expansion tank cap, but also the SOD.
- Do not use sealants to seal leaks . It has already been proven that they do not help much, but they clog the system STRONGLY!
AND THE MOST ACCURATE CHECK . This is to make a stand. When I worked at a service station, our VAZs often came to us, especially KALINA, VAZ 2114, 2110, etc. Their stoves often leaked, and often the problem was precisely the plug in the expansion tank (high pressure).
So, we made a simple but very effective stand, we removed the expansion tank from the car. It has three entrances. Two were turned off, and the third was supplied with pressure from a pump with a pressure gauge (usual for tires).
Screw the plug into place. The pump was turned on and pressure was created in the tank. If it doesn't hold any pressure at all, IT'S NOT WORKING, you can throw it away. If it stays above 1.3 - 1.4 ATM, say 2.0 ATM, then it’s also not working!
But if the pump starts pumping, reaches 1.4 ATM, then the valve opens and excess pressure is released, hissing appears (but 1.3-1.4 ATM remains, even after you turn off the pump) - then it can be installed on the machine. THIS IS 100% CHECKED!
Now let's watch the video version
And here I end, I think my materials helped you. Sincerely yours, AUTOBLOGGER
( 5 votes, average: 5.00 out of 5)
Similar news
Antifreeze (antifreeze) into the washer reservoir. Filled, what should I do?
DIY WD-40. How to make an almost complete analogue
Windshield wipers freeze - what to do? Making ANTI-ICE with your own hands
Add a comment Cancel reply
Good day everyone, I decided to write my review of the 2010 Toyota Avensis. Just want…
TOP articles for the month
I have many different articles and videos on various gearboxes, for example here...
I already have an article on the website about choosing memory cards (you can see it here), it’s very...
In the article - is it possible to open windows when the air conditioner is running (you can read it here), I was asked...
Verification Instructions
Trying to create pressure with your mouth in order to check the functionality of a potentially failed valve cover from the expansion tank is usually in vain. It is better to abandon such an idea. Otherwise, there is a risk of drinking antifreeze. And if he is also hot, then a visit to the hospital cannot be avoided.
The easiest way to check it is at a car service center. There are special pumps to create pressure. They pump the required number of atmospheres, which makes it clear whether the valve operates or not.
But many are interested in self-checking. It is also possible.
Here you need to act according to a certain algorithm.
- First, turn off the engine, let it cool for a while, then carefully unscrew the cap from the tank. Examine its condition visually. Any breaks in the seal, chips or cracks indicate the need for replacement;
- In the absence of mechanical damage, there is still no guarantee that the element is in working order. Screw the plug into place, turn on the engine at idle speed;
A fairly simple but effective way to check yourself. Its advantage is that this method is suitable for any car with a liquid engine cooling system.
There are alternative diagnostic options, but they cannot always be carried out due to the design features of the motor. If you can reach up and reach one of the thick hoses coming from the coolant reservoir. It is compressed, and before that the plug is unscrewed. Squeeze the hose, tighten the plug, and then release the tube. If it returns to its original shape, the valve performs its functions.
Despite such a modest size and external inconspicuousness, such an element of the cooling system has a huge impact on the performance of the entire engine. Therefore, you should definitely remember the reasons, signs and methods for diagnosing the condition of the valve plug on the expansion tank.
Thanks to everyone who reads us and leaves comments! Continue in the same spirit! We look forward to your feedback and pressing questions!
(
8 ratings, average: 3.88 out of 5)
Lada 2114 =KUZBASS= › Logbook › Modernization of the expansion tank + adjustment of the lid valves.
Once again, antifreeze leaked out from under all the pipes. A typical situation is that the plug has stopped working to relieve pressure, but buying a fourth one in less than 2 years is too much! This time I approached the solution to the problem radically, namely: I remembered that the first plug (factory one, seemingly better quality than all the others) was changed in vain, because it wasn't about her. I decided to install it after first making sure it was working properly. In order not to invent wonderful devices, I made the simplest design, consisting of a simple tubeless nipple. Functions of this system: 1. The ability to use a compressor or pump with a pressure gauge to verify, by the characteristic hissing sound, that the cover is in good condition (permissible pressure in the cooling system is 0.9-1.1 MPa
). 2. The ability to check the operating pressure in the system at any time with a tire pressure gauge. 3. Perhaps the most important thing. I was taught this in the army. The ability to use a “blind” cap and a compressor to very quickly find coolant leaks! 4. The best way to drain coolant! The throttle heating pipe is in the bucket, and the compressor is in the barrel! So, the nipple is inserted. I tighten the plug, connect the compressor, wait... Pressure 0.9 - nothing, 1.3 - nothing, 1.5 - inflated like a balloon, the plug is silent, 1.7 - click, hiss! Yes, it’s a bit much, you need to adjust it. The setting principle is simple and primitive - we disassemble the plug, there are 2 springs: a large one for releasing pressure, a small one for air leaks (when it gets cold, for example). Relying on intuition, I cut off 1 turn on the large spring. Check: 0.9 - nothing, 1.0 - click, hiss. Amazing! We check the inlet valve with our lungs while inhaling; the air should pass through with effort. I checked, it is so! Just great! I am posting a photo report, paying special attention to inserting the nipple into the hole! This is done only from the inside, so the easiest way is to pass it along the wire.
“Planned breakdown” of the expansion tank. — Lada 2114, 1.6 l., 2007 on DRIVE2
On the morning of April 15, there was no sign of a breakdown. I arrived at work, parked, got out, and looked from under the left wheel, “the little green light has gone”... (there were no doubts - mine... I lost my head). At the right moment, Mark-Antoniy was nearby and called for help =). I open the hood, thoughts: 1 - the lower pipe is not it, 2 - the thermostat - past 3 - the tank, it’s dry on top, closer to the left wing there is a stream and to the battery, then on protection and under the wheel. We removed the strap securing the tank, I touched the bottom, it was wet and cracked, no. and on the side there is (in the photo there is) clearly at the max mark) And before that I didn’t add a lot of antifreeze so that in the morning I wouldn’t see the light on the BSK =)
Culprit
so it's normal =)
and here it is(
so he's still in trouble (
Well, there’s not even anything to write here - VAZ
That's who was snotty in the cold)))
I bought a tank - 2 pieces in different places for 85 rubles. In the first place I took it without thinking, in the second I also took it for comparison. The first tank is poorly cast and soft (considering that the plug should hold 1.1 atm). The second one is harder and has less burr. But not ideal! I came home and found this
Cutting knife, arsonist =) big file and his little brother
Well, actually I bought it, finished it, installed it - AvtoVAZ. Buy - bought, began to remove the flash with a cutter and used files to level the surface of the necks (there were depressions, Mariana). I also smoothed out the remnants of the flash along the way - by burning))) The surface became better than from the store, but to be sure, a sealant was bought! Photos of the marriage tank "Sadko".
In the area of the inscriptions min max, the thin casting is pressed with your finger!
Reference hole
Entrails
Obloy
Obloy 2 return
Obloy 3 Final there is absolutely nothing to say about the hole (
I didn’t take any photos of the installation, I was afraid I wouldn’t have time. I went with a 20 cc syringe and a piece of a dropper to drain the antifreeze into one and a half racks))). I drained it, loosened the clamp, spilled the remaining antifreeze from the bottom, removed the barrel and carefully put it in the Dirt (it was everywhere - it’s Spring). I coated the new barrel at the junction with the lower pipe with sealant and waited 5-10 minutes. I connected the old pipe, removed the excess sealant with a cloth, put on a clamp (NORMA 15 rubles, the Internet says it’s good), tightened it with a screwdriver and then with a wrench. I waited 40-60 minutes for the sealant to set and poured in antifreeze from one and a half liters.
Result
How everything works
The main task of the sealing device on the expansion tank is to maintain a certain pressure for the system. In this case, the threaded connection must ensure a high contact density of the surfaces after screwing.
The expansion tank cap design assumes the presence of a built-in valve that ensures voltage balance. Depending on the current situation, one of the tasks is performed:
- the process of releasing excess volume into the atmosphere occurs;
- volume is pumped to get rid of the vacuum inside;
- the valve is in the closed position, without interaction with the surrounding space.
It must be taken into account that in old domestic cars two independent valves are responsible for pumping and releasing pressure. In modern machines, one valve is used for both operations.
Checking the expansion tank plug — Lada 2114, 1.6 l., 2008 on DRIVE2
Hello, good day! As you know, modern engines use a sealed cooling system that operates under excess pressure. Due to this, the boiling point of the liquid increases, cooling conditions improve and steam losses decrease. The correct operating mode of the system is ensured by the inlet and outlet valves in the expansion tank plug. The VAZ exhaust valve compensates for the expansion of the liquid as the engine warms up and should open at an excess pressure of 1.1...1.5 atm, and the intake valve at a vacuum of 0.03...0.13 atm. during the cooling process. However, for a number of reasons (poor condition, defects in the manufacture of springs, incorrect assembly, etc.), not all plugs provide the specified parameters. Particularly dangerous is excessive pressure, which leads to expansion of the expansion tank, rupture of hoses, and leaks in radiators (main and heater) and the heater tap. For example, there have been cases when a rupture of a heater hose in a car resulted in burns to the passenger’s legs. Therefore, it is advisable to check both used and newly purchased plugs for the opening pressure of the exhaust valve. To do this, you can use a simple device assembled on the basis of an expansion tank (Fig. 1).
Rice. 1. Device for checking the expansion tank plug: 1-tank; 2-bus compressor; 3-valve tubeless tire; 4-checked plug; 5-coolant level sensor cover; 6-bottom pipe
The valve of a tubeless tire fits tightly onto the vapor outlet pipe of the tank and stays on it well even without a clamp. Instead of a compressor, you can use a pump with a pressure gauge. A coolant level sensor is needed to plug this hole in the tank. The sensor can be removed from the vehicle during testing. It would also be nice to plug the lower pipe of the tank with some kind of plug, but you can simply close it with the thumb of your left hand. When checking, turn on the compressor, close the hole in the lower pipe and wait for the pressure gauge readings to stabilize. This will be the opening pressure of the exhaust valve (the accuracy of the readings depends on the error of the pressure gauge). If it is not normal, the valve can be adjusted. To do this, use a circular motion of a narrow screwdriver to remove the rubber gasket from the plug (Fig. 2), and then use curved scissors, a screwdriver or other tool to pry it off (Fig. 3) and remove the valve cover (Fig. 4).
Rice. 2. Gasket removal process
Rice. 3. Initial position of the tool before removing the valve cover
Rice. 4. Valve cover removed
In Fig. Figure 5 shows the parts and components of the expansion tank plug.
Rice. 5. Expansion tank plug disassembled: 1-plug body; 2-inlet valve assembly; 3-outlet valve; 4-exhaust valve spring; 5-valve cover
The opening pressure of the exhaust valve depends on the force created by a large spring. Therefore, if the pressure is higher than normal, you need to grind the ends of the spring using an emery wheel. If it is less than normal, you can try to stretch the spring. After these manipulations, we assemble the lid and check the pressure again. If necessary, we disassemble the cover again and work with the spring. And so on until the required pressure is reached. If you want to check a cover that has already been used on the engine and your check will definitely not make it any worse, you can assemble the installation according to Fig. 6.
Rice. 6. Installation for checking the expansion tank plug on the engine: 1-tank; 2-valve tubeless tire; 3-steam removal hose
To check, disconnect the steam exhaust hose and do not forget to plug it, for example, using a punch from the driver’s tool kit. We attach a valve instead and proceed according to the previous description. The operation is not complicated, but it requires some patience and time. But you will be confident in the lid and avoid many troubles. Thanks to everyone who read this opus to the end. I will be glad if this is useful to someone.
Lada 2114 not bad › Logbook › Expansion tank cap, coolant reservoir and the whole pandemonium)
So, it all started like this, I drove up to the house, steam was pouring out from under the hood, I opened the hood, I looked... steam was coming from the thermostat area... I looked further away, and there was a fountain of antifreeze from the pipe that goes from the thermostat to the stove faucet (beautiful, but unpleasant: )
the pipe burst not far from the clamp, so it was decided to pump out the liquid from the tank using a 150 ml syringe, a huge syringe like in the film the Caucasian captive pumped out the liquid, removed the clamp when removing the pipe, it turned itself back where necessary, it was only necessary trim it with a knife, and cut off the other part that remains on the thermostat. As a result, the pipe turned out to be shorter, and since vibration enters the engine, it was decided to replace the pipe with a new one...
After purchasing all the spare parts, and this is a pipe from the thermostat to the heater, it was also decided to change the pipe from the thermostat to the coolant expansion tank and the pipe from the thermostat to the throttle assembly, they, like the first pipe, did not inspire confidence... then these are standard 16-27 clamps 3 pieces (heater thermostat, and one side from the thermostat to the tank, clamps standard 10-16 2 jokes (thermostat throttle, and clamp 20-32 (tank).
About the tank
tank VAZ -2114
As you know, it comes with two holes for the pressure relief roof and the coolant level sensor. Regarding the coolant level sensor, about its unfortunate location, which is located directly under the stream coming from the coolant return pipe, I think everyone knows, but not only that... this sensor is made so poorly, or rather its rubber seal, that when the pressure in the cooling system increases , antifreeze (antifreeze) begins to press out of it, add a pressure relief cap (which does not cope with its task) (AvtoVAZ, Eurokryshka, Luzar, in general, all domestic covers) and we have leaks from the sensor, as well as the pressure relief cap itself , as a result, the entire tank is covered in antifreeze (antifreeze) and smudges...
There are many solutions to the problem with the coolant level sensor and the pressure relief cap; I don’t see the point in describing these methods here, because the task is to solve the problem radically.
1.About the coolant level sensor
, we will need a tank from a VAZ 2108, it does not have a sensor, it only has a hole for the excess pressure release cap. The tank is installed in place of the old one, like a native one, now regarding the quality of the tank, there are a lot of fakes! Be careful when purchasing a tank, first of all pay attention to its color (must be white) and the factory markings must be present.
tank from 2108
2.Overpressure relief cap
, we find in our city a store of spare parts for foreign cars, namely Audi, Volkswagen, call the store, tell us the make of your car, the employee will tell you everything.
I changed the pipes and replaced the cover with EuroDetal
cover Eurodetail
before that there was Luzar, it began to press antifreeze out of the connections even more strongly than before, especially where the pipes are put on plastic, this is the stove faucet and the tank... all the pipes became hard (harder than with the Luzar lid), you can’t press them with your fingers.
After a trip to the store for a cap
and its installation (it fits perfectly on the thread of the tank), all the smudges disappeared! All pipes became moderately soft. The lid works great, releases pressure correctly, you don’t need to open it slightly like previous lids or do anything else.
Now the tank is clean without any leaks, and most importantly the cooling system is working normally, a poor quality cap can lead to very disastrous consequences with the cooling system and engine. GOOD TO EVERYONE!
Repair
If you find leaks at the inlet and outlet of the hoses into the tank, you just need to replace them and secure them with new clamps. In this case, it is advisable to place the new hoses on the sealant. If you notice leaks of fluid from under the reservoir cap, it needs to be replaced. But what to do if you find a malfunction on the road and there is no auto shop nearby? You need to try to temporarily fix the problem on your own and to do this:
- Wait until the coolant cools down and the pressure in the expansion tank drops.
- Unscrew the tank cap.
- Using a screwdriver or knife, remove the rubber and valve spring from the cover
- The spring needs to be shortened by several turns by biting them off with pliers or simply breaking them off.
This repair should last for some time, even if the rubber seal on the lid is worn out.
Buy a tank cap as soon as possible. As noted earlier on models of the VAZ 08 -15 family, this part is identical.
If the expansion tank has received mechanical damage: it has burst, worn out, then it can be repaired by sealing it. But such repairs are undesirable due to unreliability, and replacement will not cause big problems, neither technical nor financial.