Hi all! From time to time, in many cars, an air chamber appears in the cooling system. It seems normal. But in fact, this phenomenon can lead to quite serious negative consequences. That is why I propose to talk about how to remove an air lock from the cooling system.
This problem is one that you can solve yourself. You just need to understand how to bleed the air properly without damaging other systems in your vehicle.
Before we begin describing the procedures, of which we will have three, I will tell you about the signs of air transport, the causes and possible consequences.
If you're ready, let's get started.
An air lock forms in the engine cooling system.
It would seem that the formation of an air lock in the cooling system of an internal combustion engine is such a simple problem, but its presence seriously affects the current and future operation of the engine. Many drivers have encountered such phenomena as boiling antifreeze, antifreeze and water, failure of various sensors, seething - all this indicates that there is air in the system channels, which is stopping circulation. It also happens that after starting the engine the car does not heat up. When the first signs of air appear in the engine cooling system, prompt elimination of the causes is required.
When and why do you need to replace Priora antifreeze?
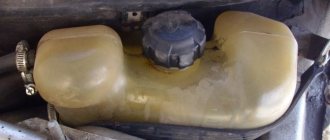
On the Lada Priora, the engine cooling system is not complex, but the design contains elements made of different materials (plastic, rubber, aluminum). To protect these parts, periodic coolant replacement is necessary.
It is important to consider that coolant circulates in the engine; constant heating and cooling additionally has a negative impact on system components. To effectively cool the engine, as well as to increase the service life of cooling system parts, a special liquid is poured into the system - antifreeze or TOSOL.
Such fluids primarily consist of dihydric alcohol (ethylene glycol), distilled water and a package of active additives for corrosion protection. Antifreeze does not freeze at low temperatures and efficiently removes heat. Coolants also protect the engine, rubber, plastic and metal elements of the cooling system.
At the same time, over time, additives in the coolant lose their properties. Antifreeze also accumulates contaminants and deposits. The result is that engine cooling deteriorates, and corrosion protection gradually weakens.
If antifreeze or antifreeze is not changed for a long time, thin channels may become clogged, and a viscous layer of deposits, rust and dirt will form on the internal surfaces of parts. Subsequently, active corrosion destroys metal elements, and increased loads damage rubber parts (pipes) and plastic elements. For this reason, the coolant needs to be changed every 70-80 thousand kilometers or every 4-5 years.
Let us also add that a clear change in the color of the antifreeze, severe clouding, the appearance of flakes, oil stains or jelly-like clots indicates both problems with the liquid itself and possible malfunctions of the engine and its systems. In this case, the engine needs urgent diagnostics, and the coolant itself must be replaced as quickly as possible.
Signs of an air lock in the cooling system
You can determine the presence of air in the engine refrigeration system by conducting independent diagnostics and eliminating the causes. We carry out diagnostics based on the above criteria.
- Checking the system for leaks. Over time, clamps weaken, oxidize, or break completely. The hose also has shock absorption; over time, it bursts and cracks; either heat or cold gradually destroy the rubber.
- Problems with the thermostat. If the engine heats up very quickly after starting, that is, the cooling fan has already turned on, and the temperature sensor shows that it is about to push the needle into the red scale, then this indicates a non-working thermostat or the presence of air in the pump discharge pipe. In this case, the thermostat valve will be in the closed position, the coolant will move in a small circle. The opposite may also happen. The engine takes a very long time to warm up after starting. This means that the thermostat valve is fully open or there is an air lock in the thermostat. In all cases, you will have to remove air from the engine cooling system.
It’s easy to check the thermostat yourself; you need to do the following:
- start the engine;
- after a couple of minutes, touch the radiator pipes (the top one should be warm first, then cold, the bottom one should be cold);
- when the engine temperature reaches operating temperature, 80-90 degrees, the thermostat should open and the lower pipe should heat up.
It's also easy to check functionality. It is determined by the noise level (it is not worth using a noise sensor and determining the level in decibels (dB)), by the sound you can already feel how the pump is working. The vibration of the pump is also checked. The pump bearing may have fallen off.
The main clue is that air has appeared in the engine cooling system in the heater. If the engine is hot and the heater is blowing cold air, then there is an air lock.
Reasons why air appears in the cooling system
Air appears in the system due to malfunctions, actions or inactions on the part of the driver. The following reasons are identified:
- The tightness of the system is broken. This could be a loose clamp, fitting, or cracks in the hoses.
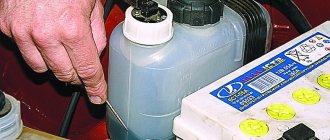
- Work has been carried out to replace or top up the coolant. This is, as a rule, the most common reason for air getting in, because not everyone knows that it should be poured in a thin stream. If you pour in a thick stream, a funnel is formed that swirls the air.
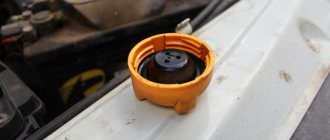
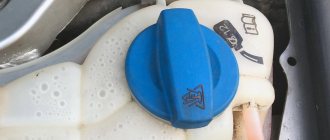
- The air valve is out of working order. This valve is located in the coolant reservoir cap. During natural heating or by installing and starting an autonomous engine preheater, the volume of liquid increases, the pressure in the tank increases and excess air must be discharged through the valve in the lid. This is also a common reason. This is the first place to look for the reasons for airing in the cooling channels. This cover costs 100 rubles for modern VAZ cars. Whoever changes it, when he has already double-checked all the reasons, even after replacing the cylinder head, it turned out that the reason was precisely the non-working cover.
- Problems with the pump (pump). The seals and fibers in the pump may be faulty, causing air leaks.
- There is a leak through a bolt in the cooling radiator (not available on all models). If there is a leak of antifreeze, antifreeze or water, the lost volume is filled with air.
- Burnt cylinder head gasket. If the engine has already been overheated, then there is a possibility that the cylinder head gasket has burned out. When it burns, coolant is released either into the crankcase or into the exhaust system. Seething and boiling begins when the volume of coolant (coolant) has decreased and the entire void is filled with air. In this case, repairs and replacement of the head gasket will be required; for this you need to know what types of cylinder head gaskets there are.
If coolant gets into the engine crankcase, it is easy to check with the oil level dipstick; the level will be higher than expected. If water is used as coolant, the engine oil will turn white. Sometimes air gets into the brake system, in which case the system also needs to bleed air. And for this you need to know the diagram, which wheel to start with and what exactly to do to bleed brakes with ABS and how to bleed brakes without ABS. If the entire fuel fluid has leaked or you want to replace it, then such work also has its own nuances. In particular, you need to know which brake fluids can be mixed and how much brake fluid is needed for replacement.
How to remove air from the engine cooling system.
The process of removing an air lock on cars is almost the same, be it Kalina, Priora, Granta, Hray, Vesta, VAZ 211(0-5), 2101-2107, Opel, Daewoo Matiz, Nexia, Nissan Almera, Gazelle Business, Audi 80-100 , BMW E39, Peugeot, Chevrolet Cruze, Skoda, Mazda, Mitsubishi Lancer, Suzuki Grand Vitara, Niva, UAZ, Volkswagen, Ford, Renault Duster, on Chinese Lifan and even on premium class cars.
There are several options for removing an air lock from the cooling system:
Option #1:
- Remove the plastic casing from the internal combustion engine. Why do you need to unscrew the filler cap to fill the oil? Remove the trim. After removing the casing, you need to close the neck to avoid the ingress of various kinds of objects.
- Find the pipes that provide heating for the throttle assembly.
- Remove any one pipe.
- Unscrew the cap of the expansion tank.
- Cover the neck with a clean piece of rag or tightly connect the hose and blow into it.
Thanks to this method, air and the general system are bleed. You need to blow until liquid flows out of the disconnected pipe. Then, immediately put the hose back in place.
Option #2:
- Start the engine and let it run for about 15 minutes.
- Turn off the engine.
- Disconnect any pipe on the throttle assembly.
- We do not touch the tank lid; it must be closed.
- Wait until the coolant starts to flow out.
- Place the pipe in place and tighten it tightly with a clamp.
To use this option, it is advisable to wear thick rubber gloves and overalls, because the temperature of the liquid is about 90 degrees.
Option #3:
- Place the car on a steep incline with the front end facing up (the steeper the better).
- Set the handbrake.
- Place wheel chocks (chocks) under the wheels.
- Unscrew the plugs from the expansion tank and the cooling radiator.
- The car should run for about 15 minutes with this setting.
- The antifreeze will gradually descend into the system, and the air will escape.
- Add antifreeze and gas.
- When the bubbles end, all the air has escaped.
Protection against air lock formation in the cooling system.
In all matters related to malfunctions and subsequent repairs, the easiest way is to prevent the occurrence of breakdowns; in this case, it is necessary to prevent the appearance of an air lock. It is advisable to learn how to fix simple breakdowns and perform preventive maintenance yourself, then you won’t have to contact a car service center.
One of the main preventive measures for the formation of an air lock is not to bring the coolant to a boil (do not overheat the engine). If antifreeze is poured in, it can withstand higher temperatures than antifreeze, and even more so than water. When the coolant boils, steam is formed, which is pressed into the most inaccessible corners of the ignition system. In such cases, certain types of breakdowns appear.
1200 rub. for the photo report
We pay for photo reports on car repairs. Earnings from 10,000 rubles/month.
Write:
The presence of air in the cooling system is fraught with problems for both the engine and other components of the car. In particular, overheating may occur or the stove will heat poorly. Therefore, it is useful for any motorist to know how to remove an air lock from the cooling system. This procedure is quite trivial, so even a beginner and inexperienced car enthusiast can do it. Due to its importance, we will talk about three methods of removing air. But first, let's talk about how to understand that air jams are occurring and the reasons for their occurrence.
Removal methods
Now let's move on directly to how to remove an airlock formed by the cooling system without the help of specialists.
I can offer 3 methods in total. Each of them has its own characteristics and can be applied to certain vehicles. Therefore, think carefully before settling on any of the methods.
First method
This option is suitable for owners of VAZ cars, including:
- VAZ 2107;
- 2110;
- VAZ 2114;
- 2109;
- VAZ 2115;
- Lada Kalina;
- Mother Superior;
- Lada Granta;
- VAZ 2111;
- VAZ 2108 and others.
If you only have these machines, you can get started with peace of mind.
The procedure looks like this:
- Provides access to the reservoir where the coolant is located. It is necessary to remove the protective elements;
- Now one of the two injectors is turned off, it heats the throttle valve. It doesn't matter which hose you disconnect;
- The lid is removed from the tank and the hole is closed with a low-density rag;
- Blow into the tank to increase excess pressure. It should blow until air comes out of the nozzle;
- The coolant should drain soon. At this point it is necessary to secure the pipe with a clamp. Here it is worth asking a friend for help;
- If the tube is loose, a new plug may appear;
- Return all elements to their place;
- Start the engine and you can drive a couple of kilometers.
In theory, the symptoms of the malfunction should disappear. Please note that this method is suitable specifically for domestic cars, since you can actually disconnect the hose on them.
Second method
If the first option for removing air from the air does not suit you, I suggest you use the second method.
Here the procedure is as follows:
- Start the engine at idle speed;
- Leave for 10-15 minutes;
- Turn off the engine;
- As in the previous instructions, remove the protective elements;
- Open access to the reservoir;
- Remove only 1 tube;
- In this case, the coolant will circulate through the system;
- The air will begin to escape without your participation;
- When the antifreeze begins to flow, the pipe returns to its place.
The method is frankly good. But there is a drawback. It is found in high temperature pipes. It is strictly not recommended to take them with bare hands.
Turn on the heater and check whether hot air begins to flow into the cabin in the required quantity. If so, then everything was fine and you can continue to enjoy the result of your own repair. The job is no more difficult than bleeding the clutch.
Third method
it is considered the most difficult because you will need a jack or some kind of inclined surface to work.
You need to act in the following sequence.
- The car is placed on a jack to lift the front of the car off the rear;
- it is important that the radiator cap is higher than the rest of the system components;
- Make sure you have the handbrake on;
- Start the engine and let it idle;
- Stop the engine after 15 minutes;
- Remove the caps from the radiator cap and coolant reservoir;
- Smoothly press the accelerator pedal, gradually increasing the speed;
- At the same time, the assistant needs to add coolant to the tank;
- If bubbles are visible, the stopper comes out;
- Turn on the stove and continue adding coolant;
- When you feel hot air in the cabin and bubbles come out, it means the plug is off.
You can't get here alone, so you need to call an assistant. You should also add coolant carefully to prevent a new plug from forming. Always top up the coolant that is currently in the expansion tank. I have already told you separately about mixing antifreeze.
It is these three methods that most car owners use when they decide to solve the problem of ventilating the cooling system with their own hands. If there are alternative options, be sure to write in the comments.
Thank you all for your attention! Register, be sure to ask questions and invite your friends to join us!
(2 ratings, average: 3.00 out of 5)
Did you like the article?
Subscribe to updates and receive articles by email!
We guarantee: no spam, only new articles once a week!
1200 rubles for a photo report
We pay for photo reports on car repairs. Earnings from 10,000 rubles. / Month Write:
The presence of air in the cooling system is fraught with problems both for the engine and for other components of the car. In particular, overheating may occur or the stove will heat up poorly. Therefore, it is useful for any motorist to know how to push the airlock out of the cooling system. This procedure is quite trivial, so even a novice and inexperienced car enthusiast can do it. Given their importance, we will discuss three methods of removing air. But first, let's talk about how to understand that there are air jams and the reasons for their occurrence.
Symptoms of airiness
How can you tell if there is an air lock in the cooling system? When this phenomenon occurs, several typical symptoms occur. Among them:
- Problems with the thermostat . More specifically, if after starting the engine the cooling fan turns on very quickly, then there is a high probability that the thermostat has failed. Another reason for this may be that air has accumulated in the pump nozzle. If the thermostat valve is closed, the antifreeze circulates in a small circle. Another situation is possible when the coolant temperature needle is at “zero” when the engine has already warmed up enough. Here again, two options are possible - a malfunction of the thermostat, or the presence of an air lock in it.
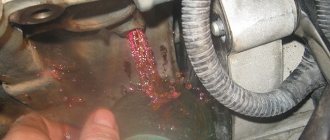
- Antifreeze leak . It can be checked visually by traces of antifreeze on individual elements of the engine or chassis of the car.
- The pump starts to make noise . When it partially fails, extraneous noise appears.
- Problems with the stove . There are many reasons for this malfunction, but one of them is the formation of an air lock in the cooling system.
If you find at least one of the symptoms described above, then you need to diagnose the cooling system. However, before doing this, it will be useful to understand what caused the possible problems.
Symptoms
Symptoms or signs of swelling are not difficult to recognize. To do this, you just need to pay attention to the unusual behavior of your car.
Although sometimes it happens that the driver, calmly driving his car, does not even suspect that a harmful air plug has long ago formed inside the cooling system. The symptoms of this malfunction are as follows:
- The thermostat breaks. When the fan turns on almost immediately after starting the engine, there is likely a problem in the system. Air sometimes accumulates in the nozzles, causing circulation only along the internal circuit of the cooling jacket;
- The coolant temperature gauge arrow is in the zero position even when the engine is warm;
- There is a coolant leak. Look under the car for traces of coolant. This will also help locate the leak;
- The engine overheats with enviable regularity. This symptom indicates a circulatory disorder;
- During operation of the pump, extraneous noise occurs;
- The oven is not working properly. It’s not a fact that the reason is in the air. But it's worth a look.
If you experience one or more of these symptoms, you need to check the operation of the cooling system. If you have a new and good foreign car, I do not recommend driving it yourself. But everyone decides for themselves.
Also pay attention to the marks on the toolbar icons. They will tell you if the engine is overheating, etc.
Causes
Since everything is clear with the signs, we can move on to the reasons why your injector may need to ventilate the cooling system.
There is no point in solving a problem until the cause is discovered. Otherwise, you can disassemble half the machine without achieving the desired result. And it doesn’t matter whether you have a Gazelle, a new Solaris or some Mercedes S-Class.
Inhalation of air often occurs due to:
- depressurization;
- incorrect addition of coolant;
- malfunction of the air valve;
- formation of suction due to the pump;
- refrigerant leaks;
- mechanical damage to system elements;
- natural wear and tear;
- failure of the cylinder head gasket;
- previous incorrect repair.
After eliminating the source of the problem, you must first eliminate the cause of the ventilation. And only then should you proceed directly to the procedure for removing the airlock chamber itself.
If you were unable to figure out the reasons on your own, it is best not to continue examining your car's parts on your own. Contact a good car service center, whose specialists, using professional and precise equipment, will carry out all the necessary diagnostic measures.
Consequences
If an air lock is detected in the automotive cooling system of an 8cl engine or any other engine, there is no point in postponing repairs until later.
Since the circulation of coolant in the car is interrupted, the engine itself and all associated equipment will soon begin to suffer. The engine does not cool properly, and operating the vehicle at high temperatures causes extremely rapid wear of the components.
There is one additional problem that doesn't seem that serious. But only before the cold weather sets in. While the system is being ventilated, the stove will not be able to adequately heat the interior. Therefore you will be very cold.
In addition, the gateway leads to increased fuel consumption, failure of various sensors and overheating. In the end, everything ends with a major overhaul. Believe me, removing the air is much easier and cheaper than repairing the engine.
Causes of air locks
Air in the cooling system can be caused by a number of malfunctions. Among them:
- Depressurization of the system . It can occur in a variety of places - on hoses, fittings, pipes, pipes, and so on. Depressurization can be caused by mechanical damage to its individual parts, their natural wear, or a decrease in pressure in the system. If, after you have removed the air lock, air appears in the system again, it means that it is depressurized. Therefore, it is necessary to do diagnostics and visual inspection in order to identify the damaged area.
You need to pour antifreeze in a thin stream.
Each of the reasons described above can damage the components and mechanisms of the car. First of all the engine suffers because its normal cooling is disrupted. It overheats, causing wear to become critical. And this can lead to deformation of its individual parts, failure of sealing elements, and in especially dangerous cases, even to jamming.
Airing also leads to poor stove performance. The reasons for this are similar. Antifreeze does not circulate well and does not tolerate sufficient heat.
Next, let's move directly to the methods by which you can remove the air lock from the cooling system. They differ in the method of execution, as well as complexity.
Methods for removing air lock from the cooling system
How to remove an air lock from the cooling system of a VAZ classic
There are three main methods by which you can eliminate an air lock. Let's list them in order. The first method is great for VAZ cars . Its algorithm will be as follows:
- Remove from the engine all protective and other elements that may prevent you from reaching the expansion tank with coolant.
- Disconnect one of the pipes that are responsible for heating the throttle assembly (it doesn’t matter whether it’s direct or reverse).
- Remove the expansion tank cap and cover the neck with a loose cloth.
- Blow inside the tank. This will create a slight excess pressure, which will be enough for excess air to escape through the pipe.
- As soon as antifreeze comes out of the hole for the pipe, immediately put the pipe on it and preferably secure it with a clamp. Otherwise, air will get back into it.
- Close the expansion tank cap and reassemble all previously removed engine protection elements.
The second method is carried out in accordance with the following algorithm:
- Start the engine and let it run for 10.15 minutes, then turn it off.
- Remove the necessary elements in order to get to the expansion tank with coolant.
- Without removing the lid from it, disconnect one of the pipes on the tank. If the system has been aired, then air will begin to escape from it.
- As soon as the antifreeze flows out, immediately replace the pipe and secure it.
The third method of how to remove an air lock from the system must be done as follows:
- It is necessary to place the car on a hill so that its front part is higher. It is important that the radiator cap is higher than the rest of the cooling system. At the same time, put the car on the handbrake, or better yet, put chocks under the wheels .
- Let the engine run for 10.15 minutes.
- Unscrew the caps from the expansion tank and radiator.
- Periodically press the accelerator pedal and add coolant to the radiator. This will cause air to escape from the system. You will notice it by the bubbles. Continue the procedure until all the air is released. In this case, you can turn on the stove to maximum mode. As soon as the thermostat opens the valve completely and very hot air enters the cabin, it means that the air has been removed from the system. At the same time, you need to check for bubbles coming out of the coolant.
As for the last method, on machines with an automatically turned on cooling system fan, you don’t even have to over-gas, but calmly let the engine warm up and wait until the fan turns on. At the same time, the movement of the coolant will increase, and under the influence of circulation, air will leave the system. In this case, it is important to add coolant to the system in order to prevent airing again.
As you can see, the methods of how to get rid of an air lock in the engine cooling system are quite simple. They are all based on the fact that air is lighter than liquid. Therefore, it is necessary to create conditions under which the air lock will be forced out of the system under pressure. However, it is best not to bring the system to that state and take preventive measures in a timely manner. We will talk about them further.
How to check the cover yourself on Priora, Grant, Kalina
It seems that it is enough to unscrew the cap from the expansion tank and inspect its insides to understand the specifics of the problem. However, it is not. For example, service centers use special pressure pumps that can pump the required number of atmospheres . By creating artificial pressure in the cooling system, the device allows you to calculate the correct operation of the valves.
A device for diagnosing VAZ tank caps has a pressure gauge and a pump
But drivers don't have this expensive equipment, so they have to make do with what they have in a standard garage. Diagnostics of the quality of operation of the tank cap will be less accurate, but it will be possible to identify the main malfunctions of the valves:
- Turn off the engine.
- Unscrew the cap from the tank neck.
- Inspect the product for cracks, dents, and chips. The seal may have ruptured or become severely worn.
- If there is no visible damage, screw the cover back on and start the engine.
- Wait until the engine warms up to its normal temperature.
- Start slowly unscrewing the cap from the tank.
- If, during the process of unscrewing, a whistle of escaping air is heard (this sound can be compared to the release of gases when opening lemonade), then the lid is in working order, since it restrains the pressure in the tank and hoses.
- After this, you need to turn off the engine again.
- Inspect the cooling system pipes. If they are pulled in, the vacuum valve of the lid does not work well, since the pressure in the system is extremely low.
Photo gallery: algorithm for checking the operation of the lid
The expansion tank cap can only be unscrewed after the engine has cooled down. The working cap must not have expansions, cracks or dents. All pipes must have an equal diameter throughout their entire length, without thickening or compression.
This is a typical scheme for checking expansion tank cap valves on all vehicle models produced by AvtoVAZ.
General recommendations for prevention
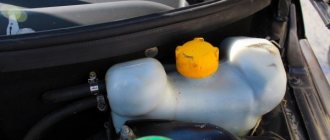
The first thing you need to pay attention to is the level of antifreeze in the cooling system . Always monitor it and top up if necessary. Moreover, if you have to add coolant very often, then this is the first call indicating that something is wrong with the system, and additional diagnostics are necessary to identify the cause of the malfunction. Also check for stains from antifreeze leaks. It is better to do this in the inspection hole.
Try to use the antifreeze recommended by your car manufacturer. Make purchases in trusted, licensed stores, minimizing the likelihood of purchasing a counterfeit. The fact is that low-quality coolant can gradually evaporate during repeated heating, and instead of it, an air plug forms in the system. Therefore, do not neglect the manufacturer's requirements.
Instead of a conclusion
Finally, I would like to note that if the described signs of airing in the system appear, it is necessary to carry out diagnostics and check it as quickly as possible. After all, an air lock significantly reduces the efficiency of the cooling system. Because of this, the engine operates under conditions of increased wear, which can lead to premature failure. Therefore, if you detect airing, try to get rid of the plug as quickly as possible. Fortunately, even a novice car enthusiast can do this, since the procedure is simple and does not require the use of additional tools or devices.
Checking the cover on the main VAZ models
Experienced owners of domestic cars have made it a rule to change the expansion tank cap every two to three years. On the one hand, such attention to detail greatly simplifies the operation of the internal combustion engine cooling system, and on the other hand, the cover costs less than 100 rubles, so absolutely every driver can afford to buy it.
And replacing the cover does not cause any difficulties. First, with the car cooled down, unscrew the cap from the tank. Then screw in the new one until it stops.
Video: diagnosing the performance of the lid
Checking the cover on the VAZ 2108/2109
The design of the “eights” and “nines” produced by AvtoVAZ allows you to check the functionality of the tank cap in one minute. The operation looks like this:
- Open the hood of a car that has cooled down after driving.
- Unscrew the cap of the expansion tank.
- Squeeze the supply hose as tightly as possible with your hand.
- At the same time, screw the lid back on.
- After this, lower the hose.
If the compression area immediately regains its original elasticity, it means that the valves on the cover are working properly. If it still cannot recover for a long time, it is recommended to replace the tank cap with a new one.
You can check the operation of the coolant reservoir cap on a VAZ 2109 with your own hands by simply squeezing the pipe with antifreeze
How to check the functionality of the cover on a VAZ 2110/2111/2112
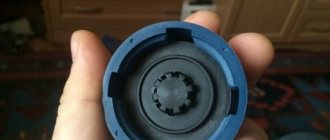
The procedure for checking the valves on the cover is the same as for previous VAZ models. The only nuance on the VAZ of the tenth family is that when unscrewing the cap from the tank, the valve mechanism itself may fall out of the cavity of the cap. This is not an indicator of failure, but, most likely, an insecurely fixed element will not work for long.
On a VAZ of the tenth family, the expansion tank cap tends to unscrew from the neck without valves
How can you remove an air lock in the cooling system, solving the problem
The issue of engine overheating due to the appearance of air in the cooling system (air lock) worries many motorists. Taking this into account, we decided to help, so in our article today, we will talk, as you may have guessed, about how to remove an air lock from the engine cooling system. The topic is quite popular, since not a single car is immune from the appearance of an air lock. Before you find out how we will solve the problem, first a few words about where the air in the cooling system comes from, that is, how an air lock is formed.
Recommendations
- Immediately after replacing the coolant, the engine must be warmed up, while simultaneously checking the heating of the lower radiator hose. It should be cold at first, but then quickly warm up. Its heating will indicate that the antifreeze is circulating normally in a large circle.
- Then the engine should continue to warm up until the cooling system fan turns on.
After turning off the fan, turn off the engine and allow the engine to cool. After cooling, unscrew the cap of the expansion tank again and check the fluid level again. If necessary, the normal level in the tank should be set again. - Please note that on models with a cable transmission, the starter will also need to be removed. To do this, you need to remove the negative terminal on the battery. Next, the latch of the wire block is pressed, after which the block is disconnected from the traction relay connector. Then you need to remove the protective cap from the nut securing the wire tip, which is connected to the “plus” wire of the battery.
We also recommend reading the article on how to flush the engine cooling system before replacing the coolant. From this article you will learn about the features of cooling system maintenance, as well as how to flush the engine cooling system correctly.
Using a spanner “13”, unscrew the nut and remove the wire tip from the contact bolt of the traction relay. Now, using a key set to “13”, unscrew the starter mounting bolts (3 pieces), and the starter is removed from the car. If there is a box with traction control, removal of the starter is not required.
How to remove an air lock
Hello again, dear readers. In previous posts we talked about how to change antifreeze and how to replace the heater tap. This article will be a very useful addition to the previous two, because not everyone knows how to remove an air lock from the engine cooling system and heating system.
Signs of an airlock. How is it dangerous?
An air lock in the engine cooling system and heater can cause you a lot of trouble. This is, firstly, uneven heating of the engine and its overheating due to insufficient cooling. Air in the cooling system prevents the circulation of coolant and, as a result, heat exchange between the engine and antifreeze does not occur. Also, due to the air lock, the coolant cannot pass into the radiator and therefore the engine begins to overheat.
The second problem when an air lock occurs is the stove (heater) not working. Antifreeze cannot pass into the heating radiator, so it remains cold and the passing air does not heat up. Both of these problems are usually interrelated and appear together, and therefore require immediate elimination.
Today I know several ways to remove an air lock in VAZ cars. They will be described below. Some of them can be used on foreign cars.
Methods for removing air lock from the system
Let's get straight to the main point of the article. There are three ways to remove an air lock. I consider them the main and most accessible. They are based on the fact that air is lighter than water and therefore collects at the highest point. From there we will delete it. Let me first make a reservation that when performing work, the heater valve must be fully open (to the hottest air). So, a description of the first method. It is suitable for cars that have the ability to disconnect the heating hose of the throttle assembly or carburetor (on most VAZ cars). Since the throttle assembly (carburetor) is the highest point in the engine cooling system, this place is the most suitable for removing air from the system. The procedure is as follows. First, remove all protective covers and other elements that prevent access. Then unscrew the heating hose clamp and remove the hose from the fitting. We unscrew the cap on the expansion tank and blow into it with our mouth until antifreeze flows out of the throttle assembly or pipe. As soon as liquid comes out of the fitting or hose, quickly put the hose back in place and screw everything back. These actions allow you to remove the airlock almost 100%. Let's move on to the second method.
How to remove an air lock by removing the heating pipes of the throttle assembly.
The second method is similar to the previous one, but does not require blowing into the tank. As in the previous version, remove all protections, warm up the engine to operating temperature, and turn off. Without unscrewing the expansion tank cap, remove the hose from the throttle body heating fitting. As soon as the coolant flows, put the hose in place and put everything back together.
If it doesn’t work the first time, put the hose in place, unscrew the tank cap, tighten it and repeat the operation. As a rule, you can remove the airlock using this method the first time. Don't forget about safety measures. The coolant has a temperature close to 90 degrees and is under pressure, so be careful and somehow protect your hands from burns (I wear two gloves: first cotton, and rubber on top). Let's move on to the third method.
Now I’ll tell you how to remove the air lock without disassembling the system. I’ll say right away that this method is less effective than the previous two, but it is simpler. Its essence is as follows. It is necessary to drive the car up a steep hill so that the top radiator cap becomes the highest point in the cooling system. We remove the cap of the expansion tank (if there is one, then the radiator), start the engine and warm it up to operating temperature. Antifreeze from the tank should begin to flow into the system; it must be added to the required level. To increase the fluid flow, you need to increase the engine speed. In this case, the antifreeze may suddenly disappear and you need to top it up immediately. We continue the operation until bubbles stop coming from the return line.
That's probably all I can say about how to remove an air lock from the cooling system. I can only add that a sign that the air lock has gone is hot air from the heater. If anyone knows other ways, I suggest writing them in the comments.
Preparation
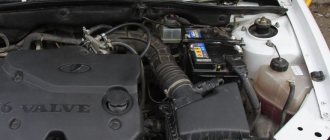
The 11183 engine has a plastic casing that can be removed by simply pulling the part up. You can first unscrew the oil filler plug.
Motor “11183” and its protective casing
The temperature regulator in the cabin is moved to the right position. Without this, all actions will be useless.
Using method 1, the engine is first warmed up. For methods 2 and 3, the engine is left without warming up.
Removing an air lock from the cooling system of a VAZ 2114 car
The presence of malfunctions in the engine cooling system can cause many problems for the car owner. The most typical problem is the presence of an air lock in the system, due to which antifreeze does not enter the furnace and, as a result, the car interior is deprived of heated air, which is extremely necessary in the cold season. But the most important thing is that many parts and components of the engine begin to experience overheating, as a result of which the resource of the unit is significantly reduced.
Causes and symptoms of malfunction
The reasons for the formation of air jams may be of the following nature:
- Thermal contraction of the material, due to which cracks are formed in the places where the pipes are attached, through which atmospheric air enters the system.
- The valve installed on the expansion tank cap has failed.
- The need to replace the cylinder head gasket due to its wear.
- Presence of cracks in the cooling or heating radiator.
- There are leaks in the pump (worn seals or another reason).
- The presence of blockages in the pipes and radiator, mechanical damage to these parts.
- The thermostat is partially not working.
How does the VAZ 2114 cooling system work and how does it work?
The engine cooling system of the VAZ 2114 car is of a closed type and consists of two circles (large and small), in which the liquid circulates forcibly - due to the pressure created by the pump. The second most important element of the system is the radiator, which consists of a large number of pipes, and a fan, due to which the liquid circulating in it is cooled.
Features of VAZ 2114 engine cooling
A special substance – antifreeze – is used as a coolant in the cooling system of this car. It circulates through the tubes while the engine is running and takes the required amount of heat to cool the components and parts of the unit. The pump drive, which ensures circulation of the working fluid in the system, is connected by a belt drive to the engine crankshaft. To regulate the direction of flow (in a small circle, bypassing the radiator, or in a large circle of the system), a thermostat is used. If the coolant temperature reaches 87 degrees Celsius, the thermostat directs it to the radiator for cooling.
Bought a new cover and it doesn't work?
If checking the new expansion tank cap shows that one or both valves are faulty, you can try to modify the part. Owners of VAZ 2110 and 2114 cars often encounter this problem. Usually the valves do not work correctly due to the manufacturer using too stiff springs.
First you need to disassemble the cover using a flathead screwdriver and pliers. During disassembly, remember exactly how all the components were installed, since the springs may fly apart in different directions. After disassembly, it is necessary to reduce the length of the springs. The large spring for the pressure relief valve is shortened by one turn, and the smaller one by two.
The safety valve spring (large) must be shortened taking into account exactly when the valve was triggered during the check of the cover. The main thing in this matter is not to overdo it. But with the second spring everything is much simpler - it should create at least minimal pressure on the intake valve at the moment of its closing. After finishing the cover, all components must be assembled in reverse order. The plug check must be repeated to ensure that the valves operate in a timely manner.
AIR IN THE ENGINE COOLING SYSTEM VAZ 2110 - Air locks in the car cooling system
The plug was removed because the throttle body is the highest point in the cooling system.
We will tell you how to remove air from the VAZ 2114 cooling system and forget about these problems. During operation of the VAZ 2114, the engine cooling system may begin to work incorrectly. There is another way to create the pressure in the cooling system necessary to remove the air lock - just start the engine for a short time. 1) First unscrew and thereby completely remove the cap that covers the cooling expansion tank. 1) First, slightly loosen the clamp of the coolant drain hose and then little by little try to disconnect it from the fitting. 2) Next, when the hose is disconnected, pour the liquid itself into the tank and at the same moment liquid should flow out of the hose that you hold in your hand.
2110 1999, the injector changed the radiator, pipes and antifreeze of the cooling system. Now I’m driving and the engine heats up very quickly, the fan operates at 95-100 degrees. But this approach often ends badly for the driver, because a malfunction can happen on the road.
And most faults can be easily fixed in a garage. For example, in the process of replacing antifreeze, some motorists experience excessive engine overheating.
How to remove the plug from the cooling system on a VAZ 2110-VAZ 2112?
You can tell that there is an air lock in the system by the cold air that is supplied by the heater to the vehicle interior even when the engine is well warmed up. Visual evidence of the presence of a plug in the system can also be the rapid heating of the motor, which ultimately leads over time to overheating of the latter. If this happens, the breakdown must be repaired quickly, because future repairs can be much more expensive.
It is advisable to install the vehicle on a flat surface to make it more convenient to work and to release air more effectively. It is necessary to turn off the engine, remove the cap from the expansion tank and lower the clamp of the water pipe into the container, through which antifreeze is supplied to the throttle assembly of the engine. In order to release air from the cooling system, it is necessary to slightly move the clamp. At the same time, a characteristic hiss of air should be heard.
After this, you need to return the pipe to its place and tighten the clamp well. While performing this work, you can at the same time check the entire system for leaks. Start the engine and warm it up to operating temperature.
If it starts working normally, the air is circulating and there are no air pockets in the system, then the air flow will also have a fairly high temperature. At the moment when the antifreeze boils over and rises, 200-400 grams flow out. 4 minutes 37 seconds but not like an airlock. It leads to engine malfunctions, seething, overheating of many car components, incorrect sensor readings, thermostat failure, poor interior heating, etc.
If there is air leakage at the joints of the pipes. And if their compression is insufficient, air gets into the micro-slits. Before you begin to identify air jams, it is necessary to exclude more serious causes of malfunction of the car’s cooling system.
If checking the cooling system does not reveal any mechanical faults, then you can safely proceed to eliminate the air lock. A plug can form on both the external and internal circuit. If the standard system from the manufacturer does not work (and this often happens), “folk” methods come to the rescue.
How CORRECT! remove air from the cooling system!
In older cars without an expansion tank, the highest point is the radiator. The car is placed on the overpass with its nose up and the engine is turned on. After some time, the air lock comes out. In modern cars with a closed system, simply lifting the front of the car is not enough. We still need to depressurize the system. For example, loosen the outlet pipe (until a small gap forms) on the heater radiator fitting and wait until antifreeze flows out without air bubbles.
Can be performed while traveling. Unscrew the screw on the radiator to bleed air. One person sits behind the wheel and periodically accelerates slightly (no more than 3500 rpm). It also monitors when hot air comes out of the stove.
How to remove an air lock from the Lada Kalina engine cooling system
It is strongly recommended to squeeze the lower pipe with your hands to completely squeeze out the accumulated air from the system. This indicates that the thermostat is fully opening." Actually, the heater radiator is a small circle of the cooling system and has nothing to do with the open thermostat. Do not mislead people.
Cooling system. Engine radiator
Please don’t start searching right away. I read it and didn’t fully understand how to do it correctly. There is also an opinion that air can accumulate in the gas reducer (the car runs on gas). It is installed slightly above the radiator and is looped with antifreeze for warming up. Several heating-cooling cycles - and the stove functions normally. The engine cooling system (ECS) of the VAZ tenth family is liquid, closed type, with forced circulation.
In the article: SOD schemes, the purpose of system elements and their operating parameters. The use of water in the cooling system is not recommended: hot water causes intense corrosion of aluminum parts. Replacing coolant, which coolant is better to choose.
If the pump fails, it is recommended to replace it as an assembly. Installation of an additional pump, and which pump is better to choose. The VAZ-2112 engine thermostat has an increased resistance of the bypass valve (throttle hole), due to which the fluid flow through the heater radiator increases. Modifications to the thermostat. To monitor the coolant temperature, a sensor is screwed into the engine cylinder head and is connected to a temperature gauge on the dashboard.
The heater heat exchanger is designed to heat the air entering the passenger compartment with the heat of the engine cooling liquid. It is connected by hoses to the engine cooling system. It is enough to unscrew it with the engine running, and if there is air in the system, it will begin to bubble. One of the reasons for this problem is air that gets into the cooling system.
Replacing coolant Priora
Replacing antifreeze on Priora occurs in several stages:
Drain the coolant from the engine cooling system (ECS). Add new coolant. If necessary, remove air from the engine cooling system.
How to drain antifreeze on a VAZ 2170
You will need : a 13mm wrench, a Phillips screwdriver and a clean rag.
Place the car on a viewing hole or lift. Make sure the engine is cool and there is no excess pressure in the engine cooling system. Procedure:
Unscrew the expansion tank cap. For convenience, it is recommended to remove the engine protection. Place a bucket under the engine and drain the coolant by unscrewing the drain plug on the cylinder block. Place a bucket under the radiator and drain the coolant by unscrewing the drain plug on the radiator. We tighten the plugs after all the coolant has drained out of the cooling system.
How to properly fill coolant into the Priora engine cooling system
Procedure:
To prevent air pockets from forming in the cooling system after filling the cooling system with liquid, you need to loosen the clamp and disconnect the hose from the throttle body heating fitting. Then fill the engine cooling system (fluids recommended by the manufacturer), pouring coolant into the expansion tank until until it begins to flow out of the hose disconnected from the throttle assembly. At this moment, install the hose in place and tighten the clamp securing it. Add coolant to the required level.
| The coolant of the Priora can be of the antifreeze type or the antifreeze type. It is recommended to change the first after 75 thousand km or once every 5 years, and the second after 40 thousand km or once every 2 years (whichever comes first). |
| For reference: the Lada Priora engine cooling system holds 7.84 liters of coolant. |