At the same time, it practically does not require complex equipment; there is no need to bore the block and do other things. At the same time, all work is carried out quite quickly and without any interference.
Features of the pillows used
There are several nuances that you should know about the supports in general, as well as about the engine mounts used on the VAZ 2109 model.
- When developing the design of supports that serve to reduce engine vibrations, manufacturers take into account the loads absorbed by the supports;
- These elements are under constant influence of loads, the magnitude of which varies;
- One constant load is the weight of the engine. But when the car starts, another load arises;
- When the car moves in reverse, the supports take on negative forces;
- When sharply accelerating or braking, when a wheel hits a pothole, or when hitting an obstacle, these same negative forces arise. The front, rear and side engine mounts are responsible for extinguishing them;
- To make cushions for the VAZ 2109, special natural rubber, high-grade SKI-3 rubber is used. In addition to rubber components, the supports include steel elements and heavy-duty adhesive;
- The VAZ 2109 engine mounts are capable of withstanding temperature loads in the range from -40 to +70 degrees Celsius.
In order for the pillows to meet all the requirements for them, experts recommend choosing products from the manufacturer or companies that were recommended by the VAZ 2109 manufacturer.
Characteristics of power units
The VAZ 2108 engine was developed specifically for the Sputnik family. It was assumed that it would become the basis for the development of subsequent power units for promising models of the Volzhsky Automobile Plant. However, immediately after launch into the series it became clear that it was too weak. Engine characteristics 2108:
- cylinder block - cast iron, in-line;
- number of cylinders - 4;
- cylinder diameter - 76 mm;
- piston stroke - 71 mm;
- Cylinder head - aluminum, 8-valve, with camshaft belt drive;
- engine capacity - 1.3 liters;
- power - 64 hp
With such a modest engine, the VAZ 2109 accelerated to 100 km/h in 16 seconds. The 21081 engine was similar to the base power unit, but it had a lower block, which is why the piston stroke was reduced to 60.6 mm. Accordingly, the working volume decreased to 1.1 liters, and the power dropped by as much as 10 hp.
After failure with the first power units, the designers created a new engine under the symbol 21083. It had a modified cylinder block with a new connecting rod and piston group. Here are its characteristics:
- cylinder block - cast iron, in-line;
- number of cylinders - 4;
- cylinder diameter - 82 mm;
- piston stroke - 71 mm;
- Cylinder head - aluminum, 8-valve, with timing belt drive;
- engine capacity - 1.5 liters;
- power - 69 hp
Despite the fact that the power of the new power unit increased by only 7.5%, torque increased by 12.5%, which improved acceleration dynamics by 1 second and brought the maximum speed of the hatchback to 155 km/h.
In the early 90s of the last century, a small modernization of the 21083 engine was carried out, during which a modified cylinder head was installed on the previous block and an injector was installed. The upgraded engine was assigned the index 2111-80. Due to the installation of the injector, the number of horsepower increased to 72, and the torque increased by 12% and amounted to 118 Nm. Thanks to this, the car's speed exceeded 160 km/h, and acceleration to hundreds took only 14 seconds. Since 2006, the VAZ 2109 has been equipped with an engine from Kalina, which has the following characteristics:
- cylinder block - cast iron, in-line;
- number of cylinders - 4;
- cylinder diameter - 82 mm;
- piston stroke - 75.6 mm;
- Cylinder head - aluminum, 8-valve, with timing belt drive;
- engine capacity - 1.6 liters;
- power - 81 hp
What to put?
Indeed, the most important issue among VAZ 2109 owners is the range of engines that may be under the hood of their car.
Let's look at several popular solutions that are most often found among those who decide to change the engine on their VAZ 2109.
| Option | Peculiarities |
| 16-valve cylinder head | Gas is a cheaper alternative to gasoline, which will allow you to save big in the future at gas stations. This replacement is called the easiest. But you should take into account the fact that such a replacement will pay off only if the car is used frequently, and you will have a gas cylinder in the trunk. Such work can only be done by specialists with appropriate qualifications and permits. |
| VAZ injector 1.5 liters | A good alternative that will allow you to extract more power from your improved car. The injector is more powerful, it requires less fuel, and provides better dynamics. But in practice, changing engines from VAZ to VAZ is not the best solution, since there are many options among more reliable, powerful imported cars |
| Engines from Priora and VAZ 2112 | Not bad domestic options that will easily fit into the space for the engine of your nine. Good output, excellent opportunity to transfer not only the engine, but also the gearbox itself |
| 1.5 liter engine from Honda Civic | Here we are talking about 1.5-liter engines with a capacity of 92 horsepower of the 1991-1995 model. Injection engines of that generation perfectly fit the dimensions of the engine compartment of the VAZ 2109 and have good technical characteristics. A kind of improved variation of the previous version |
| Engines from Opel | Vectra engines of 1.4, 1.6 and 1.8 liters have proven themselves well. The engines, although old, are playful, quite powerful, and relatively economical. Their main advantage is their affordable price with good build quality. If you find a decent German engine of any of the presented volumes, your VAZ 2109 will perform significantly better compared to the factory engine |
| Motors from Mitsubishi Lancer | 1.5-liter injection engines with a power of up to 100 horsepower are to the taste of many. Good dynamics, good assembly, pleasant economy. Finding such a motor is not very easy, but there shouldn’t be any big problems either. |
| An attractive replacement option that allows you to get a high-spirited, interesting, reliable Korean engine. The only important nuance is that the box from the nine does not match the features of the engine from the Korean, so you will have to change everything together | |
| VW Passat or Golf | Excellent reliability, amazing engine life, despite their age. You won’t be able to install engines from the latest versions of these German cars, because then you’ll have to redo literally everything. But engines from the 90s will take your VAZ 2109 on board very well |
| Another example of the excellent German quality of the engine that can be installed on the nine. In many ways it is similar to engines from Volkswagen and Opel in terms of characteristics, dynamics, and efficiency. It’s not difficult to find, but try to choose a motor with minimal mileage. This way you will ensure a long and carefree life for your car. | |
| Engines from FIAT | You should choose engines up to 2.0 liters. The best option is a 1.6-liter engine with 16 valves and a power of 90 horsepower. You will find such engines on the Doblo model. There are quite a lot of them at car wrecking yards, so there shouldn’t be any problems finding them. |
| Torquey, quite powerful, dynamic engine with a good margin of safety. A good solution for our roads. Japanese quality is not much inferior to the presented analogues from Germany. At one time, engines for the 626 model received many positive reviews, which is why their installation on the VAZ 2109 is recommended by many experts |
Replacing a motor is a complex operation that requires the participation of an experienced specialist. It is strongly not recommended to change the engine yourself in a garage environment.
Why install a new power unit?
Installing a new engine can be useful for those motorists who want to improve their outdated car. Many domestic car enthusiasts know that the “nine” has pretty good driving characteristics, requires little gasoline and is generally not as demanding to maintain as foreign cars, which is why it is often tuned. Replacing an engine from an 8 cl to a more advanced model has its advantages:
- Increased power.
- Improved driving characteristics at high speeds.
- Efficient use of fuel due to the injection system.
- More stable operation of the power unit.
- No constant valve adjustment required.
But there are also disadvantages:
- You need a lot of parts and tools to replace them in your garage.
- At low speeds the 16 cl engine is slightly worse than its 8 valve counterpart.
There are two replacement options here:
- Installation of the entire engine from the 2112 model. In this case, not many parts will need to be replaced, but the cost of the entire engine may discourage this idea.
- Modification of the cylinder head for new components. This is a more economical, but very labor-intensive process.
Decoding of the index in the name of the AvtoVAZ engine
At first, the internal combustion engine index was tied to the car model on which it first appeared.
Now the concern has formed a unique system for naming its units:
First two digits
11 or 21 means the number of the workshop where their assembly was established
Third digit
here it acts as a separator and for now it is always equal to one
Fourth digit
indicates the number of valves: 1 and 8 are 8v, and 2, 7 and 9 are 16v
Fifth digit
reports the position of the internal combustion engine in the series and the larger it is, the newer the engine
You can contact the site administrator by email
All texts were written by me, are authored by Google, included in the original Yandex texts and notarized. For any borrowing, we immediately write an official letter on company letterhead in support of search networks, your hosting and domain registrar.
Next we go to court. Don’t try your luck, we have more than thirty successful Internet projects and have already won a dozen lawsuits.
Source
VAZ 2109
Basic faults
Almost all VAZ 2109 engine failures, no matter what type it is, are associated with malfunctions of 3 systems:
- Lubrication systems.
- Cooling systems.
- Gas distribution systems.
In cases where the lubrication system is faulty, the engine oil does not lubricate the rubbing parts well, which causes them to wear out quickly, scuffs appear on their surfaces and a knocking noise occurs in the engine. Any knocking noise in the VAZ 2109 engine is a very bad sign, especially when it comes from below. If the main or connecting rod bearings are knocking, you must immediately stop and go to the service station in tow, since otherwise the engine may simply jam. If the source of the knock is located in the cylinder head, then you can go to the service center yourself, at low speeds.
If the cooling system malfunctions, the power unit overheats, as a result of which the cylinder head gasket and valves burn out, the cylinder head becomes bent and the piston rings become stuck. If there is severe overheating, the block may simply jam. The main malfunction of the timing mechanism is a broken drive belt. Since on 1.1- and 1.3-liter engines a broken timing belt leads to bending of the valves and major repairs of the head, it needs to be changed every 30-60 thousand kilometers, regardless of the condition. This repair is very simple:
- First, the engine protection is unscrewed.
- Then the alternator belt is removed.
- After this, 3 bolts are unscrewed and the front timing drive cover is removed.
- Next, the mark on the camshaft pulley is aligned with the mark on the rear drive cover.
- After this, the nut is unscrewed and the crankshaft pulley is removed.
- Then the nut securing the tension roller is loosened. It is moved to the side, and the toothed drive belt is carefully removed first from the camshaft pulley, and then from all other pulleys.
- The new belt is placed first on the crankshaft sprocket, then on the camshaft pulley, and only then on the pump gear and tension roller.
- After this, the crankshaft pulley is screwed on and the belt is tensioned by turning the roller and tightening its nut.
Standard tuning of the VAZ 2109 carburetor power unit involves installing an injector. And on injection engines you can install lightweight connecting rods, pistons and a crankshaft with a flywheel.
Characteristics of the base engine for the VAZ 2108
The front-wheel drive hatchback of the Volzhsky Automobile Plant had three doors, and with a total length barely exceeding 4 m (4006 mm), the weight of the car was only 915 kg. Given such technical characteristics and weight, the car could easily be accelerated by any engine. Over the long history of the car, several engines were installed on the VAZ 2108 model. Among the power units one could see:
Characteristics of motors for the G8
- derated 1.1 liter gasoline unit with a manual transmission with 4 gears;
- 1.3-liter engine, which was installed as the base power unit;
- the 1.5 liter engine had a carburetor version and a modification with an injector; a car with such an engine worked only in combination with a 5-speed manual transmission;
- as experimental models, the G8 was equipped with a 1.6 liter and 1.5 liter engine with a 16-valve gas distribution mechanism; These types of engines were transitional and subsequently began to be actively used on the VAZ 2110, Priora and other cars in the AvtoVAZ concern line.
A modification of model 2108 with a 1.1 liter engine was produced only at first, and subsequently became less and less common. The remaining engines appeared in the technical indicators of the car throughout the production of 2108. Engine 1300 cm³, technical data:
- type - gasoline, 4-cylinder;
- number of valves per cylinder - 2;
- compression ratio - 9.9;
- type of power system - carburetor;
- fuel used - AI-92;
- assembled engine weight - 127 kg;
- power - 64 l. With. at 5600 rpm;
- torque - 94 Nm at 3500 rpm.
The engine could confidently accelerate the car to 100-120 km/h with a maximum speed of 160. However, due to the low torque, when the weight of the 2108 increased, or when driving uphill, it “soured” very quickly, forcing it to switch to a lower gear. The 100 km/h mark was reached in 16 seconds. Engine 1500 cm³ (carburetor), technical data:
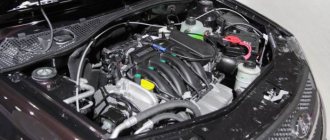
Under the hood of a car
- type - gasoline, 4-cylinder;
- number of valves per cylinder - 2;
- compression ratio - 9.9;
- fuel used - AI-92;
- power - 70 l. With. at 5600 rpm;
- torque - 106.4 Nm at 3500 rpm.
The VAZ 21083 model with a 1.5-liter engine was able to maintain “cruising” speed in fifth gear, which immediately affected fuel consumption. The car consumed up to 6 liters per 100 km, and in practice this was even more noticeable. After all, the driver could not spin the engine as much as the 1.3 liter engine required. Motor 1500 cm³ (injector), technical data:
- power - 78 l. With. at 5400 rpm;
- torque - 115 Nm at 3000 rpm.
The VAZ 21083 engine with direct injection not only made it possible to further increase power and torque, which was reflected in the traction and dynamic performance of the car. But the engine has also become a little more economical, but at the same time the emission of harmful substances into the atmosphere has decreased. The weight of the power unit, in comparison with the base one, does not differ significantly.
VAZ-2108 tuning
Preparation
At the preparatory stage, short but very important, it is worth completely de-energizing the car by disconnecting the battery. You also need to remove all hoses, speed and clutch sensors. Be sure to drain the oil from the engine crankcase and the liquid that cools the radiator. Removing the engine without removing the gearbox:
- first of all, you need to put a reliable support under the car, preferably wooden stumps;
- unscrew the left crab, move the stretcher to the side;
- remove the generator from the engine;
- remove the tensioner pin, pump, distributor and receiving pipe;
- do not forget to remove the head if you are planning a major overhaul;
- the motor must be removed from the box and lowered to the floor;
- in order to get the engine, you need to raise the front part higher (this is done using a jack);
- you can also just pull everything through the top.
We recommend: Window regulators for the VAZ 2107: diagram, design, repair, electrical installation, how to remove and install the mechanism, cable, handle, instructions How to remove the motor from the gearbox:
- The first thing you need to do is turn off the power to the car. To do this, disconnect the battery. It’s easy to check the lack of current, try turning on the wipers;
- Drain the oil from the engine crankcase. A warm engine will speed up the process;
- drain the coolant from the cooling system, here you need a cold engine;
- get rid of the engine crankcase and exhaust pipe protection;
- carefully disconnect all hoses;
- Next, you need to unscrew the ground wire fastening nut. Next, you can safely turn off the thermostat;
- disconnect the central high voltage from the ignition distributor. To do this, you need to release the pad lock and remove it;
- remove the drive cable from the clutch lever;
- next, you should disconnect the starter supply wires;
- turn off the generator;
- disconnect the wires from the coolant temperature and oil pressure sensors;
- further work will take place under the car. To make it as comfortable and safe as possible, it is worth acquiring an overpass;
- At this stage, unscrew the drive rod mounting nuts. Disconnect the speedometer drive rod, disconnect the power wires;
- disconnect the two braces, tie rods and ball joint from the lever;
- Move the upper tail of the drive a little and push it out with a pry bar. Insert the technological plug into the vacant space;
- Next comes the stage of dismantling the engine. We fix it with a strong rope using the eyelets (rings). It doesn't hurt if you take the time to check their strength first;
- It is best to remove it through the top, but you can also get it through the bottom. Then lower the engine to the floor and lift the front of the car using a jack;
- After you have secured the engine with ropes, you can reach it through the top.
Remember that you need to act extremely carefully so as not to lose the motor, scratch the body, or damage parts. As you can see, the process is very complex. Successful dismantling is possible only if all points of the instructions are followed, you have deep knowledge, extreme caution and no haste.
We install the finished engine
We put the 2112 engine on the “nine”, since the power units of the models are similar to each other. You will also need a fuel pipe of a suitable diameter (you can take a steel one, but copper is better) and a gas tank from the same 12th model. The following work is carried out:
- We dismantle the old power unit, disconnect all pipes and electronics. In order to remove and install the engine, a crane is needed for convenience, since the entire assembly is heavy. This is a major problem in the garage.
- When the engine is removed, you can install a new one in the seat. It is worth immediately checking the condition of the seals and gaskets if the unit is used. Also check the belt tension.
- Next you need to replace the entire fuel system: tank, fuel pump, fuel lines.
- An excellent replacement for the “nine” tank is the analogue from 2112. The parts are the same in size, but their design is different, which is not an obstacle to installation.
- For fuel lines you need to take copper tubes, which bend better.
- Now you can start wiring the injector. If the “nine” was produced in 2002 and younger, then there will be no special problems with connecting the wires, but for older models you will have to make new holes manually.
- You need to install an absorber and a gasoline filter. They are usually placed under the bottom and secured with studs.
- We install the sensors, change the wiring to one that is suitable in length.
- Installing the generator will have to work hard, since the original mounts do not fit. Find suitable ones, replace them and you can install them. If the gearbox is not changed, then it will have to be sharpened with a grinder.
- The starter will have to change the bendix from 12 to 9 teeth.
- The last modification is the exhaust system. The pipes will not fit, so they will need to be welded. Fitting helps put all the parts in place.
Online calculator
The volume of a cylinder can be calculated using:
- base radius and height, with the height equal to the piston stroke;
- base area and height.
But there are also more complex calculators with an expanded range of functions. They allow you to calculate not only engine volume, but also the compression ratio. For calculations, the values of the following parameters are required:
- connecting rod length;
- piston stroke;
- piston under-return;
- cylinder diameter;
- piston chamber volume;
- thickness and diameter of the gasket;
- chamber volume in the cylinder head;
- number of cylinders.
Before calculating the volume of a cylinder or the entire engine, or calculating the compression level, you should clarify and record all of the above parameters. Beginners may have difficulty with this, so they will have to be persistent.
Installation of a 16 valve engine on a VAZ 2109. More power my lord
- Installation of the whole unit;
- Replacing the cylinder head.
- First, the old motor is dismantled, here everything happens according to the usual scheme;
- We are preparing the new engine for installation. To do this, you need to replace all consumables. Usually they change seals, gaskets, belts;
- The power unit is put in place and attached to the pillows;
- They installed a tank from 2112. It fits perfectly. The difference is in the design of the fuel pump and the presence of sensors. If you don’t have such a tank at hand, you can leave your original one. But you will have to install an external fuel pump from the Volga;
- The next step is to install the fuel line. It is best to use copper tubing. It's more flexible. If you decide to install steel, then heat it on fire before fitting. This will allow you to bend it as needed without any problems;
- Wiring is being installed. On cars younger than 2002, no modifications will have to be made. There is already a hole for the wires coming from the injector, as well as other elements necessary for fastening. If the car is older, you will have to cut the hole yourself. Studs are placed under the bottom for attaching the absorber and gasoline filter;
- The wiring will have to be redone. Some sensors have short wires. In this case, we lengthen them;
- To install the generator you will have to buy new mountings, otherwise you will not be able to install it;
- The box won't fit a little. You need to try it on and grind off the extra corners with a grinder. It's a matter of a couple of minutes;
- The starter installed on 2109 has 11 teeth, it will not converge with the flywheel. Therefore, replace the bendix, take one with 9 teeth;
- The exhaust system will also have to be overhauled and adjusted.
- First, the engine is removed from the car and disassembled. To do this, remove the cylinder head, pan, dismantle the pistons;
- New pistons from 2112 are installed. They have more reinforced connecting rods, and they also have recesses for the valves;
- Replace the fuel pump;
- Shorten the cylinder head mounting bolts. 12 holes are drilled in the new cylinder head;
- A hole of 8 is drilled in the block and a thread is cut for the knock sensor;
- They install a pump from 2112, at the same time install a thermostat from “Samara”;
- Change the breather;
- All that remains is to assemble the entire body kit for the engine, install the wiring and configure the unit.
Engine
Installation of a 16 valve engine on a VAZ 2109 can be done in 2 ways. Each has its own pros and cons. Therefore, you can choose one of these methods:
- Installation of the whole unit;
- Replacing the cylinder head.
The final choice depends on your goals and capabilities.
If you have a complete and serviceable engine, you can install it. Otherwise, when buying parts from scratch, it is better to install a new head. Article on the topic “Which engine is better, 8 or 16 valves.” To remake your "nine" it is best to use a motor from a VAZ 2112
. They are almost identical. The differences are only in small details. But these nuances are precisely what make this engine more modern. What is important for you is that this engine fits perfectly into the mounts. In this case, you can even use the original box and clutch basket. Next, we will analyze these methods in more detail.
What influences the replacement
There are two main factors that force motorists to replace airbags.
- Natural wear and tear. Each pillow has its own service life, exceeding which is very rare. Often they don’t work it out for the second reason.
- Mechanical impacts leading to breakdowns. These are our roads, potholes, accidents, collisions with manholes, etc.
When replacement is required
There are several factors you should know about replacing engine components.
| Situation | Peculiarities |
| Body vibration | If you feel vibration in the body, you should definitely check the condition of the supports. This effect can be caused by various reasons, but pillows are one of the main |
| Replacing the timing belt | When replacing a belt, removing its cover can be very difficult, since the engine is almost tightly pressed to the right mudguard of the front wheel. You have to remove the pillow in order to fully carry out repairs. |
| The engine sags, loads the CV joints | Due to the impact of the engine weight on CV joints, their geometry changes, which leads to a significant reduction in the service life of the elements. The resource is reduced, it is necessary to carry out replacements ahead of schedule |
| There is a knocking noise in the backstage area | It may be barely noticeable. But its presence indicates that the engine has sagged. Consequently, the supports do not work properly and need to be replaced |
We recommend: High-quality batteries for cars and motorcycles
If you do not replace the supports in a timely manner, this will lead to more serious consequences and expensive repair of the breakdown. Therefore, it is better to replace the pillows when primary signs of wear are detected. To do this, we additionally recommend periodic inspection of the unit.
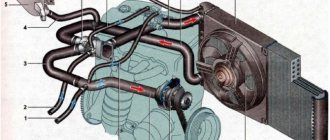
Removal and installation of the VAZ 2109 engine
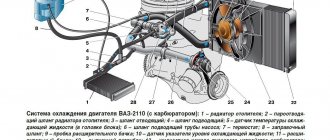
| Engine (top view): 1 — blocks with carburetor wires 2 — fuel return hose 3 — heater hoses 4 — vacuum booster hose 5 — fuel supply hose 6 — clutch cable tip 7 — ignition coil wire 8 — radiator hoses 9 — rod throttle valve 10 - air damper rod 11 - sensor wire for emergency oil pressure warning lamp |
| Engine (bottom view): 1 - generator 2 - right front support 3 - engine 4 - gearbox 5 - starter 6 - reverse light switch 7 - extension 8 - left front support 9 - left front wheel drive 10 - oil drain plug gearbox 11 — rear support 12 — gear shift rod 13 — oil sump 14 — right front wheel drive 15 — engine oil drain plug |
General information
Before removing the engine, disconnect the wire from the “-” terminal of the battery.
Drain:
coolant oil from the engine crankcase (see subsection 11.12.) oil from the gearbox (see subsection 11.12.).
Recommendations
Remove the engine and gearbox assembly.
When removing the engine, lower it down from the engine compartment.
It is more convenient to remove the engine by placing the car on a lift.
| EXECUTION ORDER Fill in: coolant; oil in the engine crankcase; oil into the gearbox.
| |||||
Installation of oil seals and oil pump
The 21083 engine lubrication system consists of an oil pump, oil receiver, filter and channels. After disassembling the engine, all channels must be washed with solvent and blown with compressed air. The oil pump should be installed together with the crankshaft seals, and the oil receiver should be installed after installing the ShPG and flywheel.
Installation procedure for seals and pump.
Using a thick copper or brass spacer and a hammer, drive the rear oil seal into the holder all the way. Using lithol or other grease, glue the gasket to the other side of the holder. Lubricate the inner edge of the rear oil seal and the crankshaft flange with engine oil.
We put the oil seal assembly with holder on the flange; to do this, carefully tuck the inner edge of the oil seal onto the flange using a sharp and soft wooden stick
Replacing the oil pump seal
- After this, we slowly move the holder along the flange all the way to the cylinder block, secure it with bolts and align it so that its edge completely coincides with the edge of the block. Only after this do we tighten all the bolts completely.
- Just like the rear one, we hammer the front crankshaft oil seal into the oil pump hole.
- Lubricate the inner edge of the oil seal and pump gears with oil. To ensure uniform lubrication, turn the gears with your finger.
- Use lithol or any other consistency to glue the gasket to the oil pump.
- We rotate the drive gear so that the protrusions on it coincide with the cuts on the front of the crankshaft.
- We put the oil pump on the shaft, use a sharp soft wooden stick to tuck the lip of the oil seal onto the crankshaft journal.
- Just like the holder, we move the oil pump all the way to the block, secure it with bolts, align the edges and tighten the bolts completely.
Replacement
Now we move on to replacing elements. Doing it yourself or contacting a car service is purely your personal decision.
For the VAZ 2109, the use of three supports is provided:
- Front;
- Rear;
- Left side.
The replacement of each of them should be discussed separately, since the processes differ from each other.
Replacing the rear cushion
- Find a suitable place to carry out repairs. You will need a pit or overpass.
- Place the car there, secure it with stops, and put the car on the handbrake.
- Disconnect the negative terminal from the car battery.
- Using a 17mm spanner, unscrew the nut that holds the cushion to the body.
- Using a 17 socket, remove the mounting nuts of the support bracket to the gearbox. There are 3 of them in total.
- Remove all the bolts and remove the old engine mount.
- Install a new motor element and reassemble the unit.
Dismantling works
Side left pillow
Left element
- Provide yourself with free access to the bottom of your VAZ 2109.
- Secure the vehicle with jack stands and the handbrake.
- Disconnect the minus from the battery.
- Remove the left engine splash guard.
- Using a 17mm spanner, remove the nut that holds the cushion to the body.
- Using a 17 socket, unscrew the 3 mounting nuts of the support bracket, removing them from the gearbox.
- After removing the mounting bolts, replace the worn engine mount with a new one.
- Carry out the reassembly procedure. Stick to strict consistency.
Replacing the front airbag
Here, follow all the same conditions that were relevant for previous works. That is, drive the car into a pit, place supports and turn off the power to the car by removing the negative terminal from the battery.
- Using a 17mm spanner, remove the nut holding the cushion to the body.
- Using a 17mm wrench, remove the 4 fastening nuts securing the airbag to the engine.
- Remove the rubber element from the eyelet.
- Place a new support in place of the old unit.
- Reassemble the unit.
When replacing engine mounts, be sure to make sure that the new mounts meet the quality and size requirements. It is also recommended to thoroughly clean the seats before installing a new element, which will extend the service life of the new motor mounts.
Replacement does not require special skills, special tools or special conditions. Therefore, VAZ 2109 owners often change the pillows with their own hands. But if you are not confident in your abilities, contact a trusted car service center.
Which of the VAZ 2109 airbags do you consider the most difficult to replace?
- Front support
- Back cushion
- Left (side) engine mount
- They are all very easy to change
Cylinder head modification
Installing a 16-valve engine on a VAZ 2109 will be much more difficult if you replace individual parts.
You will need:
- A 16-valve cylinder head with a corresponding receiver (the kit must include a manifold with a knock sensor, a throttle valve and a pressure switch);
- another fuel supply system: gas tank, fuel line, ramp with suitable injectors;
- electronics kit - wiring, controller;
- new sensors for thermostat, oil level, crankshaft position, phases;
- mechanics: thermostat, pulleys for the camshaft, pistons with finished rings and pins, connecting rods, pulley for the crankshaft;
- complete replacement of the exhaust system;
- power supply: generator with suitable tensioners, generator drive;
- other parts: throttle pipes, idle speed regulator, housing for the oil pump with a cast-in mounting location for the crankshaft sensor.
All parts must be suitable in power to work with a 16-valve engine and injection system. The kit is impressive, and there is even more work to complete the VAZ 2109 with 16 valves. Engine conversion begins:
- We dismantle the following elements: the old cylinder head, the gasoline tank, the fuel system pipes, the entire ignition along with the generator and thermostat. Remove all belts and pulleys.
- We install the tank and fuel pump first.
- You need to remove the carburetor and wiring and replace everything with new parts.
- We turn off the cooling, the system should be replaced with an analogue of the 2112 model.
- We remove the pallet. We replace the pistons and connecting rods of the “nine” with a set from the 12th VAZ.
- Let's start replacing the oil pump; it is advisable that the new one has a molding for the crankshaft position sensor.
- Let's prepare to install the 16-valve cylinder head. The mounting points match, but the bolts do not fit, they need to be made shorter. You also need to drill 12 mm holes if there are none.
- We replace all the fuel lines with new ones, then connect them to the tank. We connect the ECU to the fuel pump.
- We make holes in the block to install a new element: a knock sensor. You also need to cut an 8mm thread.
- We change the pump, crankcase ventilation breather and oil dipstick - all from 2112.
- We put a new cylinder head with 16 valves in the seat. If it does not fit tightly, you need to trim all the protrusions at the joints.
- The best replacement for the thermostat is a similar spare part from Lada Samara. We change.
- We install the cooling system pipes.
- Install the rear timing cover and rollers. We tighten the belt and pulleys from 2112.
- We install the generator and its drive in its place. To put the part in place, you will need a lower bracket, a generator mounting bolt and an upper tensioner, like the VAZ 2108. We do not touch the upper fastening, just tighten the two lower bolts.
- We put all the sensors in their places.
- You will also need a new thermostat sensor that works with the injection system.
- We put the valve cover in place and coat it well with sealant.
- We install the ignition. Next we work on the receiver, installing the corrugation and throttle.
- Install the air filter and throttle cable. The part from 2110 will fit.
- We install the exhaust elements.
- We connect the wires to the tidy and ignition switch.
- Fill in all liquids - antifreeze, oil, fuel.
The motor is ready for use.
It’s easier to install a power unit from a VAZ 2112. Of course, you will need a crane to pull out the engine itself, but this is nothing compared to the work that will have to be done to modify the “nine” unit.
Sources
- https://luxvaz.ru/vaz-2109/291-zamena-opory-dvigatelya.html
- https://expertVAZ.ru/2109/dvigatel-modifikacii.html
- https://expertVAZ.ru/2109/16-klapannyj-dvigatel.html
- https://ladaautos.ru/vaz-2109/kak-samomu-snyat-dvigatel-vaz-2109-karbyurator-inzhektor.html
- https://uaz-sura-motors.ru/diagnostika-i-remont/dvigatelya-2114.html
- https://CarManuals.ru/vaz/vaz-2109/dvigatel-i-ego-sistemy/snyatie-i-ustanovka-dvigatelya
- https://www.motors-vaz.ru/2109.html
How to remake: step-by-step instructions
Before starting work, wash the car thoroughly and remove dust and dirt from around the engine.
- In the rear of the car we remove the old carburetor fuel system.
- Pull out the gas tank and fuel pipes.
- We screw on the new bracket and use it to secure the new injection lines.
We install the bracket in its original place and secure the lines - We install the fuel filter along with hoses.
We fix the fuel filter with hoses - We attach the fuel pump to the injection gas tank.
- We go into the engine compartment and remove the ignition.
- We disconnect the wires that go from the sensors to the ignition braid.
- We pull out the old ignition tee and install an injection tee in its place. Before doing this, completely drain the antifreeze from the system.
We install the injection ignition tee in place of the carburetor - In place of the distributor, we make a plug with a seal and treat it with sealant.
- Remove the carburetor along with the intake manifold.
We dismantle the old carburetor along with the manifold - We replace the gasket and install a new injection manifold.
We install the injection manifold in place of the carburetor - We install the injectors on the ramp and secure it to the manifold.
- We connect the hoses and install the receiver.
We install the injection receiver and connect the hoses to it - If your model has an oil pump without a casting, then it also needs to be replaced.
- The generator on the nine must be replaced, but the pulley itself is suitable for the new system and can be left.
- Instead of a carburetor ignition cable, we install an ECU wiring cable.
- We connect the wiring to the controller and the motor.
- In our case, the fuel sensor will remain the same; you just need to connect it to the new pump.
- Turn on the ignition and check the operation of the fuel pump. The entire fuel system must be sealed and leak-free.
- We replace the carburetor module with an injection one.
We remove the carburetor ignition module and install the injection module in its place - We install a new ignition system (spark plugs and module).
- We install the air filter.
- Drill a hole for the knock sensor (depth 16 mm).
- We start the engine and check its operation.