A generator is needed to convert the mechanical energy of rotation of the engine crankshaft into electricity. The generator of the Lada Vesta car is an alternating current device that charges and replenishes the batteries.
If the generator produces more than 15 V, or less current, then in the first case this threatens to overload the on-board network. In the second case, the battery will constantly be discharged, since the generator will not charge it.
For the Lada Vesta, AvtoVAZ installs a bocsh brand generator - the part has proven itself well, even on previous models.
The power supply for all electrical devices of the Lada Vesta (from the on-board computer to the wipers) is located in the service area of this unit.
In order to ensure the operation of all electrical appliances and electronics of the car, you need to regularly take care of the current source, which means checking the generator on the Lada Vesta car. This must be done before winter. Read the article to the end and you will be in the topic of car electricity - you will be safe and the generator will never let you down. Find out from the article how to change this unit. Interchangeability of belts from other manufacturers. After how many km? the belt needs to be checked. Find out the differences between replacing a unit on a car without air conditioning. What role does the generator roller play and what should I do with it? You need to know the characteristics of the generator!
How many km does it take to replace the timing belt on a 16-valve Lada Largus?
The timing belt of the 16-valve Lada Largus must be changed on time. Thus, it is worth considering what the timing is according to the plant and the experience of motorists. There are different opinions, but it is worth considering real experience.
Factory replacement schedule
But since the Largus is equipped with a Renault engine, these data do not coincide with those written in the Renault service manual.
So, who to believe in this case? It is worth referring to the factory manual, which is published in French for the K4M engine that is installed on Largus.
A similar K4m engine is found in Renault Megane and Renault Logan
According to this document, the timing belt must be changed every 60 thousand km, regardless of condition
The adjustment is carried out, it is worth paying attention - no later than 15,000 km. That is, it can be carried out earlier
When is it better to change according to the experience of the owners
The valve rockers came off because the timing belt broke.
Having considered the information and experience of many owners of this car, we can say that there are quite a lot of cases when the belt fails ahead of schedule. This is due, first of all, to the quality of the spare part. So, a Bosch timing belt will last as long as the original one, or maybe even better.
Of course, it is worth noting that, although we do not always expect that we are buying a high-quality spare part, it lives up to expectations.
8 exhaust and 2 intake valves “bye-bye” as a result of a broken timing belt
So, a timing belt can fail at 30,000 km, and it’s good if this is discovered during adjustment, and not on the road, because then the owner will incur a large sum of money for repairs. Therefore, it is recommended to monitor the condition of the part regularly, or better yet, every 5,000 km. If cracks occur, replace the belt.
Possibilities for improvement
The only real modification, according to the experience of many motorists, is the installation of a sports-type timing belt and pulley. They have increased strength and resource. They are produced mainly by analogues from France, such as “FRW” and “FranceSport”.
The timing of replacing the timing belt for Lada Largus (16 valves) varies according to the service book and reality, but it is worth relying more on the experience of car enthusiasts than on data from the AvtoVAZ plant. Only they face this problem every day and know how to solve the issue.
Reasons for discharge
On the 2022 Vesta, released in the Luxury trim level, there is a factory mistake - self-discharge of the battery. The manufacturer himself points out this problem and recommends taking such actions. Swap certain contacts, which will automatically update the software version and reset all electronic unit errors. But it is better to entrust this procedure to specialists, especially if the car is still under warranty.
On other vehicle configurations, battery discharge is possible due to something else. For example, many owners, contrary to the ban, install high-power halogen lamps or simultaneously turn on fog lights with optics. The battery quickly loses capacity due to unnecessary additions.
Other common causes of discharge:
- crooked installation of electrical-related equipment;
- regular driving at speeds 1 and 2;
- frequent movement over short distances within 30 km - while using many electrical appliances at the same time (powerful acoustics, heated steering wheel and seats);
- cold weather and lack of thermal insulation of the car hood.
A low battery on a Lada Vesta can cause the doors to lock. They cannot be opened using the transmitter, but the manufacturer has taken this into account. You can also get into the cabin with a discharged battery. Here's what you need to do to do this:
- remove the decorative cap of the handle by prying it by the groove from below with some sharp object;
- clean any small debris that gets on the lock with a rag;
- lubricate the larva with a special penetrating compound - warm the lock in the cold or use thawing special means;
- open the door with the ignition key.
| Barabas | I installed a Vesta Red battery in my car. Starts without problems, even in severe frosts. Just what we need for our winter! It has never failed me yet, it works properly and the design is unusual. |
| Sasha Vad | I have negative experience using Westa RED batteries. It stayed with me for exactly 10 months (Lada Vesta car). I left for several months, the car was in the garage, and it was completely discharged. After charging it never came to life! The guys at the service station suggested that it was a calcium battery and when fully discharged it no longer worked. |
| Power | The Premium 6ST-65 battery from the Russian manufacturer Akom worked for exactly six months. It just suddenly stopped charging and barely got into the car. Most likely, there was a short circuit between the banks; on Monday I’ll go to the service center to swear. I do not advise anyone to buy this battery. |
| Evgeniy Serovich | The standard battery worked for me on Vesta for about 2.5 years, which is not bad in principle, since it is a budget option. Now Bosch has installed it. I took a little more power than it came from the factory, so that it would not run out longer in the winter. I am very pleased with the purchase, it starts with half a turn, even in the most severe frost. |
| Zheka | Install a Mutlu battery, purchased in 2022. No complaints, turns perfectly, does not boil, does not discharge. The Turkish manufacturer is more affordable in price than the European one, and much better than the Russian one. |
| Shroud | I purchased two Russian batteries. To be honest, I'm very disappointed in their quality. One died after a year, the second still works somehow, but you have to constantly remove and recharge. It’s better not to save money and buy a more expensive manufacturer, Volt or Bosch. |
| Andrey755 | Immediately after purchasing the car, I removed the factory battery, from a domestic manufacturer, and replaced it with a more expensive and high-quality Bosch battery. The factory one, yes, fits all the characteristics, but neither I nor my mechanic friend trust this battery. Moreover, they write about some problems with discharge. |
| VVA | Hi all! I personally took a Tyumen battery 60 for myself! Starts in any frost, no problem! I recommend to everyone! |
| Vazgen | To start the car in cold weather, you can’t even start it with a fully charged battery if your oil is too thick. In general, I believe that with the purchase of a battery, simple luck plays a big role. You can travel longer in a domestic car than in an imported one. |
| Kasper2506 | If there is a need to replace the battery, then select a battery so that the characteristics are not lower than those specified. You should not focus only on ampere hours, since products from different manufacturers with the same capacity can differ quite significantly in other parameters. When going to the store for a new battery, the selection procedure should be something like this: the polarity and size of the new and old batteries should match; as well as a unit of measurement of charge (in the old fashioned way called “capacity”). The amount of electricity that a battery is capable of delivering during a long-term discharge mode. We choose as recommended by the manufacturer (62 Ah). The capacity may be slightly higher than the nameplate. The starting current must be at least 600 A. This parameter is an indirect indicator of the quality of the car battery: the higher it is, the lower its internal resistance! In other words, the higher this parameter, the greater the chances of starting the engine in winter. |
| Boryan | There are a lot of negative reviews about West batteries. One gets the impression that they are not very suitable for this car. Immediately after the purchase, after reading dozens of reviews, I bought and installed a better battery. |
Other disadvantages of the model
The gasoline consumption of the Lada Largus is higher than that of the Kalina station wagon by 1.5 liters, with a weight difference of only 80 kg. Engine vibration occurs as soon as the tachometer needle reaches 1500 rpm. The rpm often jumps or drops to 500. When driving at a speed of more than 90 km/h, the ears begin to pop, like in an airplane during takeoff. This upsets many car enthusiasts, because at these moments they want to stop the trip and get out of the car.
The lack of rear mudguards is a big drawback of the presented model. Ball joints pressed into the arms will make it difficult to repair the suspension in the future. The gap between the fender and the front bumper must be covered with some kind of gasket to maintain cleanliness. Dirt constantly accumulates in this area.
Limited functionality as standard - no ABC or front windows. During rainy weather, the windows constantly fog up; in this case, they need special treatment. In winter, the accelerator pedal freezes, the interior warms up very slowly, and the engine cools down quickly. Pump malfunctions occur when the car's mileage is more than 30,000 km; there are no floor mats in the cabin.
Sources
- https://www.dvigokcomtrans.ru/avto/vaz/vaz_largus/
- https://lada-avtovaz.ru/remont-generatora-na-lada-granta/
- https://expertvaz.ru/lada-largus/problemy-minusy-nedostatki.html
Causes of failure - we make a diagnosis
Very often, owners of 99 VAZ are faced with the problem of poor engine performance, which can occur in both warm and cold seasons. One of the main reasons for this problem is malfunctions of the carburetor. The symptoms that arise during malfunctions are very easy to notice - the car does not start well, the speed on the tachometer fluctuates, unusual sounds in the form of pops can be heard from the exhaust pipe.
While driving, the VAZ 21099 may stall when changing gears. During acceleration or releasing the gas pedal, jerking and failures in operation are possible. Fuel consumption increases noticeably.
If you find problems with the operation of the VAZ 21099 carburetor, then in case of minor damage it can be repaired or replaced with a new one, if the problems are more serious. Repairing a carburetor is a delicate matter and requires experience in the work. For self-repair, you will need a standard set of tools and, preferably, a book on the maintenance and repair of this type of device.
Belts 4PK715, 4РК718, 6РК836
The first belt has a diameter of Ø715 mm – the designation is “4PK715”. This drive belt is suitable for Logan and Lada Largus without power steering and air conditioning.
The second one is slightly longer (see video), its length in diameter is Ø718 mm - the designation is “4РК718”. This type of drive is intended for Logan, Matis and Renault Sandero and also without power steering and air conditioning.
Alternator belt, size Ø836 mm. This type of strap is intended for Lada Largus without power steering. Its designation is “6РК836”.
Rubber drives for the models listed above are included without power steering and air conditioning.
On a Renault car with a D4F engine with air conditioning, the power steering has one 4PK715 belt. There are 2 belts installed, one for the power steering and the other for the generator.
Belts 5PK1110, 5РК1113
Then we will look at alternator belts for Renault Logan models with power steering, but without air conditioning.
The first rubber drive, its size Ø1110 mm - designation “5РК1110”. This belt, in my opinion, is installed only on Renault Logan.
The second rubber drive, size Ø1113 mm – designation “5РК1113” is intended for Logan and Lada Largus.
The difference between these straps is only 3 mm and my subjective opinion is that they are interchangeable if necessary. The stroke of the tension roller should, in theory, compensate for this difference in length.
Belt 5PK1750 until 2010
In front of us on the hood of the car is the Logan air conditioning drive and power steering.
The first drive has a size of Ø1750 mm - designation “5РК 1750 250”. This is a strap from the famous one.
This size is suitable for vehicles with 8-valve engines assembled at the factory before September 2009.
The second rubber drive (see video), similar in size to the well-known one. But the thickness of the straps differs slightly. The rubber drive from is slightly thinner in thickness than the first drive from, and all other dimensions are the same.
My car has just this type of drive, since the package includes air conditioning and power steering, but the length does not fit.
For your information, my LoganMachine was produced at the AutoFramus plant in 2012.
Next, dear, let’s look...
As you can see, there are many different types of Logan alternator belts with different designations and it takes a long time to understand them. I think you need to select the belt that is needed specifically for your car model on the spot by opening the hood of the car.
However, there are some nuances. So, I checked on my car and the type of belt “5РК1750 250” from - really does not fit the width and year of manufacture of the car. As I wrote above, this size is suitable for cars with 8-valve engines manufactured before September 2009.
On my car, the “original” strap is about 3 mm wider.
I will have to determine which type of belt is intended specifically for my Renault model with a 16-valve engine and automatic transmission.
Let's go back to my Logan car, equipped with air conditioning and power steering.
Questions
Is it suitable for Vesta SV cross 1.8 via LIN bus? Error U0120 will not appear?
Do I need to change the wires or is it enough to replace the original 60A fuses with new 100A ones?
Suitable for West We Cross 1.8?
Andrey Valentinovich Volodin
Is it planned to produce 200A generators for the Patriot?
I bought a 200 amp generator; the box says 200 amps, but the generator should say 200 amps.
Good afternoon I am interested in the generator, article number lg 0181. It is possible to send detailed specifications by email, I am especially interested in the output power at various speeds. Thanks in advance!
At what speed is the power of 200A achieved? And how many amperes does it produce at idle? On your generator? And is it possible to increase the voltage with the regulator?
Hello! What current does this generator produce at idle, with the engine warm?
Good afternoon, is there a graph for this generator with ampere output at rpm?
Hello! I have a question about 200a generators. Are there power graphs? I just can’t understand, the generator is 200 and in the kit there is a pre-100))) And another thing that generally interests me is powerful generators on an ongoing basis. I am engaged in the professional installation of car audio and additional equipment in cars, high-power generators are very necessary in this area)))) Well, if you send me a wholesale price list, it will be absolutely great! Thank you, I'll wait for your answer
Source
Snapshot53252323
Marking of the drive belt for auxiliary units 6РК 995 (six-V-ribbed, length - 995 mm).
Marking of the drive belt for auxiliary units 6РК 995 (six-V-ribbed, length - 995 mm). In order to improve visual control, remove the plastic engine casing. To check the condition of the belt, engage fifth gear in a manual transmission, push the car (or rotate the suspended wheel) and inspect the belt along its entire length. On a car with an automatic transmission, remove the right mudguard of the engine compartment and, by rotating the crankshaft by the bolt of the auxiliary drive pulley, check the condition of the belt.
With any of the gearboxes, the following method is also possible: apply chalk marks to sections of the belt and, turning on the starter for short periods of time, turn the crankshaft at small angles. We inspect the belt along its entire length, checking the areas covered by the marks.
The belt should not have cracks, tears or separation of rubber from the fabric base. A defective belt must be replaced. To do this, from the engine compartment side...
Replacing the generator on a VAZ-2104-2107
A car generator is designed to generate electrical energy and power the vehicle's on-board circuit. It is driven by transmitting torque to its pulley from the engine crankshaft pulley. The generator structure consists of a stator, a rotor, a cover and a rectifier that converts alternating current into direct current.
VAZ 2107 is equipped with alternating current generators models 372.3701 or 9412.3701.
Malfunctions
The main malfunctions of the VAZ 2107 generator include:
- brush wear;
- failure of the diode bridge (rectifier unit);
- failure of rotor bearings;
- short circuit in the excitation winding;
- break or short circuit in the stator winding.
Signs of a faulty generator are:
- no indicator light on the dashboard comes on;
- the voltmeter needle is in the red zone;
- sparking inside the generator;
- noise during operation (hum or howl);
- smoke and burning smell coming from the generator.
Do I need to change the generator?
It is quite difficult to determine the cause of generator failure without having a clue about electrical engineering, so in order to repair it, it is better to contact specialists. Most often, in VAZ 2107 cars, the generator fails due to brush wear, which occurs due to an expended resource or mechanical damage to the commutator. In addition, a short circuit or open circuit in the rectifier often occurs, which is “treated” by replacing the diode bridge.
The hum or howl of the generator indicates bearing failure, which can also be repaired. But if suddenly a short circuit occurs in one of the windings, you will have to either negotiate with home-grown specialists about winding a new winding, which is quite risky, or replace the generator with a new one. The last option would be most appropriate here, especially if it also comes with a guarantee.
Price
A new generator, depending on the model and manufacturer, can cost from 2800 to 5000 rubles. Replacing it at a service station will cost about 500 rubles.
The catalog number of the standard VAZ generator for the “seven” is 21083701010.
Replacing a VAZ 2107 generator with your own hands
If you don’t want to overpay for the work of installing a new generator, you can install it yourself, especially since there is nothing complicated in this procedure.
Required tools:
- a socket wrench with a “cardan” for 17 (for models 372.3701) or the same for 13 (for models 9412.3701);
- socket wrench 19;
- 10mm socket wrench.
Work order
- Place the car on an overpass or car inspection pit and secure it with the parking brake.
- Raise the hood, disconnect the ground wire from the battery.
- For easy access to the generator mounts, remove the battery using a 10 mm wrench;
- Using a 17 or 13 socket wrench (depending on the model), unscrew the nut securing the generator to the adjusting bar.
- Go down into the inspection hole and remove the engine protection.
- Remove the alternator belt from its pulley.
- Disconnect the wire block from the generator contacts.
- Move aside the rubber protective cap and, using a 10mm wrench, unscrew the nut securing the ends of the electrical wires to the “positive” terminal of the generator connected to the corresponding battery terminal.
- Using a 19mm socket wrench, unscrew the nut securing the generator stator to the cylinder block bracket.
- Remove the retaining bolt and remove the generator from the bottom of the engine compartment.
- Install the new generator in place.
- Place the belt on its pulley, as well as on the water pump and crankshaft pulleys.
- Secure the generator and attach the engine protection.
Conclusion
But the installation of the new generator is not completed yet.
It is important to properly tension the belt here. If its tension is weak, the belt will slip, especially in high humidity. This is fraught with its rapid wear, as well as problems with the performance of the water pump.
If the belt is overtightened, it will damage the generator and pump bearings. Adjustment is carried out by rotating the nut on the adjustment bar.
This is fraught with its rapid wear, as well as problems with the performance of the water pump. If the belt is overtightened, it will damage the generator and pump bearings. Adjustment is carried out by rotating the nut on the adjustment bar.
To determine the correct tension, use a screwdriver or other object to press a section of the belt between the water pump and crankshaft pulleys. The deflection should be 12-17 mm. Then recheck the area between the pump and generator pulleys. Here the deflection should be within 10-15 mm.
If everything is correct with tension, start the engine and check the operation of the generator.
mylada.net
Diagnostics
In the case of scheduled maintenance according to the regulations established by the Togliatti automaker, as well as upon contact when signs of a malfunction of the generator drive and/or timing belt appear, first of all, diagnostics are carried out by the technicians.
The conversation is primarily about visual inspection. The engine is checked for traces of leakage of certain fluids, especially engine oil, and the condition of the generator drive is assessed (in some cases, additionally the drives of the power steering pump and air conditioning compressor). To check the condition of the timing belt, it is necessary to partially disassemble the engine
Attention is drawn to the presence of traces of deformation, various liquids, damage
The regulations indicate that it is necessary to check not only the condition of the belts, but also the degree of their tension. For this purpose, our specialists use instrumental diagnostics. Depending on the situation and type of belt, mechanical devices are used (their operation is based on the principle of a dynamometer; the force applied to bend and retract the belt is measured and compared with factory parameters) and electronic (high-frequency sounds are measured). The experience and skills of the craftsmen make it possible, if necessary, to use traditional methods of visual assessment of the degree of belt tension.
Price list for spare parts from 05/18/2020
Watch on the website Online
Reasons for reducing the service life of equipment
- Violation of operating conditions for Lada Largus;
- Failure to comply with scheduled technical inspection deadlines;
- Refueling with low-quality fuel;
- Installation of non-original parts;
- Violation of installation technology;
- Defective parts during manufacturing;
- Damage due to an accident, collision, impact;
- Incorrect operation of the firmware of the electronic control unit.
Preparatory work
If you forgot when you changed the timing belt on the Largus (16 valves), it’s better to carry out the repair. If you do not want to make the replacement yourself, contact a service station. To repair on your own, you will need to do the following preparatory work:
- Disconnect the negative wire from the battery. This will ensure that your vehicle is fully powered.
- Disconnect the inlet pipe, and then remove the drive belt of the generator and other auxiliary mechanisms.
- The support on the right side of the engine will interfere with you, so it must be removed.
- The protection cover consists of lower and upper halves. They must be removed by unscrewing the mounting bolts.
That's all, the preparatory work is finished. You can begin replacing the timing belt on the Largus (16 valves).
Tips for replacing bearings on a VAZ 2110 generator
After identifying the malfunction, you can proceed directly to work. All that is required is to figure out how to change the bearing on a VAZ 2110 generator, where to start and in what sequence to carry out all the manipulations.
Let's consider the algorithm of actions in more detail:
1. Slightly loosen the fastening nut installed on the generator and the special adjusting bolt.
2. Reset the alternator belt and start the engine. This is done to make sure that the problem is really with the generator. If the noise has disappeared, then you can safely continue disassembly.
3. Go to the battery and remove the “minus” from it
This precaution is very important in terms of protection against accidental short circuits during work. After which you can unscrew all the wires that go to the generator.. 4
We unscrew the crankcase protection bolts, if any, and remove it, unscrew the lower fasteners of the generator and the device itself. At the same time, remove the generator from the bottom of the engine compartment.
4. Unscrew the crankcase protection bolts, if any, and remove it, unscrew the lower fasteners of the generator and the device itself. At the same time, remove the generator from the bottom of the engine compartment.
5. Block the generator rotor with a screwdriver or other device and unscrew the pulley.
6. Find the special latches, pull them to the sides and remove the housing.
7. Unscrew the generator brushes and the four bolts of the generator assembly halves.
8. Don’t forget that you still have to put the device back together, so to avoid confusion, immediately make marks on the two halves. After this, pry up the cover using a screwdriver and remove it.
9. As a rule, it is much more convenient to remove the rotor from the front cover bearing by screwing the nut into place on the threaded part of the rotor and hitting it with a bronze or copper hammer, or a regular one, but only through some kind of wooden block.
11. Select the necessary part that will fit the diameter of the bearing. In our case, you can take the head at “27”
Now gently tap the device and knock the bearing out of its place.
12. Remove new bearings and prepare them for installation. In particular, the first thing to do is fill them with the required amount of lubricant.
13. Install the new bearing using the old part; to do this, simply place the dismantled bearing on top. And lightly press the bearing into place.
14. You can remove the rear bearing using a puller, if available; if not, you will have to knock it down with a chisel (you can use a thin metal rod or a powerful screwdriver) and hit the device with a hammer, constantly moving it along the surface (you need to move in the opposite direction) . By the way, you can also dismantle the bearing using a powerful open-end wrench.
15. The next step is to drive the new device using the head mentioned above and the old bearing. In addition, to solve this problem you can use a special tubular wrench or a pipe with the required diameter.
16. Once all the bearings have been changed, you can proceed directly to assembling the unit.
17. Return everything to its place in the reverse order of dismantling. In this case, start working directly from the front cover of the device. After this, you can complete the assembly.
Replacing the bearings of a VAZ 2110 generator yourself is the best way to fix the problem and save on visiting expensive service stations.
In this case, the work will not cause any difficulties. The main thing is to be well prepared for work, namely, briefly familiarize yourself with the design of the generator, study the replacement instructions, buy original bearings and good lubricant, prepare the necessary tools and allocate only 40-60 minutes of your precious time.
If everything is done correctly, the extraneous noise will disappear, and the generator itself will continue to successfully perform the task assigned to it. Good luck on the roads and of course no breakdowns.
Features of service provision
Before talking about the services we offer and their relevance, you should pay attention to the design features of the engines installed on this station wagon, its pseudo-off-road version and van. There are four in total
Initially, the model, which is essentially a modernized version of the Dacia/Renault Logan MCV of the first generation, was equipped with engines installed on Renault Largus cars. It received K4M and K7M gasoline engines, both in-line “fours”, the first has 16 valves, the second has 8 valves. A further development of the model was the installation of motors of our own production, adapted for French gearboxes. The K7M engine was replaced by the VAZ 11189 (a slightly modified version of the VAZ 11186); this power unit is not found anywhere else on other Togliatti-assembled models. The K4M was replaced in 2022 by the VAZ 21129 (a modernized version of the VAZ 21127 brought into compliance with Euro5 environmental standards), this engine is also installed on the Lada Vesta and Lada X-Ray
There are four of them in total. Initially, the model, which is essentially a modernized version of the Dacia/Renault Logan MCV of the first generation, was equipped with engines installed on Renault Largus cars. It received K4M and K7M gasoline engines, both in-line “fours”, the first has 16 valves, the second has 8 valves. A further development of the model was the installation of motors of our own production, adapted for French gearboxes. The K7M engine was replaced by the VAZ 11189 (a slightly modified version of the VAZ 11186); this power unit is not found anywhere else on other Togliatti-assembled models. The K4M was replaced in 2022 by the VAZ 21129 (a modernized version of the VAZ 21127 brought into compliance with Euro5 environmental standards), this engine is also installed on the Lada Vesta and Lada X-Ray.
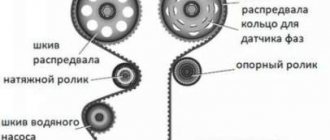
On the timing belt of all Lada Largus engines there is a belt, or rather a timing belt of the Lada Largus, there are toothed pulleys for the crankshaft, camshaft (if there are 16 valves, then there are two pulleys, according to the number of camshafts, that is, one pulley for the intake camshaft, the second for the exhaust), water pump . A Largus timing tension roller is also used (if there are 16 valves, then the tension roller tensions the belt, and a second Largus timing support roller is also used).
Our specialists carry out both replacement of the timing belt for 16 Largus valves and replacement of the timing belt for Largus 8 valves.
In addition to the timing belt, the Lada Largus uses a belt that drives auxiliary units. This is the so-called Lada Largus generator belt or the second name is the Largus drive belt. We replace the Largus drive belt. The specifics depend directly on the design of the drive that ensures the operation of the auxiliary units, or more precisely, the configuration of the car. A number of configurations are “empty”. This is the simplest diagram, there are two pulleys, one for the generator, the other for the crankshaft, between them is the Lada Largus generator belt. In this case, we offer such type of work as replacing the Lada Largus belt.
The second scheme is a little more complicated. A number of trim levels include the installation of power steering (power steering). Then a power steering pump pulley and a belt tensioning roller (it’s called a tensioner) are additionally installed. This Largus drive belt differs from the generator belt, it is longer. In other words, a diagram with three pulleys and one roller.
Our craftsmen are replacing the Largus drive belt.
The richest trim levels come with not only power steering, but also air conditioning. In this case, an additional drive pulley for the air conditioning compressor and a bypass pulley for the belt, that is, four pulleys, two rollers and a Lada Largus air conditioning belt.
We replace the Largus air conditioner belt, and also offer to purchase the Lada Largus spare parts necessary to provide this type of service.
Injector or carburetor? Advantages and disadvantages
When choosing a used car, the question arises - which is better, an injector or a carburetor?
Most drivers extol the advantages of an injection engine, but experts advise not to ignore carburetor cars. In fact, there is no definite answer, since both fuel supply systems have both their pros and cons.
Principle of operation.
The difference between an injector and a carburetor lies in the principle of fuel supply. Fuel enters a carburetor engine “by gravity” - the prepared air-fuel mixture is drawn into the combustion chamber due to a pressure difference. The volume of the mixture is regulated naturally, namely by the difference in pressure in the combustion chamber and the carburetor. The injector (translated from English as injector) forcibly supplies an air-fuel mixture under pressure, the volume of which is controlled electronically. This is their main and most fundamental difference. That is why the carburetor has a simpler structure than the injector.
Pros and cons of the injector.
An injection engine is quite easy to start in the cold season. Due to the fact that the operation of the injector is electronically regulated, the volume of fuel used exactly matches the needs, so there is no overconsumption. Gasoline and air are forced to mix, resulting in a homogeneous mixture that burns evenly and provides maximum power. But the injector also has negative sides. First of all, a car with forced injection needs to be filled with gasoline with a high octane number, and as you know, the better the gasoline, the more expensive it is. The second point is the high cost of maintenance and repairs. Of course, the injector rarely breaks down or fails, but if such a nuisance happens, then it can’t be done without a little bloodshed. Repairs will be expensive and take quite a long time.
Pros and cons of the carburetor.
The main advantage of a carburetor is the simplicity of its design. Unlike the injector, the carburetor can be cleaned, adjusted and brought to the optimal level of operation. In addition, the carburetor is a pure mechanism, while the injector is controlled by electronics, which are difficult for a non-specialist to understand. As a result, most of the causes of carburetor malfunction can be eliminated independently, without resorting to the services of specialists.
The negative side of the carburetor is its “unintelligibility”. Often after 10-15 thousand km. After adjustment, the carburetor prepares a fuel-air mixture in which the gasoline content is higher than normal. Accordingly, not only the environment suffers, but also all parts of the engine. The opposite phenomenon also happens, when the mixture has an increased air content, due to which the movable parts of the engine are oxidized. Such discrepancies lead to excessive consumption of gasoline. The thing is that when fuel is injected from the carburetor, the pistons experience a lack of pressure and cannot work with the power for which they are designed.
What's the verdict?
We can summarize. By and large, an injection engine is more economical (in terms of fuel consumption) than a carburetor engine. If you look from the other side, it requires gasoline of better quality (with a high octane number), which leads to certain costs. In terms of operation, a carburetor is preferable, since it is more repairable, and if it breaks or becomes clogged, you can clean it yourself. Of course, the probability of carburetor failure is much higher than that of an injector, but this point is compensated by the low cost of maintenance.
Tuning today is especially popular among car enthusiasts. It represents an improvement not only in the appearance of the vehicle, but also in its technical characteristics. Thus, car owners are trying to make their car unique and different from similar models. This article discusses tuning the VAZ 2109 carburetor of the Solex brand.
The most current type of tuning for the VAZ 2109 is carburetor modernization. Its goal, as in the case of other cars, is to increase the power and dynamics of the car. According to experts, first of all, it is simply necessary to modify the power plant itself and only after that begin to modernize the carburetor. If you do otherwise (for example, due to budget constraints), this may pose a certain risk, which in some situations is quite justified.
How to install a new belt on a car
Place a new part on the crankshaft pulley. Install the belt onto the pulley teeth by hand. In the same way, hang the belt on the pulley towards the camshaft. Place the remaining part of the timing belt behind the tension roller.
Now tighten the belt drive. Turn the roller counterclockwise and secure it with the bolt. Then secure this bolt. Rotate the crankshaft until the marks align.
Let's take a closer look at how to remove the belt on an 8-valve engine:
- place the Lada Largus car on the lift;
- remove the terminals from the battery, thereby stopping the operation of the on-board network;
- take a suitable wrench and turn the crankshaft so that the marks on the pulley and timing cover match;
- fix the shafts so that they do not rotate;
- take the 10th key and remove the protective cover;
- remove the pulley that is responsible for the belt drive;
- Using the 17th wrench, loosen the tension roller nut;
- remove the tension roller and timing belt.
How to work with a 16-valve engine:
- Hang up the car, stop the final drive and remove the crankcase protection.
- Under the area where the Lada Largus engine is located, install something as a support.
- Use the 19th key to remove the right side of the support. Watch how the bolts are located in this place so as not to get confused later during assembly, since the bolts have different lengths.
- Remove the covers to protect the timing belt on the Largus car.
- Lock the crankshaft.
- Take the 18th key and remove the drive pulley.
- Set the piston to the normal TDC position, and then remove the belt drive, holding the bolt, and rotate the crankshaft.
This is how you remove the belt on a 16-valve engine.
Which timing belt is suitable for a Lada Largus car with any number of valves? In addition to the fact that you need to properly dismantle the belt, the quality of the materials from which it is made has a great influence on its service life.
The official manufacturer of materials for Largus is Gates. You can also choose Bosch, Dayco, Pilenga. There is no point in relying on reviews from owners about the quality of this or that manufacturer; follow the recommendations of official dealers. Trust your experience.
When changing the timing belt on Largus, also replace auxiliary spare parts. Replacing a belt is not a difficult task.
Don't skimp on the timing belt. Saving 200-300 rubles or postponing its installation until later, everything can turn into an expensive repair.
What generators are installed on Lada Vesta
A revolutionary decision made by AvtoVAZ was a generator unit with a current strength of 115A. For the Lada 2180 modification, equipped with a heated windshield, the unit has a current strength of 120-150A.
If the factory (original) Lada Vesta generator fails, you can purchase a new heavy-duty LG 0108 from StartVolt. It has the following characteristics:
- completely repairable;
- has parts that are interchangeable with standard units;
- increased service life of all components;
- increased power characteristics.
StarVOLT has been applying innovations to the production process of spare parts for 2180 machines for many years. Most recently, two new models with an output current of 140A and 200A went on sale. If we compare the units with the “native” AvtoVAZ unit, both modifications significantly exceed the latter in performance (120A).
The operating principle of the latest generators from StartVolt is designed so that the battery consumes exactly as much current as is needed for a quick charge. In case of connecting additional energy-consuming devices (on-board computer, navigator, powerful sound system), the generator unit from StarVOLT will be the best option. Each spare part from StartVolt is accompanied by a technical passport.
In addition, the Russian plant KZATE named after. A.M. Tarasova, produces high-quality spare parts adapted for Lada Vesta. For example, generator 9402.3701-01 with an analog voltage regulator and a built-in rectifier unit, which has the following characteristics: 14V, 80A. This model is supplied by AvtoVAZ as a standard unit.
Features of service provision
Before talking about the services we offer and their relevance, you should pay attention to the design features of the engines installed on this station wagon, its pseudo-off-road version and van. There are four in total
Initially, the model, which is essentially a modernized version of the Dacia/Renault Logan MCV of the first generation, was equipped with engines installed on Renault Largus cars. It received K4M and K7M gasoline engines, both in-line “fours”, the first has 16 valves, the second has 8 valves. A further development of the model was the installation of motors of our own production, adapted for French gearboxes. The K7M engine was replaced by the VAZ 11189 (a slightly modified version of the VAZ 11186); this power unit is not found anywhere else on other Togliatti-assembled models. The K4M was replaced in 2022 by the VAZ 21129 (a modernized version of the VAZ 21127 brought into compliance with Euro5 environmental standards), this engine is also installed on the Lada Vesta and Lada X-Ray
There are four of them in total. Initially, the model, which is essentially a modernized version of the Dacia/Renault Logan MCV of the first generation, was equipped with engines installed on Renault Largus cars. It received K4M and K7M gasoline engines, both in-line “fours”, the first has 16 valves, the second has 8 valves. A further development of the model was the installation of motors of our own production, adapted for French gearboxes. The K7M engine was replaced by the VAZ 11189 (a slightly modified version of the VAZ 11186); this power unit is not found anywhere else on other Togliatti-assembled models. The K4M was replaced in 2022 by the VAZ 21129 (a modernized version of the VAZ 21127 brought into compliance with Euro5 environmental standards), this engine is also installed on the Lada Vesta and Lada X-Ray.
On the timing belt of all Lada Largus engines there is a belt, or rather a timing belt of the Lada Largus, there are toothed pulleys for the crankshaft, camshaft (if there are 16 valves, then there are two pulleys, according to the number of camshafts, that is, one pulley for the intake camshaft, the second for the exhaust), water pump . A Largus timing tension roller is also used (if there are 16 valves, then the tension roller tensions the belt, and a second Largus timing support roller is also used).
Our specialists carry out both replacement of the timing belt for 16 Largus valves and replacement of the timing belt for Largus 8 valves.
In addition to the timing belt, the Lada Largus uses a belt that drives auxiliary units. This is the so-called Lada Largus generator belt or the second name is the Largus drive belt. We replace the Largus drive belt. The specifics depend directly on the design of the drive that ensures the operation of the auxiliary units, or more precisely, the configuration of the car. A number of configurations are “empty”. This is the simplest diagram, there are two pulleys, one for the generator, the other for the crankshaft, between them is the Lada Largus generator belt. In this case, we offer such type of work as replacing the Lada Largus belt.
The second scheme is a little more complicated. A number of trim levels include the installation of power steering (power steering). Then a power steering pump pulley and a belt tensioning roller (it’s called a tensioner) are additionally installed. This Largus drive belt differs from the generator belt, it is longer. In other words, a diagram with three pulleys and one roller.
Our craftsmen are replacing the Largus drive belt.
The richest trim levels come with not only power steering, but also air conditioning. In this case, an additional drive pulley for the air conditioning compressor and a bypass pulley for the belt, that is, four pulleys, two rollers and a Lada Largus air conditioning belt.
We replace the Largus air conditioner belt, and also offer to purchase the Lada Largus spare parts necessary to provide this type of service.
Injection "ten"
In addition to the wiring that is provided for the VAZ 2110 - carburetor, "ten" - injector, it is also equipped with a number of fuses that protect almost all of it from the possibility of short circuiting.
Structurally, fuses are not provided only for the electrical supply via a relay wire from the battery, in the car starting and ignition circuit, as well as for the wire going to the generator.
In addition, the injector (as opposed to the carburetor) is a more complex system, and in order to repair it yourself, you need to understand it well. The controller in this wiring system “reads” the operation of all systems, thereby determining and setting many indicators - calculation of the fuel mixture, etc.
Lada Largus replacement of the drive belt for auxiliary units 8 and 16 valves
Lada Largus, replacing the belt on an engine with 8 and 16 valves is different. Today we will talk about replacing the drive of auxiliary units on both types of Lada Largus engines. The manufacturer requires replacement every 60 thousand kilometers or after 4 years of operation, if the 60 thousand mark has not been passed. In addition, the drive belt patterns with air conditioning and without air conditioning are different. Our article today is about all this.
Belt replacement Lada Largus 8 valves with air conditioning
Belt diagram with power steering and air conditioning.
- 1 - auxiliary drive pulley
- 2 - tension roller
- 3 — power steering pump pulley
- 4 — generator pulley
- 5 - air conditioning compressor pulley
- 6 - support roller
The tension of the drive belt for Lada Largus auxiliary units with power steering and air conditioning is automatically adjusted by a tensioner. To replace the belt, remove the right mudguard of the engine compartment.
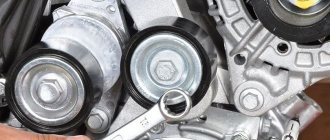
To loosen the belt tension, from below the car we put a spanner or a 13-mm socket on the tension roller mounting bolt and turn the roller bracket clockwise, overcoming the force of the tensioner spring, until the hole in the roller bracket and the recess in the device body are aligned.
We fix the roller bracket by inserting a “6” hexagon or a rod with a diameter of 6 mm into its hole and the recess in the tensioner body.
Remove the accessory drive belt.
Marking of the drive belt for auxiliary units of a car with power steering and air conditioning is 5K 1747 (five-strand, length 1747 mm). When replacing the belt, the support and tension rollers must also be replaced.
To replace the support roller with a spanner wrench or a 13-mm socket, unscrew the bolt securing it and remove the bolt with the protective cover of the roller. Remove the support roller.
Similarly, unscrew the fastening bolt and remove the tension roller. If it is necessary to replace the tensioner (for example, if a spring breaks), use a “13” head to unscrew the two bolts securing the tensioner housing and remove the tensioner assembly with the roller.
Automatic tensioner assembly in the next photo
Install the removed parts in reverse order. Before installing the belt, the tension roller bracket must be turned clockwise and locked (see above).
When installing the belt, place it on the pulleys and place it under the tension and support rollers in accordance with the drive diagram
Attention, very important point! The drive pulleys for auxiliary units, generator, air conditioning compressor and power steering pump are six-ribbed, and the drive belt is five-ribbed
We lay the belt on the pulleys so that it is shifted to their outer edge, and the inner groove of the pulleys remains free. Let's look at the next photo.
After installing the belt, slightly turn the tension roller with a wrench and remove the lock from the hole in the roller bracket and the recess in the tensioner housing. Then, using an 18-inch head with a ratchet, we turn the crankshaft clockwise three turns by the bolt securing its pulley to check the correct position of the belt and the functioning of the tensioner.
Belt replacement Lada Largus 8 valves without air conditioning
Belt diagram without air conditioner.
- 1 - auxiliary drive pulley
- 2 — tension roller with bracket
- 3 - adjusting bolt
- 4 — tension roller bracket mounting bolt
- 5 — generator pulley
- 6 — power steering pump pulley
- 6 - drive belt
Checking the belt tension of auxiliary units of a car with power steering and without air conditioning must be performed using a special tool at a dealer service. Considering that if you replace it yourself, you will have to change the belt outside of the dealership service center, we will show you a way to approximately estimate the belt tension.
Remove the right mudguard from the engine compartment. From below the car, use your thumb to press the belt in the middle between the pulleys of the power steering pump and the crankshaft. With a pressing force of 10 kgf, the belt deflection should be 6–8 mm. To tension the belt, loosen the two bolts 4 securing the tension roller bracket and rotate adjusting bolt 3 clockwise. Having tensioned the belt, tighten the bolts securing the tension roller.
Required Tools
To repair and replace the generator on a Lada Vesta, tools are required, the list of which is given in the table below.
Table - List of necessary tools for replacing the generator
| Name | Note |
| Bat | Torx T-20, Torx T-30, Torx T-55 |
| Head | "at 10", "at 13" |
| open-end wrench | "at 15" |
| Spanner | "at 13" |
| Vorotok | With ratchet and extension |
| Penetrating lubricant | For detaching threaded connections that are stuck or have signs of corrosion |
| Wire brush and rags | For cleaning fixtures and work surfaces |
| Screwdriver | Flat blade |
Torx bit T-55
It is convenient to carry out work on removing and installing the generator from the bottom of the car. Therefore, it is desirable to be able to park the car over an inspection hole or on an overpass.
Timing for belt replacement according to regulations and experience
Many people have encountered the problem of a belt breaking on the highway even on “eights” and “nines”, and now they believe that it is better to play it safe and change the belt already at 50 thousand mileage. But as practice shows, this concern is not always justified and many Largus models can easily travel over 100,000 km without replacement. Much also depends on the specific use of the car - in the ragged city rhythm, wear always occurs faster than on the highway. The manufacturer in the service book recommends replacement no earlier than 120,000 km. However, from the experience of car enthusiasts, we can say that the belt usually exhausts its service life by 100 thousand km. If you don’t want to use the services of a tow truck one day, it’s better to change it in advance. If you have doubts about whether it is time to change the belt, simply assess its visual condition by opening the hood of the car. If there are cracks on the surface, traces of abrasions, delamination or protruding cord threads are visible, then it is necessary to replace it as soon as possible. Even if there are no external signs of wear, it is still worth periodically checking the degree of tension, since an overtightened or sagging belt can also lead to breakage.
Signs of belt and tensioner wear
There are a number of characteristic symptoms that indicate an abnormal drive condition:
- Whistle when starting the engine. Appears due to insufficient tension caused by a worn belt or a faulty roller (on cars with air conditioning). If it rotates freely, there are no visible signs of wear, the cause is looked for in the belt. It has a polycline structure. The surface consists of several longitudinal ridges, called wedges, and depressions, “streams,” located between them. When the ribs are ground down, the wedges sink deeper into the pulley grooves, thereby reducing the internal diameter of the drive. The increase in length at a certain stage goes beyond the limits that the tension roller can compensate for.
- Cracks on the surface. With use, transverse cracks appear, often on the inner surface. Several of these are a warning sign; when there are many of them, the drive must be replaced immediately.
- Worn roller surface. An evenly ground pulley is not so bad if the sagging is compensated by moving the roller. Otherwise, the belt will slip and may even jump out of the groove. Uneven wear can create edges that cut the belt.
There are no effective ways to restore the functionality of the mechanism. The only way out is to replace worn parts.
Problems when paying with bank cards
Sometimes difficulties may arise when paying with Visa/MasterCard bank cards. The most common of them:
- There is a restriction on the card for paying for online purchases
- A plastic card is not intended for making payments online.
- The plastic card is not activated for making payments online.
- There are not enough funds on the plastic card.
In order to solve these problems, you need to call or write to the technical support of the bank where you are served. Bank specialists will help you resolve them and make payments.
That's basically it. The entire process of paying for a book in PDF format on car repair on our website takes 1-2 minutes.
Generator repair
The price of a new Lada Vesta generator is very high. Therefore, in case of some breakdowns, it is more advisable to repair the unit rather than replace it. Restoring functionality usually begins by removing the power source from the vehicle.
For electrical problems, it is recommended to use a multimeter. Using a continuity test, you should make sure that there is no winding breakage, breakdown to the housing, or interturn short circuit.
Most often problems arise due to abrasion of the brushes. Replacing them allows you to restore reliable electrical contact.
Abrasion of slip rings usually occurs during long-term operation of the generator.
Source
Types of drive belts
Depending on the configuration, the Largus is equipped with power steering or air conditioning; the power plant can be 16- or 8-valve. Accordingly, different products are used:
- Renault 117200593R (6PK 837) – standard poly-V-ribbed six-ribbed belt used on an 8-valve power unit without power steering, with air conditioning;
- model 4PK715 (four-strand, length 715 mm) - used on an eight-valve engine without power steering and without an air conditioning system;
- the eight-valve K7M engine uses a five-valve 5PK 1110, length - 1110 mm, power steering and air conditioning are also not installed on this engine;
- K4M engine (16-valve) - a six-strand 6PK 1200 with a length of 1200 mm is used, an engine without air conditioning, with power steering.
- power units equipped with power steering and air conditioning (8 and 16 valves) are equipped with a six-stream 6RK 1820 with a length of 1820 mm.
The approximate cost is set from 300 to 400 rubles for short ones, and up to 800 for long ones.
How to test a generator with a multimeter
The diode bridge of the generator can be checked with a multimeter, but you can also use the stand that was used to check the regulator.
But before that, first of all, without removing the rectifier bridge from the generator, connect the red wire of the tester to terminal 30 of the generator, and the black wire to the housing. Set the tester operating mode to dial (diode icon). If it is not there, then set it to 1-2 kOhm. The multimeter should show infinity. If the readings are different, the diode bridge is faulty.
Then check the current rectifiers for breakdown. Leave the positive (red) probe on terminal 30, touch the negative one to the bridge mounting bolts one by one. The multimeter display should show infinity in all cases; any others mean a breakdown.
Next, connect the positive probe to the axle mounting bolts, and the negative probe to the generator housing. In this case, the tester should also output infinity.
But in practice, such verification is most often not enough. In most cases, it is necessary to ring the generator in more detail.
Careful testing
To do this, unscrew the fastening bolts of the rectifier unit, disconnect the copper wires of the stator winding and remove the diode bridge from the generator. Now you can test each semiconductor individually. Before checking, it is advisable to rinse the stabilizer with running water using a medium-hard brush, and then dry thoroughly. For quick drying, a hair dryer is quite suitable.
Attach one of the tester probes to the diode plate, connect the second to the central terminal of each diode fixed to this plate. Then swap the probes. In one case, the multimeter should show infinity, in the other - a nominal resistance of approximately 570-590 Ohms. Rectifiers are considered faulty if:
- In the first and second measurements (when the polarity was changed), the multimeter readings are the same;
- Diode resistance is greater or less than nominal values.
Perform the same actions with the second plate of the diode bridge. If a fault is detected in one or more diodes, it will be easier to replace the entire rectifier unit. True, there are craftsmen who replace failed diodes individually, but such work requires a certain skill and dexterity.
How to replace the tension roller
To replace the Lada Vesta generator belt roller (part number 8450006996), place the car on a lift and do the following:
The generator on a Lada Vesta car is one of the most important and at the same time reliable elements. If the generator requires repair, this is usually due to either a very long service life or mechanical damage to the generator itself or the vehicle's electrical wiring.
You will learn how to disassemble a generator, troubleshoot it and put it back together in our article using the example of a similar LADA Vesta generator. The “patient” had typical problems of long-term operation - a slight squeak, rustling and general increased noise of operation. The comments are not critical, but to avoid more significant problems, the unit must be disassembled and worn parts replaced.
It is worth noting that there are not many wear parts in the generator - these are brushes, bearings and rotor slip rings. All other elements are not consumables and are quite simple to check - the regulator, the rotor and stator windings, as well as the rectifier diodes.
2271-3-8-05-02
We turn the roller bracket clockwise, overcoming the resistance of the tensioner spring (for clarity, shown on a removed engine)...
Rotate the roller bracket clockwise, overcoming the resistance of the tensioner spring (for clarity, shown on a removed engine)...
We turn the roller bracket clockwise, overcoming the resistance of the tensioner spring (shown for clarity with the engine removed)…
