What is a timing belt, what parts does it consist of?
The abbreviation GRM is short for “gas distribution mechanism.” This unit is present in all cars, with the exception of vehicles equipped with an electric motor. The timing belt supplies the fuel mixture to the internal combustion engine cylinders, providing the combustion chambers with the required volume of fuel at the right time.
The gas distribution mechanism consists of:
- cylinder head (head mounted on the cylinder block);
- valves;
- bushings;
- landing seats;
- camshaft;
- belt;
- tensioners;
- other elements (plates, springs, stoppers).
Standard belt with
AvtoVAZ equips the new Vesta with products from Gates or Contitech. The Gates consumable is installed on Lada Vesta with a 1.6-horsepower unit. Vestas with a 1.8 liter engine are equipped with a Contitech timing belt.
The price of both options does not differ much. The quality of the rubber is the same. The products are well packaged to prevent damage during delivery. Gates has protection against counterfeiting: each consumable is assigned an individual code, which is used to check the originality of the spare part on the official website.
What belts are installed on the Lada Vesta
The size of alternator straps on Lada Vesta may vary depending on the specific modification. There are different versions for cars equipped with and without air conditioning systems. So, for Vesta with air conditioning, modification 6РК1039 is used, and for those without such an option - 6РК778. Contitech and Gates companies are official suppliers for AvtoVAZ for the installation of alternator drive belts.
The tension and support rollers deserve special attention. They provide the necessary level of tension so that the strap does not fly off, but allows the generator to produce the maximum possible charge for the on-board electrical network. If these parts are made with high quality, then they do not require adjustment for a long time.
Will the Lada Vesta valves bend if the timing drive element breaks?
If the drive element breaks, the camshaft stops rotating, but the crankshaft continues to operate. The valves freeze and the pistons rotate. As a result, the cylinders hit the valve plates, deforming them and bending the rods.
The likelihood of a cylinder head cover breaking on 8-valve engines is significantly lower. The VAZ 11189 unit is equipped with mechanical protection: the valve plates are located so that the cylinders do not reach them even in the open position.
In addition to the VAZ 11189, the Lada Vesta is equipped with 16-valve engines VAZ 21129, HR16DE-H4M, VAZ 21179. A break in the drive element on such a Lada Vesta will lead to deformation of the valves and rods. Structural protection is not used on them, since as a result the size of the engine is unacceptably increased. Therefore, owners of Lada Vesta with a power of more than 100 hp. treat the unit with the utmost care.
The Lada Vesta service book states that drive belts and corresponding rollers are not covered by the manufacturer’s warranty. If the original consumable breaks down before the expiration of the declared service life, the dealership is obliged to repair the engine, since the breakdown is considered a warranty case.
Since mid-July 2022, Vestas with a 1.6 liter engine with grooves on the pistons began to roll off the AvtoVAZ assembly line. Specially shaped darts prevent damage to the valves when the timing belt breaks. Tests of improved piston geometry are also underway on 1.8-liter engines, but so far the exact timing of the implementation of the modernization has not been announced. Owners of Lada Vesta manufactured earlier than 07.18 replace the piston group themselves.
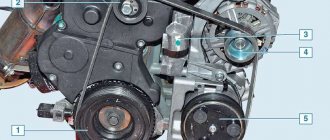
Lada Vesta generator belt tensioner roller
- Buy with this product
- show more
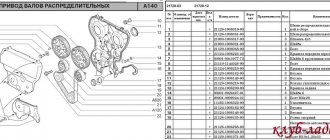
- Passenger cars / VAZ / Lada Vesta1 drawing
- » href=»/catalog/vaz-3/legkovye_avtomobili-30/lada_vesta-1883/156010__privod_navesnogo_oborudovaniya-153/#part4202802″>TENSION ROLLER ASSEMBLYAttachments / 156010. Attachment drive
- There are no reviews for this product yet.
Applicability
| Brand | Model | Name according to auto catalog | Drawing |
| VAZ | Lada Vesta | TENSION ROLLER ASSEMBLY | Engine/Attachments |
The parts data presented on this page is for informational purposes only.
Download price lists
To download price lists, you need to log in. If this is your first time on the site, please fill out the registration form.
Price list
- Special offers
- KAMAZ spare parts
- Spare parts KAMAZ-5490
- Spare parts MAZ, YaMZ
- ZIL spare parts
- Spare parts ZMZ, for GAZ vehicles
- Spare parts for Volzhanki cars
- Spare parts for Gazelists
- Spare parts for trucks Lawns
- Spare parts for GAZ-71 caterpillar
- Spare parts UAZ, UMZ
- Spare parts KrAZ, BelAZ
- Spare parts URAL
- Spare parts BUSES
- AMAZ spare parts
- IKARUS spare parts
- KAVZ spare parts
- LAZ spare parts
- LIAZ spare parts
- NEFAZ spare parts
- PAZ spare parts
- Other buses
- Tractors, computer equipment, attachments
- Tractors and walk-behind tractors
- Municipal vehicles
- Attachments and trailed equipment
- Spare parts for TRACTORS and SPECIAL EQUIPMENT
- JCB - spare parts for special equipment
- Truck crane (KS-3577, KS-4517, etc.)
- AMZ (A-01, A-41, D-440, D-442, D-447, D-461, D-467)
- Amkodor (TO-18, TO-28, TO-30, etc.)
- ATZ (T-4A, TT-4M)
- VgTZ (DT-75)
- VMTZ (D-120, D-144, D-130, D-145T)
- VTZ (T-25, T30A-80, VTZ-2048)
- LTZ (T-40, LTZ-55, LTZ-60)
- MKSM, UNC, DETVAN
- MTZ - spare parts for tractors
- OTZ (TDT-55)
- PTZ (K-700/701/702/703/704)
- KhTZ (T-150, MT-LB)
- ChTZ (T-130, T-170, B-10, B-12, B-170, T-10M, DET-250)
- YuMZ - spare parts for tractors
- Other special equipment and tractors
- RVD - high pressure hoses and sleeves
- MMZ spare parts and engines
- Spare parts for MMZ engines
- MMZ engines: D-242, D-243, D-245, D-246, D-260
- VAZ spare parts
- Spare parts OKA VAZ 1111
- Spare parts VAZ classic 2101 - 2107
- Spare parts VAZ front wheel drive
- Spare parts VAZ Granta and Largus
- NIVA spare parts and all-wheel drive
- Spare parts Moskvich, IZH
- Spare parts for Korean trucks
- Spare parts for Starex, H-1
- Spare parts for Porter, H-100
- Spare parts for HD65,72,78, County
- Spare parts for HD120, AeroTown
- Spare parts for HD160,170, . ,700,1000
- Spare parts for HYUNDAI, KIA buses
- Spare parts for Korean passenger cars
- Spare parts DAEWOO, CHEVROLET
- FOREIGN CAR spare parts more
- BMW spare parts
- DAF spare parts
- FIAT spare parts
- FORD spare parts
- Spare parts HONDA, ACURA
- IVECO spare parts
- MAN spare parts
- MAZDA parts
- MERCEDES spare parts
- MITSUBISHI spare parts
- Spare parts NISSAN, INFINITI
- OPEL spare parts
- Spare parts PEUGEOT, CITROEN
- RENAULT spare parts
- SCANIA spare parts
- SHAANXI spare parts
- SSANGYONG spare parts
- SUZUKI parts
- Spare parts TOYOTA, LEXUS
- VAG spare parts: VW, AUDI, SEAT, SKODA
- VOLVO spare parts
- Other foreign cars
- Trailers and semi-trailers
Source: https://kalina-2.ru/remont-vaz/rolik-natjazhitelja-remnja-generatora-lada-vesta
How to check the timing belt on a Lada Vesta
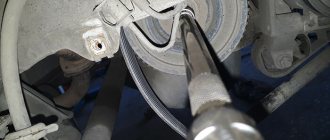
You can check the drive element on the Vesta by removing the plastic engine screen and the protective cover. The link tension must be controlled. A sagging belt wears out faster, so when a weak tension is detected, the integrity of the rollers (tensioner and bypass) and the pump are monitored. Noise and backlash are not allowed.
Sticking tensioners will damage the rubber. Timing repair kits for Lada Vesta are more often found on sale, including rollers (tensioner and bypass). The unit is also replaced in the absence of external damage, if the service life declared by the manufacturer has come to an end.
What generators are installed on the Lada Vesta
The main function of the generator is to provide electricity to all devices when the engine is running and charge the battery, leading to the restoration of its expended capacity. Without this assistant, the battery life is quickly wasted, so you should pay attention to the signals of the warning lamp, which warns of a current or upcoming malfunction.
The automobile plant itself, located in Togliatti, does not manufacture generators for its vehicles, and these functions are assigned to third-party suppliers. Based on this, generators for Lada cars are supplied by manufacturers such as Bosch and Valeo. These products are sold under production article 8450006900. On the domestic market you can find other analogues that are installed by car enthusiasts during operation. The most famous of them is the StarVolt company.
Cost of timing belt repair kit
An original repair kit for a 16-valve Vesta engine costs from 3,000 rubles. The price of analogues takes the value of 2900-3700 rubles. Separately, the original timing belt (article 21126100604000) will cost 1,700 rubles. AvtoVAZ offers a reinforced version for 1900 rubles.
Along with the parts of the gas distribution mechanism, owners of the 16-valve Vesta often change the water pump. It is recommended to change the pump every 100 thousand kilometers, so installing a new pump is combined with replacing the timing drive element. A pump with the AvtoVAZ logo (artikul 21126130701082) costs 1,100 rubles, Luzar (LWP 01274) - from 950 rubles, Pilenga - 650 rubles.
Do-it-yourself timing belt replacement
The procedure for installing new elements of the timing system is complex, which is why many car owners come to the service station with a purchased repair kit. You can change it at home if you can hang up the car engine.
Tools
To replace you will need:
- repair kit;
- torque wrench;
- wrench 17;
- set of socket wrenches;
- "Torx" of different sizes;
- hexagon 5 mm;
- a screwdriver or other straight metal object to fix the crankshaft.
The car is driven onto an overpass or inspection hole. On a Vesta with any engine, preliminary work is carried out: disconnect the car’s battery, hang the car on a lift, remove the right engine mount, front wheel, fender liner and mudguard.
"Vesta" with VAZ-11189 engine
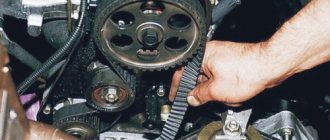
Step-by-step instructions for removing the timing belt on an 8-valve engine:
- Remove the engine cover.
- Remove the timing gear drive protection by unscrewing the 3 bolts.
- Turn the crankshaft by the bolt, placing the piston of the 1st cylinder in the uppermost position (rotate clockwise).
- Block the crankshaft by inserting a screwdriver between the flywheel teeth. It is better to entrust this process to an assistant. You can also fix the crankshaft using the brake pedal, having previously placed the gearbox in 1st gear.
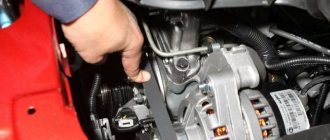
- Unscrew the generator pulley.
- Remove the generator pulley.
- Check that the alignment marks match.
- Loosen the tensioner.
- Rotate the roller to loosen the drive element as much as possible.
- Remove the timing belt.
- Unscrew the nut and remove the tension roller.
Installation procedure for the repair kit:
- Install new rollers and generator pulley.
- Check that the installation marks match.
- Place new rubber on the crankshaft pulley.
- Replace the back half of the belt by pulling the rubber over the pump and around the tensioner.
- Place the belt on the camshaft wheel at the front.
- Rotate the tensioner until the timing belt is tensioned (rotation is counterclockwise).
- Tighten the generator pulley fasteners.
- Turn the crankshaft by the bolt and make 2 full turns (rotation goes clockwise).
- Make sure that the installation risks match.
Lada Vesta with VAZ-21129 engine
The procedure for working on a Vesta with a 16-valve engine is slightly different:
- Remove the engine screen.
- Remove both halves of the drive guard by unscrewing the 7 screws.
- Remove the alternator belt.
- Lock the flywheel with a screwdriver.
- Remove the pulley (fastened with a bolt) and the support washer.
- Move the piston of the 1st cylinder to the top point in the same way as step 2 of the previous instructions.
- Secure the camshafts. For this purpose, equipment is used, consisting of polyurethane bushings and a bolt (art. 67.7811-9516).
- Turn the tensioner bolt to loosen the drive element as much as possible.
- Remove the timing belt (after which the crankshaft and camshaft cannot be turned).
Installation of the repair kit occurs in the same way as assembly of a Lada Vesta with engine 11189. Sealant can be applied to the threaded part of the rollers.
"Vesta" with VAZ-21179 engine
A 16-valve engine of this type does not have any marks on the camshafts. Therefore, special equipment is used to fix the camshafts: 67.7811-9516. The cost of the fixator is 600 rubles. It is difficult to install the device, because there is a drive disc on the intake shaft that covers the desired slot on the camshaft.
The following are subject to dismantling:
- drive belt;
- generator;
- generator bracket;
- air conditioning compressor;
- fuel rail;
- engine mounts;
- intake manifold;
- timing belt protective cover.
Otherwise, the procedure for removing and installing the timing belt is similar to that described in the instructions for other engines.
How to replace the Vesta timing belt without special tools
Sometimes stories appear on forums that it is possible to change the timing belt on a Lada Vesta faster and easier. It is enough to cut off with a knife and remove part of the old rubber, and pull a new drive element onto the crankshaft pulleys. Then remove the remaining half and put the new belt on all the way.
Using this method is strictly not recommended. Incorrect installation will result in accelerated tire wear. The risk of a sudden break increases significantly. In addition, a pulled roller knocks down the marks. The time saved is unlikely to pay for the engine repair.
How to adjust the tension roller
For the regulation process, you will need a device for dismantling the retaining rings (tongs), a socket wrench set to “10”. Stretching process:
- Loosen the hardware securing the roller.
- Insert the pliers into the recesses of the tensioner.
- Rotate the roller until the groove in the outer casing aligns with the protrusion of the inner sleeve (turn counterclockwise).
- Tighten the fastening bolt (tightening torque: 32 Nm).
At the end of the work, be sure to turn the crankshaft a couple of times and see if the installation marks match.
It is advisable to work with a torque wrench, since an overtightened tensioner will jam during operation. To determine if the roller needs to be loosened, look at the behavior of the bushing protrusion while the engine is idling. In normal condition, the tongue should tremble slightly. If the tab does not move, the roller will be overtightened. Video demonstrating how the tensioner works:
How to set timing marks
On a Vesta with a 1.6 liter engine there are 2 marks that must match:
- on the gear wheel and the antenna of the rear timing cover;
- in the slot of the inspection window located on top of the clutch housing.
After setting the marks, it is necessary to make 2 revolutions with the crankshaft to make sure that not only the marks, but also the rotation strokes of the shafts match. Since the crankshaft makes 2 rotations per camshaft revolution, it may turn out that if the marks coincide, the compression stroke is accompanied by an open valve, which destabilizes engine operation.
On engine 21179, the installation mark is present on the tensioner. The camshaft marks are located on the back of the cylinder head, to find them you need to:
- Remove the rubber plug on the exhaust shaft from the back of the cylinder head;
- on the intake, remove the receiver and valve cover, then pull out the plastic partition and rubber plug covering the end of the camshaft.
How long will it take to repair
The time spent directly depends on the qualifications of the auto repairman. The longest work is replacing the drive element on a Vesta with engine 21179, but for a beginner, even repairing an 8-valve unit may seem like a labor-intensive process. Reinstallation cannot be abandoned; if the marks do not match, you will have to remove the drive element and reinstall it until the shafts fit correctly.
Can a broken timing belt bend the valves?
Many owners of a car from the Russian Federation Lada Vesta, and other models, are worried that due to the fact that the timing belt was not replaced in a timely manner, this can lead to bending of the valves, and in order to repair them they will have to pay a tidy sum. This is true. Experts say that in car power units that come with a timing belt from the factory, in most new car models, unpleasant valve failures often occur.
The design of the Lada Vesta engine with a power rating of 122 hp will in most cases bend the valves when the belt breaks. Even the fact that at one time, to eliminate this unpleasant situation, grooves were introduced into the piston itself will not help. The depth of these very grooves is not sufficient, and a torn belt easily bends the valves. Avtovaz's creators of the popular domestic car changed the piston system, but did not succeed in this matter. All the same, the valve mechanism came out of order due to the timing belt falling off. And there is only one panacea: timely replacement of the timing belt. And we told you when to change it at the very beginning.
Important! Domestic Lada Vesta cars bend valves only if they have a belt on them. There are models that AvtoVAZ produces with Nissan engines, in which there is always a chain connection. Consequently, there is no impact on the valves and the chain will never break at one moment, it will gradually fail.
Step-by-step instructions for replacing the timing belt in Vesta (necessary tools)
- We install the Russian Lada Vesta on a lift.
- We remove only one negative terminal on the battery.
- We dismantle the starter and, accordingly, the belt drive of the automobile generator.
- Now lower the lift completely.
- A traverse is carefully installed on the right side of the engine.
- Lift the motor using a hook.
- Using Torx 12 sockets, remove all bolts. A hexagon wrench will be required to unscrew the 8 fasteners, which are located on the protective special casing of the drive (3 on the bottom, 5 on top).
- The following steps when replacing the timing belt entirely depend on what type of unit is in the car. To do this you will need a matching diagram.
- The video material will clearly tell you about all the subtleties that will prevent valve failures.
- After installing a new belt, it is necessary to adjust the tension, and then check the functionality of the entire system.
What are the dangers of incorrect installation?
Incorrect installation of the timing belt leads to an imbalance of air intake and exhaust gases. When driving in these conditions, the driver may notice:
- loss of power;
- wear of all elements of the drive system;
- increased fuel consumption;
- the appearance of suspicious noises and vibrations.
If a discrepancy between the timing marks is detected or other signs of a timing discrepancy appear, the timing belt must be rearranged immediately. When correcting, you need to check the condition of the rubber and make sure there is no wear.
The integrity of the timing belt is a prerequisite for the functioning of the car. A torn part often causes bent valves, leading to major repairs.
Signs of belt and tensioner wear
The drive and electric current generation system in the vehicle can function correctly for a long time, and the driver does not even have to look into the hood compartment. However, the driver should be aware of the approximate symptoms that may indicate a malfunction of the belt or its tensioner.
The following signs may indicate a drive malfunction:
- characteristic whistle when starting the engine. Indicates a faulty or overly worn belt. It is necessary to immediately check its surface for wear criteria. If almost none are identified, it is worth taking measures to check the degree of tension;
- the appearance of transverse or longitudinal cracks on the surface, scuffs and burrs. If there are too many of them, then it’s time to change the belt drive;
- abrasions on the surface of the roller can lead to uneven wear of the strap and, as a result, to its sagging in certain areas.