Symptoms of a problem
The Lada 2170 model received a liquid heater, which is connected to the engine cooling system. The radiator is a heat exchange device; due to this component, the air entering the Priora’s cabin is heated. Coolant constantly circulates through the radiator; this part of the heater is subject to wear.
It is worth checking the radiator in the following cases:
- The stove stopped heating properly.
- The coolant level drops.
Once you disassemble part of the heater system, you will see a rusty and most likely leaking radiator. There may also be leaks in hoses, pipes and the junctions of these elements. You should check the heat exchanger of the stove only after you have made sure that there are no defects in the operation of the gearmotor and damper.
Radiator replacement
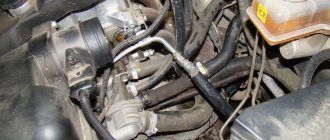
To work, you will need a standard set of tools, which includes socket wrenches 10 and 13, side cutters, a Phillips screwdriver, and a wrench 8. In both cases, you will have to disconnect the heating system hoses; the remaining coolant will pour out of them, so immediately place containers under the pipes heater Then the liquid can be returned to the system.
With air conditioning
- First of all, we need to remove the rubber seal of the windshield to gain access to the parts;
As you can see, dismantling the radiator in a Priora with air conditioning does not require draining the antifreeze. Coolant will only come out of the expansion tank and the heat exchanger itself. Removing the radiator in a VAZ 2170 with Panasonic air conditioning follows the same scheme, only a few fasteners may differ. Now you can replace your worn-out heater with a new one!
Without air conditioning
- Work begins by disconnecting the negative terminal of the battery. We remove the windshield trim along with the windshield wiper arms, as these elements will interfere with operation;
- The next step is to remove the coolant supply pipes to the engine injectors;
- The windshield trim is held in place by seven screws. Unscrew it to completely remove the element;
- Now we move on to the hood seal, in its center you will find a tightening screw - unscrew it;
- The engine noise insulation closes the passage to the heater system - pry up the plugs with a flat screwdriver and unscrew the plugs;
- We unscrew the screws and dismantle the sound insulation. Remove both covers;
Clean the heat exchanger and inspect it for damage. If cracks are found on the plastic elements, then you will no longer be able to repair the part - only replacing the stove radiator on a Priora, which is done in the reverse order, will help here.
Video instructions for replacing a leaking stove:
Lada Priora Hatchback KosmosS › Logbook › Replacing the heater motor with Panasonic air conditioner
I drove for the last month and suffered with my air conditioning.
The symptoms were bleak; the air conditioner either worked or didn’t.
In other words, the air conditioner worked properly, but the heater motor
He was obviously shirking his own work.
Especially when you drive on smooth Russian roads))
Symptoms: the motor refuses to operate in all positions of the rotation speed control handle.
At first there were floating speeds, later it completely died out, and from time to time it came to life on bumps.
Fan doesn't work
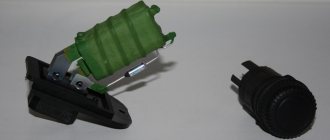
But sometimes another problem occurs with the Priora stove. The driver turns the heater switch, and in response there is silence. The electric motor is not working. What is the reason. There may be several of them:
- The fan motor burned out.
- The heater control unit has failed.
- The fan speed resistor has burned out.
- Broken electrical wiring.
The easiest way to determine if a resistor is broken. In this case, only the maximum speed is turned on, and the stove does not respond to other positions of the handle.
The control unit is checked either by computer diagnostics or by a simple replacement. There are no other options.
The condition of the electric motor can be determined by checking with a test lamp. It is enough to remove the top frill and gain access to the motor connector. Disconnect this connector and insert a test lamp instead of the chip going to the fan. When you turn on the stove handle, the light should light up if the unit and wiring are working properly. If there is no signal, start checking the wires sequentially. If the lamp lights up, replace the electric motor.
Priora stove diagram
Before changing the stove on a Priora, buy new heater elements using the catalog numbers:
Priora heater 2111-8101012: 1 — heater inlet/outlet hoses 2170-8101200/208; 2 — additional resistor 2123-8118022; 3 — electric fan 2111-8118020; 4 — heater 2111-8101012; 5 — nut 1/07259/11; 6 - screw 1/51873/01
Dismantling and replacing the heater on a Priora
Any car should provide its owner with comfort while driving. Otherwise, using a personal vehicle loses all meaning. A large share of responsibility for the comfort of the driver and passengers lies with the stove. If in summer you can do without using a heater, then in winter it becomes completely unbearable to travel in cold transport. So drivers are interested in how to remove the stove on a Priora in order to carry out maintenance, repairs, or even replace it with a new one. There is no point in turning to specialists to do this work, since everything is done according to a simple scheme.
Yamaha diversion 600 reviews
Pros Excellent ergonomics. Acceptable acceleration dynamics. Good brakes. Excellent handling at all speeds. Small price. Cons Noisy clutch operation. The motorcycle was produced only for European and…
A failed stove in winter is a very serious problem for the owner of any car, including the Lada Priora. It should immediately be noted that there can be many reasons why a breakdown occurred. Sometimes it will take very little time to eliminate them, but in some cases you will have to tinker. However, often there is nothing particularly complicated in such work, and it is quite possible to do it yourself, even if you have never done anything like this before.
Removing and replacing the stove
For further work, we will need screwdrivers with Phillips and flat designs, as well as a 10-mm head. Replacing the stove on a Priora is carried out according to the following scheme:
- Very often, car repair work begins with disconnecting the negative terminal from the battery. Our situation is no exception.
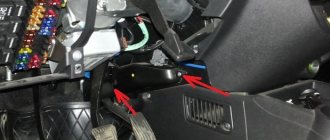
- We disconnect the fasteners on the wiring harness from the shield. To do this you will need to deal with the clamps.
- Disconnect the wiring harness from the bracket on the brake pedal.
- Bend the bracket upwards.
- Unscrew the tightening on the two clamps with a Phillips screwdriver.
- Disconnect the hoses from the heater radiator.
- The electric motor, which is responsible for the operation of the fan, has blocks with wires attached to it; they must be disconnected.
- We also disconnect the wire block from the resistor.
- From the heater, unscrew the nut on the right mount and two nuts on the lower mount. For this work you will need a 10mm socket.
- The bracket that secures the wiring harness must be moved to the side.
- The self-tapping screw on the upper heater mount is unscrewed using a Phillips screwdriver.
- The block with wires is disconnected from the micromotor gearbox, and the heater is moved forward.
- We remove the hoses from the pipes on the radiator by reducing the degree of tightening on the clamps.
- It is now possible to remove the Priora stove.
If it is necessary to replace the Priora heater, and not repair it, then we install a new heating system and reassemble the car in the reverse order. Even a completely inexperienced motorist will spend no more than an hour and a half on this work. Agree, replacing the stove on a Priora without air conditioning does not involve any difficulties or incomprehensible moments.
During this work, it is necessary to carefully inspect all components and parts for wear or damage. For example, you may need to replace stove pipes, clamp gaskets and other important parts. The more thoroughly the inspection is carried out, the less likely it is that after a short time you will have to remove and disassemble the heater again.
Heating system and its composition
The heater is also located in the compartment where the engine is located. It is usually attached to the front shield. The inlet through which air enters for heating is fixed by a filter. It cleans the incoming air and enters the cabin already filtered.
The Priora stove has the following components:
- filter cover;
- the filter itself;
- frame;
- micromotor gearbox;
- radiator;
- resistor;
- fan.
Principle of operation
This device, which is responsible for heating the interior of the Priora, has important mechanisms. Without them the process would not have taken place. The important nodes are:
- The functioning of the next component is called the Priora heater control unit - there are special knobs; when rotated, they are responsible for various parameters of the entire system. The correct work process depends on their working condition.
- Temperature sensor in the cabin - with its help you can maintain a stable temperature in the cabin throughout the trip.
- Additional resistor - it is located in the fan housing along with other elements.
- Correctly connecting the radiator through special hoses to the cooling system helps avoid overheating. Due to the fact that part of the cold air is supplied for heating, and the second for cooling, you can use the stove for a long time without fear.
- The heater damper micromotor is responsible for control control. With its help, you can direct the flow not only inside the cabin, but also in different directions, in particular: to the front window and the driver's and front passenger's doors. This not only warms up the interior, but also melts glass that is frozen or fogged up due to the large temperature contrast.
The stove in the Priora has such features, but not all operating aspects were familiarized with.
Features of air distribution
You can be convinced from personal experience that the warm flow does not flow to a certain point, it spreads evenly throughout the entire car. This is a feature of the priors, for which elements such as:
- air ducts on the sides;
- glass blowing;
- air distribution housing;
- Priora's heater damper and its gearmotor;
- air duct at foot level.
The air distribution housing and air ducts are held to the panel by fastening to the rear of the panel. The air distributor inside has special dampers. Their adjustment allows you to change the direction of warm wind flows. When the car is in motion, air enters it with a certain pressure. The faster the vehicle moves, the stronger the pressure. To ensure that the interior heating process occurs evenly regardless of the speed, manufacturers used a fan. It works at all speeds - the stove control unit is responsible for this.
Changing the cabin filter
There are Lada Priora configurations that include air conditioning. It could be HALLA or Panasonic. Owners of such cars are also concerned about replacing the stove on a Priora with air conditioning. But first, it’s worth understanding the air conditioners themselves, which differ not only in the country of manufacture.
HALLA is made in Korea and Panasonic is made in Taiwan. You can find out which air conditioner is installed in your car by visual inspection. Attention should be paid to the button, which is located in the center of the air conditioner control panel. Panasonic system has a button to turn it on, but HALLA does not have such a button.
Car owners should change the filter regularly. so that there are no foreign odors from the street in the cabin, and the air is clean. Before you find out how to change the heater filter on a Priora, you need to know the type of system that is installed in your vehicle. After all, each cooling system model has different filter elements.
The filter changes differently depending on whether the car has air conditioning or not. If the car is not equipped with an air conditioning mechanism, then proceed as follows:
- Open the hood.
- We dismantle the grill installed under the glass on the left. There are screws on it, closed with plugs. They need to be unscrewed. After completing this step, access to the filter will be freed.
- The cleaning component cover is held in place by four bolts that must be removed.
- We remove the cover, which will allow us to get the filter. We clean the vacated area from possible contamination and debris.
- We install a new filter element and assemble the car in the reverse order.
If the car has a cooling mechanism, the actions will be slightly different.
- Open the hood and find the required part.
- We bend the upholstery material.
- If Panasonic is installed, then the latch on the filter element must be unscrewed. With a Hull cooler, you will need to press the latch, which will open the lid.
- We take out a filter that has already served its purpose and in its place we put a new one, which will need to be twisted using the slots in the housing.
- We install the cover and all parts in their place.
Repairing the Priora stove may be associated with a number of problems that initially need to be correctly diagnosed. We will write several more articles on this topic and consider the main problems in detail. In any case, you need to know how to disassemble the stove on a Priora, because this is the basis.
The main differences between a stove with air conditioning and a standard one
The main feature of this device is the presence in the air duct of a heater, an air conditioner evaporator radiator, which cools the air passing through it.
Operating principle of the air conditioner
All cars equipped with these devices have approximately the same set of components. It includes the following elements:
- Control block.
- Relays and fuses.
- Air conditioning radiator with fan.
- Compressor with electric coupling.
- Evaporator.
- Aluminum tubes for connection.
- Sensors and wires.
The main feature of this gas is its ability to lower temperature when strongly compressed. That is, the higher the pressure in the system, the lower the temperature during evaporation. This is such an interesting thing. In general, when turned on, the compressor pumps pressure into the evaporator, located in the heater housing in the path of the air sucked in by the engine. The heated gas goes through the return pipe to the radiator, located in front of the main heat exchanger of the cooling system. And from there, under pressure, again into the evaporator. The air conditioner is turned on from the control panel of the unit, with a button built into the heater mode handle.
Differences
It is the presence of the evaporator that dictates the requirements for the location of the stove components. That is why the electric motor of the Priora heater is located not vertically, as on a standard stove, but horizontally. And the Priora cabin filter takes a vertical position instead of a horizontal one. There is a separate article about this on replacing the Priora cabin filter.
Heater radiator with air conditioner
It was also positioned somewhat differently. The difference is that it does not go towards the vacuum brake booster, as on a simple Priora, but forward. That is, in the direction of the car engine. All this is done so that you do not have to dismantle the entire stove to replace the unit.
Heater fan
The engine on such stoves, as already mentioned, is located vertically. One detail. If a Panasonic air conditioner is installed, then its electric motor is located on the right side of the stove (along the direction of the car). But on the Hallo system, on the left. Next to the radiator. The Halo air conditioner motor is slightly smaller than the Panasonic motor.
Air conditioner evaporator
And, of course, the evaporator radiator. It is installed in the right half of the heater, right at the air inlet. It is its presence that requires special care when repairing and replacing any part of the climate control system.
Replacing the heater radiator on a Lada Priora
If the stove on your Lada Priora starts blowing cold air instead of hot air, you should pay attention to the heater radiator. There are already discussions on our website about why the stove on the Priora does not work. But still, we decided to publish additional material on replacing the heater radiator with our own hands.
Features of the design of the stove on the Lada Priora
Main elements of the heater:
– heater heat exchanger (radiator), designed to heat the air entering the passenger compartment with the heat of the engine cooling liquid; – an electrically driven fan (supercharger), providing a controlled supply of outside air to the heater dampers; – a damper for the air temperature regulator coming from the heater into the passenger compartment, the position of which determines the amount of air passing through the heat exchanger of the heater, and the amount of outside air passing bypassing the heat exchanger; – air heating distributor dampers 4, which distribute the air entering the cabin from the heater through air ducts 2, 6, 8 and 9 or for blowing the windshield.
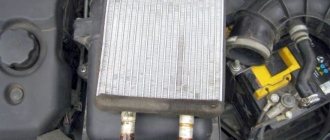
If antifreeze or antifreeze is leaking from the stove, then the radiator is leaking and requires replacement.
Let us recall that in the previous article we looked at how to replace a Priora heater fan with your own hands.
Replacing the stove (heater) radiator on a Priora
— drain the antifreeze. - remove the heater. - Prepare a Phillips screwdriver.
Video. How to remove the stove on a Lada Priora
Replacing the heater on a Priora with your own hands:
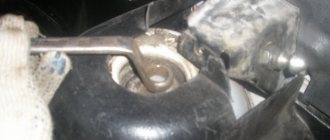
1. First of all, you need to unscrew the 3 screws that hold the heater radiator.
2. Then remove the radiator from the stove body.
Installing the stove radiator will be done in the reverse order; this requires a little sleight of hand. I spent about 50 minutes on this operation.