The heating problem in the interiors of VAZ Samara cars is not particularly acute, since the heater is designed quite well. Sometimes the assembly and quality of components are upsetting, which nullify the entire structure. With the VAZ 2109 heater working completely properly, the microclimate in the cabin is within normal limits and there is no need to particularly complain. But as soon as one part fails, a series of dismantling works begins, which takes a lot of time and effort.
Containment:
- Heater device VAZ 2109
- About the reasons for the malfunction of the VAZ 2109 heater
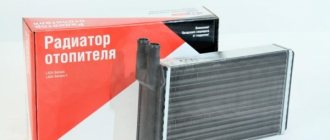
- How to choose a heater radiator 2109
- Replacing the heater radiator 2109 without removing the panel
Typical faults
Where is the heating system on the domestic nine? How to disassemble and remove hoses for repair, for what reasons may the device stop working? If the VAZ 2109 stove does not heat up, first of all you need to understand the reasons why this is happening.
Radiator device for heating system
Causes
If the VAZ 2109 stove stops working, there may be several reasons for this:
- The stove fan does not work. According to the connection diagram, the problem may be an inoperative fan of the heating device. Sometimes the cause is a failure of the fan switch itself or broken and oxidized wiring.
- Another reason why the VAZ stove does not work may be clogged air ducts. They can become clogged with leaves and other debris that falls on the car while parked. Sometimes the VAZ stove does not heat up due to closed air duct dampers.
- On a VAZ 2109, the heater may not heat up due to the radiator; this problem is one of the most common. The heater radiator of a VAZ 2109 or VAZ 21099 may be clogged with dirt, which is why antifreeze cannot circulate through the system. In some cases, the problem is a heater faucet that does not open, or this may also be due to the refrigerant level in the cooling system being too low. If there is an air lock in the system, this will also lead to insufficient heating of the vehicle interior. If the radiator of the VAZ 2109 stove is working normally, it is possible that the power unit simply cannot warm up to operating temperature. Much less often, the reason for the inability to heat the interior is a broken pump.
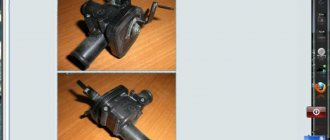
Heater valve for nine
Remedies
How to disassemble the heater on a VAZ 2109 and how to fix the problem?
- First of all, you need to check whether the ventilation device of the circuit is functioning; to do this, turn on the ignition and the interior heater, first at the lowest power. If the device is working normally, this will be audible. Before removing the stove for repairs and changing or blowing out the pipes, you need to make sure that the fan is out of order. Try cleaning the contacts connecting the power wires - sometimes their oxidation makes the element impossible to operate. If, through diagnostics, you have discovered that the ventilation device is working, but it still does not turn on, the problem should be looked for in the wiring.
- The next stage of diagnosing the VAZ heating system will be checking the air flow. Turn the heater on to maximum and check how well it blows from different air ducts - onto the windshield, side windows, and into the feet. If the fan is functioning and there is no good air flow from the air ducts, it is necessary to diagnose the blowers themselves - perhaps they are simply closed.
- The radiator may not work only because antifreeze does not pass through it. As a rule, this is due to the fact that the system is simply clogged due to the use of old consumables in it, in which sediment has formed, collecting in the stove pipes. So first you need to drain the consumables from the system and flush it, in particular the pipes, from sediment. Fluid for flushing pipes can be found at any auto store. The purchased product is poured into the cooling system, then the engine is started, which must run for a certain time in accordance with the instructions. If, after draining the flushing agent from the pipes, you notice dirt and sediment, this indicates the need to fill in new antifreeze. Replacement of pipes occurs in cases where the flushing agent cannot remove all the sediment from the system, which is firmly lodged in the lines. If the radiator device is clogged, there is no other way out other than replacing the radiator of the VAZ 2109 stove.
- The valve of the VAZ stove, as practice shows, is one of the weak points of the circuit. The heater valve is opened and closed by installing a regulator on the panel. This regulator is connected to the tap through a rod. If the thrust is very weak, you can try to adjust it. The VAZ stove valve is replaced if the element does not respond to adjustment.
- If the problem of unit inoperability is due to a low level of antifreeze in the system, it simply needs to be replenished. But at the same time, you should determine the reason why the leak occurred so that this problem will no longer bother you in the future.
- As stated above, the problem may be that the engine does not warm up to the desired temperature, usually due to a failure of the thermostat.
- The unit's electric motor has failed. A breakdown of the VAZ heater motor will make it impossible to heat the car's interior. If the mechanism fails, the issue can be resolved by replacing the heater motor (the author of the video is Pro Remont).
Troubleshooting
To find the source of a leak in a stove radiator, pay attention to the following points:
- The primary sign of a leak in the interior heating system is an increased frequency of adding antifreeze to the expansion tank. At the same time, it is impossible to guarantee that the problem is in the radiator itself;
- Examine the condition of the heater valve and pipes;
- If the culprit is a faucet, it is not difficult to determine. If there are no unpleasant sweetish odors inside the cabin and the floor is not covered with traces of coolant, then this is definitely not it. The presence of such signs indicates that the stove tap needs to be replaced;
- The presence of deformations and cracks in the pipes can only be determined by visual inspection. Therefore, dismantling work will have to be carried out;
- Having discarded the options with pipes and tap, there is only one option left - damage to the heater radiator itself.
You should not delay repairing the radiator, as this will first lead to the need to spend extra money on antifreeze. A liter of coolant costs about 100 rubles. And over time, the problem will worsen, antifreeze will fill the interior, begin to corrode the floor covering, and cause a lot of other troubles.
Video “Step-by-step replacement of the radiator on a VAZ 21099”
Learn more about how this process is carried out in the video below (the author of the video is the Engine Repair channel! And interesting!).
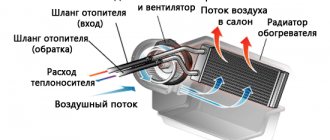
Heating of the interior of any car is provided by air, which is heated in the heater radiator. The VAZ 2109 heater radiator is connected in parallel to the main radiator, which is part of the cooling system of a car engine.
The heater itself is secured with four nuts in the passenger compartment under the instrument panel to bolts that are welded to the air supply box. The air heated in the heater is directed through an air duct system into the passenger compartment. The air ducts are attached to the instrument panel from below and sealed with gaskets.
Reasons why the heater radiator leaks
A coolant leak can be caused by the following factors:
- factory defects during the manufacture of the radiator;
- depressurization of the device due to corrosion processes;
- use of low-quality coolant, the composition of which promotes corrosion;
- mechanical damage to the heater.
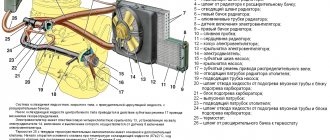
Features of the VAZ 2109 stove design
1. Heater casing mounting bracket; 2. Heater control damper; 3. Left heater casing; 4. Leg heating damper rod; 5. Radiator gasket; 6. Radiator; 7. Heater gasket; 8. Electric motor; 9. Fan shrouds; 10. Fan impeller; 11. Heating damper; 12. Heated windshield air duct; 13. Side nozzle air duct; 14. Side nozzle; 15. Central nozzle flap; 16. Blade pusher; 17. Blade axis; 18. Shoulder blade; 19. Lever for shutting off the central nozzle; 20. Windshield heating damper rod; 21. Lever for changing the direction of air flow; 22. Air heating control handle; 23. Windshield air supply handle; 24. Leg air supply handle; 25. Control lever bracket; 26. Bracket for fastening the rod shell; 27. Crane control rod; 28. Heater control damper rod; 29. Foot heating flap; 30. Axes of air heating control levers; 31. Screw clamp; 32. Heater valve; 33. Crane body; 34. Valve lever; 35. Hoses connecting the tap to the heater radiator; 36. Internal ventilation duct; 37. Windows for heating the feet of rear passengers; 38. Heater valve; 39. Driver's foot heating window; 40. Facing the central pillar; 41. Internal cavity of the central pillar; 42. Exhaust ventilation duct; 43. Upholstery of the central pillar; 44. Exhaust ventilation deflector lining; 45. Rubber valve; 46. Deflector housing; 47. Exhaust ventilation deflector; 48. I. Heater; 49.II. Heater operation diagram; 50.III. Heater valve; 51.IV. Interior exhaust ventilation
The stove consists of 2 plastic casings (right and left), which are connected to each other along the perimeter with fastening brackets. A special harness is placed into the grooves of the casings for sealing. The electric fan, which forces air into the passenger compartment, is secured with two screws on top of the heater. The design of the stove is made in such a way that the electric fan can be easily removed from the engine compartment.
An electric motor of type 45.3730 is attached to the fan casings, on the shaft of which an electric fan impeller with three rotation speeds is installed thanks to two resistor spirals. To obtain the required rotation speed of the impeller, an additional resistor is provided, attached to the hole in the stove casing on the left side with a screw.
The radiator for heating the supplied air is installed in the heater casings. It is attached to the right casing with three screws and sealed with a polyurethane foam gasket. It consists of:
- two rows of tubes,
- cooling plates,
- two plastic tanks.
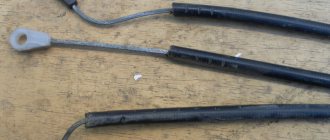
The heater tap, consisting of a housing with two pairs of pipes, is connected to the cooling system by rubber hoses. The cooling system pump circulates fluid through the radiator. On the supply line in the faucet body, a plate faucet valve is installed on the axis, which has a hole that allows coolant to pass through. The valve lever is connected by a rod to the handle lever, which can be used to control air heating. When you turn this lever, the hole in the valve will open the line so that fluid begins to flow into the radiator. Read more about replacing the heater valve here.
The stove is controlled using three handles, the levers of which are mounted on the axes of a plastic bracket attached to the instrument panel with four screws. The heating control handle acts on the valve lever through the rod and on the damper drive lever. When it moves completely to the right, both the valve and the damper are fully opened, and air is supplied by an electric fan through the radiator, where the heated coolant flows.
Checking the system
Before you start work, you need to make sure that it is the heater radiator that is to blame for the malfunction.
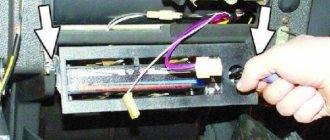
- We bend the center console where the computer is located. We disconnect the shield from the overhead torpedo, here we will see the body of the heater itself;
- We take a flashlight and look, it should be visible if water is leaking. We immediately check the tap and pipes.
- Let's look at the leaks. The fact is, if the leak is not large, you might not notice it in the cabin.
Therefore, it is worth inspecting everything with sufficient quality.
You can watch the video on replacing the stove radiator on a VAZ 21099 on our website. But only after a thorough inspection can you begin to work.
Instructions for this topic are given below.
Features of operation and repair of the VAZ 2109 stove
Many owners of a domestic car of this brand know that the VAZ 2109’s heater does not heat well. As a result, the interior warms up poorly, and driving in such a car is not comfortable. In such cases, the stove is modified. Most often this is done within the framework of VAZ 2109 tuning with your own hands. Video and photo instructions for do-it-yourself tuning work can be found on the Internet. But sometimes it is enough to remove the VAZ 2109 stove and take it for repairs.
The operating procedure is described below.
- Loosen the clamps and disconnect the two hoses from the tap pipes under the instrument panel from inside the cabin.
- Loosen the clamps and disconnect the hoses in the engine compartment from the tap pipes.
- Unscrew the nuts securing the stove faucet.
- Remove the valve from the front panel.
- Remove the crane rod holder.
- Disconnect the rod from the crane lever.
- Remove the cover protecting the gear shift lever from the floor tunnel lining.
- Remove the floor covering.
- Unscrew the fastening screw at the rear of the floor covering tunnel.
- We remove the floor tunnel lining with a shift back.
- We remove the internal ventilation duct and disconnect it from the stove body.
- Disconnect the wires from the heater motor.
- Disconnect the wires from the resistor.
- Unscrew the mounting nuts on the right side of the heater.
- Unscrew the fastening nuts and remove the heater along with the control panel.
After these manipulations, it is enough to choose a good workshop and take the stove there.
When the stove blows weakly, you can adjust the dampers. How to do this is shown in the video.
The radiator may be the culprit for leaving a cold heater in your car.
Instructions for replacing it are presented below:
- Open the heater valve completely and drain the coolant from the system.
- We remove the instrument panel: first disconnect the wire from the battery terminal with a minus sign, set the wheels in a straight position, disconnect the drive cable and the choke rod.
- Remove the heater control knobs, the fan switch and disconnect the trim.
- We disconnect all connectors with wires: fog lamps, exterior lighting, hazard warning lights, cigarette lighter illumination, rear window heating.
- We unscrew the screws that secure the control panel and the canopy over the instruments.
- Disconnect the fitting hose, speedometer cable and block with wires.
- We remove the devices from the panel.
- Remove the hydraulic light corrector handle and unscrew the nut that secures the headlight corrector socket.
- We remove the steering wheel and all switches.
- We take out the ignition switch with the steering column pipe.
- We remove the handle from the rod, disconnect the screws that attach the rod guide to the dashboard.
- Unscrew the screws securing the instrument panel on the left and right sides.
- We take out the panel.
- We unscrew the screw from the right edge of the stove, which secures the damper rod clamp, which is responsible for heating the glass.
- We take out the heater radiator by unscrewing the 3 mounting bolts.
- Loosen the clamps securing the hoses and remove them from the pipes.
The radiator must be thoroughly cleaned, and in case of serious problems, it is better to replace it with a new one.
If, during a routine inspection of the coolant reservoir VAZ 2108 2109 21099, you noticed that it had become smaller, you added it to the normal level, and after a few days the level dropped again. This means there is a leak somewhere in the cooling system. It is looked for using a visual inspection: the attachment points of the hoses, clamps, and the absence of cracks in the hoses are checked. And if during the inspection you find out that coolant is flowing into the passenger compartment, then this indicates a leak in the heater radiator VAZ 2108 2109 21099. With this malfunction, antifreeze is like As a rule, it begins to drip onto the gas pedal, and with it onto the driver’s shoes. Antifreeze is a caustic liquid, so it can ruin good shoes. And antifreeze itself costs money; a liter bottle of antifreeze costs about $2. Therefore, as soon as antifreeze begins to leak from the cooling system of the VAZ 2109, it is necessary to find this leak and eliminate it. So, you have to replace the heater radiator (stove) of the VAZ 2109 . But it’s not so easy to get to. All car manuals say that you need to disassemble the entire front panel. Of course, without it it will be much more convenient for you to change the radiator, but this will take you about 3 hours of time, not to mention the reassembly. Therefore, below we will show a method for replacing the heater radiator of a VAZ 2108 2109 21099 without removing the front panel. But first you need to drain all the antifreeze from the engine cooling system. In total, about 8 liters of antifreeze circulates in the cooling system of the VAZ 2109, so prepare containers in advance where you will drain it. Wear rubber gloves, as it is better not to touch the antifreeze with bare hands. It would also be a good idea to have a couple of liters in reserve, since a little will probably spill. Open the coolant tank cap and find the cap at the bottom of the cooling radiator.
Disassembling the torpedo
First, we prepare a couple of containers; they will be needed for the machine parts. You can put plastic in one, and different screws in the other.
In order for us to get to the torpedo bolts, we need to remove the trim, which is located in its upper part;
Attention: You should prepare and place empty containers nearby; they will come in handy if coolant suddenly starts leaking. Take the volume within 6=7 liters
It's better to have a reserve.
- The most important thing is to purchase a radiator. Before paying, inspect and check it for defects and only after that make a purchase;
- Prepare the necessary tools. Put in a set of sockets and screwdrivers. After this, take a flashlight and you can begin further work;
- Replacing the VAZ 21099 radiator heater begins with closing the tap, and the heater should be set to cold. The engine must also be completely cooled;
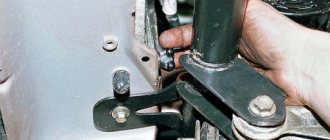
- We unscrew the radiator mount, which consists of three bolts, raise the rod, which is located above the radiator and remove the pipes;
- When you remove the first pipe, be careful to place the container. A little liquid should come out of it, about 200 grams. Use clean containers; after repairs are completed, you can use this antifreeze back;
- We plug the first pipe with something and remove the second one. In principle, liquid should not come out of it, if only a small amount comes out;
- Replacing the radiator on the VAZ 21099 stove continues by removing the radiator. Which moves without problems, quite easily, but on the way of movement we will be prevented from doing this by the edge of the torpedo. You can raise it slightly by resting your back against the bottom edge of the glove compartment. After that, we place it on the lower mount, which is located on the passenger seat side. After this, the stove will come out freely;
- We attach foam rubber around the perimeter of the new radiator, which is sold complete with the part. In principle, any other sealant can be used;
- We insert the radiator into the heater housing. We put on the pipes and make the connection using clamps.
Attention: The clamps should be tightened after a couple of days. To avoid antifreeze leakage
Do not forget to lubricate the fittings on the radiator with silicone glue and only put this on the pipes;
Replacement of the heater radiator high panel VAZ 21099 is complete. Only after filling do we immediately check the operation of the stove. And you may be very surprised that it only heats up at high speeds. This may indicate the presence of an air lock. It can be removed in the following way:
- We park the car so that the front is higher than the rear. The higher the better.
- Remove the expansion tank cap;
- We set the engine speed to 4000, not lower. Let it run for 2-3 minutes. Then let it run for a couple of minutes at idle speed. After this, keep it at 4000 for a couple of minutes;
- After this, add antifreeze. Close the lid. Now everything will be fine.
Of course, such a breakdown can happen unexpectedly. But it is better to sometimes check the floor in the cabin under the rugs. This will allow you to detect the leak in time and eliminate the malfunction.