I bought myself a toy in the summer - Niva 21213. All sorts of minor improvements began.
Remembering the problems with the heater from the time when I had the 2106, I decided to immediately remake this device. We don’t go into plumbing details - a lot has been written about this on the Internet.
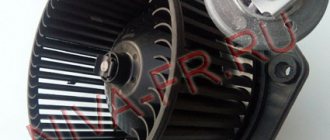
1. The snail from 2108 in the air supply boot is not a problem. Decided and completed in two days. Snail price – 900 rub. 4-speed switch, price 150 rubles, resistor from 2123, price 120 rubles. I completely threw out the air intake damper; it is not needed there. The air flow is crazy. Original three-row copper radiator. The temperature in the cabin is like in Africa. Tested already in winter.
Now a little about the tap. Knowing the “advantages” of the Zhiguli ones, I immediately went to the disassembly site and found a heater valve from some Toyota:
I had the same one on my Toyota, so I took the already tested one. The faucet was installed under the hood. I brought the radiator pipe directly under the hood and threw out the original faucet. I redid the tube coming out of the cylinder head and made a direct exit. I connected the pipe to the tap, and from the tap to the radiator inlet:
True, it’s hard to see him – but he’s there.
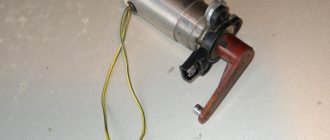
I found a suitable pipe in a store, I don’t know what car it came from, the sellers don’t know either. From the outlet of the radiator, the pipe goes to the thermostat, made from two pieces, also unknown, but it seems to be from Oka, at one end there is just an extension of 18, under the thermostat. To control the crane I used a heater damper servomotor from a Japanese car, I don’t know which one:
I connected the cable from the Niva faucet, having previously shortened it to the required size. I found the drive control in a headlight from the Volga, an electric headlight corrector. I disassembled the headlight unit, and there was the Bosch corrector drive:
I disassembled the drive - there is an electric motor and an adjustment board made on the TLE 4209A chip:
I looked at the datasheet for the current of this microcircuit - it is enough for a more powerful drive, I connected a servo drive from Toyota (see the group of four photos above).
Now the position of the heater tap is adjusted from the passenger compartment using a variable resistor. By what angle you turn the regulator, the tap will open or close by the same amount. Stops in any position from “closed” to “open”. The degree scale is not used:
I connected it according to the headlight electric corrector circuit:
2. Thermostat from Shniva - also very simple:
I plugged the hole on the pump and threw out the metal tube from the radiator:
I connected the carburetor heating pipe. The lower pipe from the radiator was connected from two pieces using a cut aluminum pipe from the thermostat housing 2110. The photo shows it directly. But the thermostat was a little pulled to the side, so I decided to redo it. Everything was done locally. No problems. For the future, I plan to machine a threaded pipe for the temperature sensor; I want to install electric radiator cooling fans. Most likely also from disassembly from a Japanese car. The price is approximately 400-500 rubles. But this is already for the summer. For now let's talk about temperature. It warms up quickly, I can’t tell you about the time, I’ve never driven a Niva in winter before, I have nothing to compare it with. But when it warms up, the thermometer needle does not move in the operating temperature zone under any driving mode and at any temperature. True, this year it was not lower – 25.
3. Distribution of air flows - this is what I had to rack my brains about, and this is what I want to write about. First, we need to modify the lower part of the heater. I threw out the bottom cover, which opens air to the feet. I cut out the internal parts of the fan installation, resulting in a smooth surface. A sheet of plastic was rounded and inserted inside, directing the main flow to the exit upward to the glass. I cut two air ducts for the legs into the lower part. I sealed everything with sealant. I installed two flaps, one closes the holes towards the legs, the other towards the windows. The third damper is a standard one, it switches the flow to the face and to the glass. The operation algorithm of the dampers is the same as on modern heaters. Face-face, legs-legs-glass, legs-glass. To control the dampers I used servos from the stoves of Japanese cars - fortunately, they cost 100 rubles to disassemble. I took 4 suitable pieces. Each drive contains a gear motor, printed tracks - limit switches, diodes for turning on reverse and a variable resistor - position sensor.
The first gear motor on the legs is open-close, the second is the face-glass, the third is the upward flow open-close. When the upward damper is closed, air only blows on the legs. When the legs are closed, the air blows upward, that is, onto the glass or the face, which is selected by the face-glass damper:
The servo drive control circuit is primitive - a biscuit switch and a diode switch:
Realizing that the homemade product would look very collective farm, I bought an automatic heater control unit from Priora with three knobs, 1,700 rubles:
I didn’t use the block itself, only the housing was useful. Not having much hope for our electronics, I decided to use it as little as possible. I removed everything from the case. I etched a board of the same size only with holes for switches and for six backlight LEDs:
Board in "Sprint Layout" format.
I secured the fan speed switch, the faucet control resistor and the 2-way, 11-position biscuit switch. I glued some plastic, dichloroethane, into my beard. I bought a new beard so I could carefully glue the block in. But as always: CRY OF THE SOUL. The new beard turned out to be nylon, dichloroethane does not glue it, only a soldering iron. Took a week to do it carefully. But. The spare parts we sell are of very low quality, it turned out to be a whole centimeter too short, that is, it doesn’t fit into place, it doesn’t fit on the deflectors that blow in the face. I had to take my own one and urgently make it out of it. In a hurry, winter is just around the corner. It turned out a little sloppy. I'll re-glue it later. I threw out the standard heater control levers. The fan resistor was cut into the furnace body so that it was blown when the fan was turned on. The fuse on the resistor burned out after 3 days - I had to short-circuit it. Now there are 4 speeds, although I don’t turn them on higher than the second. Not required. The end result is this device:
Possible heater malfunctions and ways to eliminate them
If the stove in a VAZ 21214 has stopped working, then, in principle, repairing it yourself is not a particularly difficult task.
The reasons for the malfunction why the Niva stove refuses to work are given below:
- Failure of the additional resistor. This element of the system is located behind the glove box and is designed to control the ventilating device for pumping warm air into the cabin. The problem is solved by replacement.
- Wear of pipes. Over time, the pipes begin to wear out, and temperature changes especially contribute to this. To detect worn hoses, each line must be carefully inspected. Wear may be indicated by cracks and other damage to the pipes through which antifreeze can escape.
- The heater valve is faulty. A breakdown of this component may be indicated by traces of a coolant leak in the vehicle interior. If the heater tap is being replaced, it is better to use a ceramic device; its service life is usually several times higher than that of traditional metal devices.
- Problems in the operation of the control unit. It is best to have this part repaired by a qualified electrician.
- The heater radiator has failed. On Niva 21213 you can easily replace it with your own hands, we will talk about this below (the author of the video is the OWNER G channel).
It is very easy to find a broken fan resistor - the fan only runs at maximum speed.
Heater (stove)
Name: Vladimir Reg.: 02/20/2020 Messages: 269 From: Tomsk region Age: 66 Car: VAZ 21214 2014
Reg.: 10.10.2012 Threads / Messages: 42 / 4784 From: Moscow Age: 57 Car: 213100M 2011 E-gas
Reg.: 04/14/2019 Messages: 18 From: Siberia Car: Lada 4x4
nibor in general, theoretically (since there is no viburnum and never was) should both close and spin, as I understand it they are from grants
Name: Alexander Reg.: 03/22/2012 Threads / Messages: 1 / 1142 From: Nizhny Novgorod Age: 56 Car: VAZ-21213-1995. There is a VAZ-21214M 2009. and will be.
My opinion about the above stove options is that I assume this is a copy-paste from my first options.
The question is controversial, of course, but why do I think so, and what are the differences?
The downside of my first heater option is that instead of a standard motor, I decided to install a 2108 motor with drilling holes in the lower firecracker.
Which prompted me to make other options - I didn’t like the flow of air from the deflectors in the heater body to the feet of the driver and passenger, because it was nirvana, damn it, flaw, i.e. there was a ragged stream of air, 10 cm from the hole there was no longer a stream/flow of air, and the sound of the stream was reminiscent of the sound of a water pump choking on air.
The version of the deflectors does not matter, because in my version the deflectors are 2107, emnip.
But it doesn’t change the essence. There will be a flaw.
Yes, those who install “these stoves” instead of drainage, yes, will have a blast.
But in my latest version, the air flow on the passenger side lifts up the skirt.
My stove was seen and felt only by one forum member - Dizel_dt-75.
Right view (passenger):
Left view (driver):
My opinion: Copy-paste of my idea, nothing more.
Reg.: 08.23.2009 Threads / Messages: 2 / 12399 From: Nizhny Novgorod region, Vyksa district Age: 37 Car: VAZ-2121 1985
Reg.: 05/26/2016 Posts: 36 From: St. Petersburg Car: Niva 21214, 2003
Colleagues, what can you say about this product?
Reg.: 10.10.2012 Threads / Messages: 42 / 4784 From: Moscow Age: 57 Car: 213100M 2011 E-gas
Name: Alexander Reg.: 06/15/2018 Messages: 67 From: Ivanteevka Age: 51 Car: VAZ2131 2010
Reg.: 01/25/2010 Threads / Messages: 1 / 1183 From: Tomsk region. Age: 32 Car: VAZ-21310 2007
Name: Alexander Reg.: 06/15/2018 Messages: 67 From: Ivanteevka Age: 51 Car: VAZ2131 2010
Name: Alexey Reg.: 03/05/2012 Messages: 544 From: Yaroslavl Age: 34 Car: Niva 21214, born in 2007
alexlozzh, what about this option with air volume and audibility of the motor?
I myself spent a long time riding with the eighth snail “in the boot” (performed by our forum member) - it’s fun and quiet, but it’s annoying because there is no way to block the flow of air from the street, plus (more precisely, minus) the volume of air coming from the street is less than in the drain. All sorts of pontoon aerodynamic air intakes partially solve this problem, but not completely.
Just for fun, I shoved the eighth motor (with the implantation of the stock impeller) into the interior box (I’ll show you a photogram later), glued it with Shumka, vibrato, glued everything that could be glued and everything that couldn’t. The box has acquired such weight and rigidity that you can kill with it without particularly straining, but that’s not the point. It is quieter than stock, but not much quieter. At speeds 1 and 2 (Kalinovskaya knob) it’s still tolerable, but at speeds 3 and 4 you get the feeling of the presence of a Soviet vacuum cleaner turned on.
In combination with the eighth snail under the hood, it ventilates the interior well, but oddly enough, it doesn’t really cool, because... Warm air is actually taken from the cabin and blows out warm, but this is another issue that will be resolved somehow later.
Has anyone managed to make the motor in the original gearbox really quiet so that it is not so audible?
Work is not a wolf. Rest is also not a wolf. Nobody is a wolf, only a wolf is a wolf.
Reg.: 07.27.2009 Threads / Messages: 2 / 480 From: Toronto, Canada Age: 50 Car: Niva 21214 monoinjector, ’96, went to Canada under the Cossack brand
Name: Alexey Reg.: 03/05/2012 Messages: 544 From: Yaroslavl Age: 34 Car: Niva 21214, born in 2007
Cossack No, by the way, I heard the sound of the engine. Although the sound from the air is also quite audible in the cabin. I had an idea to install a squirrel wheel, I don’t even remember why I abandoned this idea, either it didn’t fit, or something else. I wanted to print an impeller on a 3D printer and even printed it (sorry I can’t find a photo), in general something like this
the blades were like candy wrappers for a fool, at minimum the muzzle was hurricaneing like hell. It did not merge with it due to strong beating, because There were some problems with the central heating system and in the end it was not possible to plant it straight - I played around with it, got sad and gave it to a neighbor.
I framed my box like this: it would have stood longer, but that bastard ruined my new copper radiator with a nut, which I had to solder.
By the way, today I was just fiddling with the radiator and felt the airflow zone from the eighth snail in the boot from below. This zone is extremely small and only the central part is blown. I need to fence the divider, but I won’t do this, because... I still plan to throw out the snail and go back to the basics, because... I wish to use the damper.
I asked about the heater from a neighbor in the yard, he has a ’16 or ’17 urban with an air conditioner, he says that it makes the same noise as in his previous 1994 Niva.
Work is not a wolf. Rest is also not a wolf. Nobody is a wolf, only a wolf is a wolf.
Instructions for replacing the stove
Replacing the radiator of the Niva stove is carried out as follows:
- First, you should drain all the coolant from the heating unit and cylinder block; to do this, place a container under the drain hole and unscrew the cap. If you are sure that the entire system is sealed, then there is no need to drain the consumables, just turn off the tap.
- The next step will be to remove the center console and the shelf under the glove box. For greater convenience, you can also remove the gearbox lever, since it will get in the way.
- After completing these steps, you can remove the lower air duct. It is not necessary to remove it, but doing so will make your repair much easier.
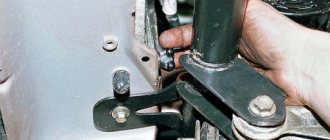
- Next, you need to unscrew the bolts that secure the radiator assembly bracket.
- After the bolts are unscrewed, it is also necessary to loosen or completely unscrew the screws securing the front panel on the left and right sides. It is not necessary to completely dismantle the panel.
- Then you can remove the rods from the faucet of the heating unit, after which you can remove the casing with the fan.
- At the final stage, the radiator device is removed, but before that you need to disconnect and dismantle the pipes. Be careful, some coolant may remain in them. The new radiator assembly is mounted in place of the old one, further assembly is carried out in the reverse order, making sure that there are no air pockets in the system. Otherwise, the efficiency of the stove will be minimal.
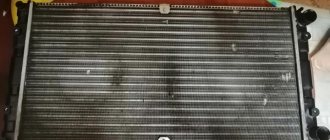
Radiator of the Niva stove
The heater radiator of VAZ 2121, 2131 is not a critical vehicle component. But in cold weather, driving a car with a faulty heater is unlikely to be a pleasure. In addition to the sheer coldness in the cabin, the windows may fog up, which leads to poor visibility, and this is a matter of safety for the driver, passengers and other road users.
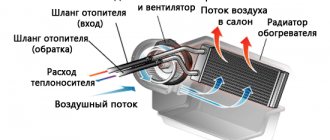
Structurally, the radiator is a heat exchanger, or more simply put, a battery, whose task is to heat the air passing through its grille. Externally, it looks the same as a similar unit on other cars.
The same type of heater radiator is used for “Niva” and “classic” VAZs
The Chevrolet Niva radiator is not suitable for the VAZ-2121, 2131 family. This should be taken into account when selecting spare parts in the store.
Radiator location
The heater radiator on the Niva is located under the dashboard behind the center console between the driver and right passenger seats. This is the standard location for the heater in most cars. Compared to many other car models, access to the radiator in the Niva is quite simple. This will take about 10–15 minutes for a semi-skilled specialist.
The radiator of the Niva stove is located in a plastic casing under the center console
Radiator design and functions
The stove radiator is a unit in which heat is transferred from the heated liquid to the surrounding air. It consists of two horizontal rows of tubes intersecting with vertical metal plates (ribs). On the sides, the structure is limited by panels that provide the functions of tanks. The incoming and outgoing pipes of the cooling circuit are connected to one of the tanks.
There are two unconnected cavities inside the tank. Antifreeze enters through the inlet pipe into the cavity connected to the upper row of tubes. On the other side of the radiator there is a return tank, through which antifreeze flows into the second row of tubes and moves in the opposite direction to the second cavity of the tank and the outgoing pipe. After leaving the radiator, the antifreeze enters the main cooling system of the car. Antifreeze circulating in the tubes ensures heating of the entire grille, thanks to which heat transfer from the radiator reaches maximum effect.
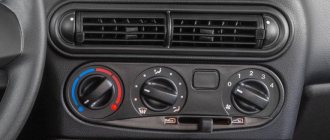
The radiator is installed in the instrument panel console in a plastic casing and sealed around the perimeter with foam tape. Air heating depends on the degree of opening of the valve that regulates the flow of liquid through the radiator. The valve is installed at the radiator inlet and is controlled by the upper lever on the center console.
Cold air comes from the external environment, passing through a hot radiator, heats up and enters the car interior
The main and only function of the heater radiator is to heat the air flow entering the cabin through the air ducts.
Radiators are made of aluminum or copper. The aluminum product does not hold temperature well. A copper radiator works more efficiently, but is more expensive. The advantages of a copper radiator include its maintainability: the ability to seal cracks in the tubes.
Options for upgrading the heater on Niva
To ensure that the heater works more reliably and you do not have to repair it from time to time, it can be modernized. As practice shows, a modernized stove for Niva will not only be able to work several times longer, but its functionality will also be more efficient. Below are several options that will allow you to modernize the node.
We will not describe them in detail, but know that all these options have already stood the test of time, since they are used by many of our compatriots, so you can have no doubt about their effectiveness:
- the use of an electric stove motor from a G8 - this device has proven its reliability;
- installation of additional resistance of the ventilation device;
- installation of a three-row copper radiator assembly;
- installation of a more reliable heater valve from the VAZ 2108;
- as an option, you can install a G8 heater assembly on the Niva.
Price issue
Video “How to install a heater motor from a VAZ 2108 on a Niva”
Detailed instructions for upgrading the heating system are given in the video below (author - Serg Morozov).
Heater VAZ 2121, 21213, 21214, 2131 modernized, in collection. with body
The heater is designed for installation on VAZ 2121, 21213, 21214, 2131, Lada 4×4 cars.
The heater is a plastic housing with a built-in electric motor and air blower.
It has a number of advantages over a standard heater:
- The motor is easy to install. Practical silent operation.
- Three-position switch.
- Increased heating speed and air flow into the cabin.
The serial motor with a fan in the cabin can be removed (removal/installation steps are carried out in accordance with routine maintenance), but if you want to have a spare option, you can leave it. In this case, the old motor with an impeller will provide some resistance to air movement
How the heater and cooling fan works in Niva Chevrolet
The movement of air through the heater radiator is carried out by a constant current motor . The impeller is installed directly on the rotor shaft, which minimizes power loss. The electric motor of the fan is firmly fixed in a sealed casing, which is located under the windshield of the car, so to repair it you will need to perform work to remove certain parts of the interior.
Attention! The highest impeller speed can reach 3000 rpm, but only if a unique electric motor model is installed.
The operation of the electronic heater motor is controlled from inside the car using a special switch.
Additional resistor
To ensure a comfortable temperature inside the car's interior, the fan motor does not always need to operate at full power. To reduce the speed, additional resistance is installed in the electronic circuit one by one . This simple but effective method allows you to significantly reduce the intensity of the air flow.
For the most precise adjustment, the resistor has 3 resistance values , and taking into account the possibility of direct connection, the rotation of the motor rotor can be set in 4 different high-speed modes.
A conventional product provides the following characteristics of the current , which is directed to the electric motor after passing through the internal spiral of the limiter:
- 5.1 A – 1st speed.
- 9.0 A – 2nd.
- 14.0 A – 3rd.
Attention! Depending on the type of motor installed, the maximum current at fourth speed can range from 18 to 25 Amperes.
Fault Diagnosis
The stove supplied as standard will need to be modified for preventive purposes. The procedure will not take much time, but it will prevent many problems in the future. Driving experience suggests that the first severe frosts will undermine the “health” of the device. The list of main weaknesses is as follows:
- the optimal operating temperature range for model 2121 is from -5 to +10°C;
- inability to warm up the air in the cabin if outside is -8°C or lower;
- when the blowing power increases, the temperature does not increase;
- When driving in 2nd gear, the noise from the Niva's stove becomes significant.
That is why it is better to take the necessary measures in advance. The driver has few alternatives. On the one hand, everything remains in its place. The heating device is used at minimum power. During mild winters this is still tolerable, but with the onset of real cold weather the conditions will become unbearable. On the other hand, it's easy to spend a few hours rectifying the situation.
The presence of an unpleasant sound indicates the need to replace the device. A specialized retail network offers ready-made options for heating mechanisms for Niva. If desired, it can be assembled independently.
The second option is considered more preferable. When you assemble it yourself, you have the opportunity to literally personalize the stove. To do the work yourself, you will need to visit a specialized store or market to buy spare parts.
When purchasing, original parts or analogues are selected. The main thing is that they have a quality certificate. Otherwise, they cannot be installed. It would be useful to rewrite the technical data of the vehicle so as not to exceed the parameters recommended by the manufacturer.
What kind of malfunctions can there be?
If the engine is working properly, but the cooling fan does not work, then this condition of the ventilation and heating system may be caused by an obvious break in the wiring. In this case, a painstaking visual inspection is carried out with simultaneous ringing of the electronic circuit with a tester.
From time to time, a malfunction of the cooling and heating system manifests itself in the constant rotation of the fan motor at high speeds. Despite the apparent insignificance of such a breakdown, it can lead to an excessive increase in temperature in the cabin.
In addition, operating the stove in this mode produces the highest level of noise, which also causes discomfort. The reason for such “behavior” of the ventilation and heating system may be a malfunction of the additional resistor. Replacing this element can completely eliminate the damage.
Technical details of the procedure
The efficiency of the new heating system on Niva will be determined not by the cost of the purchased parts, but by their quality. To operate, you will need the following elements: a car resistor, a figure-eight heater and a “snail”. It is a mistake to believe that only “original” spare parts are suitable for repairing a heating device. The main requirement is technical compatibility.
If in doubt, a drawing of the heating system will provide clarity. The further procedure is as follows:
- Cut a new mounting hole. This is done carefully, because the reliability of the heating system’s operation depends on the quality of the preparatory process. It is recommended to place the engine as low as possible in the air duct, otherwise the device will rest against the hood. This should not be allowed to happen, otherwise the stove fan will not last long.
The heating system of a new model is checked by test switching on. It is recommended to switch modes smoothly. The device must remain on each of them for at least 5-7 minutes. The driver’s task is to make sure that the operation of the system is not accompanied by extraneous noise and vibration.
Original parts vs analogues: practical advice
As mentioned earlier, such a choice does not affect the quality of the heating system. At the same time, car mechanics make several reservations. For those who plan to use VAZ stoves, it would be useful to check the power system. It is different for some modifications. That is why all actions are consistent with the drawings.
It is permissible to use the VAZ 2108 heater, provided that two recommendations are followed. Firstly, the mounting socket is 1-2 cm larger than the size of the device. The additional area will reduce the vibration impact. Secondly, the switch is installed taking into account the specifics of the VAZ heating system. You will have to tinker less when minor modifications to the system are needed.
The ventilation system is updated in 1-2 hours, depending on the degree of wear of the engine.
If the factory-installed “snail” has no signs of physical wear, you only need to replace the heater “engine” itself.
It’s worse if the factory equipment of a Chevrolet model has manufacturing defects. A complete replacement of the device is recommended. This will save time.
The operation of the heating system determines the comfort and safety of driving. The driver constantly monitors the system's performance. If extraneous noise appears, it is necessary to urgently carry out a technical inspection.
Comprehensive modification of the stove/heater of Niva 4x4 (VAZ 2121, 2131)
Having set out to increase the efficiency of my car's heater, I re-read the available methods on the forums, and realized that these methods have some drawbacks that did not suit me. For example, installing a fan from a VAZ 2108 allows you to increase the air flow through the heater and blower nozzles, but this air is taken from the street, it is icy, and therefore the interior begins to warm up only after the engine has completely warmed up. In addition, this method requires significant modifications to the design of the heater, as well as the cost of purchasing a fan. Next, I’ll tell you how to modify the stove on the Niva with your own hands without investment and in a short time.
Improvement No. 1. We take air from the cabin
The main disadvantage of the Niva heater is that all the air into the heater radiator comes from the street, and when the air intake flap is closed, air circulation and heating stop completely. To eliminate this drawback, I disassembled the heater (I had to drain some of the antifreeze and disconnect the heater radiator pipes), and in the side wall of the heater housing, opposite the wall where the radiator tubes exit, I made a hole in the shape of a rectangular trapezoid. I did it in such a way that there was 1.5-2 mm of the body wall left to the boundaries of the plane in which I made the hole, and 6-8 mm from the side of the stiffener for attaching the petal valve. I made the hole using a drill, marked it, drilled along the contour of the small diameter holes, then connected the holes using a knife, then filed the edges of the resulting hole, giving it its final shape. The area of the resulting hole was approximately 25 square centimeters. It is through this hole, when the heater air intake flap is closed, that air is drawn from the passenger compartment.
Since the salon is a closed space, air circulation occurs in a closed circle, and the warming up air of the salon, passing through the heater radiator, becomes increasingly hotter at the exit. Despite the small size of the hole, due to the absence of a supply of icy air from the street, the time for warming up the interior to a comfortable temperature and melting icy glass is reduced by 4-5 times, and it is possible to achieve a comfortable temperature even in severe frost.
To prevent cold air from entering the cabin through the hole when the air intake flap is open and the heater fan is turned off, a petal valve is installed on the hole on the inside of the heater housing, which does not interfere with air intake from the cabin. The petal valve is a rubber band cut from a car chamber (preferably from a truck), 1.5-3 mm thick, in the shape of a hole, but slightly larger, and attached to a bolt in such a way that it can freely bend inside the heater body, opening the access of air from interior, and fit snugly against the wall of the heater housing, blocking the hole for the passage of cold air into the cabin, past the heater radiator.
Preventing glass from fogging
To protect the windshield and door windows from fogging, it is enough to direct cold air onto them, for which:
- close the heater cover with lever 10;
- move lever 7 to the right, and set lever 8 to the middle position;
- If necessary, turn on the electric heater fan.
If you need to warm up the incoming air a little, move lever 6 of the heater valve control partly to the right.
To protect the rear window from fogging, turn on its electric heating with switch 11.
Improvement No. 2. Increasing fan performance
I also slightly increased the efficiency of the standard heater fan. The fact is that the gap between the fan blades and the diffuser is about 3 mm, and the width of the diffuser is no more than 15 mm, while the width of the fan blades is more than 30 mm. Therefore, some of the air leaks back between the blades and the diffuser, preventing a large pressure difference from being created between the suction area and the discharge area.
According to my estimates, the efficiency of the fan increases by 10-15%, so you don’t have to bother with this problem.
Replacing the stove fan (motor) and additional resistor
Disconnect the negative cable from the battery.
Remove the radio mounting panel (see here).
Using a 10mm socket, unscrew the nut securing the relay-interrupter for the turn indicators and hazard warning lights...
...and remove the tip of the “negative” wire of the heater fan electric motor (black) from the stud.
Two more terminals of the “negative” wires are attached to the same pin.
In photos 1–2, the instrument panel has been removed for clarity.
On the right side of the fan casing, release the rod from under the spring clamp.
Use a slotted screwdriver to pry up and disconnect the four (two on each side) spring brackets securing the fan casing.
Remove the fan casing, guide casing and the fan itself.
Remove the guide casing from the fan casing.
Use a slotted screwdriver to pry up and disconnect the two spring brackets that mount the fan.
Disconnect the fan wire from the additional resistor...
...and remove the fan from the casing.
Remove the rubber motor mounts.
Improvement No. 3. Installing the grille on the air intake
When disassembling the heater, a large number of tree leaves and insect remains were found in the air intake casing and in the honeycombs of the heater radiator grille, which also reduced the efficiency of the heater. Therefore, after cleaning and flushing the heater core, I took measures to prevent the radiator from clogging.
To do this, I bent a wire frame to the size of the air intake inlet, covered it with a nylon mesh with a 1x1 mm cell, and installed it at the bottom of the rubber seal of the air intake inlet. It was perfectly fixed there in the fold, like an accordion, without additional fastening.
All work to modify the heater took me about 4 hours of time and did not cost a penny of additional costs. Unfortunately, during work I didn’t think to take a photo, but from the attached drawing and picture everything should be clear. I'm happy with the result, now the stove heats better.