Third party manufacturers, depending on configuration and specifications№Positive1. Victor, 39 years old: after buying the car, he did not change the radio, despite the push-button control option. The sound quality is not bad, the radio reception is excellent, that’s enough for me. 2. Konstantin, 41 years old: bought the car second-hand, second owner. I didn’t change anything, I left the original radio. The functionality is good, the build quality is also good, it reads from a flash drive. 3. Vasily, 44 years old: I listen to the radio more, the reception is good in the city. True, it causes interference near metal structures, but this is natural. 4. Kirill, 36 years old: I work as a taxi driver, on wheels all day. The standard tape recorder saves the day, it works properly. My friends recommended replacing it with a touchscreen model from the new Granta, but so far the old one hasn’t failed. Negative1. Victor, 38 years old: the standard audio module, although not bad, seemed to me not enough, so I replaced it with a foreign one and supplemented it with an amplifier. Now the volume is good, the quality is excellent. 2. Mikhail, 42 years old: I work as a courier, I drive for the entire shift. I expected more from the standard radio, so I had to replace it with a new one. The volume suits me, I plan to connect an amplifier - a crossover. 3. Ivan, 33 years old: I bought the car second-hand, immediately replaced the audio module, the reviews are not good. New and high-quality equipment from Trinity, no problems. 4. Vladlen, 40 years old: friends gave me a gift for my anniversary in the form of a radio with touch controls. Before this there was a push-button one. Can't compare, quality, sound, control, functionality at a high level.
Conclusion The opinions of motorists on the functionality and sound quality of the standard radio are divided, which is obvious. Everyone evaluates according to their own criteria. Some people care about sound, others about functionality, and others about control. Regardless of the type of radio: push-button or touch-sensitive, the workmanship is good. No massive breakdowns or defects were recorded. Maintenance is not expensive, parts and components are available both at official representative offices and on the Internet. Now it will not be difficult for the owner to remove the radio on the Granta liftback with his own hands without contacting a service station.
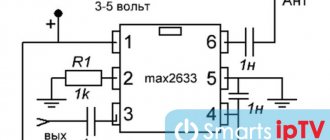
What is the functionality of the radio?
The fact that there is a standard radio in the domestic car Lada Granta Lux and in Kalina-2, and the devices are constantly being improved. A special feature of the radio is that it fits deep into the standard place, which is accompanied by minor difficulties when removing it. The large monochrome display displays a user-friendly interface.
Read also: Replacing the camshaft gear UMZ 4216
Reviews from owners indicate that the software has an operating system based on the legendary Windows, the potential capabilities of which are increased by firmware. It is possible to create a desktop in the image of a household computer and connect to the Internet. To do this, you should use a 3g modem.
If you need to enter data, manipulation can be done using the on-screen keyboard. Own memory is not enough, so to meet the ever-growing demands of owners, it is recommended to use an SD card as a storage medium. This drawback is included in the list of reasons, due to the relevance of which, most motorists prefer choosing a foreign vehicle.
A convenient option for connecting with a mobile phone is available for the Lada Granta radio. This allows you to make calls without having to take your phone out of your pocket. You only need to activate a specific button on the device display. This is a kind of extended “hands-free” function.
The radio receiver is also not without pleasant features. If you program a news wave, the device will automatically switch to it from any other channel when a program on the designated topic begins broadcasting.
In the LADA Granta standard, the radio with an integrated LCD display is capable of supporting such file formats as:
- outdated "MP3";
- "WMA";
- "WAV";
- video files that support the “WMV” extension.
Installing speakers in Granta rear doors
The procedure for working with the rear doors is identical to the front ones.
An important difference: homemade spacers are not required here. The plant produces a set of special mounts for installing 13 cm speakers in the rear doors
Articles for ordering online:
| Speaker Mount - Rear Left | 21907901033 |
| Speaker Mount - Rear Right | 21907901032 |
| Rear left column trim | 21906202095 |
| Rear right column trim | 21906202094 |
| Trim for front left door | 21906102097 |
| Trim for front right door | 21906102096 |
Installation sequence:
- Disassemble the door;
- Cut a hole in the door card for the lining;
- Install the speaker mount on the door;
- Replace the standard audio terminals with normal ones;
- Connect the wires to the column, secure it;
- Install the trim and assemble the door.
You can replace the fastening with improvised materials, but factory production takes into account all bends.
Removing the car radio using standard keys
Initially, you need to familiarize yourself with the list of required elements.
§ Standard set of keys. Their numbers vary.
§ Knife for prying up the frame.
How to properly remove a car radio from a niche?
· The radio panel is first dismantled. If the need arises, the decorative frame, which is located directly under the panel, is also dismantled. As a rule, the need arises when we are talking about older models.
· On the side you need to find holes directly for the keys.
· They must be placed in a special hole until there is a click. In some cases, some effort will be required.
· Once the keys have been placed, the equipment must be carefully removed.
Video about dismantling a car radio using standard keys...
Start your own blog
Today I installed a 2din radio on my grant (liftback, normal). Soundmax radio (audio, video, navigation (no GPS receiver included), radio and TV, usb, sd, hdmi, aux, camera output, touch screen, bluetooth for mobile) - 4500 rub. I ordered mvideo from an online store (at first I traveled all over the city, but only expensive ones were on store shelves, and even then they did not have all the listed functions). Previously, I installed Hertz speakers in the front doors (I took 2t.r. from the shelf in mvideo). What problems did I have to face: - the colors of the wires do not match the car manual, and on the speakers both contacts were the same width, and on the audio preparation one terminal is wide, the other is narrow. It turned out that wide is a plus, narrow is a minus. I filed the negative plate on the speakers with a file, the terminal sat down and was there. — I screwed the column on, checked it, it turns out that now it interferes when lowering the window. I had to install washers about 8mm. I screwed it on, clamped it, and the speakers fit perfectly. Now about the space for the net. Here I can’t help but draw a parallel with both my former Priora and a friend’s Viburnum. On the Prior there was a mesh in the body of the skin - nothing else is needed. Cut it out if you want, leave it like that (I liked my dear one, I don’t like to interfere). On viburnum - the mesh is attached to the casing - if you want, take it off - put on what you like. There is no need to cut anything. Granta (like a new model). There is a place to install a mesh (couldn’t this place be perforated, like on the Prior?), you either need to perforate it yourself, or cut it out and install the mesh. Without a mesh, the sound is not bad, but the casing rattles in the bass (in short, it’s nowhere without a mesh). - for the radio - they made an opening for 1din - convenient. Couldn’t it have been possible to make this stupid shelf also removable for 2 din? I sawed it out. Then the radio tape recorder rested against its rear. I had to saw off the rear plastic (why is it there anyway?). There was nowhere to stick the original radio mounts (sadness). It's good that the plastic of the panel is hard. I cut the opening close to the height and pushed the radio through. She stood up rigidly. I'll go like this, maybe I'll have to fix it after all. The width of the opening in the panel is larger than the width of the radio, and it was possible to do without a frame. — there were no prepared wires for connecting to the car’s systems (prohibition on watching video while driving, auto-muting the sound when driving backwards and something else), I just put the plug in the box with the radio. (I haven’t installed a TV antenna and GPS yet) - and about the frame (which I was looking for, so I ended up on this site). How do you even put a frame on this non-flat panel? Unless such craftsmen as the author of the topic can do it. Does anyone have any advice on how to glue the cracks so that it looks civilized?
Installation of 1 din radio in Grantu standard and norm
What is needed to install a radio in a VAZ 2190:
- The radio itself is also the head unit;
- flat screwdriver;
- Straight arms.
In the article we consider only the installation of the GI. Read how to install speakers here.
Abbreviations and symbols in the text:
- GU – head unit;
- MMS – multimedia system;
- DIN (din) – installation size for acoustics in a car.
Step-by-step instructions for installing the head unit
Required:
- a narrow flat screwdriver or plastic spatula for installing acoustics;
- 1-din radio with frame.
The seat in Grant is designed for 1 din. To work with large 2-din sizes, you will need to cut out the partition and install a decorative frame.
Step 1. Using a flat-head screwdriver, remove the plastic plug for the radio. To do this, carefully pry it around the edges and pull it towards you.
The placeholder for the radio is installed from the factory.
Step 2. On the back of the plug there is a mount for ISO connectors. There are two connectors: music power and wires for the speakers.
When connecting the pads, you can’t confuse them - they have fastenings of different shapes. 8 wires at the speaker terminal. The second power connector.
Step 3. If necessary, connect an adapter for your radio to the ISO. Usually it comes included.
If an adapter is not needed, proceed to step 4.
If an adapter is needed for acoustics, it is included in the kit. Example in the picture.
Step 4. Remove the glove compartment. Holding the glove compartment clamps in the upper position, forcefully lower the glove compartment down.
Overcoming resistance, we pull the lid towards ourselves - the glove compartment is removed.
Removing the glove box on a Grant is easy when you know where its latches are located.
Step 5. Using a flashlight, we climb under the panel in the area of the front right passenger's feet. Behind the felt on top we find a thick black wire - at its end there is a plug for the factory antenna.
We extend the plug to the installation location of the radio.
Here we are looking for the antenna wire.
Step 6. Install the metal slides for the radio. Use a screwdriver to bend the fastenings of the slide at the top and bottom to ensure secure fastening.
These fasteners secure the slide into the panel opening.
Step 7. Connect the power connectors, speakers, antennas to the radio. We insert it into the slide all the way. We attach a decorative plastic frame.
If you plan to install an amplifier, you must first stretch the wires under the panel and bring them to the installation site of the power unit.
What to do if the length of the wires and antenna is not enough
To get by without extending the wires, you will have to suffer:
- We put our hand under the panel in the glove compartment area;
- We put the radio in the slide and connect it to the plugs;
- We blindly connect the power, the connector for the speakers, the wires for the amplifier, and the antenna.
Disadvantages of the method: we spend a lot of time, the process is dreary and inconvenient. We'll probably rip off your wrist.
Plus: there is no need to build up wires, which will then interfere with the installation of the PG, resting against the back wall.
If, after installing the acoustics, the alternator belt begins to whistle, the solution to the problem is here.
As you can see, immediately behind the GU in Grant there is a vertical partition, which greatly interferes with blind installation.
If the radio tape recorder dangles in the slide and rattles
It happens that the acoustics hold weakly in the sled, although they sit firmly. Solving the problem:
- Using the keys for dismantling (included with the control unit), remove the radio;
- We take a small piece of vibroplast (resin-based foil) and glue it onto the slide from the inside, top or bottom - this way we will ensure that the tape recorder is completely pressed against the slide without unnecessary vibrations;
- Once again, use a screwdriver to press down all the fastenings of the slide: some might have been under-tightened;
- We put the acoustics back and check - all unnecessary vibrations during shaking should disappear.
Vibroplast helps not only with soundproofing a car.
Choosing the right radio size
We carry out installation either independently or by contacting specialists at the service center. In the second case, the service is paid.
By default, all VAZ and Lada models are equipped with a 1-DIN radio. The opening dimensions correspond to: 180 x 50 mm. This is an old standardization that has been in force since the times of the USSR. Modern audio modules can be purchased complete with a pre-installed LCD display.
To install the radio in the Granta liftback, cut out the top pocket, remove the plastic, and install the assembled module. For a beginner, the process will seem somewhat complicated, so strictly follow the instructions.
What to choose for Grants
Granta can be equipped with a 1 or 2 Din head unit with a touch or standard display. When using alternative equipment, it is necessary to purchase or independently manufacture a decorative frame framing the body of the radio. This is especially true for 2 Din systems, since small head units are equipped with a standard frame that fits the Grant instrument panel. The final choice of car radio remains with the car owner.
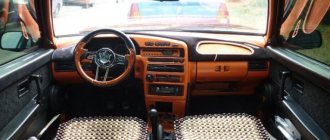
AvtoVAZ produces a special 2 Din radio for the Lada Granta, equipped with a touch screen.
The advantage of using such equipment is the identical backlighting of the control buttons and other elements on the dashboard.
To install a standard radio, you need to purchase an original decorative panel on the center console, since the standard mounting socket is not designed for such equipment.
Instead of a total
- If we install a simple radio, the size should be no more than 178 * 50 mm. Installation requires plastic spatulas or a screwdriver. Adapters and slides are included .
- To install 2 din, you need a new overlay on the console, a decorative frame on the GU itself, wire cutters and a metal blade to adjust the installation location.
- Are we replacing the standard speakers with another of the same size? Still need a new decorative frame . Otherwise, gaps in the panel will be visible.
More articles about Granta here.
Source: car-fact.ru
How to remove the radio without keys?
If standard keys are lost, you need to make homemade ones, focusing on the shape of the slots. To see them, remove the device’s removable panel and plastic frame. Here is a list of available tools with the help of which owners of various cars manage to unlock the latches:
- thin steel strips 6-15 mm wide;
- stationery knives;
- plastic clamps for electrical wiring;
- nails and straight wire - for round holes;
- thin screwdrivers and other similar items that fit the shape of the cracks.
These steel strips can be used instead of keys
The first step is to remove the front panel of the radio.
To remove the car radio, use the same algorithm:
- Insert first one and then a second strip of thin metal (or a utility knife, thin screwdriver) into the technological opening. Feel each latch unlock.
- If the turntable is supported by 4 clips, insert four instruments.
- Slowly remove the radio from the niche at the same time as the improvised keys.
The strips need to be inserted into the side slots
The music center is removed along with the strips
What you need to remove
The tool needed to remove the player from the vehicle is included with this unit. The key for removing the radio is a steel strip 5 to 10 cm long with special slots. There are protrusions on one end that you can grab with your fingers. Using this tool, the tabs on the frame are bent and bent or the elastic clamps are pressed out.
If the branded car radio is bolted to the brackets, then you will need 2 screwdrivers. One will allow you to unscrew the fastener, and with the help of the second you can remove the decorative trim under which it is hidden. Removal of the radio, fixed with elastic latches, is carried out with special U-shaped removal keys, which are inserted into the holes on the front panel.
To unscrew the additional stud, you will need a wrench or a socket that fits the nut. If the removal tool included in the kit was lost, then improvised tools may be useful for dismantling the car radio. For example, to bend the tabs on the frame, you can use a screwdriver of a suitable width, a nail file, a car repair probe, a narrow and thin metal strip or a knife. To release the latches, several wire clamps of suitable diameter, a nail or a strong metal rod will be useful.
Installation of Lada Granta car radio
Tools:
- Open-end wrench 10 mm
- Small flat screwdriver
- Knife (if necessary)
- Soldering iron (if necessary)
Parts and consumables:
Notes:
Initially, in this car model, the calculation is made for a 1-DIN radio. If the owner wants to install another type, a newer one, for example 2-DIN, he will need to start sawing the partitions in the console itself. And if the size is not suitable, then a suitable cantilever frame will have to be cut into the panel. This is much more complex than the first type of installation listed. In the second option, it is better to entrust the installation to a specialist, because there is a high risk of damaging the interior trim.
Here is a description of how to install a 1-DIN radio.
1. Remove the negative terminal from the battery.
2. Remove the plastic pocket installed in place of the future radio using a flat-head screwdriver.
3. Having taken out the pocket, on the back of it you will find slots where ISO connectors will be inserted to connect the radio. Disconnect the connectors to completely remove the pocket.
4. Now remove the metal frame from the radio and install it in the place where the plastic pocket was. Unbend the frame's tendrils to lock it securely in place.
Note:
There should be a click to confirm that the frame installation was successful.
5. Connect the connectors to the radio.
Note:
If you connect the radio to the connectors incorrectly, all car systems may fail, including, of course, the sound system.
Some radio manufacturers make custom connectors. Most of them come with an ISO plug. But there are times when none of the types are suitable, then the last option remains - cutting the wires. You remove the original plugs of the radio and the plugs of the car wiring and solder them together, but be sure to match the color.
A mistake many car enthusiasts make is twisting the wires and wrapping them with adhesive-backed insulating tape. In winter, the same electrical tape cracks due to frost. As a result, a short circuit may occur in the wiring, which will lead to the failure of all electrical systems of the car.
6. Insert the car radio into the previously installed frame.
Dismantling a standard music center
Often standard head units (aka radios) are removed using the method described above, since they are attached to 2 or 4 clips. For example, the factory player on a Priora is held on by two latches, and to unlock them, thin steel strips need to be inserted between pairs of buttons for switching radio channels “2” - “3” and “5” - “6”.
Advice. Before you start disassembling the factory radio, find out about the method of its fastening, so as not to poke pieces of iron at random in this case if you do not find technological openings.
In Priora, stripes need to be inserted between the keys
To remove car radios that are fastened with screws, you need to prepare the following set of tools:
- a narrow flat screwdriver or knife;
- Phillips screwdriver;
- set of small sockets (from 6 to 10 mm).
With this mounting option, the factory turntable must be unscrewed using the heads
On different brands of cars, standard players can be mounted in different ways, but the principle is approximately the same: the device is screwed to brackets that are covered from the outside with a plastic lining. As an example, it is proposed to consider the removal of the radio on a Korean Hyundai Solaris car, performed in the following order:
- Use a flathead screwdriver or knife to pry up the bottom corner of the plastic decorative panel framing the stereo. Pull the edge and grab it with your hand.
- Gently pull it towards you and release the first latch, and then move in a circle and unlock the others.
- Holding the panel with both hands, remove it and, if necessary, disconnect the connectors located at the bottom.
- Use a Phillips screwdriver to unscrew the 4 mounting screws and remove the radio.
Factory car radio Hyundai Solaris
Advice. When dismantling any player, do not rush to disconnect the battery from the on-board network, since the device will power down in 10-15 minutes. It may become blocked and, when you turn it on again, require you to enter a security code that you do not have.
Torpedo Granta dorestayl
The panel from Kalina began to be installed on the pre-restyling Granta immediately before the release of the updated Lada Granta FL family.
If the dashboard of your car is like in the left photo, then you will need to replace a number of parts of the instrument panel (dashboard) with parts from the Lada Kalina dashboard:
- 21925-5325011-00 Instrument panel VAZ-21925 Lux with air duct SB AvtoVAZ OJSC
- 21920-7905020-00 USB cable 2192
- 21925-5326014-00 Overlay for the instrument panel console LUX
- 21920-5326014-00 Instrument panel console trim NORMAL - lower, depending on the climate unit
- 21920-5303014-00 Glove box body 2192
- 21920-3710010-00 Hazard switch
- 21920-5303016-00 Cover of the glove box of the instrument panel
- 21920-5325322-00 Fuse box cover
This is a global alteration of the car interior, which cannot be called rational.
After this, you can begin installing the center console according to the instructions below.
How to remove the center console (panel trim)
The photo shows the general diagram of the fastenings of the central panel trim of the new Kalina. in red are clips that simply snap off under force. Blue - fastening screws that should be removed with a screwdriver.
- Remove the control unit for the heater and air conditioner by unsnapping the 4 clips around the perimeter;
- Remove 2 screws securing the top cover;
- Remove the top panel trim by snapping 3 clips on each side;
- We remove the overlay from the upper engagement with the panel.
The process of removing the plastic dashboard trim is also shown in the video:
Installation of an audio system on Granta of different configurations
In the “standard” configuration in Grant, power wiring harnesses are already pre-installed, which are located in the console opening. The wires are connected exclusively to the car radio, so don’t be surprised if you can’t find them in the doorways.
In the Lada Granta Norma, the power wires coming from the console are already connected to the doorways. You just need to connect the sound system in full accordance with the assembly diagram. It often happens that the pre-installed door wiring does not match with some speaker connectors. Here we get out of the situation by purchasing additional suitable wires.
During assembly, the Lada Granta “luxury” is equipped with a special touchscreen multimedia system and already installed speakers. The improved radio is complemented by a Bluetooth system and a 5-inch display with a linear output.
Among other things, the built-in car radio allows you to connect a memory medium – a USB 2.0 flash card, through which you can listen to recorded music.
What to do?
On driving forums you can often come across a popular question: how to remove the radio without keys? Today you will learn about all the nuances and tricks that will allow you to dismantle quickly and correctly. Of course, you first need to indicate that the factory tape recorder is removed taking into account the vehicle model and its configuration, because as we know, a wrench and a set of screwdrivers are required.
Each “music box” is equipped with protective fastenings that are hidden from human eyes. Without a doubt, each manufacturer has its own developments and technologies that can affect the removal process, starting with the protective mechanism and ending with the specifics of the fasteners.
Decoding problems
The main pitfall of the described procedure lies in the security code embedded in the memory of most radio tape recorders. The bottom line is this: disconnecting the music center from the external power supply for 10-15 minutes will lead to the fact that the next time you turn on the car radio, it will require you to enter a security code (usually a four-digit one), without which it will not function.
The device requests a code after connecting to the on-board network
If the card with the code is lost or missing, the issue can be resolved in several ways:
- when it comes to a standard device, for a certain fee they will help you find the code at a dealership that sells cars of your brand;
- there are companies and individual specialists dealing with these problems;
- the free way is to search for code using various programs.
Serial number location
Regardless of the method chosen, you will have to remove the radio from the socket to find out the serial number. It is printed along with a barcode on a tag glued to the side or top of the case. After taking out the device, rewrite these numbers, and then try to calculate the PIN code using them using various online calculators on the Internet. If it was not possible to determine the required code using this method, then remove the music center and take it to specialists in this field and prepare to pay for their services.
The issue of removing a car radio from its socket is not very difficult and will not require much time. But the consequences can be unexpected for an unprepared motorist. Hence the last piece of advice: find the lost pin code before turning off and removing the player in order to save your time and nerves.
The standard multimedia system 2190 on the Lada Granta has many useful functions, but this does not mean that one day you will not need to connect additional equipment to it (rear view camera, etc.) or remove it altogether. For example, to replace with more powerful multimedia systems or, conversely, to install a double-din radio without a touch screen.
In any case, you may need to dismantle the MMC on Grant, which we will talk about now.
Soundproofing panel/dashboard Grants
| Probably all owners of LADA Granta have noticed that the interior of the car begins to fill with crickets over time, and the dashboard is no exception. The reason is poor build quality and materials (cheap plastic). To get rid of crickets for a long time, it is recommended to soundproof the Granta panel, and the advantage of this method is that it does not need to be removed for this. |
There can be many sources of rattling and squeaking in dashboards, let's look at the most common ones:
The radio/radio plug is rattling. Solution: use anti-creak or sealant.
The air duct rattles at the point of contact of the windshield blower nozzle. Solution: use silicone sealant or anti-squeak.
The airbag plug creaks. Solution: when installing the plug, coat it with sealant, or use bitoplast (5mm or 10mm).
The panel trim creaks. Solution: Remove the dashboard trim and glue the places where it touches (on the panel and on the trim itself) with bitoplast or anti-squeak.
The panel/dashboard creaks. Solution: The solution to the problem of panel rattling must be comprehensive.
- It is recommended to weight the dashboard using vibration materials (for example, 1 sheet of STP Gold 250 RUB/sheet is enough). Heat the pieces with a hairdryer and glue the panel with a “vibra” using a hard roller. A heavier Granta panel will produce less extraneous sounds.
- Wrap the torpedo wires with anti-squeak.
- Treat all removable elements with anti-squeak (panel trim, airbag cover, glove compartment, etc.)
- Tighten all possible panel mounting nuts.
Soundproofing the dashboard is a modification that should be done at the factory, but AvtoVAZ provides car owners with the opportunity to do this with their own hands.
Remember that the best sound insulation is when a set of works has been carried out aimed not only at insulating from external noise (noise from wheels, engine, wind, etc.), but also eliminating creaks and crickets inside the car.
Similar materials
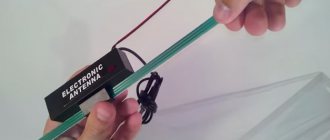
Installing speakers in the standard places of the front doors on the Lada Granta
In addition to the radio, for its normal operation, it will also be necessary to install speakers and acoustics in the car door.
To cut holes in the door trim, it is better to remove it from the car. To do this, you need to dismantle the door handle, the plastic casing in which the door opening lever is installed, and the glass position adjustment handle (if you have a standard package). See the article “Removing and installing door trim on the Lada Granta.” The door trim and metal frame of the front doors provide a size for 16 cm speakers.
Depending on the variation of the speakers you have chosen, the following problems may arise: - if you have chosen 13 cm speakers, then you need to cut out a corresponding hole in the center of the plug on the door trim according to the template supplied with the speakers. In this case, the hole in the door frame is slightly larger and you will have to increase the plane from the mounting “ears” of the speaker to the mounting holes in the door;— If you decide to install 16 cm speakers, then you may have to modify the door frame here, since the speaker basket can It definitely won’t fit into the standard hole in the door hardware. You will need a grinder or a jigsaw with metal files. We cut a hole of the required diameter and try on the speaker. We connect the speaker and install it in place. We install door trim. We mount the frame for the metal grille of the speaker and, accordingly, firmly fasten the speaker to the door with 4 self-tapping screws. We install the speaker grille.
This is, in principle, the entire algorithm for installing a radio and speakers in the front doors on a Lada Granta car. In addition, you may find the material from the article “Wiring diagrams of the Lada Granta” useful, which shows the blocks for connecting the power supply of the radio and connecting the speaker wires to it, blocks 17 and 18. The “standard” configuration also includes wires going to the front door speakers car. So, the connection of the radio speakers in the doors is carried out through the rear harness, see the article “Wiring diagram of the rear wiring harness of the Lada Granta”, contacts on the block 16,17,18,19.
Additional information when installing speakers in the front doors of a Lada Granta car: When choosing speakers for installation, choose acoustic sets with minimal protrusion of the plastic frame and metal grille. The fact is that some speakers, after installation, may interfere with the opening of the glove compartment. Not all speakers, but some. As a result, you will crawl into the glove box of the Lada Grant through a small gap, or only after you open the right front door
Safety warnings when installing and connecting the radio in a Lada Granta car. All installation work should be carried out with the negative terminal of the battery disconnected. After installing the radio, you must carefully check all connections and that they are connected correctly.
How to connect a Lada Granta head unit with a 1-DIN connector
- We carry out the work inside the car, having previously disconnected the terminals from the battery in order to prevent a short circuit in the circuit;
- We remove the plastic partition - pocket. It covers the hole, preventing objects from falling inside the torpedo. We use a flat-head screwdriver to unscrew the bolts;
- Two ISO plugs are visible behind the partition body. These types of wire terminals are manufactured in accordance with international automotive standards. More than 98% of all automakers use the standard when equipping technical equipment;
- We remove the metal frame - the block - from the body of the audio unit and place it in the cavity of the torpedo.
- We first connect the blocks with wires. Fitting into the connectors is accompanied by a characteristic click;
- We insert the module into the metal frame.
Note to the driver. Incorrect terminal connections result in a short circuit. To ensure the safety of the connection process, the connectors have guides that allow you to install the block in only one position.
Installing a sound amplifier
By liftback radio amplifier we mean:
- crossover installation;
- subwoofer installation.
The choice is up to the owner of the Lada Grant, as different goals are pursued: cleanliness, sound quality. Obviously, the cost of the equipment will also vary upward. Crossovers are installed in the cavity of the glove box, since their dimensions do not exceed 100 x 150 mm and are rectangular in shape. Subwoofers are fixed in the luggage compartment. Equipment requires more space.
Connection of an external device is carried out strictly in accordance with the operating instructions:
- brown wire color: responsible for the operation of the system;
- black: power supply to equipment;
- yellow: audio module activation;
- red: settings and programming.
At the very end, do not forget to connect a red wire with a pre-installed fuse to the positive terminal of the battery. It directly connects the amplifier (subwoofer) to the current source.
How to install in Granta
To install the radio, you will need to perform several sequential steps. They are presented in the form of step-by-step instructions:
- Use a pry bar to remove the climate control knobs.
- Pry and pull out the cover of the middle of the panel. When dismantling, you will need to remove the wiring sockets to the equipment control keys.
- Use a hacksaw to cut out the main jumper in the dashboard. You can use a construction knife. Reduce the channel for the central ventilation deflectors by 5 mm.
- Install the car radio into the installation shaft using ready-made brackets. Fix the device at special points located in the panel.
- Mount the frame for framing. It is necessary to rearrange the deflectors on it in advance.
It’s easy to find many videos on the Internet with the title “installing a 2 din device in a Lada Granta.” Detailed descriptions will help you complete the task faster.
If the 2 DIN radio supports a subwoofer, it is advisable to run the wiring under the door sill trims. If an active subwoofer is used together with a bass reflex, you need to route the power cables into the trunk. They must have a special fuse.
A double-din speaker system differs from a stamped one not only in size. The DIN radio has advanced functionality, which explains its popularity among motorists.
Connected amplifiers greatly increase signal reception. Simplification of radio search occurs due to accessible viewing of system files. The storage devices are connected using a USB connector.
Music zone allows you to switch the frequencies you listen to. There is access to various radio programs in the AM and FM bands.
The combined navigator has a calculated router map.
Impact protection extends service life.
The development of digital technologies has not spared modern cars. Installing a 2 DIN device does present some challenges, but these are outweighed by the excellent functionality.
How to install a head unit on a car with basic equipment?
Since the Lada Granta base is not equipped with musical equipment, and only a push-button radio is installed on board, the question justifiably arises: how is the standard radio installed in the cabin? In reality, this is a simpler procedure than it might seem at first. The occurrence of problems during installation is excluded, since a seat is already provided for the standard device on the Lada Granta panel, regardless of the level of equipment.
You can purchase the device in a retail chain or on an Internet site, where you can actually find an improved version, equipped with a navigation system with a detailed map of the Russian Federation. Don't forget to buy an additional luxury panel. Although multimedia will fit into the standard panel without any problems, the appearance will not be so beautiful. The price for this device reaches 2.5 thousand rubles.
Next comes the installation of the radio. The design feature of the landing niche in the Grants panel does not provide for the need for additional wiring.
- The first step is to remove the plastic pocket in the audio system opening. This is done using a flat-profile screwdriver. There is access to several connectors that involve connecting a radio.
- We remove the frame from the head unit and fix it at the location of the pocket.
- Next we move on to the connection. To do this, connect a couple of connectors and install the device in the landing niche.
- After this, you can install the speakers in the front door cards. The procedure involves the need to dismantle door trims with unlocking handles and adjust the position of the glass. Using a special template, we begin cutting out the mounting holes.
We attach the speakers to the cards using self-tapping screws. We insert the cables from the speakers into the input connectors intended for this on the rear panel of the car radio. We install the decorative door panels in their original places and evaluate the sound provided by the standard head unit. Thus, the radio is connected.
Removal according to instructions with keys
Before removing the car player, you will need to remove the radio panel and the decorative frame under which the technological openings are hidden. If this cannot be done manually, then you need to disconnect this element with a thin screwdriver, prying one by one the teeth attached to the body of the head unit. Be careful not to use excessive force to avoid breaking the frame. If the car radio does not have a protection mechanism, you should disconnect the battery from the car to increase safety.
The next stage of removal is to insert the keys into the slot near the frame located in front of the device. This must be done carefully and gradually until the tool enters the opening between the side wall of the car radio and the frame tongue. At this point, a slight resistance will be felt.
To bend the tabs towards the frame, disengaging them from the grooves on the head unit, you should slowly lift the key, rocking it from side to side.
Removing a device secured with elastic latches is best done with an assistant: one inserts the keys into the holes and gently presses them, the other carefully removes the car radio, pulling it towards himself. As soon as the latches become visible, the tool is removed from the openings and the device is removed from the niche.
If the radio is not removed, then it could be screwed on with an additional pin or jammed due to damage to the frame. In this case, you will need to remove the car's dashboard so that you can approach the player from the back. Then the outer nut securing the stud is unscrewed, and the radio is removed from the niche. To release the head unit, bend the tabs that secure the frame to the dashboard niche. After this, all the deformed elements are unbent and the frame is removed from the player.