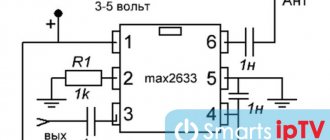
| The standard radios of Grant Lux and Kalina 2nd generation are gradually being supplemented with new features that have long been favored by foreign cars, for example, touch screen, navigation, playback of video files, etc. In this article we will consider the possibility of connecting an amplifier and subwoofer to a standard MMC. |
The general diagram for connecting an external amplifier in a car is as follows:
- We pull a separate red thick wire from the battery to the amplifier. We install a pre-flask next to the battery.
- Ground (black wire) to the body and to the amplifier.
- We connect the amplifier to the subwoofer (speakers).
- We stretch the speaker wires (separately from the other car wiring) from the amplifier to the radio.
- We connect the laid wire of the external amplifier to the Granta/Kalina 2 radio.
Currently, the last point raises the most questions, so let’s look at it in more detail.
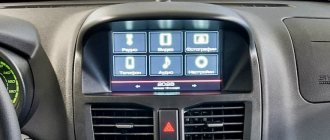
Standard original factory push-button radio for Lada Kalina II.
This radio is installed on cars with the “Norma” configuration.
The mount differs from the “Grant” radio.
On the right side of the radio there is a USB connector, which is designed to connect:
- USB Flash card (USB 2.0 and 3.0 up to 64 GB);
- USB Flash player with a memory capacity of at least 1024 MB;
- USB HDD with FAT32 file system;
- Mobile phone (only in charging mode).
On the left side of the radio there is a slot for SD cards. SD Memory Card Slot: Supports SD, SDHC cards of size 32 X 24 X 2.1 mm. SDHC up to 32 GB, SD up to 32 GB.
The file allocation table (FAT) of the connected device must be FAT16 (< 2 GB) or FAT32 (> 2 GB). The maximum number of primary partitions should be no more than 4. It is advisable that the directory tree of the connected device have no more than eight levels. There should be no more than 1000 files in one directory.
While playing files, the display shows all the necessary information about the track. The playback source is selected using the AUDIO button on the left side of the radio. The radio has equalizer presets (JAZZ, POP, CLASSICAL, VOCAL and USER). The range of timbre adjustments for bass, treble, balance, front/rear balance is from “-7” to “+7” units.
The radio has Bluetooth and Handsfree functions. You can connect your phone by long pressing the handset button. When pairing on the phone, the inscription “MMC12” should appear in the list of found devices, the default password is “0000”. After successful connection, the BT icon will appear on the display of the radio. There is no phone book on the Kalina 2 and Grant radio, but it is possible to save up to 6 numbers in the radio’s memory. The audio system also remembers the last outgoing and incoming calls. The manufacturer does not guarantee operation of a phone in Handsfree mode that uses two or more SIM cards.
The radio allows you to listen to audio files from your mobile phone. To do this, you need to connect your phone to the radio via Bluetooth and launch the player on your phone. The manufacturer states that certain cell phone models may not work correctly with this radio, but this is not a sign of a malfunction.
The Kalina 2 and Granta radio has its own battery, which allows you to save user settings after disconnecting the battery for 10 days. The audio system supports audio formats (MP3. With constant or variable bit rate, bit rate 32–320 kb/s and sampling rate 44.1/48 kHz; WMA. (without DRM protection). With constant bit rate and bit rate 10–320 kb/s , with variable bitrate and transmission speed of 32–192 kb/sec). The head unit of Kalina 2 and Granta has all the necessary functions for a modern car. The audio system works flawlessly, there are no freezes, all operations are performed instantly. The build quality is at a high level. The only disadvantage is the lack of a CD/DVD drive, but nowadays discs are becoming a thing of the past. The standard radio of the Lada Kalina 2 and Granta without an LCD display is a good alternative for those who find physical buttons more convenient than a sensor.
Over the weekend I got to MMS and connected it to OBD. For connection there are special cords that are plugged into the OBD connector, and on the other side they are plugged into the MMC block.
Since my OBD block is occupied by Multitronics TC 750, I simply screwed the contacts to the wires, took ordinary small connectors on the other side, put them in heat shrink and connected them to the MMC. We connect MMC 10 to 6 on OBD and MMC 12 to 14 on OBD, wire 11 is ground; it is not needed; it can not be connected.
In order to attach it to the OBD wires, I recommend removing the glove box; you only need to unscrew 8 screws, but it will be much more convenient to work with.
I connected it, checked everything works and shows.
Or rather, almost everything I have is old firmware 1.7, so the functionality is reduced.
1) Go HERE and download exactly the firmware based on what we want from life.
I downloaded 1.11 2 Unpack the osfiles folder and put it \sdmmc\osfiles
if you put the contents of the osfiles folder in the root (gut it, as is done when flashing MMC firmware), or put it in some other place, you will receive the following error: standard file S19 not found MMS_CAN_bootloader.s19
3 We turn off the car, turn off the lights, close the doors, wait 30 seconds for the Can tire to fall asleep.
4 We go to the desktop, no more programs should be running on the MMS, it should be better to reload the MMS altogether.
5 Click the executable \sdmmc\osfiles\UPPwriter.exe (AGAIN CHECK THAT THE PATH MATCHES)
6 We are waiting for the firmware to finish; at this time you cannot start the car, open the doors, turn on the lights, launch applications on the MMS, set the alarms off
. We sit quietly and do not glare.
7 After finishing the firmware, check
I would like to immediately note that if you do not have any blocks, then you should not wait for a miracle to appear. For example, I have the Standard package, I don’t have an electronics control unit, so I don’t have indicators for turn signals and low and high beams, I don’t show the temperature in the cabin and outside, I don’t have climate control, and it also doesn’t show the temperature of the oil in the box like the I'm a mechanic. And in general, the main reason for connecting the diagnostic wire for me personally is that data is written to the log about the distance traveled per day and time, I need this to fill out travel sheets, plus this data can be easily transferred to an SD card or USB, they are saved in an Excel file.
After connecting the wires and updating the CAN, I clicked on error checking and it gave me a bunch of errors, strange, but for some reason my bot computer was silent about them, they were sitting somewhere deep. True, I could not find the decoding of these errors, some strange errors.
The general diagram for connecting an external amplifier in a car is as follows:
- We pull a separate red thick wire from the battery to the amplifier. We install a pre-flask next to the battery.
- Ground (black wire) to the body and to the amplifier.
- We connect the amplifier to the subwoofer (speakers).
- We stretch the speaker wires (separately from the other car wiring) from the amplifier to the radio.
- We connect the laid wire of the external amplifier to the Granta/Kalina 2 radio.
Currently, the last point raises the most questions, so let’s look at it in more detail.
Connecting the radio, connector pinout
From time to time I answer the question about the correct connection of the radio. Many people do not understand the process of connecting via an ISO connector. Today I’ll write down for everyone (and for myself too) a link to an article about the pinout of the ISO connector. vaz-2109.ru/avtozvuk/podklyuchenie-magnitoly.html
For Peugeot (Citroen) owners, I’ll add that in the power block it is necessary to change red with yellow - so that the radio does not reset the settings every time the ignition is turned off.
Comments 25
I have a similar problem. I called that there is constant power on pin 7, and after the ignition on pin 4. After turning off the ignition, there is no reset? The radio works as expected. What's wrong?
ps stock radio for Ford Galaxy 1999.
This means that the standard radio has a suitable pinout. A similar situation happened with Pioneer radios, when it was necessary to swap the red and yellow wires. Manufacturers of radio tape recorders provide this opportunity, implementing this in additional features. contacts on the cable
Connecting a car radio is a job that you can do yourself. But for this, it is worth understanding the rules and features of connecting the device. Despite the variety of audio systems and car brands, the connection is made according to a similar algorithm everywhere, but with minor nuances.
Types of radio tape recorders
Let's start by looking at the types of car radios. They are:
- Full-time. Such audio systems are installed at the factory during the assembly process of the car. The peculiarity of standard devices is the variety of sizes and design options.
- Built-in. As a rule, such devices come with a curtain or a removable panel.
Connecting the radio is carried out strictly according to the instructions, because errors in this work can lead to failure of not only the radio, but also the car itself. Consequences of incorrect connection:
- Rapid battery discharge.
- Spontaneous change of radio settings.
- Sound distortion, uncontrolled shutdown, severe interference.
A connection diagram with pinouts of connectors is usually easy to find on the top cover of the audio system head unit.
Types of connectors
When connecting a radio, different connectors can be used, the type and design of which depends on the make of the car and the model of the radio. Conventionally, there are two types of connectors:
- Individual. Such connectors have a number of inconveniences for the car owner, because in the absence of connection experience, difficulties arise. In such cases, it is better to buy adapters for ISO connectors.
- ISO is a standard type of connector found on almost all modern car models. Its presence eliminates problems when replacing the radio. All that is required of the car owner is to reposition the plug.
If during the installation process the connectors match, this is good. Otherwise, you will have to select suitable conductors.
Connector pinout
The next point that requires special consideration is connecting the audio system, in accordance with the connector pinout. To perform the work, it is important to know the markings of the wires (varies by color):
- Yellow (BAT or B+) - connects to the battery positive.
- Black (GROUND or GND) - connected to the negative of the battery.
- Red (ACC or A+) - ignition.
- Gray with stripes (FR-) - to the “minus” of the right, front speaker.
- Gray without stripes (FR+) - to the “plus” of the front speaker, on the right side.
- White with stripes (FL-) - to the negative of the left speaker, in the front of the car.
- White without stripes (FL+) - to the “plus” of the left, front speaker.
- Purple with stripes (RR-) - to the “minus” of the right, rear speaker.
- Purple without stripes (RR+) - to the “plus” of the right, rear speaker.
- Green striped (RL-) - to the negative of the rear speaker, on the left side.
- Green without stripes (RL+) - to the “plus” of the rear speaker, on the right side.
Please note that paired wires, one of which has stripes, belong to the acoustic part of the wiring and are connected to the speakers of the radio. During installation, be careful with polarity. If you confuse “plus” and “minus”, there may be problems with playing bass.
How to connect power
The greatest number of errors are made when connecting power to the car radio. To solve the problem, use separate wires to connect to the battery, having a cross-section of 2-4 sq. mm. To achieve maximum sound purity, connect the yellow and black wires to the battery. In the yellow wire circuit, install a fuse with a rating of 10-20 Amps. As for the red wire, it is connected to the ignition circuit.
In practice, the yellow and red wires are often connected together, because the audio system must work regardless of the position of the key in the ignition switch. But this option has a disadvantage - the risk of battery discharge while the car is parked. This is due to the fact that the car radio will be in standby mode all the time (even after turning off). To avoid draining the battery, place a shutdown button on the red wire. When the car is parked for a long time, the power will be turned off automatically.
How to change the standard radio
Many people are interested in how to remove the standard audio system and install a built-in type device. The reason for the replacement may be the low power of the standard radio or the lack of certain functions. In any case, when installing a new device, it is important to choose the right adapters and take into account the pinout of the connectors.
Common mistakes when installing a standard Granta liftback radio with your own hands
- when connecting additional terminals, manual twisting of wires is used instead of classical soldering;
- regular insulating tape is used on connections instead of heat-resistant sleeves;
- Incorrect connection of a large number of speakers on one branch leads to overload, heating, and short circuit.
Read also: The door lock does not open, what to do?
Installing a sound amplifier
By liftback radio amplifier we mean:
- crossover installation;
- subwoofer installation.
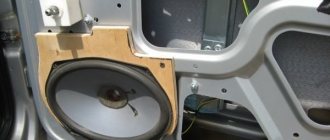
The choice is up to the owner of the Lada Grant, as different goals are pursued: cleanliness, sound quality. Obviously, the cost of equipment will also increase. Crossovers are installed in the cavity of the glove box, since their dimensions do not exceed 100 x 150 mm and are rectangular in shape. Subwoofers are fixed in the luggage compartment. Equipment requires more space.
Connection of an external device is carried out strictly in accordance with the operating instructions:
- brown wire color: responsible for the operation of the system;
- black: power supply to equipment;
- yellow: audio module activation;
- red: settings and programming.
At the very end, do not forget to connect a red wire with a pre-installed fuse to the positive terminal of the battery. It directly connects the amplifier (subwoofer) to the current source.
Installing two speakers in the front doors
- dismantle the door card, handle, control unit;
- We compare the standard cutouts for the speakers with the actual dimensions. If necessary, expand with a file or fine sandpaper. It is strictly forbidden to use cutting objects, as there is a high risk of damage to the plastic of the door card;
- we check for the absence of roughness in the hole, install the speaker, fix it, connect the standard terminals with wiring;
- we check the operation of the speaker, install the door card, and fix the metal grille to protect the speaker from mechanical damage.
LADA Granta with EnjoY Pro
Connector “X1” (20 pins)
- A2 Front left loudspeaker (“+”)
- A3 Loudspeaker front left (“-“)
- A4 Rear left loudspeaker (“+”)
- A5 Rear left loudspeaker (“-“)
- A7 “ACC” position of the ignition switch
- A8 Reverse signal
- A11 Front right loudspeaker (“+”)
- A12 Front right loudspeaker (“-“)
- A13 Rear right loudspeaker (“+”)
- A14 Rear right loudspeaker (“-“)
- A17 Terminal “15” of the ignition switch
- A19 Terminal “30” battery
- A20 “Mass” (“-“)
Connector “X2” (40 pins)
Connector “X3” (5 pins)
- D1 VBUS
- D2 DD3 D+
- D5 GND
Connector “X8” (2 pins)
- M1 AM/FM signal
- M2 AM/FM GND
Connector “X9” (2 pins)
- O1 GNSS signal
- O2 GNSS GND
Connector “X10” (2 pins)
- P1 GNSS signal
- P2 GNSS GND
Schematic diagram for connecting the MMC of GRANTA vehicles
: 220A – multimedia navigation equipment (IVI); 312A – rear view camera; 313A – audio system microphone; 408A – reverse light switch; 569A – FM antenna; 748 – front right loudspeaker; 749 – front left loudspeaker 750 – rear right loudspeaker; 751 – rear left loudspeaker; 817A – USB connector; 903 – automobile terminal of the “ERA-GLONASS” system; 911-ERA-GLONASS antenna.
Markings and types of connectors
Today, all car radio connectors comply with the ISO standard, and two connectors are used. Each is a plug with eight pins, sometimes the manufacturer can combine them into a single housing. Energy consumption sources are connected to one of them; it is marked with the letter A. As for the second, acoustics, that is, speakers, are connected to it. The connector designation is marked with the letter B.
Adapters for car radio connectors
Head units with three outputs can be found on sale, but they are rare and usually represent an exception.
Even if the connected sockets do not correspond to each other, the car owner has several connection options:
- You buy a special adapter for the radio, which can be connected to the outputs of the speaker system.
- The second method is considered “collective farm” among car enthusiasts. Its essence is to cut off the non-standard output and wind the necessary wires to it. But we do not recommend using this option, because eventually the wires will begin to unwind, so the “collective farm” procedure will have to be repeated. In addition, the cost of adapters is not so high to use this method.
How to properly connect a car radio
Connecting the car radio is done in several ways:
- Using an ISO connector.
- Without using chips by splicing wires.
- By directly connecting the power wires to the battery terminals.
- Via the ignition switch or a separate switch.
- Through a security alarm.
Car radio diagrams, which help with the correct connection, are printed on a label on the top cover of the device. They indicate the color marking of the wires established by the generally accepted standard:
- red - power management;
- yellow - power supply to memory and amplifier;
- black - mass;
- blue with a white stripe - power supply to the antenna with amplifier.
For reliable fixation, the wiring can be secured using cable ties.
Connection with and without chip
The first option for connecting the radio to the car is suitable if you have an ISO connector, which is built into recently released devices. If the tape recorder is equipped with a proprietary connector, then you need to purchase an adapter suitable for it, which may or may not be equipped with an additional feature. In the first case, if there is a mating part in the car wiring, the connectors are inserted into each other.
Pinout of a standard Euro connector
What does a car owner need to know about the pinout of the Euro connector? Let's look at the notation using output 10478 as an example.
Upper power connector "A"
As already reported, this output is intended for connecting power supplies to the electrical circuit of the vehicle.
| 1 | Not involved |
| 2 | Not involved |
| 3 | Not involved |
| 4 | Regular meals |
| 5 | To connect the antenna |
| 6 | To connect the backlight |
| 7 | To connect the ignition |
| 8 | Vehicle weight |
And although the device is equipped with eight contacts, all of them can not be used to connect the head unit. But these contacts would not exist if they did not perform certain functions. The first three outputs, as well as the sixth, are rarely used, especially for connecting budget device options. Typically, their use is due to the need to connect additional functionality, and we are talking about more advanced car radios. Please note that contact colors may vary.
If we talk about additional options, we mean:
- ANT output. This pin is used if the vehicle is equipped with a retractable antenna.
- Remote function, thanks to which external amplifiers can be connected to the head unit. This will increase the number of connected speakers. This is relevant for music lovers and owners of vehicles with a large interior, which, with proper installation of the speakers, will increase the sound quality.
- Illumination function. This option allows you to automatically change the brightness and color settings of the head unit display. If the car is moving at high speed, the screen brightness will drop so that the system does not distract the driver from driving the car. When the vehicle stops, the radio will return to the initial settings.
- Mute function. Today, many head units have this option. But this option can be activated either by clicking on the corresponding button or automatically. In particular, if an impulse from a mobile device passes through the head unit receiver, the system will automatically lower the volume so that the driver can talk on the phone without being distracted from driving.
How to perform a flashing?
The stock firmware for the Lada Granta radio has become very popular among car enthusiasts. This does not require installation of a new type of radio. This function does not have any effect on the sound quality, but it allows you to provide the interface with additional options that are not available for the standard version of the radio. For example, you can generate a convenient touch keyboard that allows you to communicate with the Internet.
To flash stock multimedia, you should get an SD card formatted in “FAT” or “exFAT”.
- First, download the firmware from the network. It’s easier to find her among the “Grantavod” members of the forum.
- After downloading, we copy the necessary files to the root directory of the card itself, having previously saved them on a flash drive.
- We insert the card into the corresponding slot of the car radio and reboot it.
- After filling out the download status scale, we use the updated interface with expanded capabilities.
To resume options: “Radio” and “Bluetooth”, remove the SD card and reboot the system again.
Automotive forums will delight with the developments of many craftsmen who, as a result of experiments, offer firmware versions with the presence of updated radio software and other functions in the menu. There is an opinion that these “specialists” have learned the secret of reading and decoding data from the CAN bus combined with the MMC. Sometimes the firmware requires you to calibrate the screen before communicating with an alternative interface.
Lada Kalina Hatchback 103 kW / MT › Logbook › Restoring the CAN bus MMC Kalina 2
Hurray restored! detailed instructions FOR MMC KALINA 2/PRIORA! ARCHIVE WITH FIREWOOD AND FILES A method for restoring the CAN firmware of the MMC controller.
To restore the firmware we need:
1.
USBDM programmer/debugger/emulator, then programmer. Can be purchased on aliexpress 2.
From the
Drivers , install the driver corresponding to your system.
We connect USBDM to the computer. The system must recognize the device and install drivers. 3 3.
From the USBDM 4.10.6.250 folder , run the file HCS12_FlashProgrammer.exe If the programmer is working properly and the drivers are installed, we will see this picture
4. Solder the pins to connect the programmer to the MMC
(THIS IS FOR GRANTS!) Connection points on the Grants board We make jumpers and connect to the diagnostic connector this is for KALIN AND PRIOR!
Pinout of the tail of the programmer!
5. Connect the programmer to the MMS
>>>>>>>>>FOR GRANT!
There is no need to supply power to the MMS! >>>>>>>>>FOR KALIN AND PRIOR CONNECTED TO THE CONNECTOR, MMS IS MANDATORY TO TURN ON AND GO TO THE WORK DESK! On the Target tab, click Detect Chip.
If everything is in order, our chip will determine ID F180. Select G-MC9S12G96 from the list. If ID
is not detected, see if the connection to the MMC is correct, and the position
of the power selection jumper inside the programmer should be 3.3V or 5V .
I personally changed the jumper
6. Click Load Hex Files
, select the firmware we need: MMS_CAN_bootloader_1_13.s19 MMS_CAN_bootloader_1_7.s19 MMS_CAN_bootloader_1_7_07E8.s19 – CAN firmware with diagnostics. Click Program Flash If the chip was registered successfully, we will see a window asking you to flash another chip, answer NO.
Disconnect the programmer from the MMC and check the CAN version. Turn off the power from the MMC, turn it on and check the CAN version. (this step is for KALIN and PRIOR)
Installation of 1 din radio in Grantu standard and norm
What is needed to install a radio in a VAZ 2190:
- The radio itself is also the head unit;
- flat screwdriver;
- Straight arms.
Abbreviations and symbols in the text:
- GU – head unit;
- MMS – multimedia system;
- DIN (din) – installation size for acoustics in a car.
Step-by-step instructions for installing the head unit
- a narrow flat screwdriver or plastic spatula for installing acoustics;
- 1-din radio with frame.
The seat in Grant is designed for 1 din. To work with large 2-din sizes, you will need to cut out the partition and install a decorative frame.
Step 1. Using a flat-head screwdriver, remove the plastic plug for the radio. To do this, carefully pry it around the edges and pull it towards you.
The placeholder for the radio is installed from the factory.
Step 2. On the back of the plug there is a mount for ISO connectors. There are two connectors: music power and wires for the speakers.
Radio on Lada Granta: multimedia happiness
Owners of Lada Granta, having acquired a new car, want to bring everything in it to perfection: they do anti-corrosion treatment, install an alarm system, and tint the car. But there is one more procedure that every car enthusiast does when he acquires a brand new Granta - this is installing a radio on the Granta.
There is probably not a single person who does not like to listen to music, and doing it in your car is doubly pleasant.
This article will help all car enthusiasts who own such an attractive and reliable car to install a radio on a Lada Granta on their own, without resorting to the help of such expensive and sometimes unprofessional craftsmen. Moreover, the result of self-installation will be no worse than installation by a specialized service.
It should be said that the manufacturer significantly eased the fate of the owners of the Lada Granta car, since it took pity and initially installed all the necessary connecting wires to power the radio and the speakers themselves.
Compared to the “ten” and “twelve” families, whose owners were forced to carry out wiring procedures from start to finish, Lada Granta owners are freed from such a tedious and expensive manipulation.
About the connectors of the standard MMC Grants/Kalina 2
The back of the radio is as follows:
You can immediately notice the familiar ISO connector (brown and gray pads in the photo):
As well as the top row of mini connectors (blue, green and empty slot). This connector is called mini-ISO and has the following circuit:
Now about the amplifiers. Typically, an amplifier has two groups of inputs: linear and high-level input. You can use any of them, and here are the features of connecting the amplifier to the standard Granta/Kalina 2 radio:
Lada Granta liftback norm
The situation repeats itself, we have the option “Audio preparation (cable, external antenna)”. There are wires, and an audio system without TouchScreen is installed only in configuration 21917-710-41. All the necessary wires are already there, all that remains is to connect them.
Now you should understand what is included in Granta's audio training. If you have to connect the radio yourself, then we recommend that you read the instructions on how to install music.
Keywords: front speakers Lada Granta | rear speakers Lada Granta | cassette player Lada Granta | torpedo Lada Granta | Lada Granta doors | Lada Kalina doors
0 0 0 0 0 0
Share on social networks:
Removing the standard radio in Grant Lux
The difference between grants of the luxury configuration: the MMS (multimedia system) installed from the factory. This is a 2 din device.
To remove standard acoustic grants:
- take a knife or plastic spatula to dismantle the acoustics and disconnect the decorative trims to the right and left of the radio. It is not necessary to take pictures;
- in the gap between the cover and the panel we find the head unit lock. There are two of them on both sides. Press it out with a screwdriver;
- we take out the GU on ourselves.
Everything is described in detail in the video:
Replacing the standard MMC in Grant
The process - after removing the acoustics, we install a new system.
Difficulties: you may have to finish the fastenings of the new system for VAZ ones. Plus you need the right frame. The factory MMC frame may not fit.
Have you bought a new 2 din radio, but there is no frame for sale? You can do it yourself. Example at the link.
How to connect a radio to a Lada Granta: course of action
The very first manipulation that needs to be performed in order for the installation of the radio on the Granta to be successful with your own hands will be the dismantling of the plastic pocket installed in the place of the future audio system. This procedure is easy to perform by using a screwdriver that has a flat blade.
When removing the pocket, the driver will find that on the reverse side there are slots where ISO connectors are inserted - connectors for connecting a car radio. These connectors are held quite tightly in your pockets, which means you don’t have to look for them on the panel for a long time to connect all the connections.
Next, we remove the metal frame from the car radio and install it in the place where until recently there was a plastic pocket. Reliable fixation can be achieved by unbending the frame antennae.
The next step will be to connect the connectors to the car radio and install it in the frame already installed in the niche. When performing the installation, the installer will only need tools to change the shape of the holes (this could be a saw or a file). It should be taken into account that all sizes are already made in accordance with the housing standards for 1 DIN car radios.
Connecting the amplifier via the ISO connector of the radio
To connect an amplifier using a high-level input, you should take the signal from the output to the radio speakers (standard ISO).
This is the simplest method, suitable for undemanding listeners. This is because the signal going from the radio to the external amplifier has many circuits (pre-amplifier, radio amplifier, external amplifier voltage divider, power amplifier) that introduce their distortions.
Standard original factory push-button radio for Lada Kalina II.
This radio is installed on cars with the “Norma” configuration.
The mount differs from the “Grant” radio.
On the right side of the radio there is a USB connector, which is designed to connect:
- USB Flash card (USB 2.0 and 3.0 up to 64 GB);
- USB Flash player with a memory capacity of at least 1024 MB;
- USB HDD with FAT32 file system;
- Mobile phone (only in charging mode).
On the left side of the radio there is a slot for SD cards. SD Memory Card Slot: Supports SD, SDHC cards of size 32 X 24 X 2.1 mm. SDHC up to 32 GB, SD up to 32 GB.
The file allocation table (FAT) of the connected device must be FAT16 (< 2 GB) or FAT32 (> 2 GB). The maximum number of primary partitions should be no more than 4. It is advisable that the directory tree of the connected device have no more than eight levels. There should be no more than 1000 files in one directory.
While playing files, the display shows all the necessary information about the track. The playback source is selected using the AUDIO button on the left side of the radio. The radio has equalizer presets (JAZZ, POP, CLASSICAL, VOCAL and USER). The range of timbre adjustments for bass, treble, balance, front/rear balance is from “-7” to “+7” units.
The radio has Bluetooth and Handsfree functions. You can connect your phone by long pressing the handset button. When pairing on the phone, the inscription “MMC12” should appear in the list of found devices, the default password is “0000”. After successful connection, the BT icon will appear on the display of the radio. There is no phone book on the Kalina 2 and Grant radio, but it is possible to save up to 6 numbers in the radio’s memory. The audio system also remembers the last outgoing and incoming calls. The manufacturer does not guarantee operation of a phone in Handsfree mode that uses two or more SIM cards.
The radio allows you to listen to audio files from your mobile phone. To do this, you need to connect your phone to the radio via Bluetooth and launch the player on your phone. The manufacturer states that certain cell phone models may not work correctly with this radio, but this is not a sign of a malfunction.
The Kalina 2 and Granta radio has its own battery, which allows you to save user settings after disconnecting the battery for 10 days. The audio system supports audio formats (MP3. With constant or variable bit rate, bit rate 32–320 kb/s and sampling rate 44.1/48 kHz; WMA. (without DRM protection). With constant bit rate and bit rate 10–320 kb/s , with variable bitrate and transmission speed of 32–192 kb/sec). The head unit of Kalina 2 and Granta has all the necessary functions for a modern car. The audio system works flawlessly, there are no freezes, all operations are performed instantly. The build quality is at a high level. The only disadvantage is the lack of a CD/DVD drive, but nowadays discs are becoming a thing of the past. The standard radio of the Lada Kalina 2 and Granta without an LCD display is a good alternative for those who find physical buttons more convenient than a sensor.
Depending on the selected vehicle configuration, the consumer receives MMC Kalina 2 with various options. At the time of choosing the necessary equipment, the future owner must carefully study this issue. It is possible to install a 2 din radio with or without a CD drive, touch screen. In the last few years, car owners have given preference to models with touch control mode.
Reviews
| Module type | Price, rub.) |
| Standard 1-DIM (push-button version) | from 3500 – 3700 |
| Standard 2-DIM (sensor) only for Lada Granta liftback | from 7500 – 8000 |
| Third party manufacturers, depending on configuration and specifications |
| № | Positive |
| 1. | Victor, 39 years old: after buying the car, he did not change the radio, despite the push-button control option. The sound quality is good, the radio reception is excellent, that's enough for me. |
| 2. | Konstantin, 41 years old: bought the car second-hand, second owner. I didn’t change anything, I left the original radio. The functionality is good, the build quality is also good, it reads from a flash drive. |
| 3. | Vasily, 44 years old: I listen to the radio more, the reception in the city is good. True, it causes interference near metal structures, but this is natural. |
| 4. | Kirill, 36 years old: I work as a taxi driver, on wheels all day. The standard tape recorder saves the day, it works properly. My friends recommended replacing it with a touchscreen model from the new Granta, but so far the old one hasn’t failed. |
| Negative | |
| 1. | Victor, 38 years old: the standard audio module, although not bad, seemed to me not enough, so I replaced it with a foreign one and supplemented it with an amplifier. Now the volume is good, the quality is high. |
| 2. | Mikhail, 42 years old: I work as a courier, I drive for the entire shift. I expected more from the standard radio, so I had to replace it with a new one. The volume suits me, I plan to connect an amplifier - a crossover. |
| 3. | Ivan, 33 years old: I bought the car second-hand, immediately replaced the audio module, the reviews are not good. New and high-quality equipment from Trinity, no problems. |
| 4. | Vladlen, 40 years old: friends gave me a gift in the form of a radio with touch control for our anniversary. Before this there was a push-button one. Can't compare, quality, sound, control, functionality at a high level. |
Conclusion The opinions of motorists on the functionality and sound quality of the standard radio are divided, which is obvious. Everyone evaluates according to their own criteria. Some people care about sound, others about functionality, and others about control. Regardless of the type of radio: push-button or touch-sensitive, the workmanship is good. No massive breakdowns or defects were recorded. Maintenance is not expensive, parts and components are available both at official representative offices and on the Internet. Now it will not be difficult for the owner to remove the radio on the Granta liftback with his own hands without contacting a service station.
Benefits of new technologies
MMC Lada Kalina 2 is characterized by a simplified control system. Now all the necessary options can be obtained with 1-2 taps on the screen. The system is equipped with a more functional resistive screen. Unlike the standard Kalina radio with a capacitive version, the resistant screen has improved performance characteristics. The device is able to operate without failures in any temperature conditions.
Lada owners often complained that in sunny weather it became impossible to use the car radio. This is due to the numerous glares that make the characters on capacitive screens almost unreadable. The designers, when developing the second version of the radio, took this drawback into account.
If desired, the car owner can choose a model with a mini-visor that protects from glare.
The maximum display area of MMS Kalina 2 is 7 inches. Its operation is based on the Windows CE 6 operating system. The version developed specifically for radio tape recorders has characteristics close to optimal. It takes a few seconds to turn on the device. The amount of RAM ranges from 128 to 256 MB. Firmware for the Kalina 2 radio has significantly improved the technical capabilities of the equipment. Now they are as follows:
- support for wav, wma, mp3 formats;
- 6 programmed shades of music playback;
- the display of the Lada Kalina 2 radio shows information about the song and album during playback;
- there is the ability to play video in wmv format;
- the multimedia system supports maximum video resolution at 320*240 pixels;
- it is possible to play video files of other formats, but for this you will have to use a convector;
- availability of FM radio;
- micro SD card support;
- Lada radio firmware makes it possible to view images saved in bmp, gif, jpe, jpg, jpeg formats;
- The maximum photo size is not limited, but if it exceeds 2 MB, then the Kalina multimedia firmware will open it from 2 to 10 seconds.
Installing speakers in the front doors on a Lada Granta
Installation of a multimedia system is not limited to installing a car radio. For normal operation of the entire audio system, it is also necessary to install acoustics and speakers in the doors of the Lada Granta. To cut holes in the plastic door trim, it is better to remove it from the car.
We remove the door handle, then dismantle the plastic casing of the door opening lever and the glass position adjustment lever.
The front door trim already has a hole for the speaker, equal to 16 cm. Next comes connecting the speaker and installing it in its original place using 4 screws, followed by installation of the door trim and installation of the speaker grille