September 22, 2015 Lada.Online 92 883 7
Standard fog lights (PTF) on the Lada are only available in the “Lux” trim levels. If you are the owner of a car with a simpler configuration (“Norma” or “Standard”), then you can install PTF on a sedan, station wagon, hatchback or liftback yourself according to the simplest and most universal scheme..
Preparatory stage (selection of PTF for Lada Granta)
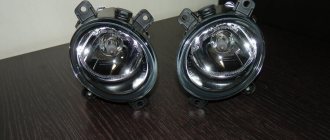
The range of PTFs is not large; it is represented by several domestically produced models. Some owners claim that PTFs from Opel and Ford are compatible, but the information has not been verified.
| Name / manufacturer / article | Price, rub.) |
| LADA Granta (VAZ 2190) / Kalina 2 / LADA Largus |
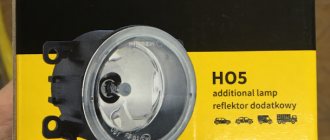
OSRAM kit 21900-3743010
*prices are as of September 22, 2018.
Procedure for self-installation of fog lights on a Lada Granta liftback
We place the car on a flat platform with access around the perimeter.
- We dismantle the front bumper along with the radiator grille.
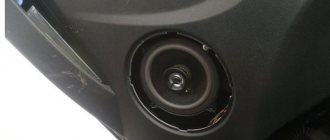
- Using a milling cutter, we cut holes in the openings for the PTF.
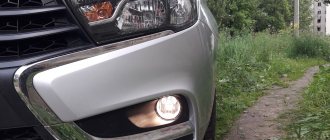
- We install the fog lights and secure them to the fasteners.
- We connect the blocks with wires.
- Reinstall the bumper. We check the functionality of the system.
Installation of PTF in Granta
First you need to remove the Granta bumper. Now we cut out the holes for the PTF using a utility knife. We fix the installed headlights with self-tapping screws, connect the wires and install the bumper in the reverse order.
Step-by-step process for preparing and installing fog lights
In the auto store we purchase: PTF, corrugation (at least 3.0 m), adapters - adapters for PTF with standard wiring.
- To remove the front bumper, unscrew three self-tapping screws on each side, four plastic clips, three “10” bolts in the lower perimeter;
- We remove the structure along with the radiator grille;
It is important to know. In the Norma and Standard models, there is no hole for adjusting the fog lights. The owners independently cut out a diameter of “8”. In the Liftback body modification, the opening is factory-made.
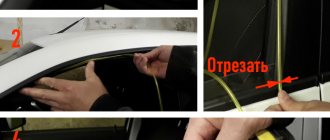
- We cut out the opening for the fog lights along the contour, it is factory-made;
- To make it smooth, treat the surface with a household hairdryer;
- We fix the headlights on three standard mounts;
- We connect adapters to each of the lamps, since the standard block with wires is short, its length is not enough;
- We put on the front bumper, screw it in with bolts and plastic clips.
Wiring diagram for fog lights Lada Granta liftback
Engine compartment
- We lay an additional wire from the right PTF headlight to the left one. We solder it and bring it into the engine compartment to connect to the relay.
- We fix the mass to the body at the place where the bumper is attached, maybe under the license plate, in the center.
- Do not forget to lay all electrical wiring in a corrugated material made of fireproof material.
Interior of the Lada Granta liftback car
- We lay the corrugated hose through the hole in the hydraulic corrector seal.
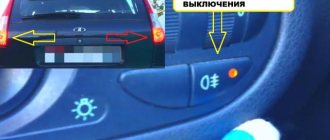
- The connection is best made at the ignition switch. That is, when turned off, the headlights will go out automatically.
- Open the glove box lid, press the side stops, and remove the lid.
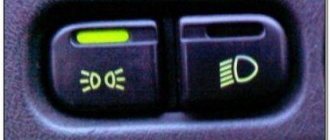
- We stretch our hand into the cavity and carefully squeeze out the block of two buttons for controlling the heated glass and PTF.
- We power the minus from the heater button. Plus we won’t take it, since they will be activated at the same time.
- We connect the positive cable and install the unit again.
- We connect to the positive from the ignition switch unit (blue wire), it is located under the steering wheel.
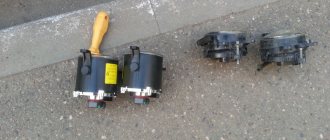
- Finally, we power the relay - regulator: ground - wire from the button - end to the PTF - plus to the ignition.
In each specific configuration, the color scheme of the wire may differ. Read the diagram in the instruction manual for details. Classic colors: red, yellow, blue, brown. If you do not want to supply power through the ignition switch, the connection diagram is simplified with one less procedure.
Connection
Below is a universal diagram for connecting a PTF using an additional button. The PTF kit contains everything necessary for installation and connection. In some cases, it may be necessary to lengthen the wires (cross-section of at least 0.75 sq. mm), be prepared for this.
It is recommended to hide the wiring under the hood in corrugation (cambric). We route the wires from the engine compartment to the passenger compartment through standard holes in the engine panel (the hole above the pedals). It is most convenient to place the relay inside the panel, behind the light control module (LCM). Plus, for switching the PTF, we take it from the battery or in the mounting block (most often this is a thick pink wire). Other useful contacts can be found in the table from the article on installing an alarm system. We install the button in any place convenient for you.
From the factory, the PTF is controlled via the light control module, diagram:
In our case, a separate, new button will be used to turn on the fog lights. The advantage of such a universal PTF connection is that the installation process is very simple and does not require much time and money. The disadvantage is that there is no indication of the fog lights on the dashboard, but this can all be solved by modifying the panel.
The process of installing and connecting the PTF on the Lada Granta FL is shown in the video:
By the way, do you know what is needed to convert a regular Lada Granta into a new FL?
Keywords: fog lights Lada Granta | fog lights Lada Kalina | fog lights Lada Priora | bumper Lada Granta | bumper Lada Kalina | bumper Lada Priora | external lighting for Lada Granta | external lighting for Lada Kalina | external lighting for Lada Priora | headlights of Lada Granta | headlights of Lada Priora | headlights Lada Kalina
0 0 0 0 0 0
Share on social networks:
Reviews
| from 2800 | |
| Kit 21900-3743011 | —/— |
| —/— 2190-3743011 | —/— |
| —/— 2190-3743010 | —/— |
| PTF wiring kit for LADA Granta (2190 2874498) | from 600 |
| PTF "LUCH" set 1118-3743010/11 | from 1800 |
| PTF glass (02B08507) Granta / Kalina 2 / Largus, Datsun | from 750 |
| AUTOMOTIVE LIGHTING / BOSCH (982469641) | from 2000 |
| № | Positive |
| 1. | Kirill , 36 years old: after purchasing a Lada Grant from the showroom, I immediately purchased a PTF from OSRAM 21900-3743010. I didn’t install it at the service station because I can do it myself. In general, I am satisfied with the quality of lighting, no complaints. |
| 2. | Vitaly , 29 years old: it is obvious that there are not enough foglights out of the box. I often drive at night and need a good view of the road. Since I don’t understand manufacturers, I entrusted it to a specialist at a service station. PTF Lada Granta liftback - my advice. |
| 3. | Georgiy , 37 years old: I’ve been working as a taxi driver for the second year, my shift often ends after one in the morning. The disadvantage of the standard lighting system is obvious. I bought a “LUCH” set 1118-3743010/11 at the market. The cost is 1850 rubles, the quality is good, installation couldn’t be simpler. |
| 4. | Victor , 25 years old: I work as an entrepreneur, purchasing goods from hundreds of kilometers away. By morning the products should be on the counter. To help the standard headlights, I installed PTF. Second week, no complaints. |
| 5. | Maxim , 28 years old: I leave my positive review of BOSCH fog lights (982469641). Special thanks to the store manager for his practical advice. |
| 6. | Konstantin , 37 years old: during scheduled maintenance, he ordered the service of installing a PTF from a technician. I chose OSRAM 21900-3743010 because the price and quality are at a decent level. Numerous positive reviews. |
| 7. | Vladimir , 48 years old: I was a little upset by the lack of fog lights from the box on the Lada Granta liftback. I had to install it myself last weekend. The lighting is good, no complaints. |
| Negative | |
| 1. | Alexander , 36 years old: not only are fog lights not included in the kit, but they also provide poor lighting. We are talking about a domestic manufacturer. Installed by BOSCH (982469641). I use it myself and recommend it to others. |
| 2. | Vitaly , 39 years old: installed domestic PTF OSRAM 21900-3743010. I regretted buying it, wasted money. The quality is below average, the angle of inclination is several degrees. I don't recommend it. |
| 3. | Vyacheslav , 37 years old: not happy with the installed fog lights, they don’t cover the side of the road, visibility is mediocre, the light is dim. |
Conclusion Every product has its own buyer. If you don’t find fault with a budget car, which is the Lada Granta Liftback, the quality of PTF lighting is good, it is enough for visibility. Of course, when compared with headlights from foreign brands in the premium segment, the advantage of the latter is obvious. In order to increase the service life of accessories, purchase products exclusively from certified points of sale. Require the provision of documents, check the functionality on site.
Installation
- buy PTF (articles: 21900-3743011-00 and 21900-3743010-00), for example here. For Lada Granta FL, PTF catalog number: 261500097R.
- PTF activation button (article 759.3710-07.01A or 995.3710-07.06).
To install the PTF in the bumper, it must be removed. Then cut holes of the required diameter. Sand the sawn edges with sandpaper. And secure it to the fog lights in the bumper using screws. There shouldn't be any difficulties at this stage.
The whole process is also shown in the video:
Connecting PTF to Grant
The wiring can be taken from the Lada Priora (price 400 rubles), but keep in mind that this kit does not have enough wire, but its length is enough to secure the relay in the mounting block under the hood. Then the control wire from the button will have to be pulled to the relay through a plug above the gas pedal. We take power to the button from the dimensions or from the ignition. We take power to the relay next to the battery, after the relay we cut the fuse sockets into the power wires on the PTF.
There are many PTF connection schemes, choose which one you like best: 1) Turn on the PTF on a separate button with an indicator. Like this:
Diagram and description:
The disadvantage of this connection is the lack of PTF indication in the dashboard.
2) Turning on the PTF from the rear fog lamp button. We connect the winding of the PTF switching relay to the wire going to the rear fog lamp. We remove the LCM (lighting control module), connector at the back. We look at the wire color according to the diagram.
Thus, when you turn on the PTF, a symbol is displayed on the instrument panel, but the drawback is that the PTF only works with low and high beam.
3) Turning on the PTF through the MUS, or rather its electrical part. Add a microphone. Mikrik was taken with his feet to pass through the circuit board. We mark its position, drill two holes for the legs and two side by side for the wires. We pass the wire through the outside and solder it at the back. One end of the wire goes to dad 31 from the mikrik, the second wire went out through the hole.
Button illumination: solder the LED onto the LED strip, cut out only the square with the diode and glue it in front of the microphone. We connect to the LED near the rear PTF button. We'll have to break the partitions because of the wires. The PTF button from Priora (hat with a headlight icon) is crossed with our dummy button. That is, we cut off the top of the PTF Grants button, and glued a piece of the Priorovskaya button in its place. It is smaller in height due to the rectangular window, so we putty, sand, and level it.
If you do not finalize the ICC Grants, then installing and connecting the PTF will take no more than 3 hours.