What is the first thing a person thinks about after buying a car? About its safety! The most popular way to protect your car from theft or accidental collision in a parking lot is to install an alarm system. In addition, the security system can combine other useful functions, for example, automatic engine start or remote trunk opening through an additional channel.
We install an alarm system on a Lada Granta with our own hands: connection points and diagram
Almost every owner of his car has thought about how to equip his iron horse with protection against theft. This also applies to owners of the Lada Granta, because the standard and standard configurations are not equipped from the factory with any anti-theft system other than an immobilizer. And in this article we will tell you how to install an alarm system on a car with your own hands, because in essence, despite the wide variety of different types and companies, the procedure for installing them is quite similar.
| TOP 15 most useful products for Lada Granta - OUR EXPERIENCE! |
- 1 Alarm connection point options 1.1 Step-by-step installation process
- 1.2 We connect the alarm approximately according to this scheme:
Alarm connection point options
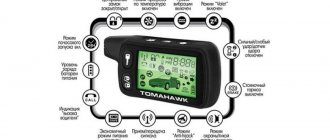
Once you have decided to start installing the alarm yourself, you need to make a choice. Don't choose the latest model with the latest bells and whistles. It is enough to turn your attention to a strong middle peasant whose brand has long established itself in this market. Consider installation on a popular car alarm model from Starline .
Depending on the model, equipment may vary.
Since the manufacturer equipped the car from the factory with a limit switch only for the driver’s door, you should purchase new elements for the remaining three, as well as connection blocks, from the store.
In addition, you should purchase about 10 meters of wire, as well as an alarm bell (siren) if one is not included in the kit.
Step-by-step installation process
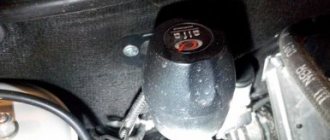
- First of all, we install the alarm siren under the hood.
It is worth choosing a place for fixing it where there is no possibility of water ingress.
A European-type end cap (additional option) will easily fit into the base location.
After the wires are in the cabin, check the plug for secure fixation.
Not far from the shock sensor, we place a service button.
In most cases, the transmitter is attached using double-sided tape.
We fix the indicator on the stand body with glue.
From the end switch of the driver's door, we stretch the “positive” wires to the other doors.
We connect the alarm approximately according to this scheme:
| Chain | Color | Polarity | Location |
| + 12V | Pink | Positive | Egnition lock |
| IGN_1 | Blue | Positive | Egnition lock |
| Start | Red | Positive | Egnition lock |
| +12 V (constant) | Pink | Positive | Ignition relay |
| +12 V (from ignition) | Blue | Positive | |
| Turns | Blue ; Blue/ black | Positive | Left threshold |
| Gasoline pump | Grey | Positive | |
| Driver limit switch | Red Green | Negative | |
| Handbrake | Brown/Blue or Red/ Black (Luxury) | Negative | |
| Driver limit switch | Red Green | Negative | Instrument cluster |
| Handbrake | Brown/blue | Negative | |
| Trunk | White black | Negative | Harness in the trunk (install the diode) |
| Tachometer | Brown/red | Impulses | In the configuration, the standard can be taken on the EUR block |
General tips for installing alarms
- To supply power to the alarm unit, you should take energy only from the constant positive, which goes directly to the battery, bypassing fuse protection.
- It is best to attach the light indicator not to the dimensions (as recommended by the instructions), but to the turn signal network.
- If possible, the alarm antenna should be connected as close to metal parts as possible, as this will result in a better signal.
- After connecting all the elements, check and adjust the shock sensor to the optimal values.
Conclusions and Conclusion
As you can see for yourself, installing a car alarm yourself is not such a difficult task that a car enthusiast can face. All you need is a little desire and some theoretical preparation. After reading our instructions carefully and acting strictly in order, you can install the alarm within 3 hours.
Wiring connection
After the alarm components are installed on the Grant with your own hands, you should connect the nodes with standard wiring bundles. The central harness is connected to the on-board network and additional components according to the circuit recommended by the equipment manufacturer. The positive signal is supplied from the battery terminal or from the lock, the negative terminal is connected to the car body. For connection, bolts located inside the instrument panel are used.
To use autostart, you need to connect the switches located under the brake pedal and under the parking brake lever. The contact group under the pedal is designed for additional protection of the car; when you try to brake in a stolen car, the engine is turned off. Additionally, it is necessary to use the cord that controls the operation of the power unit. The signal comes from the tachometer; some of the alarms support voltage control in the on-board network.
The central harness is connected to the direction indicator control unit. Fuses should be provided in the power circuits; the rating of the products depends on the type of security system. The design of the machine does not provide end elements that fix the position of the doors. The parts are installed in separate holes, which are made on the body pillars. The connecting cables are routed under the sill trim.
Connection to central locking
The head units of the security complex are connected to the central locking system, which is used on Grant vehicles. For switching, you need to cut the wire covered with a layer of brown insulation. The switching takes place in the driver's door or near the central locking control unit. The opposite end of the cord is connected to the corresponding output of the head alarm module (the location of the contact depends on the model and manufacturer of the complex). There is no need to connect power cables to ensure operation of the nodes.
Option for Luxury package
When installing an alarm system on a Granta with extended factory equipment (according to factory terminology, the version is designated as “luxury”), you should take into account the presence of an additional switch that allows you to block the locks. The element is located on the door trim on the driver's side. To switch the head unit of the security complex, an output is used, at which a positive signal appears when the switch is acted upon.
Additional resistance is introduced into the switching circuit (nominal 2.7-3.0 kOhm). The resistor is soldered to the cable going to the lock control unit, and to the wire laid to the lock unlocking relay. The connection points are protected with insulating tape or a special tube that prevents short circuits and fires in the electrical wiring.
Option for Norma configuration
To connect an alarm system to a Lada with basic equipment, you need to connect to cables with blue-red and yellow insulation installed in the standard central locking unit. Then you need to swap the wires connected to the standard power drive in the driver's door. If, when testing the complex, it turns out that the drive is not operating correctly, then it is necessary to switch the wires coming from the head unit to the central locking module. The standard plug is not connected to the locking block; it is recommended to additionally insulate the unit.
Connecting an alarm system to the Lada Granta from 2022 - keyless bypass
Alarm system with auto start for Lada Granta restyled FL, late 2018, equipped with automatic transmission or manual transmission - bypassing the standard immo via Lin
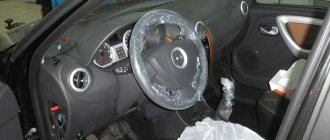
To access the ignition switch connector, remove the steering shaft protective cover. To do this, first remove the plastic trim under the steering column (fastened with clips). Remove the decorative trim (fastening with clips). Unscrew the two bolts and five self-tapping screws securing the steering shaft protective casing and remove it. To access the wires of the LIN bus and the trunk limit switch, remove the driver's door threshold (fastened with five self-tapping screws).
Remove the instrument panel of Grant 2 . To do this, you must first remove the decorative trim (fastening with three screws), then unscrew the four fastening screws and remove the panel, disconnecting the connectors.
Grant connection points 2
Ground connection to the right of the steering column under the standard bolt.
Connecting the CAN-A bus in the instrument panel connector harness. Connect the LIN bus in the harness coming from the driver's door according to Diagram 1.
Diagram LIN bus connection
Connecting the hood switch control according to Scheme 2.
Scheme Control of the hood limit switch
connecting the trunk limit switch control in the left threshold harness according to Scheme 3
Scheme Control of the trunk limit switch
connecting the light signal control circuits in the hazard warning control button connector harness.
In the ignition switch connector harness, connect the engine autostart power circuits - accessories and ignition, power supply and the autostart power module. Connect the starter circuit to the gray connector under the fuse block
Review of Manufacturer Prices
| Name / article | Cost, rub.) |
| Convoy XS-3/65263 | From 1100 |
| Sigma SM-50 65873 | —/— |
| Sigma SM-55 65875 | —/— |
| CYCLON X7 LC 216877 | —/— |
| CYCLON X5 LC 172924 | —/— |
| DaVINCI PHI-100 168541 | From 1500 |
| DaVINCI PHI-130 208766 | —/— |
| Convoy XS-4 178593 | —/— |
| RS C-800 179291 | —/— |
| Convoy XS-6 10469 | —/— |
| RS C-815 179292 | —/— |
| Convoy XS-7 68605 | From 1650 |
| Convoy XS-6 22847 | —/— |
| SPY SA1/LT150+LT302 43670 | —/— |
| Sigma SM-300 PRO 57602 | —/— |
| SHERIFF APS-2400 20237 | From 1800 |
| SHERIFF APS-2600 1210 | —/— |
| EX C169 178833 | —/— |
| Sigma SM-700 208628 | —/— |
| DaVINCI PHI-370 209797 | From 2000 |
| ALLIGATOR A-LIGHT 236831 | —/— |
| Viper 3100 154251 | —/— |
| Eaglemaster E4 LCD 170182 | —/— |
*prices are current as of October 14, 2018.
Step-by-step installation of an alarm system on a Lada Granta with your own hands
The alarm is very useful and multifunctional.
With its help, you can protect your car from thieves or accidental collisions in the parking lot. More complex security systems are capable of using a key fob to open the trunk from a distance, start the engine, or perform a host of other interesting functions. Lada Granta models such as Norma and Standard do not have an anti-theft system in their factory equipment. The factory simply does not install them, since the designers considered this part superfluous, if you do not take the immobilizer into account.
That is why this article was created, since the relevance of the issue of installing an alarm system on the Lada Granta is soaring at exorbitant heights. Despite the fact that there is a huge range of security systems for cars on the market, they have almost identical installation schemes, with only minor differences.
Connection points
As soon as the thought of purchasing an alarm has occurred to you, you must first decide on your choice.
What exactly do you want from a security system? You only need protection or some other additional functions that a device of this kind can provide. It’s worth saying right away that in most cases there is no point in buying the most sophisticated newest model. A strong middle player will be more useful for Granta. Typically, brands of such systems quickly become popular or fly off the shelves like melted popsicles. An alarm system that has proven itself to be excellent will be in demand simply because it has been tested by many, and nowadays information reaches consumers much faster than even just five years ago.
The configuration of the security system completely depends on its model, so the presence or absence of any elements does not yet indicate a defect, etc.
Next, we will look at one of the proven autostart systems - Starline. It is chosen by car owners who prefer to service their iron horse themselves, rather than throw it into the hands of service station masters on every occasion. Moreover, this system is perfect not only for Grants standard, but also for liftback and luxury.
Reviews
| № | Positive |
| 1. | Victor: after purchasing the car, I immediately ordered the installation of an anti-theft device. The service recommended StarLine A93. Budget option, basic set of functions. It works properly, no complaints. |
| 2. | Kirill: I installed the alarm myself for the first time, everything worked out, it works. The process is not difficult, I advise you to try it. |
| 3. | Vladimir: I bought a security guard at a car store, the manager advised me to buy a budget assembly from StarLine A93. I've been using it for six months and it works well. |
| 4. | Vyacheslav: after buying the car I used the standard immobilizer. Two months ago I installed the StarLine A93 signaling system. The quality is good, the price is affordable, my recommendations. |
| 5. | Sergey: I installed a Pandora Deluxe 1870 security system on the car. Despite the budget price, the quality is quite decent. |
| Negative | |
| 1. | Kirill: I don’t recommend installing various types of budget alarms. Duration of operation is six months to a year, after which replacement and repair. It is better to choose more expensive models from American manufacturers. |
| 2. | Ivan: negative review about Pandora Deluxe. I installed it six months ago at a service center, but yesterday it broke down. I couldn’t get into the car, so I called a team of specialists. |
| 3. | Alexander: I don’t recommend anti-theft from StarLine. Budget model, service life only one year. I won’t install it again, I’ll buy it more expensive. |
Features of installing an alarm system on Lada Granta
I'm completely tired of using the standard central locking. This was followed by the fact that a couple of times I forgot to lock the car before work (fortunately, the parking lot was near work), and when I remembered on the way, the standard key fob clearly did not have enough range.
As a result, it was decided to install an alarm with auto start, and with a normal range, according to reviews. The choice was not easy, I was tossing between Starline A 91 and SCHER-KHAN LOGICAR 2. In the end I decided on “SCHER-KHAN”.
I installed it in a friend’s garage, but only because I was confident in his professional knowledge. As a result, my hands guide his head. If you have never done this on your own, you shouldn’t start. So, let’s open and understand the wires of the mounting block, this is necessary for understanding, and so as not to cut off unnecessary things.
[adsense]
The central locking relay slightly jumped off the contacts, which is probably why it didn’t always work.
I was then faced with the choice of creating an additional secret button; at the moment it was possible to insert it into the ignition switch circuit, these three standard wiring. I changed my mind and am going to install an ignition switch from Garant. And later we’ll put a seal on the fuel pump.
And then the most interesting part begins - finding a place where we will crash. We take out the wiring harness from the central threshold and disassemble the wires.
The main thing here is not to confuse anything - there are blue and black wires going to the turn signals, and brown and green wires to the left front door.
But for the rest of the doors you don’t even have to look for wires for limit switches - you’ll have to lay them yourself. Since I was interested in installing an alarm system with auto start, a handbrake is strictly necessary.
It was decided to take the wires for it from under the instrument panel (closer to the alarm control unit, it was also placed under the panel). Fortunately, there is plenty of space under the Grants panel.
Next, open the glove compartment and look for the engine control unit. You need to take a signal from the generator from it - this is a brown-blue wire.
We connect a white-black wire to the trunk end switch, into the gap of which it is necessary to insert a diode, but we had to install a Euro end switch in the engine compartment.
Next was the long installation of limit switches on the remaining doors, the main thing was to connect them to the driver’s door, and not according to another scheme. Tested and produces fewer glitches.
At first there was a defect - when arming, the locks in the passenger doors kept clicking. this is because their locks also have limit switches. They simply fixed it - diodes were soldered into the circuit (as on the trunk end) and now the control unit receives the signal correctly.
Taking into account these features of installing an alarm system on a Lada Granta, you can be guaranteed to install the system in 1 day, and not overpay for a service station.
Programming the duration of control pulses
Even if the alarm is connected correctly, it is not a fact that the owner will be able to control the locks from the key fob. The point is that it is necessary to correctly select the duration of the control pulse (for locking and for opening). There is no need to make it too large so as not to overheat the actuators.
Screenshot of Starline signaling instructions
See what exactly the manufacturer Starline offers. We can set the pulse duration to 0.7 s, which should be enough. The value “3.6” will be redundant at the same time.
The “Lux” package has the following property: after 15 minutes of inactivity, the electronics “fall asleep”. It may take an extra boost to wake her up. So, try to use the option that provides for a double pulse. The main thing is not to activate the “comfort” option, which uses a 30-second duration. To connect the signaling with “comfort”, you need to install an additional unit in Grants (AvtoVAZ does not produce it). We wish you success.
Do-it-yourself alarm installation on the Grant fret: video instructions
basic information
Quite often, buyers decide to purchase cars from a domestic manufacturer. Naturally, this has its advantages, but there are also disadvantages. As a rule, domestic cars have a low cost and this is their main advantage.
The presented fact even covers the fact that such a car will have less efficiency. So, the car that we will discuss today is precisely one of these budget cars. The most popular configuration of the Lada Granta car is the norm configuration.
When choosing such a vehicle, the buyer naturally hopes that it is equipped with a standard alarm system, since, for example, the Lada Kalina is equipped with such an alarm system. But the Lada Granta is not equipped with an anti-theft system; the only thing the buyer can count on is an immobilizer.
- At a car dealership, the buyer will simply be given the keys to the car and wished a safe journey.
- In this configuration, the alarm is triggered when the doors are opened, thus preventing unauthorized entry into the vehicle interior.
Preparing the car before connecting
What controls the central locking? A special block to which the lock actuator wires fit. There are also two wires connected to it, connected to the driver's door microphone. More precisely, this wire is used alone in “Grant”, it has a brown sheath, and the second contact from the “micrik” is connected to ground.
The “micric” itself is located inside the actuator. So, the first piece of advice: after removing the left front door trim, you need to find the cable going from the actuator to the 7-pin connector.
Depending on the configuration, under the trim you will see the following:
- There are 6 wires suitable for the connector (from 2 microphones and a drive);
- The cords from the electric drive (pins “2/7”) are not connected, but there is still a brown wire connected to pin “1”;
- Only those wires that, according to the diagram, should be connected to contacts “4/6” are missing.
Connecting the signaling means that the wires from contacts “2/7” are still connected to the central locking control unit. The cords coming from the three actuators are always connected to the standard unit. You need to connect a fourth one, if this is not done by the factory. You may have to lay a two-wire cable from the door to the central lock control unit:
The central locking control unit is located under the fuse block, it is designated BUBD-2190.
Here's how one of the car owners coped with the task:
The cords that come out of the door are connected to the wires of the standard terminal block. The following connector pins are used: “3” and “4”. The main thing is not to confuse them. Take another look at the diagram to see what exactly we are talking about.
How to properly install anti-theft alarm system on a Lada Granta?
Installing an anti-theft system today is a priority for many of our compatriots. For obvious reasons, leaving a car without a signal on the street is not at all safe. From this material you can learn how to install an alarm on a Lada Granta and how to activate the immobilizer yourself.
Standard anti-theft system Grants
Installing an alarm system on a Grant with your own hands is a rather labor-intensive task, which not every car owner can handle correctly. The system must be installed taking into account all rules and standards, since the safety of the vehicle depends on this. Although the central lock of the Lada Granta protects the car, in the event of a break-in or a broken window, it will not notify the owner of the car.
Immobilizer and its location
An immobilizer is a standard car alarm system. Its purpose is to block the engine starting system if an attempt to start it is unauthorized. The device blocks the main components that prevent the engine from starting. Such a Lada alarm system will not be able to signal with a siren about illegal entry into the car, but it will block the engine, so the maximum that a potential thief can do is to “surround” the car’s interior (the author of the video is Ivan Sergeev).
Of course, in this case, the car owner may lose personal belongings, but you don’t have to worry about the safety of the vehicle. The main immo block is located in a hard-to-reach place for obvious reasons, so that a hijacker cannot disable it. To get to the unit in your car, you need to partially disassemble the center console. The unit itself is located behind the stove, and the immo control sensor is located in the ignition switch.
How to activate immo?
Activating the immobilizer is a procedure that many of our compatriots encounter. An activated immobilizer will be able to fully perform the functions assigned to it.
How to properly activate a node:
- First you need to close all the doors, then turn on the ignition, but to do this, use a red training key. Wait at least six seconds; if the immo is not activated, the corresponding indicator should appear on the device.
- Remove the learning key.
- Then, within five seconds you need to turn on the ignition with your working key. Having done this, you can hear the immo making beeps, there should be five of them in total. If there is no sound, there may be several reasons - either you did not meet the time limits, or the working key is configured to work with another device, or the node is not working.
- Next, turn off the ignition and remove the key.
- Then you need to quickly turn on the training key again while the car is blinking (you have no more than six seconds). Five beeps should sound again - 3 and 2.
- Now turn off the ignition, but do not remove the key. Another beep should sound. When this happens, within 6 seconds, turn on the ignition for 3 seconds, no more, then turn it off, and the key can be left in the lock.
- After these steps, three more signals should sound, but the key does not need to be removed. Wait at least ten seconds before removing the key. If for some reason the system was not activated, the procedure must be repeated.
Alarm Installation Instructions
Installing an alarm system with or without auto start on Granta begins with a careful study of the connection diagram . If errors are made during connection, it will be difficult to identify them later, so at this stage, be careful to take into account all the nuances.
Stages
Installation of the anti-theft system is carried out in the following order:
- First install the siren in the engine compartment; when installing, keep in mind that it should not be exposed to moisture or high temperatures.
- Attach the hood warning switch.
- It is necessary to install a power unit temperature controller on the motor itself.
- To the left of the cylinder block you can see a plug - through it you need to pull all the cables from the siren, the controller and the installed open hood limit switch. When all the wires are in the cabin, it is necessary to diagnose the plug and the reliability of the wires.
- After completing these steps, you need to install the anti-theft system control unit; it is best to place it behind the control panel. When installing, keep in mind that the unit must be securely fastened, otherwise vibrations will affect it, and this will not lead to anything good.
- Now open the fuse box - you need to mount the Valet service button on its bottom bar. You can also install a shock sensor here, in accordance with the signal of which the siren will turn on.
- Next, we move on to installing the transmitter; it can be placed near the rearview mirror or opposite the driver’s seat. As a rule, this adapter is fixed with tape. If the kit comes with a separate light indicator, it can be installed in the rack housing. The light bulb is fixed with glue.
- The next step is to connect the wire to the door end switch, to this wire you will then connect the wiring from the remaining doors. We move on to the luggage compartment and lay out the wiring, connecting the corresponding cable to the end switch.
- Now all you have to do is connect all the necessary contacts to the control unit, as well as to the ignition switch. To do this, use the diagram above.
Installation
Installing an alarm system on a Lada Granta with your own hands consists of several stages:
- Removing the plastic trim of the steering column. Then the instrument cluster is removed and the card installed on the driver's door is removed. The parts are secured with screws and plastic pistons, which are removed with a special mounting spatula.
- The installation point of the head unit depends on the dimensions and characteristics of the product. Small-sized modules of Starline or Pandora products are located behind the instrument cluster.
- Connect the control diode to the front roof pillar trim on the driver's side. The antenna unit (some of the complexes contain an impact detection sensor) is glued to the upper edge of the windshield. If the owner has previously installed the unit on a different point on the glass, it is recommended to replace the layer of 2-sided adhesive tape that is applied to the module body at the factory.
- The siren horn is placed in the engine compartment, the cable is routed into the vehicle interior through standard channels made in the engine panel. Since overheating of the housing leads to damage to the electronics of the unit, the horn is protected from the exhaust manifold. The base of the siren is secured with screws that are screwed into pre-drilled holes.
- When installing an alarm with auto start, it is necessary to install a sensor that measures the temperature of the engine block. The device is secured with a nut in accordance with the manufacturer’s recommendations; it is prohibited to squeeze the element during installation.
Installation Rules
An alarm installation map (individual for each device model) is attached to the factory installation instructions. When performing installation work, secure fixation of the elements with screws or plastic clamps is ensured. When using 2-sided adhesive tape, the adhesive layer may be destroyed due to temperature changes, loose parts are damaged and can destroy the standard electrical wiring of the car.
It is not recommended to install parts of the security system next to the standard electronic controllers of the car. The location of the head unit is located at a distance from the ventilation ducts of the standard air conditioning unit. To ensure cooling, natural ventilation must be provided.
All work related to connecting electrical wiring is carried out with the vehicle de-energized.
The wires are connected by twisting; to improve the quality of contact, solder or special metal tubes are used. It is not recommended to cut cables that are not used for switching. The cords are neatly rolled into rolls and attached to the car’s structural parts with plastic clamps.
Immobilizer and its location
The immobilizer is a ring antenna located in the ignition circuit control lock. The plant equips cars with 2 keys, inside of which there is a special chip. If the microcircuit is correctly recognized, the blocking of the engine starting circuits is disabled. Automatic engine start, performed without a key, is only possible when an immobilizer bypass is installed. The device is a separate unit with a chip or a copy of the key; some alarms use an electronic unit that simulates the signal from a standard key.
Connecting the signaling to the central locking system
Now we get to the most interesting part. The contacts of the signaling relay must be connected to the gap in the brown wire (see diagram in Chapter 1). Moreover, this will be required regardless of the configuration. Oddly enough, we won’t need power cables at all. And the task now looks like this: you need a two-wire signal cable connected to the break in the brown cord.
The moral here is:
- If you were able to remove the central lock control unit, connect the cable to the break in the wire connected to pin “7” of the control unit;
- If you have removed the door trim, then pull the cable out of it (from the point where the brown cord breaks).
It is clear that the second side of the cable must reach the relay connector of your alarm.
Option for the “Lux” package
So, this means that there is a button on the armrest in the cabin that allows you to lock the locks. From one of the contacts of the button, to which a “plus” is applied when pressed, you need to stretch the cord to the signaling unit. Nothing else is required, and you can connect the alarm according to the following scheme:
According to reviews, this option is suitable if we are talking specifically about the “luxury” configuration. By the way, the resistor can be connected to the gap in the wire designated “blue” (the common contacts are then connected with a jumper).
It must be remembered that when working with any electrical equipment, you must first remove the negative terminal from the battery.
Each cord that is re-laid must not touch metal surfaces. Otherwise, in places of contact, the wire is protected with a tube that can withstand temperatures of 250 degrees. This is how you can protect yourself from unforeseen consequences.
Option for the “Norma” configuration
Let's say there is no button in the cabin that allows you to perform emergency closing. Then you need to connect the signaling to the central locking system according to the following scheme:
As you can see, unlike the first option, there are no resistors here, and positive voltage is not used at all. But in the luxury configuration the effect that is characteristic of this scheme will not be observed:
- We perform closing from the key fob - all locks are locked;
- We try to open the locks with the key fob - only the driver's lock unlocks.
If you are satisfied with this property, try to implement the scheme in practice. And other options, more advanced, look much more complicated.
Read what is said about installation safety in the previous chapter. Do not neglect the advice about disconnecting the negative terminal. We work only with signal circuits, so nothing will fail even if connected incorrectly. However, be careful not to confuse the locking and unlocking relays, which are located in the alarm unit. This unit is usually equipped with a 6-pin connector (for details, see the signaling manufacturer's instructions).
general information
On machines equipped with Norma, central locking control units are installed, which are replaced with new ones if they break down. On Luxe vehicles, TsBKE are used instead. Below we will try to take a more detailed look at the central locking unit and its control unit, their relationship with the remote control, symptoms of a malfunction of this part, and also provide instructions for replacing it yourself.
Now let's look in more detail at remote control, which is intended not only for locking and unlocking car doors at a distance with synchronous activation of the security mode. In addition, it allows you to lock all locks with one turn of the key, lock and unlock all door locks by pressing one button located inside the cabin, and also turn on and off the car alarm both remotely and with the key.
Operating modes
Door locks on Grants are blocked by pressing the corresponding key on the remote control, after which they can be unlocked using the remote control in stepwise and simultaneous unlocking modes. The first of the listed modes will allow you to unlock all door locks by double pressing the key (first the driver's door is unlocked, and then all other doors). When you activate the second mode, you can unlock all the doors of the car at the same time, with one click.
To change the mode, the car owner will need to perform the following steps:
- first you need to turn on the ignition with the remote control key;
- then you will need to press and hold the unlock and lock keys in this position for five seconds;
- After the buzzer sounds, release the keys.
Blocking
If, after unlocking the door locks, you do not open the trunk or one of the doors, or do not turn on the ignition, then after twenty-five seconds all doors will be locked again.
Control from the cabin
When blocking doors directly from inside the car, you need to press the corresponding button located on the driver's door, or press a similar button in the module of the same door. Unlocking will require lifting the desired key on the door or pressing it in the module. To lock the doors from the outside, you will need to turn the key in the lock located on the driver's door clockwise, and to unlock the doors, turn the key in the opposite direction.
Window control
By pressing and then holding the lock button in this position for three seconds, you can raise the lowered door windows, with the front windows going up first, followed by the rear door windows. By pressing and holding the unlock key for three or more seconds, you can lower the raised windows in a similar sequence.
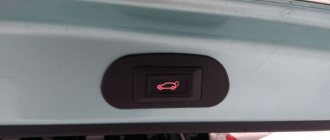
Opening the trunk
Unlocking the trunk lid lock on a Grant using the remote control is possible only after turning off the ignition. So, when opening the lid, you must either press the key on the remote control twice, with a minimum interval, or press it once, but hold it down for at least several moments. When the security mode is activated, the trunk will open synchronously with the security zone being turned off for at least half a minute. To close the lid you will need to slam it shut again.
How to replace the central locking unit
Required
: remove the mounting block (put it aside without disconnecting the connectors with wires), a new central locking control unit (article 21900651201000, price about 1100 rubles).
- Remove the two screws securing the block.
- Disconnect the block with wires (pull it towards you).
The most difficult thing: unscrew the screw securing the mounting block, unscrew the bolts securing the central locking unit, remove the connector from the central locking unit and install it in its place. If it is not possible to tighten the bolts of the central locking unit in the reverse order, use plastic ties.
The process of removing and installing the central locking control unit on the Lada Granta is also shown in the video:
By the way, do you know that LADA cars can be equipped with sensors? This update will change the way you think about lock management.
The central locks (CL) installed on Grants allow their owners to lock and open the doors of their car from a distance using the remote control, or to perform this manipulation by turning the key in the lock of one of the doors (driver's).