What is a fuel pump
The gasoline pump is a key component of the power system; its job is to ensure an uninterrupted, timely supply of fuel to the system.
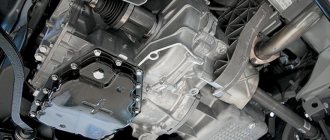
In each model, the design and location of the fuel pump is unique; for the Lada Kalina, this device is located on the opposite side of the power unit.
On the one hand, this arrangement allows you to benefit from the technical capabilities of the machine, but on the other hand, the device requires more powerful operation than models in which the fuel pump is located closer to the engine.
In order for Kalina’s fuel pump to cope with its job, it is presented in an electric version. Its advantages are:
- simplicity of design;
- good fuel supply;
- safety.
But, as one might expect, Kalina’s electrics are not yet a strong point; they often break down, which is the main disadvantage.
In addition, the disadvantages of the Lada Kalina gas pump include increased noise levels, sensitivity to the quality of gasoline, and the fact that it requires cooling.
The issue of high-quality gasoline in our country, unfortunately, still remains unresolved; this is one of the reasons why the fuel system of the Lada Kalina fails.
Filters become clogged, which disrupts the operation of the entire mechanism and ultimately leads to pump failure.
This is why filters, or meshes as they are also called, need to be changed regularly.
We’ll talk about this, but first, let’s figure out what malfunctions happen with the Kalina fuel pump?
Types of faults:
- One of the most common pump malfunctions is a rapid decrease in pressure after the engine starts. This fact indicates serious violations that can be caused either by a valve defect or a breakdown of the pressure level regulator; it is quite possible that the injectors are also clogged. A sharp drop in pressure leads to problems in starting the engine , which, if the breakdown is not corrected, can even lead to engine failure.
- It also happens that the engine loses power, or the engine does not start at all, even when cold or hot. All this happens when a membrane or spring breaks, a rod wears out, or filters become clogged, and the latter happens more often than anything else.
- In any case, having discovered that there is something wrong with the fuel system, you should first check the condition of the filters, because, due to low-quality gasoline, they become clogged quite quickly, and it is better to change them in a timely manner, without waiting for problems. Now let’s talk about how to change the mesh from the pump yourself.
Main features
To understand that the fuel filter element has become clogged due to time or low-quality gasoline, you need to monitor the operation of the engine more often. It is also necessary to take into account other features. Drivers often experience increased fuel consumption, rough engine performance, decreased power and poor dynamics.
You may be interested in: Solex 21053 carburetor: description of the device and operating instructions
But in the case of a filter, engine performance does not suddenly deteriorate. The power will decrease gradually. At the beginning, any significant deterioration in engine performance may not be noticed at all. But if the fuel filter is really clogged, the symptoms will increase. There is no need to ignore them - this can lead to dire consequences in the future.
You may be interested in: Engine 11189: characteristics, reviews
Any engine with a clogged fuel filter may have trouble starting, but will idle relatively smoothly. And under load, stability of operation is lost along with power. One of the symptoms is that the engine may not spin up to a certain speed under load. If you let off the gas suddenly, the engine will try to stall.
It is enough to imagine such a situation - when driving along the highway you need to perform some sharp maneuver (for example, overtaking). The driver, out of habit, presses the accelerator pedal, and the engine, at best, does not increase speed. In the worst case, the engine will stall and may even stall. The situation is not only unpleasant, but also dangerous.
Fuel filters on cars with different types of engines are different. Depending on the type of engine, the following types can be distinguished:
- On older carburetor engines, the requirements for the degree of fuel purification are small. Gasoline must be purified to 15-20 microns. Larger particles do not enter the system. The filter constantly becomes clogged during operation, but this process is very, very slow.
- On engines equipped with a distributed injection system, elements with a finer degree of purification are installed - most often 5-10 microns. Anything smaller can get into the system without causing any damage. Symptoms of a clogged fuel filter on the injector are a significant drop in the power of the power unit.
- The diesel fuel filter is designed in such a way that it can easily retain particles whose sizes do not exceed 4 microns. The element also has a moisture removal function.
If the filter in your car is clogged, it is better to replace it. To do this, you need to contact the manager of the auto parts store and inform them of the make, model, and year of manufacture of the car. Sometimes original items are not available in the store's warehouse, but there are always analogues available.
Changing the mesh with your own hands
So, the mesh located in the fuel pump is forced to constantly come into contact with dust and dirt, because the pump itself is located between the seats, and dust constantly settles on its body.
That is why experienced motorists are not lazy to wipe the pump body with a damp cloth from time to time to avoid untimely clogging of the system.
- The very first thing we do is buy a new filter.
- Raise the rear seats to provide access to the pump.
Motorists advise carrying out such work every 45,000 - 50,000 km. mileage, this is exactly the time during which the Kalina mesh wears out. Of course, this work is classified as dusty, but, in principle, it is not as difficult as it seems, it can be done alone, in half an hour - an hour.
If the engine power of a Lada Granta car drops, increased noise occurs, or whines are periodically heard when the fuel pump is operating, then most likely the fuel pump is faulty. First check the pressure in the fuel supply system by connecting a pressure gauge to the fitting on the fuel rail in the engine compartment If the pressure in the power system is higher than 400 kPa (4.0 kgf/cmg), then the pressure regulator installed in the fuel pump module is faulty and must be replaced (see “Repairing the fuel module of Lada Granta.”)
Operating principle and specific purpose of the filter
Any car, regardless of its design, has a fuel filter. (pictured is a fuel filter on a VAZ-2115)
Naturally, it differs in terms of fuel type and its supply to the car. But still, there is a filter. In the case of the Lada Granta car, this is a traditional filter element used everywhere in injection-type cars.
The main task of such a filter is to catch and sift out particles of dust, rust and other inclusions so that they do not penetrate into the fuel line. If such a filter did not exist, the motor would very quickly fail, since a lot of solid particles that could damage the cylinder walls would get into it.
The filtration system has an established principle of operation, which involves two degrees of purification. The first stage involves catching the largest contaminants, followed by the second stage of fine cleaning, which is usually called a fuel filter in the traditional sense of the word.
Fuel filter cross-section
Fuel filter from Granta in a section (removed from the car, not new)
But it must be located in front of the engine and after the fuel tank.
Given the increased pressure in the fuel line, the filter must be made of metal or high-strength plastic.
Which fuel filter should I choose?
As you know, all variations of the Lada Grant are equipped with an engine with the same displacement of 1.6 liters. The differences are only in the power that this power unit can produce.
This injection engine, unlike its “carburetor counterparts,” requires a much greater degree of cleaning. So, many experts recommend not stopping at the basic recommendations for a purification degree of 10 microns, but turning to a more significant level of filtration that would guarantee the retention of solid particles with a size of 5 microns. The operating pressure, in the case of the Lada Granta, will vary between 3 and 5 bar.
When to change the fuel filter?
And, of course, you need to say a few words about when exactly it is appropriate to replace the fuel filter.
On average, a fuel filter loses its characteristics closer to 25 thousand kilometers. But this applies to optimal conditions when the highest quality gasoline is used. In reality, the need for replacement may occur earlier.
Signs of a dirty fuel filter
To find out exactly when you need to replace the fuel filter on your Lada Granta, you need to monitor the main signs of its contamination.
- This usually concerns the engine starting, which will be uneven and delayed.
- Next comes insufficient traction.
- And, with sharp acceleration, the power unit can even stall.
- As for idling, if the filter is dirty, it will be uneven.
Of course, some of these “symptoms” are also typical for problems with the air filter or injectors. But, in any case, this is already a sign that it is necessary to begin a thorough check of the fuel filter, and, if necessary, replace it with a new one.
Operations performed when removing the Lada Granta fuel pump
Removing the fuel module is shown on a car with a VAZ-21116 engine. On cars with other engines, this work is performed in the same way.
1. Reduce the pressure in the supply system.2. Fold the rear seat cushion forward.3. Lift the cut out parts of the carpet and the thermal and noise insulating lining above the hatch at the base of the body.
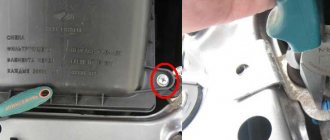
4. Remove the four screws securing the hatch cover above the fuel module.
5. ...and remove the cover.
6. Disconnect the wiring harness block from the fuel module by releasing its spring clip.
7. Disconnect the fuel hoses from the module fittings by pressing the buttons of their spring clamps and sliding the hoses along the fittings.
Disconnect the hoses from the fuel module fittings carefully, avoiding lateral forces, so as not to break the fittings.8. Using a screwdriver, slide the spring plate of the fuel module bayonet mount counterclockwise and turn the plate until the seven cutouts in it align with the protrusions on the fuel tank flange.
9. Remove the plate.
At the factory, the spring plate securing the fuel module is tightened (or, if necessary, unscrewed) with a special tool. If it is absent, a strongly tightened plate can be moved out of place with light blows of a hammer, resting the drift on the bent upward tendril of the plate.10. Remove the module from the tank by tilting it to the side...
11. ...to avoid bending the fuel level indicator sensor lever and turning the float on the lever. Otherwise, the indicator readings in the instrument cluster will be incorrect.
When removing the fuel module from the tank, immediately place a cleaning cloth under it, as gasoline may leak from the module’s glass.
12. Remove the rubber O-ring from the tank flange. Be sure to replace a heavily compressed, hardened or torn ring to avoid gasoline leakage.
13. Install the fuel module and all removed parts in the reverse order of removal. After installation, slightly tighten the spring plate of the module with light blows of a hammer through a drift (see note above). When installing the module into the fuel tank, the installation arrow on the module cover should be directed towards the rear of the car.
When connecting fuel lines, follow the direction of gasoline supply indicated on the fuel module fittings
I think there is no need to explain once again that the design of the fuel pump on Kalina and Grant cars is not at all different. That is why the entire process of replacing the components of the fuel pump on the above cars will be the same. Also, it is worth noting that when compared with the models of the 10th VAZ family, there are some points that differ.
Replacing the fuel pump (gasoline pump)
Next, you will see the following picture, as shown in the photo below:
As you can see, now you need to disconnect the power plug from the fuel pump, which is located on the left, and the two fuel fittings, located on the right. They are secured using plastic and metal fasteners. To remove the lower fitting, you need to press on the metal bracket and pull the tip towards removal; it is most convenient to do this with pliers:
Then, when everything is disconnected, you can begin to knock down the retaining metal ring that secures the Granta fuel pump. This procedure can be carried out using a screwdriver and a hammer by placing the screwdriver on the protrusion in the ring and tapping counterclockwise several times until the ring comes free.
Now you can remove the ring and then the pump itself
Please note that before this work you need to thoroughly wipe everything around so that there is no dust or other foreign objects. Otherwise, all this may penetrate the tank and, accordingly, ultimately clog the mesh of the new fuel pump
We take out the part, carefully, and take it out a little to the side at an angle so as not to bend the fuel level sensor float.
That's basically the whole replacement. After everything has been done, you can begin installing the new mechanism and carry it out in chronological order!
Stable, reliable, uninterrupted operation of the Lada Kalina engine is ensured by a complex of systems, the most significant of which is the fuel system.
It includes many mechanisms that act harmoniously and complement each other, so when even the smallest part fails, it negatively affects the operation of the entire fuel system.
Today we will talk about how to replace the fuel pump mesh on Kalina, and also reveal the most important issues regarding the fuel pump. So, let's go.
Causes of clogged strainer on Grant
It is not necessary to change the grid so often, since when refueling with normal fuel, it can easily travel more than 100,000 km. But symptoms may appear that indicate a clogged fuel pump mesh:
- poor engine start
- insufficient pressure in the fuel system
- dips when pressing the gas pedal
- the engine began to slowly gain speed
If you begin to notice the problems described above, then the first thing you should do is look at the mesh filter and, if necessary, replace it.
REPLACEMENT GUIDE
Let's look at how to change the fuel pump yourself using the Hyundai Solaris as an example.
- Unscrew the mounting bolts and remove the rear seat cushion.
- Cut off the sealant with a utility knife.
- Remove the power plug.
- Using pliers, loosen the self-tightening clamp and remove the gasoline vapor removal hose to the adsorber.
- Remove the fuel supply hose.
- Release the ventilation hose going to the gasoline vapor adsorber from the bracket.
- Unscrew the fastening screws and remove the pressure plate.
- Pull out the fuel module.
- Remove the rubber seal.
- Disconnect the power plugs.
- We recommend removing the FLS to avoid damaging it during module disassembly.
- Remove the fuel pipe tip stopper.
- Remove the tube and O-ring.
- Press the latches of the metal guides, and then separate the parts of the housing.
- Release the latches and pull out the filter element housing complete with regulator and fuel pump.
- Unclip the fuel pump clamps.
- It is advisable to install a clean mesh on a new fuel pump. At this stage, all you have to do is assemble all the elements in the reverse order of removal.
Procedure for replacing the fuel pump mesh on a Lada Granta
Since the fuel filter on a Lada Granta car is located directly in the tank, it must be removed from there. To do this, one half of the rear seat is folded back, after which the two screws securing the hatch are unscrewed. Below it is the fuel pump. To remove it, you need to do the following:
- Relieve pressure in the vehicle's power system
- Disconnect the block with power wires
- Disconnect the two fuel pipes from the fuel pump cover.
- Move to the side the retaining ring that secures the pump in the tank
- Pull out the entire module assembly
After this, you can begin removing the mesh filter without any problems.
We move a little to the side three latches - latches, which are clearly shown in the photo below.
Now we move the lower container to separate the module into two parts, first disconnect the tube, which is shown in the photo.
Now we completely separate the two parts of the module.
Now we have full access to the mesh, and it is enough to pry it with a screwdriver so that it moves away from its seat. You may have to apply a little more force than expected, but you can remove it without any problems.
Recommendations for self-diagnosis of the fuel cell on a Lada Kalina car
Regardless of the modification, on the Lada Kalina 1, Lada Kalina 2 in the sedan and station wagon body variations, the diagnostic process is identical.
At the initial stage, you need to make sure that there is fuel in the tank, that the fuses of the mounting block are working properly, and that the fuel supply line is intact.
To do this you need:
- Turn off the engine, open the hood.
- Inspect the fuel circuit, eliminate defects, flaws, and mechanical damage.
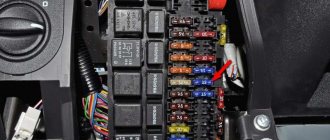
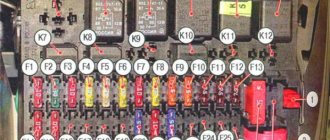
- Inside the car, in the lower part of the central channel, check the serviceability of two fuses (No. 12, 14).
- Place the vehicle over the inspection hole, check the tightness of the circuit, and eliminate fuel leakage.
At the second stage, we proceed to the direct inspection of the TF. To do this, remove the fuse (central channel) from its seat for 5 seconds. The so-called pressure release in the system.
Next, remove the rear seat, unscrew the diagnostic hatch cover, and remove the fuel pump with strainer. We clean the equipment and install it in its original place.
If after the work the engine has not recovered, then replace the fuel filter with a new one. We'll look at how to do it yourself on a Lada Kalina below.
Replacing the fuel pump on Grant
Before changing the fuel pump on a Lada Granta, the motorist must relieve the pressure inside the fuel lines. To “zero” the car’s fuel system, you must:
- Put the Granta at neutral speed;
- Apply the parking brake;
- Remove the rear sofa;
- Disconnect the wiring from the fuel pump;
- Start the Lada and wait for it to stall;
- Crank the starter for a few seconds.
To work with the fuel filter, the car enthusiast will need:
- flathead and Phillips screwdrivers;
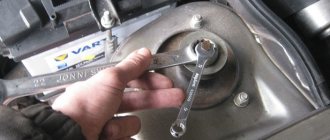
- spanner set to “10”;
- hammer;
- rags.
After resetting the fuel lines, it is necessary to remove the terminals from the battery so that the possibility of supplying power to the fuel pump is completely excluded.
Installing a new fuel pump
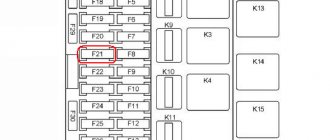
The first step is to open the fuse panel (on the left side of the front panel) and remove the element responsible for the operation of the unit.
Next, dismantle the rear sofa and remove the plastic trim. Below it is the fuel tank flap (on the right side). The hatch cover is held on by four screws - remove them using a screwdriver. Next, disconnect all the fittings from the cover of the old fuel pump.
Using a “10” wrench, unscrew the nuts of the pressure ring of the fuel pump, of which there should be 8 pieces along the entire diameter of the ring. Next to the clamping ring there is a pin with which the ground wire is in contact. We throw off the wire, and then completely remove the clamping ring. The ring unscrews counterclockwise; for ease of dismantling, it needs to be tapped with a hammer.
You need to make sure once again that all wires and lines adjacent to the part are disconnected. Only then can you remove the used unit and place a new one in its place. You also need to install a new O-ring between the tank opening and the pressure ring - it is made of rubber and wears out quite quickly.
Installation of a new pump is carried out in the reverse order. Before disassembling, draw a diagram or photograph the original location of all fittings and hoses on the fuel pump cover.
How to replace faulty devices
The power system filters are replaced by first disconnecting the battery. The replacement sequence for car modifications with different engines is the same. It is more convenient to remove a fuel module with a coarse filter when there is little fuel in the tank.
To work you will need:
- screwdriver;
- socket wrench 10;
- 0.5–1 liter container for draining gasoline from the filter.
Before removing the fuel filter or opening the gas tank, relieve the fuel pressure.
Fuel pressure relief algorithm
Proceed according to the sequence below:
- Turn off the ignition.
- Remove the right floor channel lining panel.
- Remove the fuel pump fuse.
- Start the engine and wait until it stops after running out of fuel.
- Turn on the starter for a few seconds.
- Turn off the ignition.
- Replace the fuse.
Photo gallery: relieving fuel pressure on the Lada Priora
Replacing the device: photo and procedure
To replace a faulty part in a garage, follow the recommendations below:
Place the machine on the inspection hole. Relieve pressure in the fuel system. Disconnect the battery. Squeeze the clamps of the supply (left) hose and disconnect it.
Using the same principle, disconnect the outlet (right hose).
Loosen the clamp bolt
Please note that the head of the 10mm wrench bolt is located behind the clamp, in front of the 13mm nut. It is welded and cannot be unscrewed.
Holding the holes in the fittings with your fingers, remove the filter from the clamp
Drain the gasoline from the filter into a container.
Install the fresh filter with the arrow pointing towards the outlet hose (towards the starboard side). Tighten the mounting bolt. Place the fuel hoses and secure the position by pressing the hoses against the filter until they click. Restore power. Turn the ignition on and make sure the new filter is seated correctly. Make sure there are no gasoline leaks.
Please note that there is no difference in the procedure for replacing filters on an eight- and sixteen-valve engine.
- Relieve pressure in the fuel system.
- Disconnect the battery.
- Unscrew the fastenings of the hatch under the rear seat, open access to the fuel unit.
- Clean the fuel cap from dust and dirt to prevent contamination of the gas tank.
- Disconnect the power connector.
- Release the spring clips and disconnect the fuel hoses.
- Unscrew the fastening nuts and remove the retaining ring.
- Carefully remove the fuel assembly.
- Press out the four clasps of the assembly cup and remove the fuel pump assembly.
- Use a screwdriver to remove the strainer.
- Install a new filter.
- Reassemble the unit and install in reverse order of disassembly.
- Restore power.
- Turn on the ignition and check the operation of the fuel unit.
Cleaning the part
Replacing the Lada Granta fuel pump in some cases is not the only way to get rid of fuel supply problems in some cases. To restore the functionality of the fuel pump, it requires thorough cleaning. To do this, you need to dismantle the unit using the method described above.
Next, unscrew the lower part of the fuel pump cup. The glass has a filter mesh that needs to be removed using a screwdriver. The mesh will need to be cleaned with a rag and rinsed in solvent. After this, the remaining elements of the fuel pump are cleaned.
After cleaning is completed, it is recommended to install a new coarse mesh, as the cells on the old one may be damaged.
Before performing work, read the operating instructions so that you know in advance where the Lada Granta fuel pump is located, as well as how to attach it. It is better to carry out work in a well-lit room away from open flame sources. For protection, use gloves to avoid damaging your skin with gasoline or solvent.
Oil filter
This filter is used to clean the oil from chips and dirt formed during engine operation and from rubbing parts. To prevent debris from getting onto the working surfaces of parts, the oil passes through the filter, thereby being cleaned.
The oil filter on the Grant must be replaced with every oil change.
Replacing the Grant oil filter
Drain the oil from the car by unscrewing the plug in the oil pan. Then we unscrew the old filter and install a new one, having previously cleaned the surface on the engine block where the filter fits. It is also recommended to lubricate the filter sealing rubber with clean engine oil.
We hope our article was useful to you.