When you turn the key in the ignition core, current from the battery is supplied to the starter. The latter is set in motion, turning the crankshaft to start the engine and ignite the combustible mixture.
If the engine is in good condition, 2-3 turns are enough to start. Deviations from the norm are signs of unstable performance.
Sometimes owners complain about the quality of the starter. They say they don’t drive more than 50-60 thousand km on domestic cars. However, few car enthusiasts know and know how to use the starting device correctly.
To avoid a number of breakdowns, follow these recommendations:
- When you next start the power unit, hold the PU for no more than 10 - 15 seconds. Re-activation no earlier than after 30 seconds. Frequent continuous operation of the PU leads to overheating of the overrunning clutch and premature wear.
Note to the driver!!! If the first three attempts in a row were unsuccessful, then look for the reason in the wiring, ignition system, or fuel equipment.
- After starting the power plant, immediately turn off the starter by releasing the key in the ignition switch core;
- Craftsmen and car enthusiasts do not recommend using PU for temporary movement by car. This is often done by inexperienced drivers when the battery is discharged or there is damage in the electrical supply circuit.
A little test
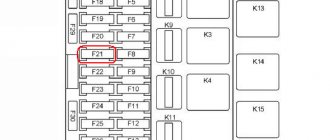
Before making a replacement, you need to make sure that it is the starter that is faulty, and not the fuse in the mounting block and the wiring. Also check the starter relay.
Let's look at all the steps in more detail. Let’s say that when you turn the key to the “II” mark, you hear a click and the starter shaft does not rotate. This means that the solenoid relay is working and voltage is supplied to the starter correctly. In this case, the starter itself must be replaced. If there is no click, try disconnecting the plastic connector and checking for voltage.
This connector needs to be disconnected
If there is no voltage at the connector terminal even when you try to start, it means the vehicle wiring is faulty and not the starter. To be sure, try closing the starter with a screwdriver; if it starts the car, then the starter and bendix are working.
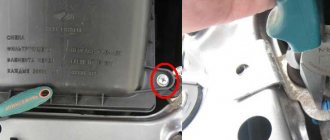
Also check the voltage on the power wire (copper nut). It must always be present. Read more in the article: why the Lada Granta engine does not start.
The power wire nut will be covered with a rubber cap. It needs to be removed.
Lada 4×4
Remove the rear support bracket for the intake pipe by unscrewing the two bolts with a 13mm wrench.
We remove the starter protective shield by unscrewing its fastening nuts with a “13” wrench.
From the bottom of the car, unscrew the two bolts securing the starter. From the engine compartment side, move the starter forward and disconnect the block with wires.
We unscrew the nut and disconnect the wire tip from the contact bolt of the traction relay. Remove the starter from the engine compartment.
Video instruction:
[media=https://www.youtube.com/watch?v=n_PmQADIfNg]
By the way, do you know that the ignition system of LADA cars can be improved, for example, by abandoning the ignition key in favor of a start/stop button.
Keywords: lada xray starter | starter Lada Vesta | starter Lada Largus | starter Lada Granta | starter Lada Kalina | starter Lada Priora | starter 4x4 | Niva starter | universal article
0 0 0 0 0 0
Share on social networks:
Three types of starters
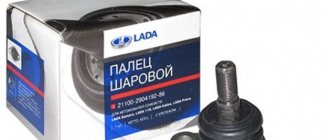
All “Grants” of the first years of production were equipped with a starter “21120-3708010-00”. It is secured with three nuts. And then, with the transition to the generation of cars with a cable gearbox, screw fastening began to be used. You can quickly find out which starter is installed:
- Box 2190 – starter 21120-3708010-00;
- Box 2181 – 21901-3708010-00;
- Automation Jatco – 21902-3708010-00.
As you can see, the choice of starter is carried out “according to the gearbox” and does not depend on the engine model.
Problems with the starter, ways to solve them on Lada Granta
Often breakdowns are associated with electrical and mechanical components. Therefore, it is important to be able to separate one from the other. Without experience in servicing a technical device, it is better to contact a service center with specialists. Sometimes unprofessional intervention is more likely to harm than restore a good condition.
Electrical
Damage is typical in the area where the current flows from the battery to the starting device (hereinafter referred to as the PU).
- Slow rotation of the rotor, the starter does not start;
- Lack of response when current is supplied to the control unit;
- The control unit clicks, but does not turn: short circuit on the turns, broken wiring, faulty solenoid relay;
- wear of brushes, armatures.
VAZ components, as well as imported analogues
At first, KZATE starters were supplied to the VAZ plant. And after 2011, Valeo became the main supplier. Therefore, the list of components looks like this:
- 21120-3708010-00 (KATEK, KZATE, ZiT) - there is one analogue, Fenox ST32101C3;
- 21901-3708010-00 (VALEO) – also known as VALEO TS12E901;
- 21902-3708010-00 (VALEO) – also known as VALEO TS12E902.
It was not possible to find any other imported analogues.
None of the three starters are interchangeable with the other. The last two differ in the number of teeth (11 and 9, respectively), but the VALEO and KZATE starters are not compatible in terms of fastening.
Auto chemical goods
On every VALEO starter, the terminal nut is zinc plated. The contact screw itself is also galvanized. This means that you can work here with WD-40, as well as its substitutes. This option will not work with copper!
Those who unknowingly used WD liquid on copper say this: it doesn’t seem like enough. At first everything looks perfect, and then the outer layer begins to change (it collapses).
The copper threads on the KZATE starter must be cleaned with special means. Options:
- Molykote S-1002 (solvent);
- Kontakt 60 or 100 (acid), WL (wash);
- CRAMOLIN ContaClean (acid only).
If the part is reused, after the acid it is cleaned with a wash. Everything is obvious here.
Source
Causes of premature wear of oxygen sensors
- Systematic use of low-octane fuel with the addition of chemical impurities exceeding the limit standards.
- Use of silicone-based sealants in the process of prevention.
- Overheating (boiling) of lambda probes due to incorrectly set ignition angle, excessive enrichment of the combustible mixture, unstable voltage supply in the circuit.
- Repeated engine starts at short intervals. As a result, carbon deposits accumulate in the combustion chamber, since the fuel is not completely burned.
- Diagnostics of spark plugs, cylinder operation with unscrewed spark plugs;
- Contact of chemically aggressive compounds and petroleum products on the tip of the DC.
- Damage to the insulating layer, wiring windings, short to ground.
- Depressurization in the system.
Stator check
The winding resistance can be checked using a megger or a special diagnostic stand. However, checking the integrity of the insulation is possible even with the help of an ordinary light bulb. The coil with the power source is connected by one drive, and the second with the lamp. During connection, the lamp should not burn, and the stator should not smoke or spark. Organize your workspace taking into account fire safety rules and requirements.
The indicator of a serviceable stator winding should not be less than 10 kOhm. The winding can be restored using impregnating varnish. But such work is unlikely to be possible for an inexperienced driver. The restoration process should be entrusted to a technician who has relevant experience working with electromechanical devices.
In some cases, it is not possible to restore the mechanism to correct operation. The thing is that the design of the gear starter includes permanent magnets. If they are damaged, repairing them is labor-intensive and irrational.
Dismantling, refurbishment, repair
Disassembling the starter is not particularly difficult:
- disconnect the solenoid relay;
- unscrew the housing studs;
- release the back cover with the brush holder;
- remove the armature from the stator;
- Now remove the cover from the gearbox side;
- pull out 3 planetary gears - replace if teeth or needle bearings are damaged;
- remove the plastic lever support - be sure to show no signs of wear, otherwise replace it;
- pull out the gearbox - lubricate the gears during reassembly;
- remove the stopper, then knock down the shaft restrictor ring using a suitable mandrel;
- remove the bendix from the drive, clean until shiny - it is advisable to use carburetor cleaner;
- pry and remove the lock washer, remove the liner from the support;
- Unscrew the screws and disassemble the brush holder;
- remove the brushes by prying the fasteners with a screwdriver;
- assemble and test the device.
Anchor check
It is recommended to pay special attention to the condition of the anchor.
- There should be no signs of burning, marks or other defects on the surface of the collector. If they are detected, it is recommended to treat the lamellas with a fine abrasive. If the roughness is significant and mica protrudes between the plates, the collector will have to be turned on a lathe. Then be sure to sand it with glass sandpaper.
- Separately, you need to check the runout of the core relative to the sleeve - it should not exceed more than 0.08 mm. Otherwise, the rotor will have to be replaced.
- The next stage is testing the reliability of soldering the winding leads to the lamellas. The reel must be carefully inspected from all sides, especially the side parts.
- Check the electrical part for breakdowns using a multimeter or a 12-volt “tester”. If a short circuit is observed, the armature will have to be replaced.
- Check the free movement of the collector rollers. If during operation there is inter-ring play or jamming, or washers are damaged or there are leaks, install a new bearing. The old one is pressed with a puller, the new one is installed using a mandrel of the required size.
- Inspect the surface of the shaft. If yellow deposits from the bearing are detected, remove it with an abrasive to avoid the gear sticking on the shaft. If scuffs, nicks and other similar defects are found, replace the rotor.
- Check the bushings in which the shafts rotate. On the Lada Granta starter they are located in both covers and on supports. Damaged elements definitely need to be replaced along with the covers. Especially if the latter are cracked.
- Inspect the stator. It should not touch the anchor.
- Check the drive stroke - free movement along the splines must be ensured, without jamming.
- Check the brushes. Replace them if the size is less than 3.5 mm. Also check the ease of movement, and the presence of defects on the holder.
You can also check the operation of the solenoid relay with an ohmmeter. The first is to determine if the contact bolts are shorting to the plate.
Reflashing the controller
Some particularly sophisticated car owners decide to reflash the control unit, which blocks the processing of signals from the second oxygen sensor. However, it must be taken into account that any changes to the system operation algorithm can lead to irreversible consequences, since returning the factory settings will be almost impossible and costly. Therefore, it is not recommended to perform such manipulations yourself. The same applies to ready-made firmware that is sold on the Internet.
Healthy! When flashing the lambda probes, they are removed.
If you still want to flash the system, then contact a competent specialist who can disable receiving DC data using specialized equipment.
It is also worth considering that almost any intervention in the operation of systems can lead to not the most pleasant consequences.
Car with gearbox 2181 or automatic transmission
Shield on cars with manual transmission
Finally, remove not only the middle, but also the left shield by unscrewing two more screws.
If we are talking about a sedan with an automatic transmission, it is enough to remove one shield (the main one). It is held in place by eight self-tapping screws - 4 in front, 2 on the left and 2 on the right (see figure).
Shield on cars with automatic transmission
Dismantling
When access to the starter is open, the actions look trivial:
- Disconnect the control connector by pressing the latch tab;
Plastic retainer varies in color
It’s better to move the cap up
Three fastening elements
The top screw is unscrewed last, holding the starter housing. Then this body is tilted back and they try not to touch anything unnecessary.
the starter has been removed
Installation can be carried out by performing the steps in reverse order. We wish you success.
general information
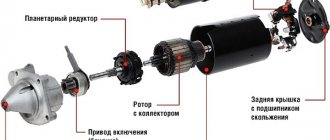
A starter is an electric motor operating on permanent magnets, having an electromagnetic two-motor traction relay and a planetary gearbox. Their cases are made of steel, six magnets are fixed to the case, and the case itself and the covers are tightened with several bolts. The starter armature shaft is put into rotation mode by two bearings, one of which, a ball bearing, is installed near the manifold, the second, a plain bearing, is installed next to the drive. Thanks to the gearbox, torque is transmitted to the starter drive shaft.
The drive shaft is equipped with an overrunning clutch with a drive gear moving along the splines of the shaft. It is the clutch that ensures the transmission of torque from the starter to the motor, separating these elements after the engine starts. This condition ensures proper protection of the starter from possible damage that it may receive due to its high rotation speed.
The relay is designed to engage the drive gear with the teeth of the crankshaft flywheel mechanism, as well as to activate the starter power supply. Thus, by turning the key in the lock, the driver begins the process of supplying electric current to the starter from the battery. The starter is set in motion and turns the crankshaft, starting the engine and igniting the combustible mixture.
In addition, the starter is one of the most powerful energy consumers on a car; when starting the engine, the electric current it consumes reaches 400 A or more. For this reason, all electrical connections between the starter and the battery must have reliable contact.
The elements that Grants are equipped with are similar to the starters used by VAZ on its other cars of previous generations. When the engine is in normal condition, two or three turns will be enough to start. Deviations from the norm will be indicated by any of the existing signs of unstable functioning. Possible malfunctions of the drive and starter relay will be revealed by inspection carried out after disassembling the part.
Buy Starter for Lada Granta 2190 sedan original or equivalent
To buy new or used
“Starter for Lada GRANT”
on the auto parts sales portal Avto.pro, you need to follow the following steps sequentially:
- click on the most interesting offer for the purchase of auto parts - a tab with information about the seller will open;
- contact the seller in any way convenient for you and discuss the compliance of the part code and its manufacturer, for example: “Starter Lada Granta, 2011, 2012, 2013, 2014, 2015, 2016, 2017, 2022, 2022, 2022, 2022, with engine volumes 1.6l. and body type: sedan” , as well as the availability of spare parts in stock.
- Our portal presents: Engine starter; Starter for Lada GRANT.
Price for Starter for Lada GRANT 2190 used or new
You can purchase auto parts for Lada GRANTA sedan (2190) (2011 – 2021) on the auto parts portal Avto.pro, both retail and wholesale.
Buy a new or used engine starter for Lada GRANT (2190)
available from 88 sellers at prices from 3755.10 RUR to 7106.93 RUR in the cities: Moscow, St. Petersburg, Nizhny Novgorod, Krasnodar, Chelyabinsk, Mytishchi, Samara, Sestroretsk, Kazan, Ekaterinburg, Podolsk, Lobnya, Skhodnya, Ryazan, Novosibirsk, Dmitrov.
Dismantling works
After opening access to the starter, you must perform the following steps:
- First, you should disconnect the control connector, for which the locking tab is lightly pressed;
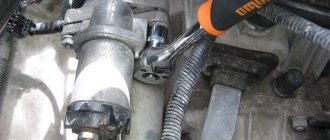
- Then the rubber cap is moved aside and the nut is unscrewed using a 13mm wrench from the terminal;
- The power terminal is removed, after which the three mounting screws located at the top and bottom are unscrewed with a 13 key.
Note that you need to start with the two lower screws, and the top one should be unscrewed last, while the starter housing must be held, then the housing is carefully tilted back. Installation work is carried out in the reverse order of dismantling.
Yamaha diversion 600 reviews
Pros Excellent ergonomics. Acceptable acceleration dynamics. Good brakes. Excellent handling at all speeds. Small price. Cons Noisy clutch operation. The motorcycle was produced only for European and…
When you turn the key in the ignition core, current from the battery is supplied to the starter. The latter is set in motion, turning the crankshaft to start the engine and ignite the combustible mixture.
If the engine is in good condition, 2-3 turns are enough to start. Deviations from the norm are signs of unstable performance.
Sometimes owners complain about the quality of the starter. They say they don’t drive more than 50-60 thousand km on domestic cars. However, few car enthusiasts know and know how to use the starting device correctly.
To avoid a number of breakdowns, follow these recommendations:
- When you next start the power unit, hold the PU for no more than 10 - 15 seconds. Re-activation no earlier than after 30 seconds. Frequent continuous operation of the PU leads to overheating of the overrunning clutch and premature wear.
Note to the driver. If the first three attempts in a row were unsuccessful, then look for the reason in the wiring, ignition system, or fuel equipment.
- After starting the power plant, immediately turn off the starter by releasing the key in the ignition switch core;
- Craftsmen and car enthusiasts do not recommend using PU for temporary movement by car. This is often done by inexperienced drivers when the battery is discharged or there is damage in the electrical supply circuit.